OWNER'S MANUAL - Elka Suspension
OWNER'S MANUAL - Elka Suspension
OWNER'S MANUAL - Elka Suspension

Create successful ePaper yourself
Turn your PDF publications into a flip-book with our unique Google optimized e-Paper software.
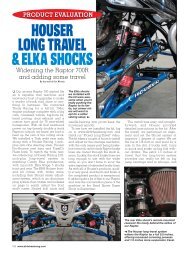
LOCATION OF THE ADJUSTMENTS AND COMPONENTS1. Top mounting eyelet, featuring spherical bearing2. Head of the shock absorber3. PRELOAD adjustment ring (see p.10 for adjustment procedures)4. Self-sagging spring (no-preload), will normally compress from the weight of the vehicle5. Top crossover spacer, prevents coil binding of the self-sagging spring6. Middle spring, vehicle-specific to control body roll7. CROSSOVER SPACER, controls the initial firmness or softness8. Body of the shock absorber9. Triple-seal seal head of the shock absorber10. Main spring, specific for the rider’s weight11. Shaft12. Bottom-out bumper13. Heavy-duty spring clip14. REBOUND adjuster (knob type, see p.14 for adjustment procedures)15. Lower mounting eyelet, featuring spherical bearing16. COMPRESSION adjuster (see p.11 for adjustment procedures)17. Reservoir (piggyback type)18. Banjo bolt fitting19. Nitrogen purge valve, NOT AN ADJUSTMENT20. Hose21. REBOUND adjuster (compact type, see p.14 for adjustment procedures)22. Lower mounting fork23. LOW-SPEED COMPRESSION adjuster (red knob, see p.12 for adjustment procedures)24. HIGH-SPEED COMPRESSION adjuster (black knob, see p.13 for adjustment procedures)25. Reservoir (remote type), length may vary from one vehicle to another26. Composite Shock Protector (optional on some models)27. Patented TRACK System adjustment knob (see p.15 for adjustment procedures)ELKA SUSPENSION INC. Phone: (450) 655-4855 or 1 800 557-0552 www.elkasuspension.com 5
ADJUSTMENT PROCEDURESRIDE HEIGHT - SPORTS & RACING ATVMEASURING THE RIDE HEIGHT (GROUND CLEARANCE)The ride height, or frame clearance, is the distance between the ground and the chassis with the ridersitting on the vehicle in riding position. The ride height is measured in inches, the front and rearmeasurements being taken according to the following procedures:Have the rider sit on the bike in a racing position. Then have the rider bounce on the pegsa few times to compress the suspension then let it settle.WITH THE RIDER SITTING ON THE VEHICLE IN RIDING POSITION:Front Ride Height Measurement = the verticaldistance from the ground to the chassisin front of the engine mounts.Rear Ride Height Measurement = the verticaldistance from the ground to the chassis,right behind the foot pegs.REARFRONTHOW TO ADJUST THE RIDE HEIGHTA preload adjustment ring is located under the head of the shock absorber. This ring is used toincrease or decrease the tension in the springs as well as for adjusting the ride height of the vehicle(frame or ground clearance). See p.10 for detailed instructions on how to use the preload adjustment.While the ride height of the vehicle is a matter of vehicle model and driver preference, the front andrear heights need to be in balance.RECOMMENDATIONS TO ADJUST THE RIDE HEIGHTWhatever ride height setting you choose, the height must be similar at the front and rear of thevehicle, with the front slightly higher (from 1/4 to 3/4 inch maximum).A higher ride height will provide more ground clearance with less chances to bottom out but will makethe suspension stiffer.A lower ride height will reduce the ground clearance and make the suspension softer, but will makethe vehicle more prone to bottoming out.IMPORTANT NOTE: The size of the tires used can affect the ride height. When using tires that arehigher or lower than the stock tires, you might need to adjust the ride height accordingly.6 ELKA SUSPENSION INC. Phone: (450) 655-4855 or 1 800 557-0552 www.elkasuspension.com
ADJUSTMENT PROCEDURESRIDE HEIGHT - SIDE-BY-SIDE VEHICLEMEASURING THE RIDE HEIGHT (GROUND CLEARANCE)The ride height, or frame clearance, is the distance between the ground and the chassis with the ridersitting on the vehicle in riding position. The ride height is measured in inches, the front and rearmeasurements being taken according to the following procedures:WITH THE RIDER SITTING ON THE VEHICLE IN RIDING POSITION:Front Ride Height Measurement = the vertical distancefrom the ground to the chassis behind the front wheelsRear Ride Height Measurement =the vertical distance from the groundto the chassisin frontof the rear wheelsREARFRONTHOW TO ADJUST THE RIDE HEIGHTA preload adjustment ring is located under the head of the shock absorber. This ring is used toincrease or decrease the tension in the springs as well as for adjusting the ride height of the vehicle(frame or ground clearance). See p.10 for detailed instructions on how to use the preload adjustment.While the ride height of the vehicle is a matter of vehicle model and driver preference, the front andrear heights need to be in balance.RECOMMENDATIONS TO ADJUST THE RIDE HEIGHTWhatever ride height setting you choose, the height must be similar at the front and rear of thevehicle, with the front slightly higher (from 1/4 to 3/4 inch maximum).A higher ride height will provide more ground clearance with less chances to bottom out but will makethe suspension stiffer.A lower ride height will reduce the ground clearance and make the suspension softer, but will makethe vehicle more prone to bottoming out.IMPORTANT NOTE: The size of the tires used can affect the ride height. When using tires that arehigher or lower than the stock tires, you might need to adjust the ride height accordingly.8 ELKA SUSPENSION INC. Phone: (450) 655-4855 or 1 800 557-0552 www.elkasuspension.com
ADJUSTMENT PROCEDURESRIDE HEIGHT - SNOWMOBILEMEASURING THE RIDE HEIGHT (GROUND CLEARANCE)The ride height, or frame clearance, is the distance between the ground and the chassis with the ridersitting on the vehicle in riding position. The ride height is measured in inches, the front and rearmeasurements being taken according to the following procedures:WITH THE RIDER SITTING ON THE VEHICLE IN RIDING POSITION:Front Ride Height Measurement = the vertical distancefrom the ground to the frontmost part of the chassis,behind the ski and in line with the motor.Rear Ride Height Measurement =the vertical distance from the groundto the middle of the axle on the upperwheel of the track’s suspension systemREARFRONTHOW TO ADJUST THE RIDE HEIGHTA preload adjustment ring is located under the head of the shock absorber. This ring is used toincrease or decrease the tension in the springs as well as for adjusting the ride height of the vehicle(frame or ground clearance). See p.10 for detailed instructions on how to use the preload adjustment.While the ride height of the vehicle is a matter of vehicle model and driver preference, the front andrear heights need to be in balance.RECOMMENDATIONS TO ADJUST THE RIDE HEIGHTWhatever ride height setting you choose, the height must be similar at the front and rear of the vehicleto ensure the snowmobile will ride properly leveled and balanced.A higher ride height will provide more ground clearance with less chances to bottom out but will makethe suspension stiffer.A lower ride height will reduce the ground clearance and make the suspension softer, but will makethe vehicle more prone to bottoming out.IMPORTANT NOTE: The size of the tires used can affect the ride height. When using tires that arehigher or lower than the stock tires, you might need to adjust the ride height accordingly.ELKA SUSPENSION INC. Phone: (450) 655-4855 or 1 800 557-0552 www.elkasuspension.com 9
ADJUSTMENT PROCEDURESSPRING PRELOADABOUT SPRING PRELOAD ADJUSTMENTA preload adjustment ring is located under the head of the shock (see p.4-5 for location). This ring isused to increase or decrease the initial tension on the spring and therefore, the ride-height of thevehicle, also referred to as frame clearance. Frame clearance is the distance between the ground andthe chassis. While the height of the vehicle is a matter of personal driver preference, the vehicle needsto be as level as possible to be in balance.HOW TO ADJUST THE PRELOAD- Remove the seat if needed (on some vehiclemodels) to access the spring preloadadjustment ring- Loosen the screw on the preload ring usingthe provided 3mm Allen key- Turn the preload ring CLOCKWISE (viewedfrom the top) to screw it in towards thesprings TO INCREASE THE PRELOAD(raise the vehicle) using the provided tool- Turn the preload ring COUNTER-CLOCKWISE(viewed from the top) to unscrew it awayfrom the springs TO REDUCE THE PRELOAD(lower the vehicle) using the provided tool.- When the adjustment is complete, tightenback the screw to lock the preload ring.Increasing the preload will raise the vehicleand increase frame clearance. This will resultin a more responsive ride. Be careful not toapply too much preload. This can cause “coilbinding”, which is when the coils of the springrub against each other under compression.This can damage the spring, the shock andcan be dangerous for the rider.MORE PRELOAD(RING MOVING TOWARDS THESPRINGS)LESS PRELOAD(RING MOVING AWAY FROMSPRINGS)Reducing the preload will lower the vehicle and decrease frame clearance. This will result in asmoother ride but the bike might come in contact with the ground more often. The preload shouldalways be enough to keep the spring strongly in place.IMPORTANT NOTE: Be careful when adjusting the preload after the engine has been running.The exhaust pipe and shock body can be hot and may cause severe injuries.Be careful and use gloves or proper protection equipment.10 ELKA SUSPENSION INC. Phone: (450) 655-4855 or 1 800 557-0552 www.elkasuspension.com
ADJUSTMENT PROCEDURESCOMPRESSION (STAGE 3 MODELS)ABOUT THE COMPRESSION ADJUSTMENTThe black knob located on the remote reservoir is the compression adjustment. This adjustmentcontrols the hydraulic resistance to high-speed impacts. A harder compression damping will offermore resistance to impacts but will provide a stiffer rider. A softer compression damping will providea smoother ride but less resistance on impacts.If the compression adjustment is correct, the wheels can achieve maximum travel. When thecompression damping is too hard, the ride will be stiff and will not be able to absorb average to majorimpacts. It is preferable to start with a softer damping and add compression until the bike barelybottoms out on major impacts. This will prevent the rider from getting tired and will increase comfortand performance.HARDER(CLOCKWISE)HOW TO ADJUST THE COMPRESSION :- To INCREASE the compression damping (making thesuspension HARDER), you need to turn the knobclockwise. There is a sticker on the knob indicatingS and H (soft, hard). Turn towards the H.- To REDUCE the compression damping (making thesuspension SOFTER), you need to turn the knobcounterclockwise. There is a sticker on the knobindicating S and H (soft, hard). Turn towards the S.You should start in the middle of the adjustment.There are about 30 clicks of adjustment. To adjustproperly, turn the knob 2-3 clicks at a time and take atest ride. The adjustment is more sensitive towardsthe H than the S.SOFTER(COUNTER-CLOCKWISE)IMPORTANT NOTE: It is not possible to check thecompression adjustment by only compressing thesuspension on the vehicle manually. You must takea test ride to assess the setting. The feeling mightbe right when bouncing on the seat but it could bevery different on the track. Never compensate fora lack of spring strenght by boosting thecompression or leaving the knob all the waytowards the H setting. If your suspension is too softwith the adjustment above 25 clicks in, you shouldreplace your springs with a higher rate. If the knobappears to be blocked, do not force it. Ifnecessary, contact our customer service foradvice or repairs.ELKA SUSPENSION INC. Phone: (450) 655-4855 or 1 800 557-0552 www.elkasuspension.com 11
ADJUSTMENT PROCEDURESLOW-SPEED COMPRESSION (STAGE 4, STAGE 5 AND FACTORY MODELS)ABOUT LOW-SPEED COMPRESSION ADJUSTMENTThe dual compression knobs located on the reservoir controls the high- and low-speed damping of theshock absorber. Functioning independently, the small red-coloured knob controls the low-speedsetting, which is when the shaft’s movement is normal to slower like on g-outs, over small undulations,when cornering and accelerating, etc.HOW TO ADJUST THE LOW-SPEEDCOMPRESSIONUse the SMALL RED KNOB to adjust the lowspeedcompression damping.- To INCREASE (make stiffer) the compressiondamping, you need to turn the knobCLOCKWISE. There is a sticker on the shock’shead indicating S and H (soft, hard). TURNTOWARDS THE H.- To REDUCE (make softer) the compressiondamping, you need to turn the knobCOUNTERCLOCKWISE. There is a sticker onthe knob indicating S and H (soft, hard).TURN TOWARDS THE S.You should start in the middle of theadjustment. There are about 35 clicks of lowspeedcompression adjustment. To adjustproperly, turn the knob 2-3 clicks at a time andtake a test ride. The adjustment is moresensitive towards the H than the S.IMPORTANT NOTE:Riding speed and compression speed aredifferent. A small obstacle hit when riding athigh speed will make the shock’s shaft movevery fast and will be managed by the highspeedcompression damping circuit (blackknob).The low-speed compression mainly affectsthe feeling of the suspension in such situationsas when cornering, riding over smoothundulations, in g-outs, under hard accelerationor braking.ON STAGE 5 MODELS:HARDER(CLOCKWISE)SOFTER(COUNTER-CLOCKWISE)ON STAGE 4 MODELS:HARDER(CLOCKWISE)SOFTER(COUNTER-CLOCKWISE)When the high-speed knob (large blackknob) is turned, the small gold-colouredknob follows its movement without going outof adjustment and vice versa.12 ELKA SUSPENSION INC. Phone: (450) 655-4855 or 1 800 557-0552 www.elkasuspension.com
ADJUSTMENT PROCEDURESHIGH-SPEED COMPRESSION (STAGE 4, STAGE 5 AND FACTORY MODELS)ABOUT HIGH-SPEED COMPRESSION ADJUSTMENTThe dual compression knobs located on the reservoir controls the high- and low-speed damping of theshock absorber. Functioning independently, the larger black knob controls the high-speed setting(when the shaft’s movement is faster like when landing jumps, holes, etc.).ON STAGE 5 MODELS:HARDER(CLOCKWISE)SOFTER(COUNTER-CLOCKWISE)ON STAGE 4 MODELS:HARDER(CLOCKWISE)SOFTER(COUNTER-CLOCKWISE)HOW TO ADJUST THE HIGH-SPEEDCOMPRESSIONUse the BIGGER BLACK KNOB to adjust thehigh-speed compression damping.- To INCREASE (make stiffer) the compressiondamping, you need to turn the knobCLOCKWISE. There is a sticker on the shock’shead indicating S and H (soft, hard). TURNTOWARDS THE H.- To REDUCE (make softer) the compressiondamping, you need to turn the knobCOUNTERCLOCKWISE. There is a sticker onthe knob indicating S and H (soft, hard).TURN TOWARDS THE S.You should start in the middle of theadjustment. There are about 20 clicks of highspeedcompression adjustment. To adjustproperly, turn the knob 2-3 clicks at a time andtake a test ride. The adjustment is moresensitive towards the H than the S.IMPORTANT NOTE:Riding speed and compression speed aredifferent. A small obstacle hit when riding athigh speed will make the shock’s shaft movevery fast and will be managed by the highspeedcompression damping circuit (blackknob).The low-speed compression mainly affectsthe feeling of the suspension in such situationsas when cornering, riding over smoothundulations, in g-outs, under hard accelerationor braking.When the high-speed knob (large blackknob) is turned, the small gold-colouredknob follows its movement without going outof adjustment and vice versa.ELKA SUSPENSION INC. Phone: (450) 655-4855 or 1 800 557-0552 www.elkasuspension.com 13
ADJUSTMENT PROCEDURESTRACK SYSTEM (FACTORY SHOCK MODELS ONLY)ABOUT THE PATENTED TRACK SYSTEM The purpose of the TRACK System is to increase shock performance over high-speed square edgebumps. It increases traction and control, by ensuring constant contact between the tire rubber andthe track surface. It also reduces feedback through the handlebars, reducing the dreaded“arm-pump” and increases rider endurance.The TRACK System momentarily reduces the hydraulic resistance of the shockabsorber under extra high speed blows. The pressure threshold at which the TRACKSystem operates and the duration of the pressure relief can be controlled with theTRACK System star shaped knob. A spring loaded floating piston inside the TRACKSystem controls the threshold pressure and the travel of the floating piston will dictatethe duration of the pressure relief. By turning in the TRACK System knob (clockwise), thespring preload is increased thus increasing the threshold pressure. Subsequently, turningin the knob will also reduce the floating piston travel and the pressure relief duration.The TRACK System can provide an advantage in various track conditions and on differentsurface types: MX (braking bumps, sharp edge woops, high speed ripples), XC (uneven terrainin corners, tree roots, holes) and DESERT (high speed ripples, rocks, holes).SET-UP PROCEDUREBelow are the steps to take to ensure the TRACK System is always performing at it highest potential.1 – Set correct Ride Height (sag)2 – Turn the TRACK System knob CLOCKWISE until it stops, this CLOSES (disengages) the system3 – Ride the vehicle to set the High-Speed Compression, Low-Speed Compression and Reboundadjustments (pages 12-14). Those adjustments must be set properly before using and/or settingthe TRACK System . Adjustments should be made in small increments (2-3 click)4 – Open the TRACK System one or two clicks at a time by turning it COUNTER-CLOCKWISE (OPEN)5 – The TRACK System is properly set when it provides additional plushness upon harsh impactswithout causing excessive diving in turns or causing bottoming-outTYPICAL SETTINGSTypical ride height:MX: Front: 7 to 7.5 inches - Rear: 6.75 to 7.25 inchesXC: Front 7.25 to 7.75 inches - Rear: 7 to 7.5 inchesAdjustment settings (all counts from closed or “fully in position”):Front:Low-Speed Compression (red knob): 5-20 clicksHigh-Speed Compression (black knob): 5-15 clicksTRACK System (star-shaped knob): 2-5 clicksRear:Low-Speed Compression (red knob): 5-20 clicksHigh-Speed Compression (black knob): 3-15 clicksTRACK System (star-shaped knob): 1-4 clicksIMPORTANT: The TRACK System must be serviced exclusively by the ELKA Factory Service Dept.to ensure optimum performance and longer oil life.ELKA SUSPENSION INC. Phone: (450) 655-4855 or 1 800 557-0552 www.elkasuspension.com 15
MAINTENANCECLEANING PROCEDURESGENERAL MAINTENANCEA well-maintained shock absorber will last longer and perform better. The best way to protect yourshock absorbers from the elements is to use <strong>Elka</strong> <strong>Suspension</strong> shock absorber protectors. For cleaning,use a gentle detergent and pay particular attention to areas where debris can become lodged. Do notuse any abrasive cleaning products.Maintenance frequency may vary depending on the number of hours the vehicle is driven and theconditions under which it is ridden. Heat, violent impacts, dust, mud and adjustment settings are allfactors that need to be taken into consideration in determining the frequency of basic maintenanceand oil changes.HOW TO CLEAN YOUR SHOCK ABSORBERS:1) Do not use compressed air when cleaning the seal head as this can damage the seals.2) Clean the threads under the preload ring using a soft brush.3) Clean around the rebound adjustment knob so that no foreign particles damage the adjustmentmechanism.4) Remove the compression adjustment knob by unscrewing the Allen type setscrew and pulling onthe knob carefully then clean delicately.5) Use compressed air to clean beneath the bottom out bumper.16 ELKA SUSPENSION INC. Phone: (450) 655-4855 or 1 800 557-0552 www.elkasuspension.com
MAINTENANCECARE & SERVICING SCHEDULEOPERATION AFTER EACH USE END OF EACH SEASON ANNUALLYClean under the bottom-outbumperYes Yes YesClean shock absorber’s exteriorYes Yes YesCheck the hoses for leaksor looseningInspect Inspect InspectCheck the shaft for damageor rustInspect Inspect InspectCheck the seal head forleaks or looseningInspect Inspect / Replace Inspect / ReplaceCheck all mounting nutsfor looseningInspect Inspect InspectCheck spherical bearings Inspect Inspect InspectCheck spring spacers(crossovers)Inspect Inspect InspectChange oil, piston and wearband,clean interior parts,check nitrogen pressureEach 6 months or each year, depending on useage(must be done by the <strong>Elka</strong> Factory Service Departmentor an Authorized Service Center)IMPORTANT NOTE: <strong>Elka</strong> <strong>Suspension</strong> recommends that you inspect your shock absorbers before and after each use inorder to detect any problems.ELKA SUSPENSION INC. Phone: (450) 655-4855 or 1 800 557-0552 www.elkasuspension.com 17
MAINTENANCEMAINTENANCE & SERVICING LOGBOOKUSE THE FOLLOWING SPACE TO LOG THE MAINTENANCE MADE TO YOUR SHOCK ABSORBERSDATEMAINTENANCE OPERATION18 ELKA SUSPENSION INC. Phone: (450) 655-4855 or 1 800 557-0552 www.elkasuspension.com
MAINTENANCERETURN PROCEDURES FOR SERVICE WORK OR WARRANTYHOW TO PROCEEDTo ship your shock absorbers to our Factory Service Department for servicing or warranty issues,simply follow these easy steps:1. Call our Customer Service Department to get a Return Goods Authorization Number (RGA Number)at 1-800-557-0552 or 450-655-4855. This RGA number is mandatory for all incoming packages.Without this return number, the service can be delayed.2. Print and fill out completely the SERVICE WORK ORDER form from our web site atwww.elkasuspension.com (servicing section, PDF file format) or use the one provided on page 20.3. Download, print and fill a COMMERCIAL INVOICE FORM from our web site atwww.elkasuspension.com (servicing section, PDF file format) or use the one provided on page 21.This form is mandatory for customs purposes. Include the form along your shipment's paperwork.Our representatives can assist you to fill out the commercial invoice.4. Clean your shocks thoroughly using gentle detergent. Wrap your shocks individually before placingthem in a box to avoid damage during shipping. Any damage occuring during shipping is yourresponsability. Full shipping insurance is recommended. Place your completed form on top insideyour package.5. Include a copy of your original invoice on top inside your package.6. Ship your package at the address below:ELKA SUSPENSION INC. - Factory Service Department1585-M De Coulomb, Boucherville, Quebec, Canada J4B 8J77. Wait for a call from our technicians to confirm reception. Turn-around time is usuallybetween 7 to 10 days from the moment we receive your package.ELKA AUTHORIZED SERVICE CENTERS IN THE UNITED STATESELKA SERVICE CENTER - WEST COAST1191 Mission Blvd, Fallbrook, CA 92028Phone: 760-731-5920www.elkaservicecenter.comELKA SERVICE CENTER - EAST COAST985 Harris Hwy, Parkersburg, WV 26101Phone: 304-863-0025www.ImpactSolutionsATV.comCATALYST REACTION - MOTO SPECIALIST15401 Redhill Ave., Suite FPhone: 714-258-7501www.catalystsuspension.comELKA SUSPENSION INC. Phone: (450) 655-4855 or 1 800 557-0552 www.elkasuspension.com 19
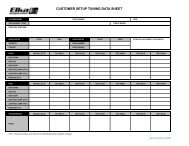
SERVICE WORK ORDERIMPORTANT! READ FIRST: SHIPPING INSTRUCTIONS1) Call our Customer Service Department at 1-800-557-0552 or 450-655-4855 to get a Returned Goods Authorization number (RGA#).2) Clean your shocks thoroughly. Use gentle detergent and pay attention to areas where debris can become lodged.3) Wrap each shock individually before placing them in a box to avoid damage during shipping. Any damage during shipping is your responsability.4) Fill out this form completely and put it on top inside your package. An incomplete form will cause additional delay.5) One of our representatives will call you to confirm when we receive your package.CUSTOMER INFORMATIONCUSTOMER NAME: __________________________________________________________________________ADDRESS: ___________________________________________ CITY: ________________________________STATE: _______________ COUNTRY: ______________________ POSTAL / ZIPCODE: ______________________PHONE: ______________________ FAX: _________________________ AGE: _________ WEIGHT: _________RIDING TYPE: ❏ MX ❏ XC ❏ DZ ❏ DUNE ❏ TT ❏ RECREATIONAL CLASS: _________________________PAYMENT: ❏ VISA ❏ AMEX ❏ MASTERCARD NUMBER: ___________________________ EXP: _____ / _____SOCIAL SECURITY NUMBER (REQUIRED BY UPS TO ALLOW CUSTOMS CLEARANCE): ______________________________VEHICLE INFORMATIONMAKE: __________________________ MODEL: _________________________________ YEAR: ___________SWINGARM: _________________________________ A-ARMS: ______________________________________RETURN SHIPPING INFORMATION❏ CHECK HERE IF SAME AS BILLING INFORMATIONNAME: __________________________________________________________________________________ADDRESS: ___________________________________________ CITY: ________________________________STATE: _______________ COUNTRY: ______________________ POSTAL / ZIPCODE: ______________________PHONE: ______________________ FAX: _________________________DESCRIPTION OF THE PROBLEM(S)20 ELKA SUSPENSION INC. Phone: (450) 655-4855 or 1 800 557-0552 www.elkasuspension.com
ELKA SUSPENSION INC. Phone: (450) 655-4855 or 1 800 557-0552 www.elkasuspension.com 21
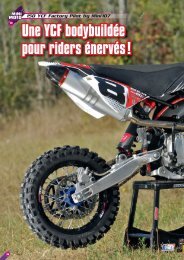
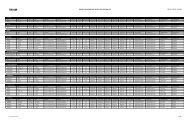
TROUBLESHOOTINGPROBLEM POSSIBLE CAUSE(S) CORRECTIVE MEASURESThe front of the vehicle diveswhen cornering and brakingThe front of the vehicle is stiff.Handling is hard on your arms and thevehicle is hard to control at highspeeds.The rear of the vehicle wants to kickto the front and bouces from side toside continually.1. The auxialiary spring hastoo much stroke.2. Not enough low-speedcompression damping.1. The auxialiary spring has notenough stroke.2. Too much compression damping.1. Vehicle is unbalanced.2. Incorrect rebound damping.3. Too much compression damping.1. Change crossover length (call forinstructions) or contact <strong>Elka</strong> forsubstitute parts.2. Increase the low-speedcompression damping (see p.12)3. Close TRACK System if suchequipped1. Reverse the crossover (see p.15)or contact <strong>Elka</strong> for substitute parts.2. Reduce the compression damping(see p.11)3. Open TRACK System if suchequipped1. Verify and adjust the ride height(see p.9).2. Adjust the rebound damping (seep.14).3. Reduce the compression damping(see p.11).The rear of the vehicle shoots upon large jumps or bumps.1. The ride height is too low and thechassis is too close to the ground.There is not enough stroke beforethe bottom-out bumper engages.2. Not enough rebound damping toprevent the vehicle from beingthrown by the force of the springs.3. Spring pressure is too high to allowsufficient stroke.4. Spring pressure is too low.The vehicle bottoms out.1. Increase the ride height (see p.9).2. Increase the rebound damping(see p.14).3. Reduce the spring pressure usingthe preload adjustment (see p.10).4. Increase the spring pressure usingthe preload adjustment (see p.10).22 ELKA SUSPENSION INC. Phone: (450) 655-4855 or 1 800 557-0552 www.elkasuspension.com
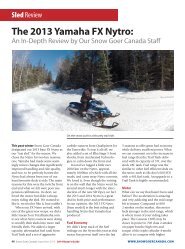
TROUBLESHOOTINGPROBLEM POSSIBLE CAUSE(S) CORRECTIVE MEASURES1. Too much rebound damping.The compression accumulates andprevents the shock absorber fromreturning to proper extension beforehitting the next bump.1. Reduce the rebound damping (seep.14).2. Too much compression damping.The shock absorber is not usingits full stroke (travel).2. Reduce the compression damping(see p.11).The vehicle shoots up and dancesabout when going over a series ofsmall bumps.3. The ride height is too low and thechassis is too close to the ground.There is not enough stroke beforethe bottom-out bumper engages.4. Spring rate is too high for the weightof the rider and the vehicle.3. Increase the ride height (see p.9).4. Contact <strong>Elka</strong> <strong>Suspension</strong>.The shock absorber does not return totheir fully extended position.1. This is normal. The weight of the vehiclewill not let the shock absorbersreturn to their fully extended positionwhen there is not much preload.1. To get more extension, increase thepreload using the preload adjustment(see p.10).1. The ride height of the vehicle is toohigh.1. Verify and adjust the ride height(see p.9).The vehicle is not stablewhen taking curves.2. The suspension is too soft overallfor the track or terrain.2. Change crossover length (call forinstructions) or increase thecompression damping (see p.11).ELKA SUSPENSION INC. Phone: (450) 655-4855 or 1 800 557-0552 www.elkasuspension.com 23
1585-M De Coulomb, Boucherville, Quebec, Canada J4B 8J7Phone: 1-800-557-0552 or +1-450-655-4855www.elkasuspension.comPART # OWNERS <strong>MANUAL</strong>