BAKER FRANKENTRANNY BUILDER'S KIT - Baker Drivetrain
BAKER FRANKENTRANNY BUILDER'S KIT - Baker Drivetrain
BAKER FRANKENTRANNY BUILDER'S KIT - Baker Drivetrain

You also want an ePaper? Increase the reach of your titles
YUMPU automatically turns print PDFs into web optimized ePapers that Google loves.
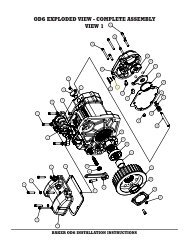
<strong>BAKER</strong> <strong>FRANKENTRANNY</strong> BUILDER’S <strong>KIT</strong>DISSASSEMBLYV4-39091) FOR YOUR SAFETY, DISCONNECT BOTH BATTERY CABLES (FAILURE TO DUE SOCOULD RESULT IN PERSONAL INJURY).2) With your bike securely supported on a bike lift or jack, drain the transmission fluid. Refer toyour Factory Service Manual for location of your drain plug.3) Refer to your Factory Service Manual for transmission gearset, main drive gear, and maindrive gear bearing removal.4) Remove your transmission speed sensor from the transmission case.CASE PREPERATIONThe <strong>BAKER</strong> FrankenTranny Builder Kit hardware is designed to fit in a stock H-D ® andaftermarket transmission cases without modification to the case or Six-Speed components, butthere are exceptions. The internal walls of transmission cases float around occasionally, this isnot a quality problem, but rather is inherent in the casting process. With that in mind the followingsteps are a number of checks to make sure that your new builders kit will function and performflawlessly.IT IS CRITICAL THAT BEFORE YOU DO ANY MODIFICATION TO YOURTRANSMISSION CASE THAT YOU THROUGHLY CLEAN OUT THE CASEWITH BRAKE CLEANER OR LACQUER THINNER IN A WELL VENTILATEDAREA, DRY OUT, THEN TAPE OFF THE COUNTER SHAFT BEARING WITH DUCTTAPE TO PREVENT ANY DEBRIS FROM ENTERING THE BEARING AS YOU WILLNOT BE REPLACING IT. IF YOU NOTICE THAT THE BEARING IS DAMAGED INANYWAY PLEASE REFER TO YOUR FACTORY SERVICE MANUAL FOR REPLACINGTHE BEARING. COUNTER SHAFT BEARING H-D ® P/N 8977 OR <strong>BAKER</strong> P/NBK2526.1) Checking for 6 th gear (P/N: 60866M) Mainshaft clearance.A. Place the provided door gasket onto the transmission case. The gasket is going to actlike a template.B. If the meat of the boss around the 5/16-18screw hole and fork rod boss hole is above orbelow the profile of the door gasket. Mark thearea with a black marker; from roughly the 10o’clock to 2 o’clock position on the 5/16-18screw hole boss and the 6 o’clock to 8 o’clockposition on the fork rod boss, shown in figure4. If the meat of the boss is below or the sameas the profile of the door gasket proceed tostep 2.C. After marking the area of concern in step 1B,remove the door gasket, then remove thecase material using a coarse flat file or die SHOWN IN RED ARE THE AREAS OF CONCERN FIGURE 4grinder. Remove only the marked materialroughly a ½” back from the door gasket surface.(CONTINUED ON NEXT PAGE)PAGE 8 - DISSASSEMBLY / CASE PREP