INSTALLATION INSTRUCTIONS: Viewline 85 mm - Howard ...
INSTALLATION INSTRUCTIONS: Viewline 85 mm - Howard ...
INSTALLATION INSTRUCTIONS: Viewline 85 mm - Howard ...

You also want an ePaper? Increase the reach of your titles
YUMPU automatically turns print PDFs into web optimized ePapers that Google loves.
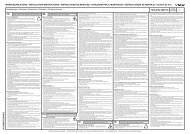
<strong>INSTALLATION</strong> <strong>INSTRUCTIONS</strong>: <strong>Viewline</strong> <strong>85</strong> <strong>mm</strong>Sumlog810/09TU00-0752-6207102 1-10 3GBIf the instrument is mounted flush (i.e., from the backso that the instrument glass and the panel form oneplane), the front ring must be removed. Press theinstrument glass with both thumbs, while at the sametime pressing the front ring forward from the instrumentwith both index fingers. Note the use of a toolin the adjacent figure.129ø 75.4 <strong>mm</strong>Flush assembly.The reco<strong>mm</strong>ended panel thickness is 1.5 to 3 <strong>mm</strong>.The drill hole must have a diameter of 75.4 <strong>mm</strong>.Ensure that the installation location is level and hasno sharp edges.101.5...3 <strong>mm</strong>• Do not drill holes or ports in load-bearing or stabilizing stays or tie bars!• Note the necessary clearance behind the drill hole or port at the installation location. Required mounting depth:65 <strong>mm</strong>.• Drill small ports; enlarge and complete them, if necessary using taper milling tools, saber saw, keyhole saw orfile. Debur edges. Follow the safety instructions of the tool manufacturer.Place the flush mount seal A2C53215641 on theinstrument glass.Put the instrument into the drill hole from the back.Adjust the instrument so that the gauge is level andfasten it to the stud bolts on the rear side of the panel,using the flush mount fixing bracket A2C59510864.1171Depending on the configuration, insert the cable into the 8-pin and 14-pincontact housing according to the following pin assignment. The contacts mustaudibly lock into place.TU00-0752-620710214<strong>85</strong>1848-pin contact housing14-pin contact housingPin 1 - T. 30 - battery12/24 V Pin 1 - NMEA0183-BPin 2 - T. 31 - groundPin 2 - NMEA0183-APin 3 - signal groundPin 3 - unassignedPin 4 - T. 15 - ignition plusPin 4 - unassignedPin 5 - sensor signalPin 5 - unassignedPin 6 - T. 58 - lightingPin 6 - unassignedPin 7 - warning LED ground Pin 7 - unassignedPin 8 - warning LED plusPin 8 - unassignedPin 9 - unassignedPin 10 - unassignedPin 11 - Configuration keyPin 12 - Mode keyPin 13 - Alarm output (max 100 mA)Pin 14 - unassignedNow insert the plug into the gauge. Note the inverse polarity protection nosein the process.Technische Änderungen vorbehalten - Technical details subject to change