Halls of Montezuma Manual - Virtual Apple
Halls of Montezuma Manual - Virtual Apple
Halls of Montezuma Manual - Virtual Apple

You also want an ePaper? Increase the reach of your titles
YUMPU automatically turns print PDFs into web optimized ePapers that Google loves.
Roger KeatingIanAndrew TaubmanMalcolm 'BGregor W1\:l~JSTRATEGIC STUDIES GROUP PTY LTDFa BOX 261 DRUMMOYNE, 2047. AUSTRALIA
uns... ..: THE UNIQUE COMPUTER GAMING MAGAZI~~E .,co TENTSAt Strategic Studies Group we make strategy gamess for yourcomputer...with a difference!Our games incorporate powerful Design Kits whichl allow youto vary the historical scenarios or create entirely neWl ones <strong>of</strong>your own choosing.Run 5 magazine is our way <strong>of</strong> further supplOrting ourcustomers.Each issue <strong>of</strong> the magazine contains new scenarrios, designfeatures, scenario notes, updates on projects in doovelopment,gossip, reviews, letters and clarifications.Scenarios appearin!:j in previous issues include....Relief <strong>of</strong>Wake Island, Japan Sweeps South and Leyte Gul#f for Carriersat War; The Blitz, Case White, Zitadelle and Flyin!g Tigers forEurope Ablaze; Guadalcanal, Task Force South, ~Gallipoli,Arnhem and Anzio for 8attlefront.Run 5 is published four times per year. Singlee issues are$4.00. Subscription rates are shown below.IN AUSTRAUAELSEWHERE «Airmail)Magazine/Disk Sub. SAUD 65.00 Magazine/Disk Sub. ,= SAUD 85.00Magazine Only Sub. = SAUD 15.00 Magazine Only Sub. ,= SAUD 35.00IN NORTH AMERICA (Su~ace PPost)Magazine Disk Sub. SUSD 65.00 Magazine/Disk Sub. ,= SAUD 75.00Magazine Only Sub. = SUSD 15.00 Magazine Only Sub. ,= SAUD 25.00Disk SUbscription holders receive all the magazine sc::enarios indisk form. For those <strong>of</strong> you who don't want to spend tthe extramoney...don't worry. All the data necessary to build thoo scenarioswill be provided in the magazinaNorth American SUbscribers should send a cheque~ or moneyorder (in US funds) to our US Offica Everyone else sshould se.ndtheir cheque, money order, Visa or Mastercard to OLur AustralianOffice.Individual scenario disks may be purchased for ~$15.00each,Run 5 is available wherever you bUy our wames oryou can order it direct from SSG.In the USAStrategic Studies Group line.1747 Orleans Ct, Walnut Crreek.CA. 94598 (415) 932-3ill19In AustraliaStrategic Studies Group Ptty LtdP.O. Box 261, Drummoyne. NSW. 2047 (02) 819-7199PARTONE-THEGAMEROUTINES1. INTRODUCTION2. HOW THE GAME PLAYS3. YOUR FIRST BATILE4. THE TYPES OF GAME MEINUS5. THE GAME MENUS DESCIRIBED6. THE COMBAT ROUTINES7. THE MOVEMENT ROUTINES8. WINNING THE GAME9. TACTICSPART TWO - THE SCENARIO SA HISTORY OF THE USMCTHE SCENARIOS - Mexico Citty (37), BelleauWood (43), Iwo Jima (54), Okimawa (57 & 62),Pusan Perimeter (66), Inchon (69), Hue (76)PART THREE - THE DESIGN ROUTINES1. INTRODUCTION2. USING THE DESIGN MENIUS3. PREPARING A DISK4. VARYING A SCENARIO5. THE WARPLAN DESIGN M1ENUS6. WARPAINT7. EDITOR'S NOTESBIBLIOGRAPHYACKNOWLEDGEMENTSAPPENDIX A3451111273131323353580808081818495989910001
P RTONETHE GAME ROUTINES1. INTRODUCTIONThis s<strong>of</strong>tware program and all the documentation associated with it is Copyright (c)1987 by Strategic Studies Group Pty Limited. All rights are reserved worldwide.No part <strong>of</strong> the documentation may be reproduced, transmitted, stored In aretrieval sys1em or translated Into any language, in any form or by any means,without the prior written consent <strong>of</strong> Strategic Studies Group Pty Limited.Typeset in 10 pt Helvetica on an <strong>Apple</strong> Macintoshand Laserwriter.Printed in Australia by Maxwell printing Co. Pty Ltd,Sydney, for the publishers, Strategic StudiesGroup Pty Limited, P.O. Box 261 Drummoyne,2047. AUSTRALIA.2<strong>Halls</strong> <strong>of</strong> <strong>Montezuma</strong> is a battle history <strong>of</strong> the United States Marine Corps, tracingits history from the Mexican War to Vietnam. It uses the Battlefront Game Systemwith a number <strong>of</strong> enhancements to illustrate various battles from Marine Corpshistory. Each scenario is accompanied by a historical article and player's notes.<strong>Halls</strong> <strong>of</strong><strong>Montezuma</strong> uses SSG's wargame construction set WARPLANTM and therevolutionary icon editor WARPAINTTM.Part One <strong>of</strong> this manual, The Game Routines, contains an introductory tutorial andexplains all you need to know to play the game. Part Two, Scenario Notes,contains extensive historical articles as well as comprehensive Player'S Notes.Part Three, The Design Routines, explains how to use the construction andgraphics kits.<strong>Halls</strong> <strong>of</strong> <strong>Montezuma</strong> uses the Battlefront Game System, with a number <strong>of</strong>enhancemer')1s. Owners <strong>of</strong> Battlefront or Battles In Normandy will be able to playthe game immediately and to use all previous scenarios. There are a number <strong>of</strong>additions in the design options and all differences are noted in Section Seven <strong>of</strong>The Design RoUtines,:The complete package consists <strong>of</strong> an album, a map, 2 menu cards, a floppy disk,this player's manual and a strip <strong>of</strong> disk labels.If this isn't the case, let us know about missing components, or return defectiveones, and we'll replace them immediately. If you live in North America, senddefective components to our US Office; if you live elsewhere, send them to ourAustralian Office.Furthermore, if you have any questions relating to the play <strong>of</strong> the game, pleaseaddress them to our Australian Office, regardless <strong>of</strong> where you live.3
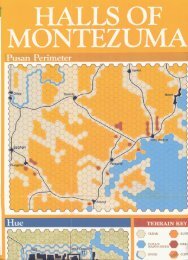
2. HOW THE GAME PLAYSBefore asking you to go through he introductory tutorial, we recommend youread this chapter.A game <strong>of</strong> <strong>Halls</strong> <strong>of</strong> <strong>Montezuma</strong> gom something like this.Choose the scenario you wish to pay. Experienced players may wish to vary anexisting scenario or to create an entrely new one.Select a normal or enhanced game Enhanced games give random but powerfulbenefits to any computer player. Chi>ose a handicap level for the game. Handicaplevels act as a multiplier on the points accumulated by either player. UnlikeEnhancement, they do not affect the artificial intelligence or the combatperformance <strong>of</strong> the protagonists.Choose sides Le. whether the gal1le will be played between two humans, onehuman (either as the Axis or Allied player) or no humans. Note the mode is a very useful tool for historcal analysis and for testing original scenarios.You may also edit the names <strong>of</strong> the ::>pposing commanders at this stage.The game is now ready to play.Each scenario lasts for a set numter <strong>of</strong> turns; up to 99. There are four turns toeach day (am, noon, pm and nite) s) that the maximum length <strong>of</strong> a scenario is 25days.The military forces at your command are battalion size units. These are your basicfighting men. They are organized ino larger formations to reflect a proper militaryhierarchy. A regiment can have upto four component battalions. A division canhave up to four component reginents as well as up to four independentbattalions. These independent batalions can be temporarily attached to any <strong>of</strong>the division's regiments.Finally, each player can have underhis command up to three divisions, for a total<strong>of</strong> 60 battalions. This is the corps famation that you are commanding. There arefourteen different types <strong>of</strong> battaliors ranging from infantry, armour and artillerytypes to airborne, engineer, anti-air and anti-tank, assault gun and tank destroyer.The battlefield on which you fight is a field <strong>of</strong> hexagons up to 39 across and 28down. The ground scale is appro~mately 1 km (0.63 miles) per hex. Differenttypes <strong>of</strong> terrain are represented by different terrain icons. Roads and cities areshown. Places <strong>of</strong> special significance are designated as objective hexes, andvictory points are awarded for contrel <strong>of</strong> these at different times in the game.It is your job as a Corps Commamer to use this time, these forces and theseconditions to capture and hold as nany <strong>of</strong> your objectives as you can, to destroyas many <strong>of</strong> the enemy battalions as you can get your hands on and, <strong>of</strong> course, toprevent your opponent from doing this to you. The player who has scored themost number <strong>of</strong> points by the end O' the game is the winner.4Your interface with the game is a structured set <strong>of</strong> menus which really do becomevery easy to use.These menus give you the power to manoeuvre and deploy your battalions, tosend them into battle and to refi and re-organize them when necessary.Although each individual fighting unit is a battalion, battalions are groupedtogether to receive and carry out ordars as regiments. Remember, each regimentconsists <strong>of</strong> up to four battalions and can have a further four battalions attached toit. As corps commander you issue a general order to each regiment. Everybattalion attached to that regiment will then execute the order.Only one battalion can occupy a hex at the end <strong>of</strong> a turn. This does not preventthem moving through each other whan executing your orders.It is vital to realize the command seJaration between you and a battalion. Fromyour l<strong>of</strong>ty height in the chain <strong>of</strong> corrmand, you have little direct control over thelocation <strong>of</strong> individual battalions. They will position themselves in order to bestcarry out your orders.You can examine a variety <strong>of</strong> repons which will provide the information to baseyour decisions on.Air strikes and naval bombardments are represented by a variable amount <strong>of</strong>support points. These can be allocated to help out any regiment.All orders are issued before any action takes place. Combat between opposingforces is resolved and described by a short report. Other orders are thenexecuted.Each scenario is accompanied by a short briefing which will give you some idea <strong>of</strong>what must be accomplished in order 0 win.On average you can expect a scenario <strong>of</strong> ten days length to take 90 minutes t<strong>of</strong>inish in solitaire mode; a little longerif your opponent is human.3. YOUR FIRST BATTLE,It is the 13th <strong>of</strong> September 1847. fen thousand men under General WinfieldScott are about to assault Mexico City. Not too many Marines are present but theydon't intend to let this stop them. YOJ will have to display similar dash to win thisbattle.Your task in this scenario is to crush lesistance at Chapultepec, move swiftly alongboth causeways to capture the gatesto the city and then strike for the <strong>Halls</strong> <strong>of</strong> the<strong>Montezuma</strong>s. Following these tutoria instructions will get you started.As well as this rulebook, yOU'll need lo have the game map in front <strong>of</strong> you and tohave located the appropriate area for the Mexico City scenario. Use thestart/game menu card appropriate for your computer.5
Starting UpStart up your computer using the procedure given on the start side <strong>of</strong> the menucard. Menu A (Start Up Menu) appears to the right <strong>of</strong> the title page. As is the casewith every menu in the game, you use the arrow keys to locate your choice fromthe menu and then type (RET) to select it.If you select the wrong menu, don't worry. Type (ESC/f1) to go back to theprevious menu.Hit the right arrow key a few times. Now hit the left arrow key and YOU'll see thecursor moves in the opposite direction. Every menu works the same way.selecting the Mexico City ScenarioBefore we can start play, we have to select the Mexico City scenario, tell thecomputer that we will control the Allied forces and decide whether we wish to usea handicap.Use either arrow key to locate the line and type (RET) to go to Menu B(Location Select).Use an arrow key to locate the line and type (RET) to go to Menu C(Scenario Menu).Use an arrow key to locate the line and type (RET) to go to MenuE (Edit Utility). The scenario briefing screen is displayed to the left <strong>of</strong> the menuwindow.Use an arrow key to locate the line and type (RET) to go to Menu N(Enhanced Opponent). We must now decide whether to play an enhancedcomputer opponent. Since we are just starting out, this probably isn't a goodidea. Locate the line and type (RET) to go to Menu F (HandicapUtility). Since this is only a tutorial, we will give ourselves a break. The handicapsbelow the line benefit the Allies, those above benefit the Axis.Use an arrow key to locate the Allied line and type (RET) to go to MenuG (Player Select). Locate the line and type (RET). The cursor has beenthrown into the briefing screen and you have the opportunity to change thecommanders' names. Do this if you wish, otherwise type (RET) until you get backto Menu E (Edit Utility).Have a last look at the briefing screen and YOU'll see the Allies have a majorhandicap advantage, the Axis forces will be run by the computer and the Alliedforces will be run by human hands.Use an arrow key to locate the line and type (RET) to go to Menu H(Game Master).That's the preliminaries over with. We're just about ready to play.6Turn your menu card over to the game side.The accompanying illustrations identify the various icons whichbattalions on the screen throughout the game.The First Turnrepresent theBack to Menu H. A current turn briefing appears to the left <strong>of</strong> the rmenu window.This scenario starts on the a.m. turn and it is turn 1 <strong>of</strong> 15. Subsecquent lines tellyou the time <strong>of</strong> day and the date, the atmospheric weather andl the expectedweather forecast. The weather looks fine.The and lines in the menu have been overprintred with a solidbar to show that you cannot access them. The solid bar will disalf>pear from the line after the line has been accessed. This is to) guard againstaccidentally selecting before issuing your orders. The line willalways be overprinted during the game. The computer does not wIant you to seewhat it is doing!Locate the line and type (RET). This brings you Memu 1 (DaylightOperations). Your choices here are , (or (unthinkable).The screen will be showing some undistinguished part <strong>of</strong> Mexico. EBelow the mapis a summary <strong>of</strong> your corps identity and the victory points you have accumulatedto date.Reviewing Your ForcesBefore issuing orders we'll review our forces, examine the b)attlefield, theobjectives and the enemy forces.Select the line to go to Menu 4 (General Reports) .. This is just abranch menu. Select the line to go to Menu 5 (Unit Statlus).The name <strong>of</strong> each <strong>of</strong> your divisions appears beside its 1.0. codre in the menuwindow. You have three .divisions under your command. Select thre lineto display Gideon Pillow's division. This screen displays the statws <strong>of</strong> an entiredivision at a time. There are three regiments all <strong>of</strong> which are on thle board at thestart <strong>of</strong> the scenario. The battalion at the top <strong>of</strong> the screen will not arrive until turn2.The status screen is quite useful and should be consulted about lonce a day toget an overview <strong>of</strong> the condition <strong>of</strong> your troops.Type (ESC/f1) to return to Menu 5 and examine your other two diwisions. Theseare not as large having only three regiments between them. Typel (ESC/f1) untilyou return to Menu 4. Select the line to obtain Memu 6 (ExamineFriendly Objective). The cursor will rest on your final objective, the <strong>Halls</strong> <strong>of</strong>7
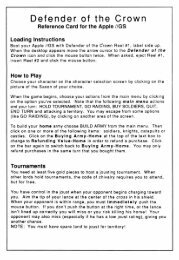
SPECIFIC BATTALION ICONS(VISIBLE OINLY TO CONTROLLING PLAYER)ENGINEERC8J Irill LEG INFANTRY~ MOTORIZED INFANTRY ~ ANTI-AIR~ EJ MECHANIZED INlFANTRY ANTI-TANK00 PARACHUTE 1~1 TANK DESTROYER~ HEAVY WEAPO NS [Q] ARMOURIZl CAVALRY[1ill ASSAULT GUN~ 0 RECONNAISSAINCE ARTILLERYXX DIVISIONHQ IiIHDIV HQ (AXiAL)8GENERAL BATTALION ICONS(VISUBLE TO BOTH PLAYERS)Q ALLIED INFANTIRYF3ALLIED ARMOUIR0~I:;} ALLIED ARTILLERY~g ALLIED ROUTEID~"PARACHUTE MCODE... AMPHIBIOUSAXIS INFANTRYAXIS ARMOURAXIS ARTILLERYAXIS ROUTEDAIR LANDING MODEIfMODEA NOTE ON MONITORS AND SIf you are usrng ablack and white monitor, typeentl(B) to enter monochrome mode. ,If you don't wi~sh to listen to the sound effects, typeCntl(S) to turn them <strong>of</strong>f.Repeat the keystroke to reverse the effect.UNO<strong>Montezuma</strong>. The text summarizes the turns for which Victory Points are received,the number <strong>of</strong> VPs per turn, and any VPs awarded for control at the end <strong>of</strong> thegame. The icons show that objective at this time is on Urban terrain, Axiscontrolled and a city hex.The arrow keys will cycle through all <strong>of</strong> your objective hexes. Use them now tolook at all <strong>of</strong> your objectives to gaUn an idea <strong>of</strong> your overall requirements forwinning the game. There are only thrree other objectives. Check this screen <strong>of</strong>tenas the game progresses to make sure you are on track.Consider the display in the bottom right <strong>of</strong> the screen. The solid area is the overallmap size. The smaller white box represents the location <strong>of</strong> the hexes currently onthe screen. As you move the cursor to different parts <strong>of</strong> the map, the small box willmove to sh'ow the relative location <strong>of</strong> jthe current screen against the overall map.Type (ESC/f1) to return to Menu 4,. The left <strong>of</strong> the screen lists the divisionalobjectives for each division if any are current. We can see that the 1st division'sobjective is the San Cosme Gate at the top <strong>of</strong> the map and the 2nd is after theBelen Gate in the middle. It is a good idea to co-operate with these objectives sowe will issue our orders accordingly.Is uing OrdersType (ESC/f1) to bring up Menu 1 and select the line to bring upMenu 8. Select the line to bring up Menu 9 and then select to bring up Menu 13. We have three regiments to give our orders to.Select . The flashing cursor indicates that the regiment is in the state. This fact determines what sort <strong>of</strong> orders we can give. Thecomponent battalions <strong>of</strong> the regiment have been highlighted and their target isindicated by the target marker. Select the line. The arrow keys will cycle thecursor through the component battalions <strong>of</strong> the regiment. We can see that wehave four battalions <strong>of</strong> veteran infantry and one artillery battalion. All are sitting onthe wetland terrain type.The line is always available from this menu. Use it to keep up with thelocation and condition <strong>of</strong> the battalion!s in each regiment as we go through them.Type (ESC/f1) to return to Menu 14 and select the line to bring upMenu 18. This is the menu with the actual orders for a regiment in the state. We won't waste time, so select to bring upMenu 19. This lists the attack options ,available to us.The options are , , and . Select and you will be returned to Menu 14. Type (ESC/f1) to go to Menu 13.REG 2 has deploy orders in the rear. We will leave it in reserve. Select and give this regiment a order as well.Type (ESC/f1) until you return to Menu 9 (Division Select) and select .
Use the same menus to give attack menus to the two regiments in this divisionbut issue them with orders. Thal find Menu 9 and select the line to get Menu 11 (Assign XX Assets). The divisional assets are fourspecial battalions which can be attached to ary regiment. They <strong>of</strong>ten contain theartillery, which allows it to be switched to the n:3;;liment needing it the most.Use the arrow keys to cycle through your assets. You will have an engineerbattalion, the marine battalion and two battalons <strong>of</strong> artillery both <strong>of</strong> which areassigned to REG 1. This hardly seems fair. Highlight the siege artillery and hit(RET). You can now assign the chosen bat1alion to a regiment or place it inreserve. Select and then . The asset is now attached toREG 2. You should check your assets for ecr:h division every tum, and assignthem, especially artillery, to the regiments whim require them.The third division has no movement points anc not much <strong>of</strong> a job. They must staywhere they are, but the Mexicans will probably :ome visiting anyway.The First Turn ReviewedWe have issued probe orders to REG 1 and REG 3 <strong>of</strong> DIV 1, and prepare ordersto REG1 and REG 2 <strong>of</strong> DIV 2. We have exanined all the troops in our commandand switched a divisional asset in DIV 2. Now itis time to fight.The Computer's RoleType (ESC/f1) until you return to Menu H, the Master Game Menu. If you think allis ready select . Combat and movement will then occur. The Mexicanswill not attack you on this first turn, so you wil get a combat report from each <strong>of</strong>your attacks. Hit the space bar to continue after each report.After the first turn is finished you will be returned to Menu H.The Game PlanWar being what it is, it is not exactly possible to tell what will have happened bynow. The defenders <strong>of</strong> Chapeltepuc may have routed or they may still be there. Ifthey are, use the order for both <strong>of</strong> the regiments in DIV 2. This willcertainly finish them <strong>of</strong>f. If they have already r~tired from the field there will not' bea shortage <strong>of</strong> replacements which will strean out from Mexico City along thecauseway on the first turn. DIV 2 has the task <strong>of</strong> removing these obstacles andcapturing the Belen Gate. Keep pushing fOl"Aard. Use to concenlrateyour men, if you are only in , and then followed by when you are engaged with theenemy.DIV 1 must lend a hand on the first day, b clear Chapultepec and the roadjunction it commands. Sometime on the sec01d day you should have pushed the10Mexicans back far enough to allow you to swing north and take the San Cosmegate. To do this you will have to be in the state Le. not in or . Us.e if you have to, to withdraw from contact. Don'tdo thl~ ~ntll the MeXicans ~re at I~ast four hexes from the road junction otherwiseyou Will Just get caught up In the fighting. Once you have taken San Cosme Gatepress on to the the <strong>Halls</strong> <strong>of</strong> <strong>Montezuma</strong>.'DIV 3 has an unenviable job. Unable to move, all you can do is fight any Mexicanswho come your way. Conserve your efforts and you should outlast your attackerswho should soon have other problems.'TacticsSo~e brief points to ~elp you on your way. Your men are superior to theMeXicans and should Win any contest <strong>of</strong> arms. Don't get carried away and assaultmore ~han once a day, especially with DIV 2 and DIV 3. Too frequent assaultsresult In exhausted men, so watch your supply and fatigue status.!hrou~h bureaucratic inertia, nobody in the War Department has got around toinventing aeroplanes, so there are no OBS points in this scenario. These arecritical in both attack and defense in those scenarios which have them. They areallocated under the line from Menu 9 (Division Order) and theircorrect use can make all the difference in a scenario.4. THE TYPES OF GAME MENUSThe order menus which drive the game can be divided into four types.(a) Branch Menus - These menus signpost the route to other menus[1,2,4,8,9,13,14]. Note that most <strong>of</strong> them also provide some information.(b) Information Menus - These menus provide specific information on the variousforces and functions in the game [5,6,7,15].(c) Action Menus - These menus are the centre <strong>of</strong> the game system. All <strong>of</strong> theorders used in the game are given through them [10,11,12,16,17,18,19].(d) Single Function Menus - [~].5. THE GAME MENUS DESCRIBEDMenu H (Game Master)This screen always appears at the beginning <strong>of</strong> each turn. It is common to bothplayers. It is the first screen you will see after completing the scenario selection11
details and selecting . You are told the turnnumber, the time <strong>of</strong> day and date, the atmospheric weatherfor this turn and the weather forecast. In a two (human)player game you will be able to select either or.In a one (human) player game a solid bar will be overprintedacross the side controlled by the computer.AXIS/ALLIESIRUNSDISKThe arrow keys will not access a line overprinted with a solid bar. is the key which activates the turn. Do not select it until all IDlayers haveissued their orders.In daylight turns, the line will be overprinted with a solid bar until allplayers have accessed at least Menu 1.In night turns, there is no insurance on the line since it i$ usual (andadvisable) to let your men get some sleep.The line can be accessed at any time and is the means by whiich the 'savegame' routines are utilized. Please see Menu 3 (Save Game Utility) fCDr full details<strong>of</strong> these routines.u 2 (Nignn.olrl:atjOons)This menu appears in place <strong>of</strong> Menu 1 (DayliglhtOpera'tions) on night turnS). You will recall from Chapter 3(How tthe Game Plays) thatt each day is divided into 4 tumls;am, noon, pm and nite.ACTIVATEREPORTSRE~Ir.:In most circumstances yow will want to rest your men at rnight. The line is ,available for selectiom as usual. However, to issue (orders you will first haveto select , 'which will then display the line. Thisadditional step has been irncluded as a precaution againsst accidently committingyour forces at night.All men on both sides willi normally sleep at night unle~ss specifically given anorder. You may carry out alII actions up to actually issuing) an order without wakingthem up. Orders issued tthrough Menus 16-18 will activi'ate the regiment for thenight. This is the only imeversible decision you can nnake except, <strong>of</strong> course,selecti ng .You should not attack at niight unless you have very gooctl reasons. See Section 9(Tactics).eDaylightO)RDERSThis is a branch menu. The information which appears to RIEPORTSthe left <strong>of</strong> the menu window displays your nationality,parent unit formation, the commander's name and the RESIGNnumber <strong>of</strong> victory points accumulated by your side to date.You should decide whether you want to look at theavailable information before giving your orders.If you select you will be given access to three categories <strong>of</strong>information. Menus 5-7 will give you all the details.If you select you will be given access to the decisiOn! making (oraction) menus <strong>of</strong> the game. Menus 8-19 will give you all the details.We recommend that you make use <strong>of</strong> the menu every turn andthen issue your orders. It is particularly important to keep an eye on lyour reportswhile you are becoming familiar with the game. A list <strong>of</strong> the things. you shouldkeep an eye on is included in the description <strong>of</strong> each report menw. The mostimportant are the percentage losses <strong>of</strong> your combat units and ttheir level <strong>of</strong>fatigue.The option is for use when, for whatever reason, there is no point incontinuing the game. The game will stop and the end <strong>of</strong> game sctreen will beprinted; Le. the current victory point status will be displayed. You will tbe promptedto avoid accidental resignations.e 3 (Save tility)This is a single function memu which allows you to load or ~save a game or to formata save game disk. Use the arrow keys to locate the line on Menu Handtype (RET). This brings up> the save game utility screen VlNhich has three options,, and .To save a game, locate with the arrow keys anctl type (RET). If you haveonly one disk drive you willi be asked to insert the appropri;iate disk and type (RET).You wull then see a list <strong>of</strong> tthe games on the disk in the largJe catalog box at the top<strong>of</strong> the screen. Use _the arrcow keys to move the highlight(ed bar to the location inwhich you wish to save tthe game, and type (RET). 1The menu window nowdisplays the and lines. (Choosing allows you to edit the boxles containing the name <strong>of</strong> the game and a three linesynopsis, which are in the middle <strong>of</strong> the screen. When YfOU are ready, locate the line and tyrpe (RET).The game will be saved tOI the highlighted location with wvhatever name you havechosen for it. Note that the catalog box displays the turn Ion which the game wassaved. This is done automlatically. Hitting the (ESC/f1) ke9y will now return you tothe garrne. One drive users, will be prompted for the appro~priate disk.To load a game choose . One drive users will bel asked for their scenarioor save game disk. Use the arrow keys to move the highliighted bar to the desiredgame Ilocation and type (RIET). The chosen game will be Iloaded. Hitting (ESC/f1)will now return you to the glame.12 13
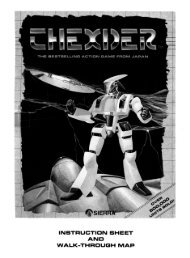
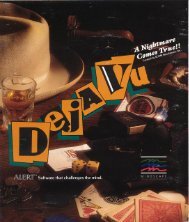
To format a new save game disk choose . A warning message willappear and you will be asked to insert the disk to be formatted. Hitting (RET) willcompletely erase any information that was on the disk and provide eight unusedsave game locations. Please exercise some care in choosing this option.Menu 4 (General Reports)This is a branch menu that directs you to each <strong>of</strong> the threereport menus. Use the arrow keys to select the requiredreport and then type (RET).Menu 5 (Unit Status)Menu 6 (Examine Objectives)This is an information menu. Use the arrow keys to cycle through each friendlyobjective. Alternatively, you can type the name <strong>of</strong> a particular objective which youwant to examine. A box will appear in the bottom left <strong>of</strong> the screen containing thename as you type it. When you have typed enough letters for the computer to14STATUSOBJ'nVEMAP WALKDlV1This is an information menu. Use the arrow keys to locate aDIV 2particular friendly division (or formation) and type (RET).DIV 3The map is replaced with a full screen text display <strong>of</strong> thecurrent state <strong>of</strong> the chosen division. Consider fig 1.This example shows the 4th Marine Division from the Iwo Jima scenario. It is aMARINE division. It is tum 7. The divisional HQ does not arrive until turn 9.At the top <strong>of</strong> the screen are the displays for the division assets. There are 4 in thisexample; the 4a (ARMour), the 4b (ARMour), 4th (INFantry) and 14d (ARTillery)battalions. They are assigned to the 3rd, 1st, 1st and 2nd regiments <strong>of</strong> thedivision. Unfortunately, the 4a and the 4th have been eliminated (Killed InAction). The 4b Bn has a fresh fatigue state. It has elite troops. It has taken nolosses as yet. The 14d artillery unit will not arrive until tum 8.The remaining battalions in the division are grouped by regiment. The regimentalI.D. appears inside a box on the left <strong>of</strong> the screen together with its combat stateand supply state. Both <strong>of</strong> these concepts are explained in detail in subsequentmenus.Thus, the 23rd R.C.T. has 4 battalions; the 1st, 2nd, 3rd and 14a. Note that the2nd has taken 60% losses and rou'ted.The value <strong>of</strong> this screen is that it will give you a concise summary <strong>of</strong> the condition<strong>of</strong> every battalion in a division on a single screen. It complements the informationavailable on the lines <strong>of</strong> Menus 16-18.Turn ': 7:' 3 4a ARn.,. KIA'''on .: 9:' I 4b ARn fresh'''4th DIY" I 4th INF .,. KIA·..nAR..............................•I NE 2 14d ART freshR,C,T,23 1st INF fitENGAGED 2nd INF routdLOS cut 3rd INF fresh,.............................. 14a ART fresh..............................•R.C.T.24 1st INF exh1dCONTACT 2nd INF freshLOS cut 3rd INF fresh............................... 14b ART fresh...............................R,C,T,25 1st INF fitCONTACT 2nd INF routdLOS cut 3rd INF routd,.............................. 14c ART fresh. ,..............................•-Ielite-Ieliteeliteeliteeliteeliteeliteeliteelitevet1neliteeliteeliteeliteFig 1. Division Status Screenon ( 8)68~ loss28~ losson. f 8' .I38~ loss98~ loss88~ lossdistinguish a unique name, the cursor will move to that objective and theinformation will be displayed. The information available on each is illustratedbelow.. Fig 2 is an Allied report from the Iwo Jima scenario. From this example we can seethat the name <strong>of</strong> the objective is W Suribachi. Thirty victory points per turn can beearned from the control <strong>of</strong> this objective between turns 3 and 9 inclusive. Afurther 100 victory points can be earned for the control <strong>of</strong> this objective at the end<strong>of</strong> the game. Finally, the objective has not been held by the Allies so far in thisgame.The middle section <strong>of</strong> the display shows the terrain type on the first line, and andthe objective name on the third. The second line shows the terrain control (Axis)and fort icons. ' ,~here is a schematic display <strong>of</strong> the map in the lower right which indicates the mapsize and the current location <strong>of</strong> the cursor in relation to the full map.15
act i ve .: 3·.. 9 :1per turn 38end galllle 189turns held': "')Menu 7 (Exam"ne Map/Units)This is an information menu. You are given control <strong>of</strong> the cursor which may bemoved at will around the map by the use <strong>of</strong> the 1-6 keys or the I,J,K,M keys.Friendly objectives are identified as flashing target symbols.16nOUHTAIH(!) ~~ ::U SuribachiFig 2. Objective Details1111I11111I11I .11I11I11111111::: .~ 11I1111I11.11111I1111..Knowing where your objectives are and their relative value to you in victory pointswill make it much easier for you to properly deploy your forces. Wheneverpossible, secure every objective within reach and be prepared to defend them foras long as possible.Frequent checking <strong>of</strong> this menu will ensure, f.or ex~mple, that. you don't de!end aparticular objective too long (i.e. past the expIry pomt for e~rnl~g VPs). It Will alsokeep you aware <strong>of</strong> when an objective needs to be secured m time to get the mostVPs from it.You can (and should) use this mennu to get information onenemy units. It is also useful Mor examining terrain,especially in active portions <strong>of</strong> thee map, and as anothersource <strong>of</strong> information on the conditidon <strong>of</strong> friendly units.Position the cursor over an enemy uunit.(On/Off)CONTROLROADSCLEAR MAPIn the lower left <strong>of</strong>the screen you vwill be told the type <strong>of</strong> enemy unit identified(either infantry, armour, artillery or (divisional HQ), whether it is contacted or notand, if contacted, an indication <strong>of</strong> thhe size <strong>of</strong> the enemy unit. Type (0) to centrethe screen on the cursor.In the lower centre <strong>of</strong> the screen yoou will be told the type <strong>of</strong> terrain occupied bythe enemy unit, and shown the iconns for terrain, control, city or mine, and forts. Ifthe hex is an objective its name will aappear below the icons.You may also position the cursor ower a friendly unit. The information presentedon the unit is in exactly the same fommat as the information available to you whenyou select Menu 15 (Examine FriEiendly Units). Please see that menu for fulldetails.If you position the cursor over an obbjective hex unoccupied by any units, you willget the same information on the obpjective as you received in Menu 6 (ExamineFriendly Objective). Please see that I menu for full details.There is a schematic display <strong>of</strong> the nmap in the lower right which indicates the mapsize and the current location <strong>of</strong> the ccursor in relation to the full map.Typing (RET) brings up a menu in thhe bottom right <strong>of</strong> the screen. There are threeoptions which may be toggled on oor <strong>of</strong>f. replaces all visible terrainicons with either the Axis or Allied ccontrol icon as appropriate. Hexes containingunits do not display a control icon; irin almost every case a hex occupied by a unitwill be controlled by that unit. Fortifiocations and minefields may take some time toclear. When an enemy fort or minefifield has been cleared the fort or mine symbolwill disappear. shows all roads and forts:> on the map not covered by a 'unit icon. removes all unitit icons from the map. These effects arecumuJative. For instance, if is selected, all unit icons are removed.If is then chosen, all t hexes will be replaced with a control marker,since there are no unit icons showin[lg.Menu 8 (Division select) DIV 1This is primarily a branch menu fODr the selection <strong>of</strong> your DIV 2divisions. To the left <strong>of</strong> the menu, thhe time <strong>of</strong> day and date DIV 3are displayed. Underneath is a des6cription <strong>of</strong> each <strong>of</strong> thedivisions in your order <strong>of</strong> battle on t the line correspondingto the division number in the menu.17
Use the arrow keys to locate a particular division and then type (RET) to select it.Note that divisions not in the game will be overprinted with a solid bar and notaccessible to the arrow keys.Menu 9 (Division Order)This is primarily a branch menu for the selection <strong>of</strong>divisional orders. To the left <strong>of</strong> the menu, a description <strong>of</strong>the division is provided.You are told the name and type <strong>of</strong> the division, the quality<strong>of</strong> its leadership, administration and supply (poor, fair, goodor excell't) and a percentage estimate <strong>of</strong> total lossessuffered to date.I REG ORDEI[]I SUPPORTI XXASSETSl MOVEHQDivisional leadership is important in combat. It remains fixed throughout the game.Divisional administration is important in regimental resupply, obtainingreplacements and ease <strong>of</strong> movement. It remains fixed throughout the game,unlike regimental administration which fluctuates with the course <strong>of</strong> the battle.Divisional supply is the major determiner <strong>of</strong> regimental resupply. It remains fixedthroughout the game, unlike regimental supply which fluctuates with the course<strong>of</strong> the battle.Use the arrow keys to locate a particular divisional order from the menu and thentype (RET) to select it. Note that divisional orders which are currently not availablefor selection will be overprinted with a solid bar and not accessible to the arrowkeys.Menu 10 (Move XX Ha)This is an action menu. The cursor is centred over the divisional headquarters.Friendly objectives are indicated by flashing target symbols.Use the 1-6 keys or the I,J,K,M keys to select the location you wish the HQ tomove to and then type (RET). If this location is illegal (Le. the computer can't getthere), the error beep will sound and the cursor will return to the Divisional HQ. Ifthe HQ has no movement points a message 'No Movement' will appear in thebottom left <strong>of</strong> the screen and the error beep will sound. Otherwise, you will bereturned to Menu 10 and the word will appear next to the supply rating.In subsequent movement phases, the HQ will move as best it can toward itsobjective. Once it reaches its destination, it will move no further until given a freshorder.In any subsequent turn, a new objective can be assigned to a divisional HQ. Theold objective is voided and the HQ will try to move to the new destination.18IIIA divisional HQ has an important role in the game. It is the source <strong>of</strong> supply for itsregiments, the administrative centre determining how efficiently supplies andreplacements are delivered and a major factor in the ease <strong>of</strong> troop movement.These are the only units in the game over which the player has direct control; Le.which can be directed to a specific hex.When deciding where to place a divisional HQ, keep the following points in mind.Units given reserve orders (either regiments or battalion assets) will head for theirdivisional HQ and deploy once they get within three hexes <strong>of</strong> it. Regimental HQsmust trace a line <strong>of</strong> supply (LOS) to their divisional HQ each turn to receivesupplies and/or replacements. We recommend you keep your divisional HQsabout 6-10 hexes away from enemy units and directly to the rear <strong>of</strong> friendly units.Once you've had a bit <strong>of</strong> experience with their placement, you can try somethingmore adventurous.A divisional HQ functions more efficiently if it is not moved. As far as possible,endeavour to keep to a minimum the number <strong>of</strong> times you must move it.Don't forget your divisional HQsl They never move <strong>of</strong> their own volition unlessthey are on the edge <strong>of</strong> the map or within two hexes <strong>of</strong> an enemy battalion. Youmust place them where you want them. It is easy to overlook them in the heat <strong>of</strong>battle. There is nothing worse than finding your divisional HQ in the front line andrealizing too late that all those troops you thought were refitting in the rear havebeen caught with their proverbial pants down.It is especially important to keep an eye on your divisional HQs when you areexpecting them as reinforcements. No matter what mode they arrive in theyshould be put somewhere safe and useful immediately. If your regiments have noLOS you should check the location <strong>of</strong> the divisional HQ.Menu 11 (Assign Assets)This is an action menu. Use the arrow keys to locate a particular divisional asset. Ifthe asset is currently attached to a regiment, all battalions in that regiment will behighlighted with their specific battalion icon.In the lower centre <strong>of</strong> the screen, the identities and current attachment <strong>of</strong> eachasset are displayed.In the lower left <strong>of</strong> the screen, the current state <strong>of</strong> the battalion is displayed. Youare told the battalion I.D., unit type (INFantry, ARMour or ARTillery), equipmentused (e.g. 45mm AT), fatigue condition (exh'd, tired, fit, fresh), experience(green, trained, veteran, elite), and percentage casualties to date.Once you have located the chosen asset, type (RET) to select it. The battalionmay either be assigned to a regiment or placed into reserve. Use the arrow keysto select between and . If you select ,19
5tth INr·~Assau.1t"'resh'~elite"18~ loss"non Rech5;a ..·REG 251b ..·REG 2~lIIm~IIIf:;!1IIFig 3. Division Asset Display11111111111111 ..111l1li1111111 ...III""1111111 •1111111111111.......you aHe then asked which one. USie the arrow keys and (RET) to make yourdecisidon.Consicder fig 3. This example is from the Iwo Jima scenario. The three battalionassetss <strong>of</strong> the 5th Marine Division andl their current assignment are displayed in thelower centre <strong>of</strong> the screen. The cwrsor on the map identifies the 5th Assaultbattalidon from t~e division.From tthe inforrration in the lower leftt <strong>of</strong> the screen we can tell that this battalion isinfantrry, it is fresh, elite, has taken 1(J)% losses and is not mechanized.Divisiconal assets should be allocatted to the regiment/s which need them themost.. In general, this will be regirments with attack orders or those in tightsituatilions.Each cdivision C.3n have up to four tDattalion assets. Note that the assets <strong>of</strong> onedivisioon are not transferable to anoth er division.The tyype <strong>of</strong> batt3.lion asset is important when deciding assignments. For example,assault guns, assault engineers and artillery are very useful in attack while antitankguns, tank destroyers and the ubiquitous artillery will be <strong>of</strong> use in defense.Keep a careful eye on the condition <strong>of</strong> your battalion assets. Place them intoreserve when they become ineffective; Le. their losses exceed 50% and/or theyare exhausted. Battalion assets assume the supply state <strong>of</strong> whatever regimentthey are attached to.Battalion assets placed in reserve will head for their divisional headquarters anddeploy once they are within three hexes <strong>of</strong> it.The assignment <strong>of</strong> battalion assets does not become irreversible until isselected. Until that point, you may return to this menu and reassign any or all <strong>of</strong>the battalion assets.Menu 12 (Allocate Off-Board Support)This is an action menu. The information to the left <strong>of</strong> the screen tells you the time<strong>of</strong> day, the date, the current air power situation (Le. which player controls the airand to what degree), the number <strong>of</strong> <strong>of</strong>f-board support points (OBS) which may beallocated and the number still to be allocated this turn.Use the arrow keys to locate a particular regiment and then enter the number <strong>of</strong>support points you wish to allocate to that regiment. You can cancel an entry byhitting the space bar or by going back to the regiment and re-entering a newnumber. You will not be allowed to allocate more support points than you haveavailable nor will you be able to access regiments not yet active.Consider fig 4. This example is from the Iwo Jima scenario. The three regiments <strong>of</strong>the 5th Marine Division have various attack and defend orders. The air support isstrong Allied. A total <strong>of</strong> 38 OBS points are available and 19 have been allocated tothis division.In general, regiments with attack orders (especially assault) should get the mostsupport. Regiment~ in tough/desperate defensive situations also need all thehelp they can get. However, support points are most effective when assaulting orexploiting, and less effective in all other situations.Correctly proportioning support to your regiments will have a major effect on theoutcome <strong>of</strong> most battles. Be careful not to forget that you have up to threedivisions; don't allocate all your support points to just one <strong>of</strong> them without goodreason. There will be some occassions when you will have an overwhelming forceand at these times you can afford to use all your OBS points <strong>of</strong>fensively.Remember that artillery is especially effective against targets in open terrain.As with aI/the menus in this game, the decisions made here do not become finaluntil you go back to Menu H and select . Up until that point, you cancome back to this menu (or any other for that matter) and re-allocate the supportpoints as many times as you wish.20 21
Menu 14 (Regiment Action)This is a branch menu. The information displa~ed to the left <strong>of</strong> the menu tells :youthe division and regiment 1.0., the type <strong>of</strong> regiment, regimental leaderslhip,22derendexploitpr()beFig 4. Off-BoardSupport13 Regiment OrderREG 1:::REG 2:::REG 3:::REG 4:::REG1REG 2This is a branch menu. Use the arrow keys to locate aparticular regiment and then type (RET) b select it.REG3Regiments not in play (either not presert or futureREG 4reinforcements) will be overprinted with a solid bar and notaccessible by the arrow keys.The divisional 1.0. is displayed in the lower left<strong>of</strong> the screen. Each regiment's 1.0.and current order appear in the lower centre <strong>of</strong> the screen on the IIinecorresponding to their position in the menu.311 5'1-administration and supply state (poor, fair, good, excel't).percentage losses to date and the brittleness level if onehas been set.The regimental headquarters is attached to a singlebattalion from the regiment, usually the one farthest fromenemy units.ENGAGEDCONTACTEADY08Throughout the game, the location <strong>of</strong> the regimental HQ ~i11 shi~ from battalion tobattalion in response to the ebb and flow <strong>of</strong> battle. There IS nothing the player cando to affect the location <strong>of</strong> the regimental HQ.They cannot be destroyed until the last battalion from the regiment is destroyed.Note that the regimental HQ can be located with a battalion asset assigned to aregiment.At every stage <strong>of</strong> the game, an active regiment (Le. one with at least one battalionon the map) will be in one <strong>of</strong> three states. These are , and. The computer determines which state the regiment is currently in.The current state <strong>of</strong> a regiment determines which actions it may perform.A regiment in an state is more or less toe to toe with the enemy. Asa useful rule <strong>of</strong> thumb, a regiment will count as engaged whenever two or more <strong>of</strong>its battalions are within two hexes <strong>of</strong> the same enemy unit.A regiment in a state is in proximity to enemy units. At least onebattalion is within two hexes <strong>of</strong> an enemy unit.The enemy unit responsible for triggering an or stateis identified by the target icon.A divisional asset cannot trigger the or state unlessthere are no non-artillery battalions native to the regiment left.In other circumstances, a regiment is in a state.Thus, only one <strong>of</strong> the three regimental actions is available to the player. The othertwo are overprinted with a solid bar and are not accessible to the arrow keys.A regiment will keep the same action from turn to turn unless you step in andissue new orders provided the combat state does not change. If the combat statedoes change (e.g. from to
Menu 15 (Detailed 0 B)This is an information menu. Use the arrow to cycle through each battalion. /All <strong>of</strong>the battalions in the regiment are identified by their specific unit icons. Assetsattached to the regiment from the divisional reserve are also included.The information presented here is identical to that obtained for friendly ILInitsunder the map walk routines.It is a good idea to have a careful look through your OBs on the first turn amd atregular intervals throughout the game. Once a regiment's average casualties :startto mount, you must plan to have it relieved before a real disaster can occur.Never forget that the worst casualty rates occur when your men are worn out,hungry and have already sustained substantial losses.Menu 16 (Ready Action)This is an action menu. Use the arrow keys to locate theaction <strong>of</strong> your choice and then type (RET). There are fouractions which may be made by a regiment in a state.RESERVEOBJ'TIVEENEMY IIDEPLOY(a). Reserve. A regiment given reserve orders will attempt to move its battallionsbehind its divisional HQ and deploy them there. A battalion with a delployinstruction will seek out the best defensive terrain in the immediate vicinity.A regiment in reserve is more likely to recover fatigue, receive replacements, beresupplied and to re-establish its administrative routine than a regiment in anyother state. This refitting procedure will be much enhanced when the compolnentbattalions <strong>of</strong> the regiment are more than two hexes from enemy units.The reserve state is an inefficient formation for fighting so you have to be calrefulwhen issuing this order. It is always a bit tricky to rescue a regiment from a itightcombat situation. Please see the notes on the action under Menus17 (Contact Action) and 18 (Engaged Action). .Selecting a state under the menu is usually pretty safe.Just make sure your divisional HQ is out <strong>of</strong> harm's way and 6-10 hexes clear <strong>of</strong>enemy units.(b). Obj'tlve. Use the arrow keys to locate the friendly objective <strong>of</strong> your choice~ andthen type (RET) to select it. As each objective is located, information describiing itappears to the left <strong>of</strong> the menu. Please see the notes under Menu 6 (ExarmineObjectives) for full details.The order in which the objectives are presented is not random. Wfhen is selected, the first objective shown is the objective the regirmentwould have if it was computer controlled. This is purely for your information andhas no effect on the playing <strong>of</strong> the game.Once an objective is chosen, the component battalions <strong>of</strong> the regiment(including any battalions assigned from the divisional reserve) will move towardsit, generally selecting the quickest route.This action is the principal means <strong>of</strong> manoeuvre for uncommitted regiments. Useit to get your men into position prior to engaging the enemy.(C). Enemy II. Use the arrow keys to locate the enemy battalion <strong>of</strong> your choice andthen type (RET) to select it. As each enemy battalion is located, informationdescribing it appears to the left <strong>of</strong> the menu. Please see the notes under Menu 7(Examine Map/Units) for full details. Only those enemy battalions within 8 hexes<strong>of</strong> the friendly regimental HQ battalion can be selected by this action.Once an enemy battalion is chosen, the component battalions <strong>of</strong> the regiment(including any battalions assigned from the divisional reserve) will move towards it,following the most direct route.You use this'action to send your men into battle!(d). Deploy. This action is chosen in those circumstances where there are noenemy units nearby but nevertheless you wish the regiment to remain in place,presumably to counter a future threat. Individual battalions will seek out the bestdefensive locations in the immediate vicinity within supporting distance <strong>of</strong> eachother and await your further instructions.Remember that is the default action for the state. Thismeans that a regiment given a order while in the statewill revert to a order if its state changes to . You shouldcheck on the orders <strong>of</strong> battalions given orders if you wish them toremain in reserve. See Menu 14 (Regiment Action) for full details.Menu 17 (Contact Action)This is an action menu. Use the arrow keys to locate theaction <strong>of</strong> your choice and then type (RET). There are fouractions which may be made by a regiment in a state.RESERVEDEFENDSUPPORTPROBE(a). Reserve. This action has the same effect as it does in the preceding menu(and the following on~ for that matter). You just have to be more careful whenusing it as enemy units will be much closer to you.If at all possible, commit a fresh regiment to the front before withdrawing a wornout one. Sometimes this is not possible and YOU'll just have to hope that yourmen can outrun their pursuers. Remember the enemy will be operating in hostileterritory while you will (hopefully) be in friendly territory.(b). Defend. This action is basically self-explanatory. Battalions within two hexes<strong>of</strong> enemy units dig in in situ while others in the regiment deploy to the bestdefensive terrain in their immediate vicinity.24 25
Certain ranged units can be effective up to 15 hexes from their target. It is quiteimportant to remember that the exact positions <strong>of</strong> the opposing battalions matteronly ins<strong>of</strong>ar as battalions must be within 2 hexes or within range <strong>of</strong> an enemy unitto fight.A battalion under attack can receive support from friendly battalions within 2hexes (or range) <strong>of</strong> itself. Battalions with the same regimentall.D. are much morelikely to provide support. Try to keep your regiments as concentrated as possible.As a result <strong>of</strong> combat, battalions will lose strength points and become fatigued.They may even rout if the battle goes too badly against them. Rout is a generalterm used here to cover a number <strong>of</strong> different states. Essentially it means unitsunable to undertake organised activities within the normal military framework. Forany given combat state, the higher the experience <strong>of</strong> a unit the less likely it is torout, and the quicker it is to· recover. Elite roops are very hard to shift andreorganise very quickly.Routing battalions are readily identified on the screen by their distinctive icons.The supply, and to a lesser extent the admin\. values <strong>of</strong> the regimental HQ arereduced in proportion to the intensity <strong>of</strong> the battle.In addition each side may have a brittleness level set when the scenario wascreated. If a formation has been flagged as brittne and its losses are greater than orequal to the brittleness level then its supply and admin values will be zeroed andthe units themselves will suffer attrition. This is to simulate the total loss <strong>of</strong> higherorganization, even though the men may still be in the field. Naturally units in thiscondition are more likely to rout.Even if a brittleness level is set, not every formation need be brittle. A brittleformation will have the brittleness level indicated to the right <strong>of</strong> the leadershipfactor in Menu 14. If the casualty level below itt equals or exceeds the brittlenessfactor you are in trouble. ~A brittle division affects divisional supply and admin and any divisional assets. Abrittle regiment affects regimental supply and admin and all component battalions.A brittle battalion which routs will be removed from play at the beginning <strong>of</strong> thenext turn.Whenever a regiment executes an attack order you will receive a report providingyou with the details. Losses will be specified as Light, Medium or Heavy. Thisrepresents the strength point loss as a proportion <strong>of</strong> current strength and is thusa relative measurement. Attackers losses are calculated on the total strength <strong>of</strong> allattackers.The combat report also shows the orders for alttacker and defender and if OBS is·allocated it is described as Light, Medium or Hleavy (LGT, MED, HVY). The orderdescriptions are more precise for one or zero player games.Fatigue losses are not shown in the combat relPort but you should check on themthrough the various status reports. You must hit the space bar to proceed.28AXIS DErENDER145 R~t ", 189 DIYdefenano lossesALLIED ATTACKERR.. C.. T.. 27 I"~ 5th DIY,exploit .,' OIS hvyno lossesFig 5. The Combat ReportConsider fig 5. The battalion under attack is identified by the target icon. It is anAxis battalion from the 145th regiment <strong>of</strong> the 109th division. It has a order. It is being attacked (using a order) by the 27th R.C.T. <strong>of</strong> the5th Marine Division. Despite heavy OBS on the Allied side, neither side took anylosses.In addition to the regimental battles displayed in the combat reports referred toabove, all other opposing units adjacent to each other are subject to the minorcombat routine. The results <strong>of</strong> this routine are not displayed on the screen.Battalions may suffer fatigue and/or strength point losses as a result <strong>of</strong> minorcombat. Minor combat ignores the presence <strong>of</strong> OBS points.The higher the experience level <strong>of</strong> a battalion, the more damage it can cause andthe less it takes from minor combat. Adverse factors for minor combat are lack <strong>of</strong>supply, high fatigue and high numbers <strong>of</strong> adjacent enemy units. Only routedunits can actually be KIA'd in minor combat.Minor combat does not occur at night, unless a side been flagged as night29
capable. Night capable battalions meeting the normal minor combat conditions willconduct minor combat at night. This simulates aggressivre night patrolling andcombat. In all other respects they are identical to normal battalions. Night capablebattalions still suffer the normal penalties if they commit a regimental attack atnight.Night capability is indicated under the reports menu.Mines and FortsMines and forts in <strong>Halls</strong> <strong>of</strong> <strong>Montezuma</strong> affect both mov'ement and combat. Abattalion moving onto an enemy minefield or fort cannot move any further thatturn. Minefields and forts are automatically cleared at the end <strong>of</strong> turn, unless thebattalion conducts or is the target <strong>of</strong> a regimental attack, in which case it has a50% chance <strong>of</strong> clearing the minefield. Even if a fort or minefield is cleared in oneturn, the unit's movement allowance for the next turn is zerroed. That is, once youhave moved onto a mine or fort hex, you cannot move <strong>of</strong>f Ulntil it is cleared, or yourout. A unit on an uncleared mine or fort hex blocks movement through that hex.An enemy fort or minefield will not be removed unless it i:s cleared by a friendlyunit. Until it is cleared, an enemy fort or minefield hex will remain enemycontrolled.Minefields (but not forts) cause losses in strength and fatigue, and will continue tocause these losses until cleared. In any turn, a unit on an enemy fort or minefieldis also very vulnerable to minor combat, and incapable <strong>of</strong> inflicting minor combatlosses on the enemy.Friendly minefields have no effect. Friendly forts use the movement and combateffects defined for them in the construction kit. In a regimental attack on a fort, anyengineer battalions (only), treat the terrain as being combat effectiveness (7) Le.the easiest terrain for combat.Routed units cannot clear minefields nor do they suffer any extra penalties forbeing in a minefield. There are no penalties for being in a minefield hex on a nightturn, nor can mines and forts be cleared on a night turn.Any enemy minefield or fort hexes occupied but not cleared at the end <strong>of</strong> thegame are still enemy controlled. This means you will recei've no victory points forthose hexes.These routines'mean undefended minefields or forts sllow movement withoutdoing much damage. Defended minefields, or worse' still, minefields withdefended forts behind them can cause a lot <strong>of</strong> grief.SpecIal UnIts. These are units showing the paraChute, glider or landing craft icon.While showing this icon parachute or glider units are especially vulnerable tominor combat. They only show the icon on the first turn that they land. Landingcraft will suffer special attrition if there was space for them to land at the beginning30<strong>of</strong> the turn and there wass an enemy unit within two hexes. If there was no spaceth~y are deemed to be kkeeping a prudent distance <strong>of</strong>fshore until such a spaceanses.7. THE MOVEMENT ROUTINESOnce the last combat rE"eport has been displayed, the movement routines areactivated. The computer I determines in which order the regiments will move. Thisis based on admin, expoerience, supply, leadership, current order and a smallrandom component.If necessary, the movemoent routine will be divided into a series <strong>of</strong> pulses. This isto ensure that no single ~ ~attalion moves more than 4 hexes (or 8 hexes along aroad) before every battahhon has had a chance to execute its order. There can beas many as 16 pulses!Objectives may now bea allocated to a particular division during the creationprocess. A computer ccontrolled player will attempt to take or re-take thoseobjectives Y:'ith the speocified division. A human player can naturally issue anyorders he Wishes. Howe9ver, if an enemy unit is KIA'd, your battalions will moveafter combat ~owards a d~ivisional objective, if it exists. Therefore you should eitherco-operate With the compputer or remove the divisional objective allocation in theWarp/an. The current di~visional objectives will be listed on the bottom left <strong>of</strong> thescreen under the reportss menu.The menu window will di isplay the word throughout the duration <strong>of</strong> themovement routines. The3 screen will centre on each regiment as it moves. Onceall movement is completee, the turn is over and the next turn will begin.8. WINNING lfHE GAMEThe game will end with thhe completion <strong>of</strong> the movement routine on the last turn. Itis always a pm turn.The victory screen will aappear and summarize the players' performance. FIg 6shows a typical result scrd"een.This ex~mple is from tithe Iwo Jima scenario. The Axis have destroyed 32mechanized SPs and 1001 non-mechanized SPs. The Allies have eliminated 36mech SPs and 942 non-nmech SPs. The Axis have accumulated 1614 VPs for thecontrol <strong>of</strong> objectives thrO"oughout the game for a total <strong>of</strong> 2700 points while theAllies have scored 37500 objective points to make their total 4728, a crushingvictory to the Allies.31
t ••••••••••••••••••••••••••••••••••••••••••• .. ••••••••••••• ,':TlnE:'6th nAR 1945.: HAND I CAP :.even.· ·..·..·..· AXIS·· ..· ·.., ,......·..·........A:LLIED.........·....··..·JAPANUNITED STATESIwoJi"a Garrison y nari'ne ARPhib.naj .Ge'n I SChRi dt...........................................................Gen. KllribayashiI••••••••••.. •••••••••••••••••••••••••••••,nECHHON nECHOBJECTIVESTOTALSnaj . Gen. SChRidt wi ns by': ;2828:' pointsHit (RET~ to return to Rain Renu9. TACTICS321"i~'~""J'i'~~"""""""""""""""'1Fig 6. The Victory ScreenSome parts <strong>of</strong> he game are so vital to playing it propeJrly that they need to bespecified in one place rather than scattered throughout the menu explanations.They are comb,t and supply.Combat. There are many factors in the game that are comsidered in the resolution<strong>of</strong> combat. The most important <strong>of</strong> these are the fatigue state, casualty level, andsupply state <strong>of</strong> the troops. Deficiencies in anyone <strong>of</strong> t1hese areas can make aserious difference to combat performance. These tare variables that areimmediately affected by your command decisions amd deserve your closestattention.Tired or exhausted men cannot fight effectively. A combat result can cause loss<strong>of</strong> strength, fatgue or both. Thus men can lose fatigue ·IPoints in combat In bothattack and defence. Each attack can cost fatigue pointis and repeated assaultswithout a breakwill cause extra fatigue and supply losses.Fatigue is recovered best at night by sleeping, and attacking at night will certainlycause fatigue losses and should only be done where really nece,ssary. There are,however, some good reasons for attacking at night. These wou Id Include havinglarge amounts <strong>of</strong> <strong>of</strong>f-board support, the fact that your opponents air power makesattacking during the day very difficult, or having so many men that you can affordto have some attack at night to keep up constant pressure on the enemy. Themain point is that troops fighting both day and night will rapidly becomeexhausted.Night capable troops will conduct minor combat at night without fatigue loss.Moreover, any aBS allocated to them for a regimental attack automatically arrivesas it does during the day. Non night capable units have only a 50% chance <strong>of</strong>receiving allocated OBS. Night capable units still receive normal 'fatigue penaltiesfor regimental night combat.Regiments in reserve will recover fatigue much faster than regiments in any otherstate and tired units should be placed in reserve to allow more rapid recovery.Attacking with units that are tired or exhausted invites disaster.Units lose effectiveness as their casualty level mounts, over and above the actualloss <strong>of</strong> strength points. Any battalion with over 20% casualties is a definitecandidate for reserve, and units with over 50%, even if they remain on thebattlefield, are not very useful. If units are brittle you must try to keep casualtiesbelow the brittleness level. Brittle units will never recover and willi eventually die <strong>of</strong>attrition, ·even if they are not in combat.Casualty levels are not the absolute totals <strong>of</strong> killed and wounded. Rather theyreflect the steady lowering <strong>of</strong> the number <strong>of</strong> men willing and alble to effectivelyfight the enemy. Most <strong>of</strong> the casualties will not be hurt at all but are out <strong>of</strong> contact,cut <strong>of</strong>f, confused or leaderless, pinned down or otherwise ineffective.Putting such a unit in reserve will allow re-organization and replacement and willeventually restore it to a reasonable fighting condition. A unitt committed andtaking too many casualties may break and rout. A routed unit is no longer effectiveas a fighting force and will usually retreat towards its divisional HQ..Routed units may not be targeted for normal combat but will suffer additionallosses if they are adjacent to enemy units. Any unit sufferin\g overwhelmingcasualties may simply cease to exist for game purposes. Such a unit is noted asKIA and disappears from the game.Supply. The toughest unit is helpless without bullets and useless without food.The regimental supply level is used for combat purposes. Its likelihood <strong>of</strong>replenishment is related to its current order (reserve is best, assault is worst), thedivisional HQ supply value and both HQs' admin values.The divisional HQ supply and admin values do not change! If these are low youhave to be extra careful in selecting an attack philosophy. Although a regimentmay start with decent supplies, resupply will be a chancy procedure. Naturallyattacks use a lot <strong>of</strong> supply, so avoid unnecessary combat.33
Even if divisional supply is good, each regimental HQ must trace a line <strong>of</strong> friendlycontrolled hexes to the divisional HQ to establish resupply for each regiment. Youwill be told if the LOS is open or cut. If it is cut, you may have to move yourregiment or your HQ or both. Placement <strong>of</strong> the divisional HQ is critical.As a special concession to amphibious operations, regimental HQs can tracesupply to divisional HQs located <strong>of</strong>fshore, Le. showing the special landing crafticon. Once the HQ has landed the normal rules apply.Terrain prohibited to mech units and the presence <strong>of</strong> enemy units may also blocksupply. If your LOS is blocked you cannot afford to wait too long beforeunblocking it.PART TWOTHE SCENARIOSHowto WinThere is no such thing as a lucky turn. A good technique can overcome mostreverses. Bad play turns reverse into disaster. A few principles to help you avoiddisaster are set out below.Keep a reserve. Your div HQ has to be about 6 hexes away from the enemy tomake this possible. If you don't have that room, fight like crazy to create it. Don'tcommit your reserve until you have made provision for a replacement.Use the right men for the job. Historically, the best formations got more than theirshare <strong>of</strong> tough jobs, for very good reasons. You will find those reasons equallycompelling.Give the right job for the men. Even inferior troops who are strategically on thedefensive can and should attack, at least occasionally. Judicious use <strong>of</strong> probeswill cause extra fatigue and supply losses to the attackers. They will probably winanyway but be in worse shape after the victory than if a purely passive defensehad been maintained. If your probe catches an attacker during a prepare he willcertainly suffer.Manage your assets. In one sense all your troops are assets and your job is to usethem correctly. The divisional assets provide a useful illustration <strong>of</strong> this. Theyshould be checked every turn to ensure that they are being used in the mostefficient manner possible. The techniques for managing them successfully applyto the rest <strong>of</strong> your troops. Apply those consistently and you'll be hard to beat.oooooA HISTORY OF THE USMC[The Marines got their reputation as fighters because] "they startedright out telling everybody how great they were. Pretty soon they gotto believing it themselves. And they have been busy ever sinceproving they were right" Sergeant Walter Holzworth, USMC, 1935THE EARLY YEARS'~ Marine is a sort <strong>of</strong> ambidextrous animal- half horse, half alligator.His duties alternate between those <strong>of</strong> a soldier and a sailor. He is abeing for whom the genuine tar entertains very little respect, and onthe other hand, his contempt is repaid... " Schoolmaster aboard theUSS Constellation, 1830Marines in their modern form were first created by the British in 1664, who formedthe Duke <strong>of</strong> York and Albany's Maritime Regiment <strong>of</strong> Foot to provide soldiers whowould be under the control <strong>of</strong> the Admiralty. Their duties in ship-to-ship combatincluded sniping with muskets, repelling boarders and SUbstituting for casualtiesanyWhere aboard. They were also a part <strong>of</strong> ship's landing parties, and were usedto enforce discipline and to protect <strong>of</strong>ficers from a mutinous crew.The leaders <strong>of</strong> the American Revolution soon realized that they would have t<strong>of</strong>ight a naval war, and that they would need marines for the same reasons thatother navies had them.The Continental Congress passed a resolution on November the 10th, 1775 thattwo battalions <strong>of</strong> marines be formed, but due to disagreements about where to34 35
actually obtain the personnel, the forrce was never raised. However, the USMCstill celebrates this date as its birthday,.The first commission as Captain <strong>of</strong> IMarines was issued to Samuel Nicholas <strong>of</strong>Philadelphia on November the 28th 1J 775. Nicholas was chosen because he waswell known in local sporting clubs, amd because his vocation as an tavernkeeperwould help him enlist the working class. In January 1776 the 230 strong marinecontingent boarded the five vessels (Of the fledgeling Continental Navy and wentto sea for the first time.After sterling but undistinguished serwice in the raiding and minor naval battles <strong>of</strong>the time, a battalion <strong>of</strong> marines joine(d the Army for a land battle at Princeton onJanuary 3rd 1777. The brigade to Whlich they were attached attacked two BritishRegiments in place, and fell back ,after heavy losses. Diminished by death,desertion and disease, the remnants ,were dispersed into regular Army units.Not until 1798, when the USA was drilfting into an undeclared war with France, didthe Congress provide itself with .a permanent naval force by creating aDepartment <strong>of</strong> the Navy. On July thEe 11th <strong>of</strong> that year they passed "An Act forEstablishing a Marine Corps". Frorm the very start it was envisaged that theMarines would serve on shore and at $ea.The authorized strength <strong>of</strong> the Mariine Corps was originally 865, but it neverapproached this number due to reCiruiting problems. Seafaring men could getbetter pay as sailors, and military men! did better in the Army.In the Quasi-War with France there- were few opportunities for the Marines toprove themselves in combat, as mostt battles were decided by manoeuvrability orarmament; seldom were the contestants close enough for the Marines' musketryto tell. Nevertheless they proved t1heir worth repelling boarding parties andquelling potential mutinies.Between the Quasi-War and the war (<strong>of</strong> 1812, the Marines participated in the warswith the Barbary States, the group) <strong>of</strong> countries from Morocco to Libya whoharboured the most voracious pirat es on the sea. The Marines got plenty <strong>of</strong>chances to show their skills, as the EBarbary crews' form <strong>of</strong> combat was to boardthe opposing ship at every opportunit.y. One small group <strong>of</strong> Marines was involvedin an extraordinary trek by a private arrmy from the Nile to the Mediterranean coastat Derna, capturing the town and holdJing it against siege for two months.The war <strong>of</strong> 1812 saw the Marines at sea again, still struggling with the sameproblems <strong>of</strong> recruitment and fracas \With the two Services. However, they earnedsome glory on land. The British lan
home. Henderffion took every opportunity to to fight in order to secure theMarines' future cas an independent force; this was a opportunity not to be missed.When the Arm}y reached Mexico City on the 8th <strong>of</strong> August 1847, the Marineswere disgusted at having been used to guard the supply trains, thus missing thebattles (such as; they were) so far. The battalion <strong>of</strong> 357 men was commanded byLieutenant Collonel Samuel E. Watson, and was attached to the division <strong>of</strong>Brigadier Generral John A. Quitman.Scott's Army nwmbered 10,738 men, and faced a Mexican army <strong>of</strong> about 32,000commanded bW the self-styled Napoleon <strong>of</strong> the Americas, Santa Anna. TheMexicans were massed south <strong>of</strong> the city (the direction from which the Americanswere approactning). so Scott decided to attack from the west. On 7th <strong>of</strong>September he lused Brigadier General William J. Worth's division to assault agroup <strong>of</strong> heavy fstone buildings called Molino del Ray, which guarded the westernapproaches an(d were resolutely defended by the Mexicans. They took it, butruined the divisiion in doing so.On Monday, 133th <strong>of</strong> September the attack proper started. The first and mainobstacle was Chapultepec, a steep hill surrounded by walls, which bore theMexican militarw academy on its crest. It was defended by about 900 soldiers an9a handful <strong>of</strong> camets - known ever afterwards to Mexicans as the Ninos Heroicos.Quitman's divisiion was assigned the difficult south face, as a diversion from themain attack by !Brigadier General Gideon Pillow's division up the west face. To theeast <strong>of</strong> the hilt, tthe Mexicans had garrisoned a vital road junction with a battery <strong>of</strong>artillery and sorme entrenched infantry.The attack was .a success. Special storming parties, including some Marines, wereformed and eqwipped with ladders and pick-axes. These were to take the lowerwalls while the bulk <strong>of</strong> each division provided covering fire. They were quicklypinned down umder the intense crossfire from the walls and from the force at theroad junction.Then, by sheer' persistence the pioneers <strong>of</strong> Pillow's division won the walls, andthe brigade om the right flank cleared the road junction. the bulk <strong>of</strong> bothdivisions, inclucfjing some Marines, swept up the hill and captured the fortress.The Marines hacd suffered 24 casualties.Captain George H. Terrett took his company <strong>of</strong> about 30 Marines and raced upthe western cawseway towards the San Cosme gate, the last defended positionbefore Mexico
AS THE MEXICANS, there is only a limited amount you can do to affect the garme.Make an immediate and swift advance down to the objectives at the south <strong>of</strong> theboard, and try to capture one <strong>of</strong> them. You will have to attack very carefully" asyour <strong>of</strong>fensive capability is small. Be prepared to run back to the city as soom asthe US approach the Belen Gate.AS THE US, you must make the running. Assault Chapultepec defenders andtheir supporting units with ·everything possible until they are eliminated, as ttheyblock your way to the city. Then advance along both causeways towards MeXKicoCity. Pillow's division should take Belen Gate and Quitman's division the SanCosme Gate. After that you will have some street fighting in Mexico City. You 1willhave to fight your way through a fair few units to be able to take the <strong>Halls</strong> in time.Scenario Variants1. Assume the Americans had launched their attack from the south, their directtion<strong>of</strong> approach. Move all US units to the southern board edge east <strong>of</strong> the swamp.2. Assume the Americans had suffered more disease and supply difficulties I(asthey might well have done). Reduce all US admin and supplies to 2.FROM MEXICO TO FRANCE"It is as artillerymen aboard our new floating batteries that their [theMarines1 importance must be felt and acknowledged in the future"Commandant Heywood, 1891"If the Marine Corps be utilized as an Advance Base organization, itwould have the opportunity to share with the Navy the glory alwaysresting on those who strike the first blows at the enemy, andit wouldhave the satisfaction <strong>of</strong> feeling that it had an important, semiindependentduty to perform" Future Commandant Lejeune, 1916Henderson used the good feeling won in the Mexican War to the Corrps'advantage, winning an increase in the size <strong>of</strong> the Corps in 1859.The Marines were kept busy in the period before the Civil War by the increaS3eduse <strong>of</strong> landing parties to protect American interests in unsettled parts <strong>of</strong> ttheworld. In Nicaragua, Fiji and China, as well as Seattle, Philadelphia amdWashington D.C., the Marines were instrumental in keeping the peace amdquelling disorder.The Marines were involved in the very beginnings <strong>of</strong> the Civil War. When JrohnBrown's body <strong>of</strong> men captured the arsenal at Harper's Ferry, Virginia, it was ttheMarines who were called in to resolve the situation. Led for the occasion byColonel Rolbert E. Lee, they decided to storm the small firehouse in which theinsurrectioni'sts had barricaded themselves. One Marine was killed in the attack.The first Marine Corps action during the Civil War was in the first big battle <strong>of</strong> thatwar, First Bull Run (Mannassas). A battalion <strong>of</strong> 336 raw recruits and 12 <strong>of</strong>ficerswere attached to 1st Brigade <strong>of</strong> the 2nd Division, and were detailed to accompanyD Battery <strong>of</strong> the 5th Artillery. As luck would have it, this battery was chosen to leadthe attack om Henry House hill.Forming a battle line with two New York regiments, the inexperienced Marineswere steadied\!2y the presence <strong>of</strong> the few veterans in the force. Finally aConfederate cavalry charge broke the line, and the Marines, followed soon by therest <strong>of</strong> the Union army, turned and ran.The Marines performed rather better on land during this war. Not involved in any<strong>of</strong> the great campaigns, they did develop a reputation for military discipline andefficiency as; guards, and helped put down the draft riots in New York City in 1863.In their tradfitional role as ships' guards they excelled. Agreeing to handle theships' guns" they helped relieve the chronic shortage <strong>of</strong> sailors. The Marineswere constantly commended by their ships' captains for valour and exemplaryconduct under fire throughout the war. In almost every significant navalengagemen in the Civil War, at sea or in the river flotillas, the Marines played theirpart and morre.The U.S. Navy'S last and largest landing <strong>of</strong> the war was also its greatest failure.The plan was to land Marines and sailors on the northeast corner <strong>of</strong> Fort Fisher,guarding the entrance to the port <strong>of</strong> Wilmington, while the Army assaulted thenorthwest ccorner. As the sailors did not have many long guns, the Marines wereto provide cowering fire while the sailors made the attack.The sailors \Were given the order to charge before the Marines had deployed t<strong>of</strong>ire, and some Marines joined the rush in the confusion. The Confederatedefenders slhot the attack into the ground, causing the sailors to break and run.The attack cost 61 Marines and 325 sailors, for probably no losses to thedefenders.After the Ci\,l il War the Corps settled into the old routine <strong>of</strong> defending itself againstthose who would abolish it, and arguing for greater numbers. Manpower was still aproblem.The Corps continued to carry out its traditional role as the Navy's police, and made24 landings in the 23 years from 1866. The new Commandant, Charles G.McCawley (iappointed in 1876), finally acted decisively on the <strong>of</strong>ficer problem.From 1882 [nearly all new lieutenants were graduates <strong>of</strong> the Naval Academy.Again pay, conditions and uniforms <strong>of</strong> the enlisted men were improved, and theCorps reacqluired a reputation for smartness and efficiency.The Spanishl-American War was declared by the USA over Spanish unwillingnessto let go <strong>of</strong> its Caribbean colonies, Cuba in particular. When the battleship Maine
lew up in Havana harbour (probably due to internal problems rather than Spanishhostile action) the press seized the opportunity to talk up the incident into a casusbelli. War was declared on April 21 st,1898.Even before the war started the Marines distinguished themselves. One <strong>of</strong> theheroes <strong>of</strong> the Maine incident was a Marine orderly who helped the ship's captainto safety. The Congress demanded action, and Colonel Heywood scentedanother chance to increase the Corps. They were allowed another 43 <strong>of</strong>ficers and1,640 men, the largest increase in their history so far.In the two decisive sea-battles <strong>of</strong> the war - Manila Bay on May 1st and Santiago deCuba on July 3rd - the U.S. Navy won crushing victories, sending nine Spanishships to the bottom. Ships secondary batteries, only some <strong>of</strong> which were mannedby Marines, played a minor role in the combats.The Marines performed better on land than at sea. They raided the Cuban coastand destroyed a Spanish shipyard in the Philippines. But their moment <strong>of</strong> glorywas to come. A Marine battalion <strong>of</strong> 659 was formed and sent <strong>of</strong>f on the secondday <strong>of</strong> the war. The men boarded the overcrowded USS Panther and sailedsouth, with not the slightest idea where they were going or what they were goingto do when they got there.Conditions on board the Panther were less than ideal. After constant quarrelswith the captain <strong>of</strong> the ship, he ejected them at Key West to look afterthemselves. For two weeks they trained, waiting for orders. Finally on June 7ththey reboarded the Panther and sailed to Guantanamo Bay to establish atemporary harbour for the fleet blockading Santiago.The men were unloaded on June 10th to protect the ships from a rumoured7,000 Spanish troops in the vicinity. They set up a oefensive position on somehills close to the beach and waited.On the second night Spanish infantry started a desultory harassing fire on thecamp. The Marines replied from their trenches with a fusillade <strong>of</strong> rifle and machinegunfire, supplemented by a huge naval bombardment.The Spanish repeated the performance for the next two nights, although theynever closed for combat. The Marines were hard pressed, and indeed the roles <strong>of</strong>protector and protected seemed to have been reversed as the Navy's barragescame in each night.O~e .<strong>of</strong> the atta.ched Cuban <strong>of</strong>ficers suggested a foray to destroy the onlydrinking water In the area, and possibly the Spanish camp nearby. Twoc?mpanies <strong>of</strong> Marines took a long, indirect route towards the well, occupying thehili that overlooked the Spanish camp. The Spanish battalion was trapped in thevalley, and after four hours <strong>of</strong> combat, withdrew, leaving 160 dead. The well andcamp were destroyed, and the Marines marched in triumph back to the base.The battle itself was a small affair, but the accompanying c'ontingent <strong>of</strong> newsmenplayed it up. As the first significant fighting on Spanish soil, it was intensively42reported, and the affair was hailed as a triumph <strong>of</strong> Marine skill and determinationagainst great odds.Commandant Heywood parlayed the Marine military and public relations triumphs,and the demands <strong>of</strong> a new and far-flung empire, into a larger and more permanentCorps over the next few years. By 1909 the Corps had grown to nearly 10,000,three times the size it was in the Spanish-American war.The Corps now had a bette,public image than 100 years before. They were seenas the first troops on the scene in a crisis (their recruiting posters said "The First toFight"), and as exemplars <strong>of</strong> military discipline and skill.The naval build-up during the early years <strong>of</strong> WWI helped the Corps' Commandant,George Barnett, to expand the Corps further. The USMC's strength was fixed atone-fifth that <strong>of</strong> the Navy, something they had been pressing for constantly. Thefirst experiments in Marine aviation occurred in this period, with two Marines beingthe 5th and 6th graduates from the Navy's flying school.As 1917 dawned, it became clear to many observers, including those <strong>of</strong> theMarine Corps, that the USA was bound to be drawn in to WWI soon. The Marinesset about making good their boast <strong>of</strong> the time that "We are ready now", Thestrength <strong>of</strong> the Corps increased from 17,400 in 1916 to over 30,000 by the end<strong>of</strong> 1917. As the only all-volunteer force, and the only one that could promiseenlistment for wartime service only - the Army and Navy were legally constrainedto <strong>of</strong>fer fixed terms <strong>of</strong> service - the Marines got the cream <strong>of</strong> the crop.In the middle <strong>of</strong> 1917 the Allies persuaded the US Government to send a tokendivision to the western front to bolster morale. The Marines ensured that a Marinebrigade was included in that division, so that they would be "The First to Fight".The US 2nd division, to which the 4th Marine Brigade was attached, trained hardin France during the winter <strong>of</strong> 1917-18, and no-one gained more respect for theirdedication than the Marines. They were keen to enter combat.The division was put into a quiet area <strong>of</strong> the line near Verdun in March 1918 togain combat experience. For two months the Marines discovered gas warfare,trenchfoot, raids and artillery barrages. After this and some open-fieldmanoeuvres in May, the Brigade was evaluated as probably the best Americanunit in France. However its tactics, use <strong>of</strong> supporting arms and communicationswere deficient - as the experience <strong>of</strong> Belleau Wood would show.2. BELLEAU WOOD"Retreat, hell. We just got here!" Captain Lloyd Williams, USMC1918 was the decisive year <strong>of</strong> World War I. The Russians had surrendered in1917, and huge numbers <strong>of</strong> Germans were transferred to the western front. TheGerman commanders had decided to try to end the war before the new Americandivisions could arrive in numbers. Their massive <strong>of</strong>fensives <strong>of</strong> March-May 191843
threw the Allies reeling back towards Paris, and once again the Frenchgovernment made plans to evacuate th~ city. The US 3rd division played a vitalpart in stopping their drive at Chateau-Thierry.The Germans wheeled right at this check, moving along the Marne instead <strong>of</strong>trying to cross it. This brought them to the area <strong>of</strong> Belleau Wood, from which theyhad ejected the dispirited French in the last days <strong>of</strong> May.The 4th Ma~ine Brig~de was part <strong>of</strong> the 2nd division. They were holding a linefrom the Pans-Metz highway, through Lucy-Ie-Bocage, to Hill 142.On June 3rd. the Germans continued their attack towards Paris, advancing fromthe Wood towards Lucy-Ie-Bocage, the centre <strong>of</strong> the Marine line. The well-trainedMarines held their ground and shot the German attack to a standstill. This was theclimax <strong>of</strong> the German advance.The Germans knew that their advance on Paris was finished, so they dug in insidethe woods and waited. The Marines were not to disappoint them.Early on June 6th. 26 years before D-Day, the Marines went in to the attack. The1st Battalion <strong>of</strong> the 5th Marines Regiment (1/5th Battalion) on the left were to takeHill 142. securing that flank. then 3/5th, 2/6th and 3/6th Battalions were toadvance on the woods and the town <strong>of</strong> Bouresches in the evening.The Marines' inexperience was to cost them dear: they had failed to send outpatrols.to gauge the defence, and ha~ believed the French reports <strong>of</strong> no enemytroops In the woods. The woods had In fact been converted into a mini-fortresswith barbed wire and a network <strong>of</strong> interlocking machine-gun nests. and mannedby an experienced regiment <strong>of</strong> Germans.The epic battle <strong>of</strong> Hill 142 went on all day. At one point the Marines nearly tookTorey. ~t another they nearly lost the ~i11 itself. But by 5 pm, the appointed hour <strong>of</strong>the main assault. they held the hill, depleted but firm.There was no pre-assault artillery bombardment, as this was to be a surprise attack- but the Germans were expecting them. The path <strong>of</strong> the advance took the 3/5thBattalion on the left flank through the wheat fields that had been the grave <strong>of</strong> somany German men three days before. As Sergeant Dan Daly started to lead hismen into the withering fire from the woods, he turned to them and exhorted:"Come on. you·sons-o'-bitchesl Do you want to live for ever?".The centre and right <strong>of</strong> the attack (2/6th and 3/6th 'Battalions) did somewhatbetter. since they ~id not have to cross such expanses <strong>of</strong> open ground as did theleft. One platoon In the centre actually managed to fight their way through theWood. only to be cut down as they emerged into the open.The right flank's task was to capture Bouresches, to anchor that flank <strong>of</strong> the mainassault. Twenty three men, the remnants <strong>of</strong> one company took and held the townfor half an hour against counter-attacks until reinforcements arrived. By the end <strong>of</strong>!he day the 4th Marine Brigade had taken 1.087 casualties (about 60% <strong>of</strong> itsInfantry strength), more than in their entire history up to that point.44•The following day. June 7th, was a day <strong>of</strong> rest for the Marines. Disorganized, withmany small units shattered, it was all they could do to hold their ground and feedin reinforcements and ammunition. The Germans put in an attack at aroundmidnight but were stopped cold.At 4am June 8th the Marines <strong>of</strong> the 3/Gt.n-sattalion were ordered out <strong>of</strong> theirfoxholes again. After 6 hours <strong>of</strong> heavy fighting with no perceptible result. theattack was called <strong>of</strong>f and the battalion withdrawn from combat. The Germandefence had again been underestimated.June 9th was spent in an enormous artillery duel, with the Americans and Frenchraking the woods from end to end. and the Germans shelling Lucy-Ie-Bocage andBouresches and the ground between.On the next day, June 10th, 1/6th Battalion advanced up the long axis <strong>of</strong> theWood from the south. while 2/5th Battalion attacked from the west across thedeadly wheat fields. The two units were able to link up. but. due to exhaustionand casualties, were unable to further dent the Germans' determined defence.The following day saw the 2/5th Battalion advancing. so they thought. north eastthrough the woods. Taking heavy casualties, they struggled in platoons andcompanies through the dense forest. When they emerged from the cover <strong>of</strong> thetrees, they reported back that they had taken the north <strong>of</strong> Belleau Wood.Unfortunately, they had been travelling west, and had merely crossed the Woodat 90 0to the defensive lines. They had accidentally rolled up much <strong>of</strong> theGermans' southern defence line, but exposed their left flank to the remainingGermans.General Pershing had already announced to the world that the Marines had takenBelleau Wood, so the local commanders set about making that news true. Again,1/6th attacked from the south and 2/5th from the east. The Germans wereprepared because the preliminary bombardment had overshot by 1000 yards,leaving the front line undamaged. The Germans fought back with everything,including mustard gas. Despite the fierce combat, the eastern half <strong>of</strong> the Woodwas captured by the Marines that day.Due to the mix up in position, the 1/5th and 2/6th Battalions, coming to relievethe 215th, found the west <strong>of</strong> the Wood full <strong>of</strong> Germans. Finally. on the morning <strong>of</strong>the 15th, the Marines were able to get a toe-hold in the western side <strong>of</strong> thewoods. Gas had caused so many casualties by now that the whole 4th MarineBrigade was jUdged unbattleworthy, and was relieved by the US 7th infantry, wh<strong>of</strong>ailed to make any headway in the next week.To break the log-jam, the 3/5th Marines Battalion was brought back to 'clear' thenorthern part <strong>of</strong> the woods - resistance still being reckoned to be light. TheGermans had manned their line with three fresh battalions, to hold the remainder<strong>of</strong> the Wood. The attack quickly ground to a bloody halt.The whole <strong>of</strong> the Marine Brigade was now recalled for action. At 5pm on the 25thJune an attack went in, after a proper all-day bombardment. The attack was45
spearheaded by the 3/5th Battalion, with the now-veteran 2/5th and 3/6thBattalions on the flanks. The attackers took heavy casualties, but the artillerypreparation had nocked out many enemy machine-guns, and they were runningout <strong>of</strong> reinforcements.On the morning <strong>of</strong> June 26th, men <strong>of</strong> the 3/5th Battalion finally reached thenorthern edge <strong>of</strong> the Wood, and were able to signal "Woods now US MarineCorps entirely".In gratitude for their efforts, the French Parliament declared July 4th that year as anational holiday; the Bois de Belleau would henceforth be known as the Bois dela Brigade de Marine. The cost was 1062 killed and 4121 wounded Marines.The defence by tle Marines saved Paris and removed the last German chance towin t~e war. The assault .also succeed~d, but at a very high cost. In this respectthe high commanders did no worse (If no better), than their contemporariesduring World War I.At .Belleau Wood,. the US Marine Corps came <strong>of</strong> age. For the first time it fought atramed enemy With comparable armament in close combat and had emergedvictorious.'Scenario NotesThe scenario begins when the first German attacks hit the French forces in front<strong>of</strong> the Wood on the 28th <strong>of</strong> May, and continues for 87 turns until the MarineBrigade is withdrawn for refit on the 18th <strong>of</strong> June.The French diviaon is made brittle to simulate the forced withdrawal it made onabout the 1st <strong>of</strong> une. By this time the Germans should have occupied the Woodand Hill 142.Player's NotesAS !HE US/FRENCH player you must first conduct a careful defence with yourfr~glle Fr~nch troops. As soon as a regiment approaches its brittleness rating,Withdraw It. You can <strong>of</strong>ten stop the Germans advancing beyond the Wood untilthe US troops ar ·ve.With the US troops in hand you must make continual assault on the Germans inand around the Wood, where the victory points are. You have good admin andsupply values! so your damaged units will recover quickly. You must, as always,rotate your units as they get tired or low on supplies.AS THE GERMAN player you must qUickly establish yourself in defensive positionsas far forward as possible. If you can disrupt the Americans as they come on theboard, so much the better. Your divisional admin and supply values are not goodso do not indulge in frequent counter-attacks.'Scenario Variants1. Assume the French make a good stand here. Remove the brittleness flag andincrease their divisional admin and supply values to 4. This will unbalance thegame severely, so ...2. Assume the Germans had got their logistics as well organized as their tactics.Increase their divisional admin and supply to 5 each.3. Assume that the Wood had not exercised its powers <strong>of</strong> fascination over theAllied commanders. Delete both objectives for both sides within the Wood, aswell as the two adjacent hills.BELLEAU WOOD TO IWO JIMA"We will not forget you. As we embrace you in uniform today, we willembrace you without uniform tomorrow - er, I mean... "Secretary <strong>of</strong>the Navy Josephus Daniels, to the Women Marines being demobbedafterWWIThe French high command decided to go over to the <strong>of</strong>fensive. The 2nd divisionwas to rush by foot to a sector near Soissons, to the east <strong>of</strong> Belleau. Thedeployment was chaotic, as rain and bad planning had their effects. The Marinesreached the start line only half an hour before the attack was due, without theirmachine-guns.The attack started at 4.30am on July 18th. With no idea <strong>of</strong> the enemy's location orstrength, they set <strong>of</strong>f into the darkness. They managed to clear a forest just infront <strong>of</strong> them, and entered the farmlands beyond. The battalions becamescattered and lost contact with one another by the afternoon. The Germandefence was patchy but fierce when encountered, and casualties in some unitswere heavy. After a quick reorganization they were able to take the town <strong>of</strong>Vierzy, but were unfit for further attacking by nightfall.The next day was much the same, and the brigade suffered nearly 2,000casualties on the two days. The division was once again retired to refit.Back home the Corps benefited from the publicity generated by the Corps'exploits in France. The Corps now grew to 73,000, undreamt <strong>of</strong> before the war.Many <strong>of</strong> these were still doing their traditional duties <strong>of</strong> ships' guards and basesecurity. Some new parts <strong>of</strong> the Corps started to appear: the MC Reserve, begunas a legal fiction to exceed the Corps manpower ceilings; the Women Marines,employed to release male Marines for combat; and MC aviation.The 2nd division had joined the I Corps <strong>of</strong> the new US First Army, which wascomposing itself for its first attack on the St Mihel salient. Between the 12th and16th <strong>of</strong> September the division made salutary advances with minimal casualties.
The dvision was next used in the assiault <strong>of</strong> the German line along tl'1e Mont Blancridge n Champagne. The French hacd lost three divisions on the aplproach to thisheaviv defended line, and were keem to use the relatively fresh US 'troops.The dvision went into the attack on October the 3rd. Two hours af er the assaultstartej, the Marines had taken thelir sector <strong>of</strong> the ridge, despitle the Frenchevaluation <strong>of</strong> the position as impregmable. The Brigade had paid d early, though;one battalion was nearly wiped out. amd all the others took heavy darmage.The rext day they charged down the} other side <strong>of</strong> Mont Blanc towlards the town<strong>of</strong> St. Etienne, now defended by a frffish German division. The Brigade lost 1,100men hat day, their worst single day's; casualties in their history. Over the next twodays lhey tried to capture the towm, but were too understrengtlh to take theobjecuve.The lest major attack <strong>of</strong> the war for thEe 2nd division occurred on Nov/ember the 1stsouth<strong>of</strong> Sedan. The assault broke tthrough the main and secondalry lines <strong>of</strong> theGermms and advanced eight kilomletres in one c;:lay. The divisiom was able toconsdidate its breakthrough with at series <strong>of</strong> night advances, capturing hugenumb~rs <strong>of</strong> Germans.This a:Ivance was still under way whffin the war ended. The Marines: were used as OCcullltion troops and even MPs untiil well into 1919.The ~ar was over. The Marine Coq:DS' badge had never shone SO) brightly, andthey vere a household name. The srmall size <strong>of</strong> the Corps' involvemlent in the warmean that ,it could keep up a levell<strong>of</strong> well trained replacements tthat the Armycould not match.The Corps had learnt a lot about rmodern warfare. The importanlce <strong>of</strong> infantrytactic~, supporting arms, staff work amd communications were all appreciated.After he war the balance <strong>of</strong> power in lthe Pacific altered radically, as the Japaneseoccuped the Marshall, Carolines and Marianas island territories <strong>of</strong> thle old GermanEmpire. The US Navy decided that itt needed a fleet second to nome to deter itsmost Ikely enemy, Japan, and to keelP the British in check.Consequently, the Corps shifted it:s main emphasis to the We~st Coast. Anexpedtionary force <strong>of</strong> at least 6,000> men were to be ready to saiil at 48 hours'notice at all times. The USMC settledl down to the study <strong>of</strong> amphibio)us operationsin gereral and opposed landings in p>articular, as well as continuing) its traditionalduties on ship and shore.A series <strong>of</strong> detailed studies <strong>of</strong> amlphibious warfare and the P:acific theatreprodu~ed a prophetic document, Operation Plan 712, which predic;ted almost all<strong>of</strong> the hazards and factors <strong>of</strong> succes;s experienced in the numerolUS landings <strong>of</strong>'World War II. A number <strong>of</strong> landing e!xercises were conducted in thle Pacific andCaribbean to turn theory into practice, with mixed success, But the 1 Y were on theright tack. .The fundamentals <strong>of</strong> the Marine Corrps' theory were that the Naval commander48must be the overall commander, that intensive and well-directed fire must besupplied from the accompanying ships, that air superiority was essential, and thatproper organization <strong>of</strong> supplies and logistics was vital. Use <strong>of</strong> tanks and artillery inthe first wave was foreseen.Putting the theories into practice proved more difficult. The Navy only possessedtwo transports and refused to build more, presumably thinking that merchantships could be used in time <strong>of</strong> war. No suitable landing craft were developed, andthe Navy was uninterested in developing a sound shore bombardment capability.All these had to wait for solution until war threatened once more.The Marine Aviation units had better success. Their projected use as closeground support saw them actually used in combat in Nicaragua and Hispaniola,and they enjoyed unqualified support from the Marine Corps Headquarters.Fortunately for the US military effort in WWII, the Marines and Navy together facedthese problems in a series <strong>of</strong> exercises from 1935-1939. Eventually the need fora specially-designed landing craft was accepted. It was produced in 1941 - barelyin time. The LCM (landing craft, mechanized) for tanks, amtrack (amphibioustracked vehicle), pin-point naval gunfire with armour-piercing shells, properhandling <strong>of</strong> ship-to-shore movement, casualties and supplies, all came from thesepre-war practice sessions.The start <strong>of</strong> WWII in September did little to change the US military establishment'splans or activities. It was not until the stunning German victories in Norway andFrance that they began to take the situation seriously. An immediate tax increase<strong>of</strong> $1 billion was voted by Congress, and the Navy embarked on a giganticshipbuilding program. Suddenly the Corps was seriously understrength again, asthe accumulation <strong>of</strong> traditional roles and new missions cut into its numbers.Thousands more were needed for base security duty; the FMF had to beexpanded to two divisions, thirteen defence battalions were called for by theNavy, the Marine Aviation group required large numbers <strong>of</strong> specially intelligentand trained men, and the Corps was encouraged by Roosevelt to formcommando and parachute battalions to copy the suCcesses <strong>of</strong> the British andGermans respectively. When war came to America in December 1941 the Corpswas up to 66,000 men but needed 150,000 to fulfil its plans.The first wartime dispositions <strong>of</strong> the Marine Corps occurred before the US wasactually involved in the war. The 1st Brigade was in Iceland to allow the Britishmore troop strength elsewhere, while the 4th Marine Regiment helped defendManila.When the Japanese attacks struck the scattered outposts <strong>of</strong> the central Pacificthe Marine Corps was represented almost everywhere. 112 Marines died in thePearl Harbour attack. Small units in China and Guam were overwhelmed. Thegallant garrison and air force <strong>of</strong> Wake Island, all Marines, fought for 16 days againstthe worst the foe could throw at them from sea and air before succumbing to theinvasion.49
The 4th Marine Regiment formed the garrison <strong>of</strong> the fortress island <strong>of</strong> Corregidor.Again they fought with skill, dedication and courage until forced to lay down theirarms.By June 1943 the Corps numbered nearly 150,000 men. Marine Aviation hadexpanded from 13 squadrons to 87. The Japanese attack had brought the cream<strong>of</strong> America's youth to join the Marines.By the middle <strong>of</strong> 1942 the Japanese were advancing southeast from Rabaul,threatening to cut the US lifeline with Australia. The Japanese attacked in NewGuinea and started building a naval base at Tulagi and an air base on Guadalcanalin the Solomon Islands. The decision was taken to counter-attack at Guadalcanal.The 1st Marine Division was chosen for the job.While the pre-landing arrangements were chaotic in the extreme, the unopposedlanding <strong>of</strong> the 7th <strong>of</strong> August 1942 went well. The Marines landed and establisheda defensive perimeter around the airfield.The fate <strong>of</strong> the Marines depended greatly on the ability <strong>of</strong> the Navy to keep themsupplied, and to deny the Japanese Navy access to the island. After two days thetransports were withdrawn, half unloaded, when much <strong>of</strong> the covering cruiserforce was sent to the bottom by a Japanese flotilla in the battle <strong>of</strong> Savo Island. The,1st Marine Division was left with no air cover and inadequate supplies.The Japanese warships were able to bring in 30,000 men with artillery and tanksto contest the island. Not until October did the US Navy regain control <strong>of</strong> the seasaround Guadalcanal. The war in the air was rejuvenated on August the 20th whenthe first <strong>of</strong> 15 Marine squadrons to be based at Henderson Field, Guadalcanal,was flown in. In the end they achieved a kill ratio <strong>of</strong> about 4-to-1, and had sunk tentransport ships as well.Fortunately for the Marines on the island, the Japanese infantry were unused t<strong>of</strong>acing a resolute defence with abundant firepower. Time and again they flungthemselves in human waves at the Marine lines, sometimes achievingpenetrations through sheer numbers, but always losing disproportionatecasualties. The Marines lost more men to disease than to the Japanese attacks.The last major attacks occurred from October the 21 st to the 28th. 20,000Japanese assaulted the Marine positions from east and west. Again thedefensive fire and careful counter-attacks broke up the charges. The Japaneselost over 3,000 men to about 200 Marines. Their <strong>of</strong>fensive capability wasdestroyed.The Guadalcanal fighting is covered by a Battlefront scenario in Issue #3 <strong>of</strong> Run 5.It took until February 1943 for the US to mop up the remnants <strong>of</strong> the Japanesearmy on the island.The next occasion on which a Marine Division was used was the invasion <strong>of</strong>Bougainville, the largest <strong>of</strong> the Solomons and the next step to Rabaul. Thelanding <strong>of</strong> the 3rd Marine Division began on November the 1st 1943, and50progressed with little interference from the Japanese armed forces. For the rest<strong>of</strong> the month the island provided as many problems, and caused more casualties,th~n did the enemy.December found the Japanese well entrenched on a group <strong>of</strong> four hills, with thedepleted division prising them out with artillery and air strikes. The battle for thisarea demonstrated again the importance <strong>of</strong> combined arms in the difficult arena <strong>of</strong>the South Pacific island war. The Marine Division was relieved on December the27th 1943.On December the 26th the 1st Marine Division waded ashore at Cape Gloucesteron the northwestern point <strong>of</strong> New Britain. The three weeks <strong>of</strong> fighting thereproduced some <strong>of</strong> the hardest combat yet experienced by these Marines, many<strong>of</strong> whom were veterans <strong>of</strong> Guadalcanal. The terrain was even worse here than onBougainville, but the Japanese were fewer and the troops and support structuremore experienced. The division was kept on New Britain by MacArthur inmopping up operations until April 1944. This was the last combat for the MarineCorps in the South Pacific.The first island to receive the attentions <strong>of</strong> the US forces in the central Pacific wasto be Betio, <strong>of</strong> the Tarawa atoll. Just five kilometres long and one wide, itsupported 4,600 well-armed Japanese troops. Due to the combination <strong>of</strong> theoutlying reefs and the local tides, it was particularly vital that the assaulting troopsland swiftly on beaches whose defenders had been well suppressed by a longand heavy barrage. Unfortunately the naval commander <strong>of</strong> the landing wasnervous <strong>of</strong> Japanese intervention, so he only allowed four hours <strong>of</strong> naval and airbombardment. This was to cost Marine lives.For the two days the battle hung in the balance. The four Marine battalions thathad landed each lost half their men in attacking the desperate Japanese in theirdeep fortifications. Finally, with the addition <strong>of</strong> two reserve battalions the battleswung in favour <strong>of</strong> the US forces. Another two days sawall the defenders dead orcaptured, at a cost <strong>of</strong> 3,318 casualties.The lessons <strong>of</strong> Tarawa were there to be learnt. The preliminary bombardment hadto be long, methodical and precisely directed against specific targets. Supportingartillery should land on nearby small islands before the main assault. Holes wouldhave to be blown in obstructing reefs, or more amtracks provided. More workwould have to be done on the co-ordination between infantry, armour and artilleryin the tactical sphere, so that the flamethrowers and engineers would get a bettercrack at pillboxes.The Marine idea <strong>of</strong> having reporters trained as infantry in the front line <strong>of</strong> battlesalmost backfired at Betio. The reports printed in the Americans newspapers wereso horrific that Commandant Vandegrift had to work hard to prevent aCongressional investigation into the battle.The 4th Marine Division were involved in the Marshalls campaign. They wereassigned to take the small islands Roi and Namur on February the 1st 1944. The51
experience <strong>of</strong> Tarawa showed. Two days <strong>of</strong> bombardment were fo_lIowed by thelanding <strong>of</strong> artillery on small islets nearby. The two regiments clearecd their islandsin less than two days, with acceptably low casualties.Another assault was planned at Eniwetok at the western edge <strong>of</strong> \the Marshalls,only 500 miles from the big Japanese base at Truk. Again the Marrine Regimentinvolved (the 22nd) proved itself, overrunning two islands in tVINO days. TheAmericans seemed to have the Japanese' number. Next stop was tthe Marianas Saipan, Tinian and Guam.In contrast to the atolls previously encountered, these were larger iislands with acivilian population and cultivated areas. The Japanese knew the Armericans werecoming and dug in to wait. They had originally planned a mobile defence, butfortunately for them they were not able to get many vehicles onto thEe islands, dueto the American air interdiction <strong>of</strong> their supply routes. They therefmre decided todestroy the US forces on the beach. Artillery and tank-infantry groups werepositioned on reverse slopes, almost immune from the flat trajectcories <strong>of</strong> navalguns.Saipan was the first to go under the hammer. On June the 15th 1944 a forceconsisting <strong>of</strong> the 2nd Marine, 4th Marine and 27th Infantry Divisions' was to attack.this stronghold. The four-day bombardment was not well executed" being mostlyconducted by carrier planes and fast battleships, rather than the wEell-trained oldslow battleships. The location <strong>of</strong> the bombardment gave away the «exact landingbeaches to the Japanese, who moved up reinforcements and waitecd.The plan was for the amtracks to carry the Marines well inland, up Ho the base <strong>of</strong>the ridge that was the first day's objective. The Japanese made this iimpossible byshelling the slow-moving vehicles as they crawled across the becach. The twoMarine divisions were ashore on schedule, but struggled for the firstt three days toclear the beachhead <strong>of</strong> the fanatical defenders, let alone advance~ to the ridgelines.The Marines cut across the narrow centre <strong>of</strong> the island and turnecd towards themountains and rugged plateau <strong>of</strong> the north. The 27th Infantryy tackled thesouthern half <strong>of</strong> the island. Meanwhile the US 5th Fleet engaged .and defeatedthe last large-scale carrier air strikes <strong>of</strong> the Japanese in what the US pilots were tocall the Great Marianas Turkey Shoot. Chalking up kill ratios <strong>of</strong> 10-to-1, theyensured that the Japanese carriers would never threaten the U$ Navy or itslandings again.By July the 9th the island was declared secure, after 12,000 Mariine and 4,000Army casualties.The Japanese had thrown away many men in barnzai assaults,although one <strong>of</strong> them had overrun two Army battalions in the last 1three days <strong>of</strong>the battle. The Americans had paid a heavy price to breach the NaHional DefenceArea.The entire Saipan campaign is included as a scenario in the originffil Battlefrontgame.52The fall <strong>of</strong> Saipan had two wider effects. One, the government <strong>of</strong> Hideki Tojo felland with it the Japanese military party's ambition to win the war. Two, the Marinecommander, Holland "Howling Mad" Smith, relieved the commander <strong>of</strong> the 27thInfantry, Ralph Smith (no relation), for its lack <strong>of</strong> drive and vigour in the campaign.This poisoned the relationship between the Army and Marines in the Pacifictheatre for the rest <strong>of</strong> the war, and the Army was determined that a Marine wouldnever again command Army troops.The Americans found they had more to learn <strong>of</strong> the art <strong>of</strong> amphibious warfare. Theco-ordination between the infantry and supporting fire from air, sea and artillerywas poor. Too <strong>of</strong>ten the infantry did not move into the attack until well after thesupporting barrage had ceased, giving the Japanese time to reoccupy theirdefensive positions. Moreover, the logistics had not been well managed, duepartly to a shortage <strong>of</strong> shipping space for trucks.Nevertheless, the Americans had taken, in a moderate time, an island that theJapanese could not afford to have fall. The Marines had again showed theirwillingness to press on with the attack, regardless <strong>of</strong> heavy casualties.The 4th Marine Division was now slated to assault Tinian, a small flat island nearSaipan. The island was pounded from air and sea, and from thirteen artillerybattalions on southern Saipan. When the men splashed ashore on July the 24th,the whole division took only 300 casualties. Joined by the 2nd Marines the nextday, they rapidly pushed the Japanese into the rough terrain at the southern tip<strong>of</strong> the island. One week <strong>of</strong> fighting cleared the island <strong>of</strong> 9,000 defenders, at acost <strong>of</strong> less than 2,000 Marines. This was probably the most skilfully conductedamphibious battle <strong>of</strong> the war.While the fighting continued on Tinian, the 3rd Marine Division plus the 1stProvisional Marine Brigade were ready for an assault on Guam, the largest <strong>of</strong> theMarianas. Having lived aboard ship for a month, the Marines were glad to be goingashore as they moved onto the beach on July the 21 st. Again the landingsthemselves proceeded smoothly, but the fight to secure the hills around thebeachhead was a tough one. Joined by the 77th Infantry Division on the secondday, the Marines fought hard for four days to get <strong>of</strong>f the beaches. The 3rd MarineRegiment suffered most as the casualties mounted; two <strong>of</strong> its battalions weredown to company strength.By August the 10th organized resistance on the island was over, althoughguerilla warfare by the 8,000 remaining Japanese continued until well after thewar had finished. At a cost <strong>of</strong> 8,000 casualties the campaign had been won - bythe o.verwhelming American firepower, and the determination and tactical finesse<strong>of</strong> the Marines and Gis.The 1st Marine Division was slated to make an assault on Peleliu, thewesternmost <strong>of</strong> the Caroline Islands. Designed to help MacArthur's projectedinvasion <strong>of</strong> Minandao, it was re'1dered meaningless by the decision to go forLeyte instead. Still the landing went ahead.53
Peleliu Is an island composed <strong>of</strong> volcanic limestone and coral, covered in densescrub. swamps and jungle, with hills, caves and cliffs. A more ideal site for theJapanese style <strong>of</strong> defence could hardly be imagined.The confident veterans <strong>of</strong> the !st Marine went ashore on September the 15th1944. A relatively short bombardment <strong>of</strong> two day's duration did little to nullify theJapanese positions. The Marines were hit with everything as they approached; astorm <strong>of</strong> artillery and mortar fire descended from above. while a curtain <strong>of</strong>machine-gun fire greeted them from hidden positions. The division lost 1,300 onthe first day. double the staff predictions.The Marines finally cleared all but the northern portion <strong>of</strong> the island <strong>of</strong> its 6.000defenders after a week's hard fighting. The Umurbrogol Ridge in the north <strong>of</strong> theisland sheltered most <strong>of</strong> the remaining Japanese. The divisional commanderrefused reinforcements and pushed his battalions into the fight once more. Everyman in the division who could hold a rifle was brought into the fight to fill thethinning ranks <strong>of</strong> the infantry companies. When the battle was over and thecounting started. 6,336 Marines were casualties.The campaign that wasprojected to last four days had taken four weeks.3.IWOJIMA"Uncommon valour was a common virtue" Admiral Chester A. NimitzOperation Detachment, the plan to capture the island <strong>of</strong> Iwo Jima in February1945. was a vital part <strong>of</strong> the American strategy <strong>of</strong> island-hopping their way toJapan. Possession <strong>of</strong> Iwo Jima and its two airfields (with a third underconstruction) would cut the Japanese links with the huge expanses <strong>of</strong> ocean thatthey still controlled. It would also enable the air force to escort the B29s nowbombing Japan from the Marianas Islands. It was thus an obvious target - a factwhich was itself obvious to the Japanese.The Japanese armed forces had suffered an almost unbroken string <strong>of</strong> defeatsfor over two years. Even their prepared defences <strong>of</strong> islands had resulted in farmore casualties for themselves than for the attackers. They looked to change thiswith a range <strong>of</strong> new tactics.Gone would be the reliance on fanatical banzai charges to decide the issue. Theyhad proved wasteful <strong>of</strong> manpower, and had not succeeded in a single instance,close though they were to the heart <strong>of</strong> the Japanese warrior.Iwo Jima was to be fortified to the limit. The island consisted <strong>of</strong> the relatively smallMount Suribachi in the south. and the larger Motoyama Plateau in the north(supporting the airfields), connected by a plain <strong>of</strong> volcanic sand. This sand wouldcause great problems for the Marines. as it was too s<strong>of</strong>t to dig in properly. andvirtually prevented running. "Like trying to fight in a bin <strong>of</strong> loose wheat" was thecomment <strong>of</strong> the 4th Division's <strong>of</strong>ficial history. Both elevated areas were naturally54endowed with hundreds <strong>of</strong> caves. which the Japanese augmented andinterconnected with kilometres <strong>of</strong> tunnels. Thousands <strong>of</strong> concreteemplacements were built, and the Japanese spread their supplies, ammunition.and 21.000 men over many sites so that they would not all be destroyed orcaptured at once.The Japanese plan was to cause such horrific casualties to the Marines that theUS high command would reconsider any further invasions this close to thehomeland.The American plan for the invasion was simple. They would use two Divisions <strong>of</strong>Marines for the main invasion, the 4th and 5th, and hold the 3rd in reserve to becommitted if necessary. The only possible landing place was the eastern shore <strong>of</strong>the volcanic plain, where eight Battalions would alight on the first day. This meantthat there was inevitably.going to be incredible congestion on the first day, nom~tter how well .the landing went. with over 50,000 men packed into 2 squaremiles <strong>of</strong> open plain - the Japanese gunners would find it difficult to miss.The Americans had also taken account <strong>of</strong> their experiences in previous invasions.Each Battalion now had an assault platoon attached, equipped withflamethrowers, bazookas and satchel charges. The tank Battalion increased theirnumbers <strong>of</strong> flamethrower tanks. A two day bombardment from hundreds <strong>of</strong>warships would take care <strong>of</strong> the surface defences.The landings occurred in the early morning <strong>of</strong> February 19th, 1945. TheJapanese held their fire until the Marines stepped ashore from their amtracks,then let loose with artillery and mortar fire in an intensity unequalled in theMarines' history. The two Divisions making the initial assault suffered 2,300casualtie.s in the first day, taking an area only half that <strong>of</strong> the first day objectives.The Mannes scooped shallow foxholes in the volcanic sand and waited for theusual counter-attack ... which never arrived. Few Marines had even seen a liveJapanese soldier so far, and no prisoners were taken.The ne~t ~ew days were spent in cutting across the island, and working throughthe prellmmary defences at the base <strong>of</strong> the Motoyama Plateau, including the firstairfield. At this stage the 4th Division held the left flank and the 5th Division theright. .Most <strong>of</strong> the 3rd Division was soon committed to the fight in the central front,as units ran low on men and <strong>of</strong>ficers.February 23rd (0+4) saw the historic capture <strong>of</strong> Mt Suribachi by the 28/5thRegiment, with the famous flag-raising under fire. The Secretary <strong>of</strong> the Navy,James V. Forrestal, witnessed this from <strong>of</strong>f-shore. and said to the Marines'commander, Holland Smith,: "The raising <strong>of</strong> that flag on Suribachi means thatthere will be a Marine Corps for the next 500 years". Smith turned to an aide andwhispered "When the war is over and money is short they will be after the Marinesagain, and a dozen Iwo Jimas would make no difference". How right he was.lwo Jima was a battle that required the closest co-operation between the infantry,armour, engineers, artillery, naval and air powers for the Marines to succeed.55
Fortunately they had gained the experience in the last two years to develop anoutstandingly successful doctrine that ensured that sUI+l0rt was available whereit was needed as soon as possible.The Japanese defenders fought with their typical dogged skill, not giving groundwhere unnecessary, not expending themselves uselessly in counter-attacks,using the terrain and their superb spotting positions on the top <strong>of</strong> the MotoyamaPlateau to the best advantage. Often they would let the Marines advance past ahidden position, then open fire from the rear. There seemed to be no front lineon the island; areas that were thought to have been 'secured' had to be clearedand cleared again before they were safe.The campaign would not be over until March 16th, as the exhausted MarineDivisions slowly eliminated pockets <strong>of</strong> resistance in the north <strong>of</strong> the island. TheJapanese garrison had, in the main, died in place as ordered. The 21,000defenders had caused 28,500 casualties to the attackers; the first time in thePacific campaign that the Japanese had inflicted more casualties than they hadtaken.Scenario NotesThe whole island <strong>of</strong> Iwo Jima was covered by Japanese defensive works. Tosimulate this all terrain is more resistant to attack, especially by artillery, than wouldotherwise be the case. To allow for the exposed and crowded US positions alongwith the well prepared Japanese artillery, all Japanese artillery ratings andstrengths have been increased. The Japanese uni's with zero movementallowance represent the fact many units, while forbidde:l suicide attacks, had noqualms about suicide defence. Many expected to die in place.Player's NotesAS THE US, your only task at first will be to win a bea~h-head large enough todeploy your troops. The 5th Division must head for tt:e West Coast and alsocontain Mt Suribachl. The 4th Division must capture Airfield1. Be prepared forsome high casualties in doing so, especially from minefields. The 5th must thenclear Mt Suribachi. When you have the necessary room you can rest, reorganiseand then drive north.The 5th should drive along the western coast to Hill 362a and Hill 362b. The 4thmust clear the Ampitheatre before assaulting Hill 362c. When it arrives, the 3rdcan assist in the south if necessary, before striking up lhe heart <strong>of</strong> the island forAirfield 2 and Motoyama.While you have excellent troops, they must be carefully managed to ensurevictory. KIA'd units, especially armour will be expensive in victory points. The UShas large numbers <strong>of</strong> OBS points during the day. These are necessary for a56successful attack but can also be used to repulse the expected Japanese attackson weakened units.AS THE JAPANESE, your job is to hold on to key terrain features and delay the USadvance as long as possible. Your artillery units can give you an edge in attack ifallocated carefully. Attacks at night will be most effective due to the absence <strong>of</strong>the overwhelming US OBS. Attacks in bad weather should be considered for thesame reason. Attacks should only be made against US units in bad shape. Unitswho have spent some time in minefields are obvious candidates.Your men will be most effective in their forts, so these should not be abandonedlightly. If you can keep the US player <strong>of</strong>f balance and unable to concentrate hispower you can win.The 109th Division has responsibility for the defense <strong>of</strong> the North, with the 2ndBrigade and the Navy defending the Ampitheatre and Turkey Knob respectively.Scenario Variants1. The 3rd RCT <strong>of</strong> the 3rd Marine Division remained in reserve and were notcommitted at Iwo Jima. Assume that they were used and land them after the 9thRCT. Model them on the 9th RCT but make the three infantry battalions strength12 and the artillery unit strength 4.2. The D-Day weather for Iwo Jima was excellent, with very light seas. Assume thatthe weather deteriorated, hampering supply operations. Reduce the Supplyvalue by 2 and the admin value by 1 for all regimental Has <strong>of</strong> the 4th and 5thDivisions.3. Assume that the preliminary bombardment had been more effective. Removethree forts <strong>of</strong> the US player's choice.4. OKINAWA - THE SHURI LINE"You cannot by-pass a Jap because a Jap does not know when he isby-passed" A Colonel <strong>of</strong> the 96th US Infantry DivisionTwo weeks after the campaign on fwo Jima was <strong>of</strong>ficially over Operation Iceberg,the invasion <strong>of</strong> Okinawa, began. The decision to take Okinawa was made at thesame time as that for Iwo Jima, and for much the same reasons: it would provide agood airbase close to the Japanese home islands, and be an excellent steppingstone fe>r the projected invasion <strong>of</strong> Japan in late 1945 and early 1946. Again,these facts were as evident to the Japanese defenders as they were to the Alliedhigh command.The Americans thought they knew what to expect after the Iwo Jima campaign. Afanatical defence <strong>of</strong> position after position, each having to be winkled out byflamethrowers, demolition charges, and sometimes even direct fire from 14" naval57
guns. There were kno~n to be ar~und ~ OO,O~O defenders on .the island, goodquality troops in the main, well supplied with artillery and automatic weapons.The Japanese planned to defend the southern third <strong>of</strong> the island as they had t~enorthern part <strong>of</strong> Iwo Jima - tunnels, caves, concrete em~lacements and a St~ICtban on vain suicide attacks. This part <strong>of</strong> the island contained the best defenSiveterrain, as well as four air-bases, the port <strong>of</strong> Naha, and the ~est beaches andanchorages. The rest <strong>of</strong> the island would be covered by delaying forces, and leftto the acknowledged US superiority in air and sea power. The defendersincluded the crack and experienced 62nd Division, the green 24th.Divi.sion ~nd44th Mixed Brigade, as well as numerous independent small units,. including10,000 naval troops, the elite 5th Artillery Command, the 27th Tank regiment and20,000 native Okinawans (Boeta;).The Americans hit the island with everything they had. Carrier planes and B29sbombed airfields in Formosa, Japan and other nearby islands to suppressJapanese raids and kamikaze missions; a full week was spent pounding the islaJ;1dfrom sea and air. Unfortunately much effort was expended on empty ground, asthe northern two-thirds <strong>of</strong> the island, including the landing beaches, was almostempty <strong>of</strong> Japanese. Several small islands in the grou~ '!'ere taken to ~limin?tethreats from the bases there, including a flotilla <strong>of</strong> SUICide boats. The invaSionforce consisted <strong>of</strong> the 7th, 27th, 77th and 96th Infantry Divisions, and the 1st,2nd and 6th Marine Divisions, accompanied by 1,500 ships <strong>of</strong> all types.The landings began on April 1st and initially went well. The Japanese had chosennot to contest the beaches. The 1st Marines landed and were held in place to actas the local reserve. The 6th Marines were given the task <strong>of</strong> clearing the north <strong>of</strong>the island, as they were not as experienced as the other Marine divisions. The2nd Marine Division performed a landing feint near the south eastern corner <strong>of</strong>the island to pin Japanese reserves.The only serious resistance encountered in the north was i.n the Moto?upeninsula, where the single battalion allocated to the north <strong>of</strong> the Island ~a?e ItSlast stand. The 29th Marine Regiment came to a sudden stop when It hit thedetermined defenders <strong>of</strong> this area, and the 4th Regiment was called in to help.In an original piece <strong>of</strong> tactics the two regiments attacked from orthogonallyopposite sides <strong>of</strong> the hill that dominated th~ 'peninsu~a, and crushed theJapanese like a vice. Three weeks after the onglnal landings, the north <strong>of</strong> theisland was secure. The two Marine divisions (the 1st and 6th) were kept there asreserves.On the 6th <strong>of</strong> April the gigantic battleship Yamato~ the pride <strong>of</strong> th.e IJ~, sailed on aone-way mission to interdict the US Navy <strong>of</strong>f Okinawa. The Allied air forces hadkept an eye on her, and detected the movement straightaway. Within 24 hours,she joined her cousins on the sea bottom. But she had d?ne some good; thedistraction allowed a huge aerial kamikaze attack to achieve unprecedentedsuccess. An air armada <strong>of</strong> 700 planes, over half kamikazes, struck the US fleet.58Six ships were sunk and seventeen damaged. If t~is rate <strong>of</strong> succe~s wascontinued, the kamikazes had a real chance <strong>of</strong> delaying or even stopping theAllies at Okinawa.It took until April 8th for the two Army divisions to work their way through thescattered defenders and outposts up to the main Japanese defensive line alongKakazu ridge, one <strong>of</strong> a series <strong>of</strong> rugged terrain features that ran directly across theUS line <strong>of</strong> advance. These defences were part <strong>of</strong> the first Shuri defence ring, afortified line extending across the island through the town <strong>of</strong> Shuri, which was anancient castle and the centre <strong>of</strong> the defences.By the 12th <strong>of</strong> April the defenders had brought the Americans to a sta ndstill. ~hemen would work their way up a hill through artillery, mortar and machine-gun fire,take the crest, and then be pinned down or driven back by the main Japaneseposition on the reverse face <strong>of</strong> the slope, almost immune !rom indirec! fire. The'blowtorch and corkscrew' tactics developed by the Amencans, referring to theuse <strong>of</strong> flamethrowers followed by demolition charges, were needed at almostevery step. Often the defenders <strong>of</strong> a position were entombed alive and bypassed,only to appear elsewhere having escaped through a tunnel.The Japanese command was divided between the cautious realists, led by thehighly competent General Ushijima, and the 'fire-eaters', the junior and .~~ssexperienced <strong>of</strong>ficers. Encouraged by the course <strong>of</strong> the battle thus far, UShlJlmagave the fire-eaters their way on the 12th <strong>of</strong> April, and put in. a six battalion a~tackthat night. The Americans had decoded the Signal flares uSing a captured Signalbook, and were prepared. By the light <strong>of</strong> star shells from the ships <strong>of</strong>f-shore, USfirepower blew the attack apart before it could get going. Still the Japanesepersisted until the 14fh, when Ushijima finally put an end to the slaughter. It was areturn to the worst <strong>of</strong> Japanese tactics, relieved only by the lack <strong>of</strong> the suicidaland unproductive banzai charges.Lt. General Buckner, Tenth Army commander, decided on a large frontal attack tocrack the tenacious defensive line. On the 19th <strong>of</strong> April all three front linedivisions ( XXIV Corps) went over to the <strong>of</strong>fensive.The preliminary bombardment was ferocious. Over 600 planes, 18 warships and300 guns opened up. The net result was estimated later to be about 200Japanese dead. The defenders reappeared from their tunnels when the barragestopped, and halted the adva~ce in its tracks. The lo~gest g~in was around onekilometre in the west; many units ended the day on their start lines.The 2nd Marine Division was again used for a landing feint to distract thedefenders who were in fact expecting another landing. In one <strong>of</strong> the mostunfortunate decisions <strong>of</strong> the campaign, the experienced 2nd Marines were thensent back to Saipan, not having seen action on Okinawa at all.But the strain told on the defenders. Every gun, man or position lost could neverbe replaced. Slowly the Japanese were forced back by th~ unrelenti~g pressure.On the night <strong>of</strong> 23/24th April, the Japanese fell back to their second line.59
After a month <strong>of</strong> combat, the US Tenth Army was in trouble. Three infantrydivisions, the 7th, 27th and 96th, had attacked for all they were worth against thefirst Japanese defensive line for three weeks and had taken more casualties thanmetres <strong>of</strong> ground.There were two alternatives available to Buckner at this point: he could use hisreserves (1 st and 6th Marine and 77th Infantry Divisions) to replace his exhaustedfront line units, or he could make another landing behind the Japanese defensivelines.Buckner chose the first course for two main reasons: he was in a hurry, andorganizing another invasion would mean two weeks <strong>of</strong> delay; and he feared"another Anzio, but worse". The 27th and 96th Divisions were pulled out on the30th April and replaced by the 1st Marine and 77th Divisions respectively. The7th had to wait another 10 days until the 96th was ready to return.At first the fresh troops made little difference. For a week, the US troopsadvanced perhaps two kilometres in the centre, and less on the flanks. TheAmericans had run into the second Shuri line <strong>of</strong> the defence ring. The men hadto go through it all again; the names changed but the tactics remained the same.The small-unit combat teams <strong>of</strong> the Americans were working together well now,'with the teams <strong>of</strong> men and tanks protecting each other as they closed right up tothe Japanese positions and fought it out man to man. The traditional US approach<strong>of</strong> identifying enemy positions with infantry and destroying them with artillery didnot work here, as the Japanese merely retreated into their tunnels and caves untilthe shelling stopped.Ushijima once more allowed himself to be talked into an <strong>of</strong>fensive. Encouragedby the stalemate at the front, he planned an attack for the 4th <strong>of</strong> May, to beaccompanied by massive kamikaze strikes on the US Navy. The 24th Division, the27th Tank regiment and the 44th Ind. Mixed Brigade were to lead the assault, andmiscellaneous small units would make landings behind the American front todisrupt supplies and communications.After a half-hour barrage <strong>of</strong> over 13,000 rounds, the attack went in early in themorning. The coastal landings were an abysmal failure; most were penned in ordestroyed within minutes <strong>of</strong> debarking. The main assault met the fate <strong>of</strong> theearlier attack: US firepower rapidly decided the issue.Incredibly, another assault was put in the next night, and actually achieved a sma"breakthrough. By the next day, the Americans had restored the front and killed all<strong>of</strong> the successful attackers. The two attacks had cost the Japanese hundreds <strong>of</strong>planes, 5,000 casualties, almost all their tanks, and 60 precious guns. The USlosses amounted to six ships sunk, six damaged, and 720 land casualties. TheJapanese attack was another expensive failure.The 1st Marines had taken more losses in their continued attacks on the westernflank than the two army divisions did in defence. By the '11th <strong>of</strong> May the refreshed96th Division was brought back into the line to replace the 7th, and the 6th Marine60Division was added to the western flank. Buckner scheduled an all-out attackalong the whole line for that day. The Japanese, certain by now that no secondlanding was coming, committed most <strong>of</strong> their reserves. The fighting went on,hardly moving, for ten days.At the end <strong>of</strong> this period, the Japanese line was in danger. Both flanks werebending back, and the Americans were on the outskirts <strong>of</strong> Shuri in the centre. Onthe east coast, there was a real possibility <strong>of</strong> a breakthrough as the US troopsopened a gap between the Japanese and the shoreline. At this point the rains,unseasonably late, started. Much <strong>of</strong> the front became a sea <strong>of</strong> mud, evenstopping amtracks. The only significant advance was made in the west, where theMarines finally took the town <strong>of</strong> Naha, largest in Okinawa but virtually desertednow.The Marines also began to outflank Shuri to the south west. The situation lookeddesperate to General Ushijima, as he had no hope <strong>of</strong> reinforcement. The onlyviable option open to him was to abandon the hard-fought-for Shuri line andretreat into the very southern portion <strong>of</strong> the island, where a last defensive line hadbeen prepared.The Japanese took advantage <strong>of</strong> the cover afforded by the constant rain to stagetheir withdrawal, skilfully covered by a rear guard. The withdrawal was complete by28th May, but the Americans only realized that it had happened at all on the 30th,when a Marine unit slipped through a gap in the rear guard and took Shuri castle.Even then, the town proper held out for another day. When the men finallyentered the ruined town, it was deserted.Scenario NotesThe scenario begins with reformation <strong>of</strong> the III Amphibious Corps as the 6thMarines enters the line to the right <strong>of</strong> the 1st. The resulting bloody struggle forthe Shuri line was only stopped by the cyclonic storms that commenced on the22nd <strong>of</strong> May and rendered <strong>of</strong>fensive action impossible.The Japanese defended their positions to the death and withdrew only under thecover <strong>of</strong> the storms. To simulate this many Japanese units have zero movementallowance.Each side will take heavy losses and if both have held at the end then the issuemay be decided by casualties inflicted as well as objectives held.Player's NotesAs THE US, you must conduct a steady and calculated assault on the Shuri line tobe successful. Careful co-ordination <strong>of</strong> assets and OBS is essential. Marinelosses will be high but your excellent supply and elite troops should allow you tomaintain steady pressure. Watch for any weakening in the Japanese lines and61
hold try to hold any gains without overreaching. Pushing exhausted troops, evenmarines, can result in disaster.The 1st Marines' ultimate objectiive is Shurl Castle, but Dakeshl must be reducedfirst. The 6th Marines must cross the Asa River and assault the Sugarloaf andHorseshoe hills which dominate the Shuri Line in the 6th Division's sector. Thesemust fall before the Japanese rear areas at Kokuba can be taken.AS THE JAPANESE, many <strong>of</strong> your units are dug in and these must form thebackbone <strong>of</strong> your defense. The mobile units you control are essential for shoringup the weak points caused by US assaults. Holding the line is your only aim as inso doing you will have caused heavy losses to the US. Your units will also sufferbut you may be certain that the US player is probably suffering in at least equalmeasure.The Shuri Line must be held. The 44th Independent Brigade is responsible forSugarloaf, Horseshoe, Hill 55 a.nd Makuba. The Navy is responsible for the Nahaarea including Maklshl, while the 62nd Division defends Wana and Shuri castle.Scenario Variants1/a Assume that Japanese kamilkaze attacks are having a greater than historicaleffect on US shipping. Reduce divisional and regimental supply values by 2points.1/b You can also assume that th,e US carriers were being somewhat diverted andreduce the reliability <strong>of</strong> US OBS Iby 2.2 Assume that heavy rains wlhich stopped the US <strong>of</strong>fensive arrived earlier.Reduce the scenario length by 4 days.5. OKINAWA· THE FI AL REDOUBT"It's all over now but cleaning up pockets <strong>of</strong> resistance. This doesn'tmean there won't be stiff fighting but the Japs won't be able toorganize another line" General Buckner, May 31st 1945By early June, when the rains had subsided, the Americans were advancingfaster than ever before. They mad come three kilometres in a week - fast byOkinawan standards. They stanted to by-pass the Oroku peninsula on the westcoast, held by the troops <strong>of</strong> AdmiJal Ota's naval base force.On the 3rd <strong>of</strong> June two regiments <strong>of</strong> the 6th Marine made a landing on thenorthern point <strong>of</strong> the peninsula. The landing by sea was considered easier thanmoving the men in the mud.By the 6th, elements <strong>of</strong> the 1st Marines emerged from the mud and cut <strong>of</strong>f theeastern side <strong>of</strong> the peninsula, isolating it. The fanatical men <strong>of</strong> the IJN wereprepared to die to defend the naval base on Oroku, and would ensure that themaximum price would be extracted from the Marines in the process. They hadequipped themselves with machine-guns and cannons from wrecked planes, andmade extensive use <strong>of</strong> mines. Ota's men fought on until 12th June, whenresistance collapsed and Ota committed hara-kiri.The remainder <strong>of</strong> the Japanese forces on the island, about 30,000, had retreatedto a new line in the south. Only one third <strong>of</strong> these, however, were trained infantry.The Japanese were running out <strong>of</strong> men. The support troops fought as bravely asthe rest, but not so well. The now-familiar process <strong>of</strong> prising the defenders out <strong>of</strong>every nook and cranny in the convoluted hills continued. Tanks were <strong>of</strong> little use,as the ground was still s<strong>of</strong>t from the rains.Again the Marines and the Gis faced the daunting prospect <strong>of</strong> resolutely heldridge lines raining mortar and machine-gun fire on them as they struggled up theslopes. The Japanese had very few heavy guns left, which eased the Americans'task somewhat. General Ushijima sensed the end was at hand, as the first ridgeline fell in only 12 days. On 17th June the Japanese front collapsed, so Ushijima,after one final, futile counter-attack, ordered his men to infiltrate through the USlines and carry on guerilla warfare in northern Okinawa. He and his staff tookrefuge in a cave near the island's southern shore. He committed hara-kiri on June22nd, when US troops approached.Towards the end <strong>of</strong> the campaign, a regiment <strong>of</strong> the unused 2nd Marine Divisionwas put into the line. It was noticeable that the fresh but experienced men <strong>of</strong> the2nd were able to accomplish much more than the tired and diluted veterans <strong>of</strong> theother divisions. This is an indication that a more frequent rotation <strong>of</strong> troops, whichthe retention <strong>of</strong> the 2nd would have made possible, may have speeded up thecampaign.General Buckner was killed on the 18th <strong>of</strong> June by an artillery shell, in the finaldays <strong>of</strong> the drama that was Okinawa. He was the highest ranking American <strong>of</strong>ficerto be killed in combat in WWII, and he died only two months before the end.The total Allied losses were 49,000 casualties, <strong>of</strong> which 9,700 were navalpersonnel - the worst losses in the navy's history. The naval dead (4,900)outnumbered those <strong>of</strong> any other service in the campaign. They also lost 221tanks (over half the original force), 36 ships sunk and 368 damaged, and 763planes.The Japanese losses were 110,000 troops and thousands <strong>of</strong> civilians. They alsolost 16 ships sunk and 4 damaged, and, incredibly, 7,800 planes. But they hadseNed their emperor well, and delayed the Allies by 83 days - nearly three timesas long as originally estimated by the Allied planners.The island fighting had shown that the only way to deal with determineddefenders who would not surrender was with fighting men <strong>of</strong> equal skill anddertermination who would not relent. The desperate, resolute and intelligentdefence <strong>of</strong> Okinawa by the Japanese must have been a factor in the decision to
drop the atomic bombs on Japan. After all, if they fought in that fashion fo~ anisland populated by people they considered their inferiors, how would they fightfor their homeland?Scenario NotesThe Japanese vacated the Shuri line under cover <strong>of</strong> the heavy storms. After therains abated somewhat, the US forces took up the pursuit. This scenario dep.ictsthe contribution <strong>of</strong> the Marines to the closing stages <strong>of</strong> the Okinawa campaign.Movement costs are greater than in the Shuri scenario due to the soddenground.Player's NotesAS THE US you must drive south and assault yet another fortified line. To win youmust clear Oroku and breach the Japanese defences near Kunishi Ridge. TheJapanese troops are weaker now but still occupy formidable positions, so allprevious comments about assaulting fortified lines still apply.Be prepared for the arrival <strong>of</strong> the 8th R.C.T. late in the game. A fresh unit canmake all the difference.The 1st must attack towards Itoman, clearing important terrain around Dakiton, enroute. Once accomplished, the main defensive line on the Kunishi Ridge must bepenetrated to reach Makabe.The 6th Marines has been split into two groups to clear the Oroku Peninsular.Once cleared the 6th should proceed south and support the 1st by strikingKyamu.AS THE JAPANESE you still have excellent positions, but the quality <strong>of</strong> your troopshas suffered. You must be extremely careful in choosing attacks. Base units andBoeitai are not suitable for any real <strong>of</strong>fensive action. If you can delay the fall <strong>of</strong>Oruku and hold the line at Kunishi, you should win.The Ad Hoc formation must delay the advance <strong>of</strong> the 1st Marines on Itoman. TheNavy defends Oroku to the death. The 24th divison holds Kunishi Ridge and. then makes its last stand at Makabe.Scenario Variants1. (a and b). Same as Shuri.2. Assume that the 8th R.C.T. clean up their small island objectives earlier.Change their arrival to turn 25.3. Assume that the rain clears earlier and therefore allows easier n:oveme~t.Adjust all the movement values for all terrain to that used in the Shun scenano.64Also adjust the movement allowance <strong>of</strong> US divisional Has, which were reduced toreflect the logistical difficulties <strong>of</strong> the poor ground conditions.4. Assume that more <strong>of</strong> the Japanese 24th Division's battalions remain intact forthe defence at Kunishi. Substitute standard rifle battalions for the Boeitaibattalions used and add 1 to the experience rating <strong>of</strong> all 24th Division riflebattalions.FROM OKINAWA TO KOREA"In Asia free countries are struggling to meet Communistaggression Some ... are battling the Communist armies <strong>of</strong> Sovietsatellites; some are engaged in bitter civil strife against Communistledguerillas; all <strong>of</strong> them face the immediate danger <strong>of</strong> Communistsubversion ... this campaign threatens to absorb the manpower andvital resources <strong>of</strong> the East in the Soviet design <strong>of</strong> world conquest ...the continued independence <strong>of</strong> these nations is vital to the future <strong>of</strong>the free world" President Harry S Truman, 1951The Marines had significantly assisted in the defeat <strong>of</strong> an enemy which they hadspent twenty years preparing to fight. No branch <strong>of</strong> the United States armedforces emerged from WWII with such a reputation for combat readiness andworthiness than did the Marines. It had expanded to a high <strong>of</strong> over 450,000serving men and women, and had fielded 6 divisions, 4 air wings and 4 carrier airgroups. It used such weaponry as tanks, amtracks, heavy artillery andreconnaissance units for the first time in its history.The only question that remained was: was there a role for the Marines in a newage <strong>of</strong> nuclear warfare, with the only fleet hostile to the USA gone?The 2nd and 5th Marine Divisions joined the occupation forces in Japan, wherethings went so smoothly that they were out in six months. The 1st and 6thDivisions had a harder time in the occupation <strong>of</strong> North China. They were orderedto keep out <strong>of</strong> the continuing civil war between the Nationalists and theCommunists, and spent their time repatriating the 500,000 Japanese soldiers stillperforming security duties in the area.As the demobilization continued these divisions dwindled to the strength <strong>of</strong>battalions, and found it impossible to keep out <strong>of</strong> the way. The Communists madetheir objections to the pre$ence <strong>of</strong> foreign troops known, and the MarinesSUffered 50 casualties over two years to minor sniping and ambushes. With thecollapse <strong>of</strong> the Nationalist government in 1949 they were withdrawn.The two years following WWII were busy ones for the Marine Headquarters andtheir friends in Washington. Powerful moves by the Army to strip the Corps <strong>of</strong> itsFleet Marine Force and its Aviation were only defeated by the most intensemanoeuvring under fire since Okinawa. The Corps emerged victorious, with a65
piece <strong>of</strong> legislation pas~e~ by C?ngress that guaranteed i s existence andprotected its FMF and AViation sections.The main threat to the Corps' viability as a force in readi~~ss canne fr?m Trum~n'sdetermination to cut government spending, especially military spendmg. At ~ t!mewhen strategists thought an appropriate military bUdg~t woulld be $30 billion,Truman was spending $14 billion. The Corps' share <strong>of</strong> this money was very ~mall,and they had to constantly economize on equip.men.t and manpiow.er. The size <strong>of</strong>the FMF shrank from two divisions and one Air Wmg to two rreglments and 12squadrons by 1950. As before, the Marines were saved by the aldvent <strong>of</strong> war. .The North Korean invasion <strong>of</strong> the south <strong>of</strong> the peninsula came! a~ a devast~tmgshock to the Western world. Months <strong>of</strong> negotiations were put aSI~e as a dl~ectmilitary solution to the conflict was sought. On June 25th 19510, eight Russlanarmedand -trained divisions <strong>of</strong> the North Korean People's Army! (NKP~) brushedaside the poorly armed and supported units <strong>of</strong> the army <strong>of</strong> the lRepublic <strong>of</strong> Korea(ROK) and headed for Seoul.The United States decided to intervene to protect its client state, South Korea,within a week. The armed strength <strong>of</strong> the US forces in the area Ihad been allowedto decline almost to the point <strong>of</strong> helplessness. Nevertheles~, men werecommitted and they did help to slow the victorious NKPA subsUantially, at a cost.By August'the UN forces had been pushe~ into a corner at the' sout~ east 0.1 theKorean peninsula known as the Pusan Perlrl~eter, after ~he large P?~ 1.1 contaln~d.The perimeter was defended by four Amencan and five ROI< diVIsions, facmgthirteen NKPA divisions.The American Eighth Army defended the left flank <strong>of</strong> the fronlt with three weakinfantry divisions, and held the battle-scarred 24th Inf~ntry in reserve. Anotherattack was expected shortly, and the situation was conSidered dlesperate.6. PUSAN - SACHON"Following Brigade rapid advance from Chindong-ni to Sachon inwhich this Brigade attacked, overcame, and pursu~d t~e lene~y, the25th Infantry Division directed the withdrawal <strong>of</strong> thIS Br!gmde m.orderto hold a defensive position and mop up enemy resIstance m thezone <strong>of</strong> action <strong>of</strong> elements <strong>of</strong> the 25th Division" 1st ProvisionalMarine Brigade order, 13 August 1950The 1st Marine Brigade, consisting mainly <strong>of</strong> the 5th Marine Re,giment, landed atPusan on August 2nd and was to go into action on the 7th. The plan was tolaunch a counter-attac'k on the very southern end <strong>of</strong> the Nortlh Korean front, todraw NKPA attention and reserves from their anticipated attaclk on the centre <strong>of</strong>the US line. The attacking forces were designated Task !Force Kean, andconsisted <strong>of</strong> the Marines, the 5th Regimental Combat ·Teann (RCT) and tworegiments <strong>of</strong> the 25th Infantry Division.66The attack would jump <strong>of</strong>f from the coastal town <strong>of</strong> Masan and head towardsChinju, cutting <strong>of</strong>f a large peninsula and threatening the right flank <strong>of</strong> the entireNKPA line. The 35th Regiment <strong>of</strong> the 25th Division would take the inland roadthrough Pansong, the 5th RCT would accompany the Marines down toChindong-ni and then cut across to Pansong, and the Marines would take thelonger coast road through Kosong and Sachon - their first major objective. The24/25th Regiment would secure the rear areas.Facing TF Keqn was the NKPA 6th Infantry Division, reinforced with the 83rdMotorcycle Regiment. This force was also about to put in an attack, hoping tostage an 'end run' on the weak left flank <strong>of</strong> the UN forces and roll up their line. Theinitial set-up advances <strong>of</strong> these two forces collided at Chindong-ni on the night <strong>of</strong>August 6/7th.From then until the morning <strong>of</strong> the 9th the fighting swirled around the hillsoverlooking Chindong-ni. The NKPA positions here were eventually wiped outand the advance began to get under way. The Marines headed south along thecoast road, and arrived at Taedabok Pass, a narrow defile 15km short <strong>of</strong> Kosong,on the 10th August. The day was spent clearing the hills overlooking the pass <strong>of</strong>an ambush.When the lead elements <strong>of</strong> the force arrived in Kosong the next morning, theysurprised about 100 vehicles <strong>of</strong> the NKPA 83rd Motorcycle Regiment. Good cooperationbetween the ground troops and Marine Air Group 33 ensured theirdestruction, at a cost <strong>of</strong> two Corsairs down. The 24km from there to the village <strong>of</strong>Changchon were almost uncontested.Again, at this point the road passed between high hills, and again the NKPAprepared an ambush here on August 12th. The Marines were expecting this bynow, and the over-eager NKPA troops sprang the trap too early. The fighting toclear the hills took all afternoon, and resulted in many Marine casuatties.The next morning it was planned to reach Sachon, the first objective for theMarine Brigade. But back at Chindong-ni the NKPA had come out <strong>of</strong> the hills toattack the UN forces' lines <strong>of</strong> communications. Two Army artillery battalions hadbeen overrun, and the 3/5th Marines were sent back to recover the potentiallydangerous situation. If the NKPA could get through to Masan all <strong>of</strong> TF Keanwould be cut <strong>of</strong>f and in danger <strong>of</strong> annihilation.The 3rd Battalion arrived back at Chindong-ni by d sk <strong>of</strong> the 12th, and hadcleared the area and the surrounding ridges by 10am the next day, without asingle casualty.The Marine Brigade was now fighting on two fronts 40km apart, facing in oppositedirections. Their leader, Brigadier-General Craig, commanded from a helicopter.At midnight <strong>of</strong> the 12/13th, the rest <strong>of</strong> the Brigade received orders to withdrawback to the Chindong-ni area. As they started to move in the early morning, an alloutNKPA attack hit them. One platoon was overrun, and the pressure did not letup until dawn, when artillery and air power forced the attackers to retreat.67
£The! Marines were finally free to withdraw from combat to prepare for MacA~rthur'smasterstroke - the landing at Inchon.Scenario NotesAs 'Wery little detail was available, the exact composition <strong>of</strong> the NKPA umits asporttrayed in the game is unknown. Nevertheless the names, location9s andapprroximate strengths are right.Botlh sides are given as night combat capable to simulate the NKPA's prefeerencefor rnocturnal combat and the Americans' demonstrated ability to cope with itlt.The Marines have been split up into company-size units to reflect their usaage asvirtUlal battalions.Player's NotesAS 1THE US, you must first deal with the extensive NKPA forces on your fWlanks.They should be wiped out if possible, but leave the Gis to deal with therm andpuslh the Marines south as soon as practical. You must take Sachon and/or (Chinjuto secure victory.The American 25th Infantry Division must hold Masan and Chindong-nl. TFhe 1stMarrne Brigade are to attack along the path Kosong-Changchon-Sachon-Chhlnju.AS THE NORTH KOREAN, you must make the best use <strong>of</strong> the limited forcees youhave. Leave one 'regiment' (actually a battalion) <strong>of</strong> the 13th Regiment to tie upthe /Allies near Chlndong-ni, and withdraw the rest into the rough to regroupp. Youcan then strike east at Masan, south at Chindong-ni or west at Pansong. C:hlnjuand 'Sachon must not fall.Scenario Variants1. Assume that the NKPA had been prepared for the attack. Move their unitits to abetter defence line, say from Paedun-ni along the south side <strong>of</strong> the road too nearPansong, then north. Allow them 10 mine and 10 fort hexes, to be placed at twill.2. A!ssume that the Marines had not been depleted by pre-war budget cutss. Usethe lblank Allied third division to create the 1st Marine Regiment, similar to ttLhe 5thalready there. Place it anywhere that is Allied controlled at the start <strong>of</strong> the gaame.FROM PUSAN TO INCHONAnother crisis arose further north. The NKPA had started crossing the Naaktongriverr in readiness to attack Taegu, the Iynchpin <strong>of</strong> the entire UN line. The M~arineswere needed to try to retake the area east <strong>of</strong> the river, to restore the situJation.68Advancing against a numerically superior and entrenched enemy, withinadequate support, the Marines took heavy casualties but destroyed an NKPAdivision in the process. The area was handed over to the Army, and the Marinesbegan again to withdraw for Inchon.On September the 1st the NKPA launched an attack with every division at hand.Once again the Marines were called for, and were sent to the same ground thatthey had captured before; the Naktong river. After three days <strong>of</strong> hard combat, inwhich the Marines decisively defeated the NKPA attack in their zone, they reallywere withdrawn to prepare for the Inchon landing.7. INCHON - SEOUL"Mr President: By the grace <strong>of</strong> a merciful providence our forcesfighting under the standard <strong>of</strong> that greatest hope and inspiration <strong>of</strong>mankind, the United Nations, have liberated this ancient capital city <strong>of</strong>Korea." Douglas MacArthur to President Syngman Rhee, September29th,1950With the addition <strong>of</strong> large numbers <strong>of</strong> UN (mostly American) troops, the situationaround Pusan had finally stabilized. The NKPA, in its last <strong>of</strong>fensive gasp, hadtaken the key town <strong>of</strong> Taegu, but outnumbered and battered, could go n<strong>of</strong>urther. General Douglas MacArthur, commander <strong>of</strong> the UN forces in Korea, haddecided to stage an amphibious landing behind the NKPA lines to retake Seouland cut the supply and communications lines that ran through there. Asimultaneous assault on the NKPA from the forces around Pusan would attractreserves, and might break open the front completely.Inchon was chosen because it was the closest large port to Seoul. Other factors,such as a wide tidal range and hills dominating the town, mitigated against it.MacArthur, typically, would hear none <strong>of</strong> it from the Navy and Marine planners.Fortunately for him the town was garrisoned by only 2,500 second rate troops,with no support arms at all. The assault force consisted <strong>of</strong> the 1st and 5thRegiments <strong>of</strong> the 1st Marine Division, with numerous supporting troops, and 260ships. Still on board were a regiment <strong>of</strong> the Korean Marine Corps (KMC).Despite five days <strong>of</strong> air and two days <strong>of</strong> sea bombardment, the landing on the15th took the NKPA by surprise. The harbour islands <strong>of</strong> Wolmi-do and Sowolmidowere captured, after a severe pounding, with light casualties. By the end <strong>of</strong>the first day the Marines controlled most <strong>of</strong> Inchon and the surrounding hills.On the next day, the two Marine regiments attacked out <strong>of</strong> Inchon along thehighway towards Seoul, leaving the KMC to secure the town. As the Marines leftInchon an aerial patrol spotted a group <strong>of</strong> 6 T34s in the line <strong>of</strong> advance. Theplanes accounted for two and Marine M26s for three more. The other was neverfound. The advance continued amid light resistance.69
Aftler a shortrt, sharp fight to take Ascom City, the Sth Marine regiment and theKMlC turned j north towards Kimpo, site <strong>of</strong> a large airfield, while the 1st MarineRe!giment heeaded east towards Yongdungp'o, an industrial suburb <strong>of</strong> Seoul justacrross the Hc~an river from Seoul proper.AftEer beatinpg back some determined but hopeless counter-attacks, the SthRe!giment toook the airfield and some hills to the south east that overlooked it. Bythe' morning (<strong>of</strong> the 18th, the airfield at Kimpo was secure.The next dayy it was being used as a base for Marine air squadrons. The regimentmOlved on too the Han river opposite Haengju, a former ferry site north west <strong>of</strong>Secoul.The 1st Marirines were having a harder time <strong>of</strong> it. Halfway between Ascom City andSosa, a groulJp <strong>of</strong> NKPA ambushed the lead platoon, but were repelled with a loss<strong>of</strong> over threee hundred by tank and aircraft fire. It had been the Marines' hardestfighlt so far. BBy noon on the 19th, the 1st Marines had taken Sosa and a group <strong>of</strong>hills beyond i' it.The Sth Reggiment were now ordered to cross the Han and take Haengju,prelparatory tltO moving on Seoul itself. The task was complicated by a completelacH< <strong>of</strong> bridgging gear. Some LVTs and rafts were trucked in, and the crossingstarrted on thoe night <strong>of</strong> 19th September.The recon teaam that preceded the crossing forces had failed to check the crest <strong>of</strong>nearby Hill 112S, and gave the all-clear signal. As the crossing started, NKPAbulliets and r mortar bombs hit the water and shore around the Marines. Theunp>repared LLVTs and amtracks beat a hasty and unauthorized retreat.Emtbarrassecd by this repulse, the Marine commanders ordered the battalioncomcerned (33/Sth) to cross in force at 6.30am that same day. A single companywas sent acrcross in LVTs and amtracks, and made it over almost unhurt. The threeplattoons thenn assaulted and took the hill. The rest <strong>of</strong> the regiment crossed overduriing the daay.Me,anwhile ttthe 32/7th Infantry Regiment had landed, and was sent to the rightflamk to relie'3ve 1/1 st Marine Battalion, who could then relieve the 1/Sth Marinebatttalion, whoo could then cross the river at Haengju.The 1st Reggiment now concentrated on Yongdungp'o. They took the hillsovenlooking ttthe town, then had to retake them, due to an administrative blunder.Another NKPPA attack consisting <strong>of</strong> tank-borne infantry came down the highwayfrom Yongduungp'o; again the wily Marines let it pass between their dug-inpositions just;t <strong>of</strong>f the road and then let fly. 300 NKPA and 4 tanks was the tally onthis; occasionn.Hawing caphlured the last hills outside Yongdungp'o, the regiment plunged intothe city at daawn on the 21 st. Fierce resistance cost the Marines many casualties,and! the twinn drives, from the northwest and southwest, were stopped. Onecorrnpany, hoowever, had penetrated into the very centre <strong>of</strong> the city.7(0Between 9pm and midnight, the company fought <strong>of</strong>f five strong attacks by NKPAinfantry. At this point, a corporal <strong>of</strong> the Company went down into the streets andshot the enemy commander who had been the inspiration for the attacks. Therest <strong>of</strong> the night passed quietly, if nervously. In the morning they counted 310dead around their perimeter. The two battalions at the outskirts <strong>of</strong> the city werenow able to swiftly reach the company.The Sth Marine Regiment was in position in front <strong>of</strong> the hills that run along thenorthern side <strong>of</strong> Seoul Ort the 22nd <strong>of</strong> September. These hills were defended bythe 2Sth Brigade, veterans <strong>of</strong> the Chinese Civil War. There was hard fightingahead for the men <strong>of</strong> the Sth Marines.The next three days saw combat as fierce as any the Marines had ever seen. TheNKPA small-unit leadership and tactics in the hills were impeccable, and they putin several locally successful counter-attacks. The Marines were told that thecapital was to be taken by the 2Sth, so that General MacArthur could announce itsliberation exactly three months after its capture. By the 24th much <strong>of</strong> the hill linehad been cleared, but there was no slackening <strong>of</strong> enemy resistance.Major-General Almond, commanding the X Corps, changed the attack plan. The32nd Infantry and the 17th ROK Regiment were ordered to cross the Han south<strong>of</strong> Seoul and take the city's defenders in the rear. The 1st Marine Regimentcrossed the Han on the Sth Marines' right flank, and the 7th Marines stood ontheir left flank. For the first time in the campaign, the 1st Marine Division wasfighting as a division.At 7am on 2Sth September, the N forces entered Seoul from three directions:the Sth Marines finally swept the hills clear and entered from the northwest, the1st Marines had crossed the Han and entered from the southwest, and the Armytroops had taken South Mountain and entered from the southeast. Theannouncement <strong>of</strong> Seoul's capture went out on time.The announcement was, however, somewhat premature. The NKPA still held thebulk <strong>of</strong> the city, and none <strong>of</strong> the captured areas were secure. Units had toconstantly about-face and retake a building or city block to clear out infiltrators.The initial caution against use <strong>of</strong> supporting fire, to preserve the city, evaporatedwith the need to take the city swiftly.That evening fliers reported that the roads north <strong>of</strong> the city were choked withfleeing NKPA troops, whereas the local commanders were sure that they must berefugees, since their men were still under heavy fire. An immediate attack wasordered that night.Just as the attack was about to jump <strong>of</strong>f at 2am, an NKPA attack came in along themain street <strong>of</strong> the city. After a vicious firefight all seven tanks and SOO infantrywere killed. Another attack hit the 32nd Infantry at Sam, and overran part <strong>of</strong> itsfront temporarily. This, too, was defeated, and netted 600 enemy casualties. Thecity could not yet be considered safe, or even taken.71
Two more days <strong>of</strong> close-in street fighting were required to clear the city centreand take Government House. The NKPA proved skilled in city combat;everywhere were barricades, ambushes, mines and booby-traps. Finally, as theevening <strong>of</strong> September 28th drew in, the North Koreans gave up the fight andstarted withdrawing to the north. The next day, to the sound <strong>of</strong> distant cannon,with an honour guard composed chiefly <strong>of</strong> Marines, General MacArthur handedthe remains <strong>of</strong> the city over to President Rhee. The lightning strike at Seoul,together with the conventional attack at the Pusan perimeter, had shattered theNKPA. Of the 130,000 men that had poured across the border three monthsago, less than 30,000 got back.Scenario NotesThe game starts at noon on the 15th <strong>of</strong> September and goes for 50 turns until the28th, when the capital had fallen and was secure.Again both sides are flagged as night capable to simulate the almost 24-hour-adaycombat that occurred.The Marines are split up into companies to conform with their usage.Player's NotesAS THE US, you must advance swiftly to capture Yongdungp'o, then swing yourMarines either north or south (preferably both) to take Seoul. The airfield must becleared for the air-landing troops that will arrive on turn 38.The Marine Division has a string <strong>of</strong> objectives Haengju-To Nth Korea-GovernmentHouse and must attack them in order.The 32nd Regt has only Seoul 3 as a divisional objective.The UN's Miscellaneous unit has the Klmpo airfield to mop up.AS THE NORTH KOREAN, you must defend carefully. You will not be able to attackwith any prospect <strong>of</strong> success until the US player gets men into Seoul. Your troopsthere, especially the 25th Brigade, are quite good. The reinforcements from thesouth that arrive on turn 8 can be used as defenders <strong>of</strong> Yongdungp'o, or canlaunch an end run on Inchon itself. The 31 st Division has been given the task <strong>of</strong>fighting for Government House, a highly symbolic building.Scenario Variants1. Assume the NKPA had got around to laying mines <strong>of</strong>f Inchon (they were goingto any day ... ). Reduce all Allied troops landing in the first two days by 1 strengthpoint and 2 fatigue points, and stretch them out so that only two units plus a HQland each turn.722. Assume the complimentary Allied <strong>of</strong>fensive had been more successfUllyprosecuted than it had. Remove the NKPA reinforcements from the south andone regiment from Seoul itself.FROM SEOUL TO HUE"The USMC is merely the Navy's police force, and will remain so whileI am president. They have a propaganda machine that is almost equalto Stalin's" President Harry S Truman 1950Even before the South Korean capital <strong>of</strong> Seoul was secure, MacArthur asked forand received permission to pursue the defeated NKPA across the 38th Parallel.The idea was to unify the two halves <strong>of</strong> the Korean state under UN supervision.Neither MacArthur nor the Joint Chiefs <strong>of</strong> Staff anticipated .Russian or Chineseintervention, but MacArthur was warned not to cross either border nor to actuallyreach the Yalu river, the ancient border between Korea and China.The 1st Marine Division was scheduled to make another landing behind enemylines, this time on the east coast at Wonsan. The approach to the post stoppedwhen mines were discovered, and ROK troops took the town overland before theMarines debarked on October 25th. The 1st Marine Regiment cleared the areaaround the town while the 7th started north towards Chosin Reservoir, a largeman-made lake only 50 miles from the Yalu river.The Marines encountered their first Chinese opponents, the 124th Division, atSudong on the road to the reservoir on November 2nd. After initial reverses, theregiment destroyed the Chinese division in five days <strong>of</strong> heavy, intense combat.Joined by the 5th Marines, they cautiously resumed their advance.By the end <strong>of</strong> November the Division had two <strong>of</strong> its regiments deployed at thereservoir, and the other guarding the tenuous supply route back to the coast.The weather had broken, and temperatures now hovered around -22 0 C (-8°F).The Chinese decided to make an example <strong>of</strong> the 1st Marine Division, reasoningthat its destruction would demoralize the rest <strong>of</strong> the UN forces terribly. The PLA(People's Liberation Army) Ninth Army Group, 100,000 in ten divisions, wereallocated to destroy the Marines.The blow fell on November 27th. The Chinese had a unique style <strong>of</strong> combat,quite unlike their Korean colleagues. Heavy on infantry, mortars and machineguns, but light on tanks, heavy artillery and air support, they would preferentiallyattack at night by penetrating the UN lines and seeking out command andlogistics structures.Despite the heavy strikes against the Marines, they fought back well. On only oneoccasion, when a combined Army-Marine-Royal Marine (UK) reinforcementcolumn was ambushed and half destroyed, did the Marines come <strong>of</strong>f secondbest. The attack on the main positions at the reservoir were stopped cold, and the73
srmall detachments stnJng out al40ng the supply routEall held their places. Due tothee collapse <strong>of</strong> the adjacent Eigjhth Army the Maries were forced to withdrawfrrom their exposed position on mecember the 1st.Tltley fought their wa~ back toJltle coast by Decemler 10th. The fighting retreatw,as an epic story <strong>of</strong> mid and heroism, where time ad again support troops andst
Vietnamese government from which it would not recover. While not entertainingany real thought <strong>of</strong> achieving military victory, they hoped to gain control <strong>of</strong> the twonorthernmost provinces <strong>of</strong> South Vietnam, and demonstrate their ability topenetrate the Allied defences. Another goal was to cause low morale anddefections among the ARVN (Anny <strong>of</strong> the Republic <strong>of</strong> Viet Nam).The Americans detected signs <strong>of</strong> the Communist build-up very early in the piece,but were not able to divine the intention. They thought that a major <strong>of</strong>fensive onthe big US Marine base at Khe Sanh was imminent, so they redeployedsignificant forces from the towns to the northern zone.Some 80,000 NVA (North Vietnamese Army) and VC (Viet Cong) struck at over100 South Vietnamese towns and cities between 29th and 31 st <strong>of</strong> January. Theattacks in the north at Da Nang and Hue were particularly heavy. The 2nd NVADivision and its supporting VC battalions attacking Da Nang were thrown back intothe wilderness, and never seriously threatened the town.The isolated Marine base at Khe Sanh was reinforced. so that it now held the 26thMarine Battalion, an ARVN ranger battalion, a tank platoon and five artillerybatteries. Westmoreland had scented a chance to destroy the two NVA divisionsknown to be in the area, and to win a great psychological victory. PresidentJohnson so feared another Dien Bien Phu that he extracted a promise from theJoint Chiefs <strong>of</strong> Staff that the camp would not fall.Although the base was cut <strong>of</strong>f by enemy action and the heavy rains, theAmericans were confident that they could supply it by air. The base includedoutposts on the overlooking hills, and there was more than adequate air andheavy artillery available. They sat back to wa~.The siege began on January the 21 st and petered out at the end <strong>of</strong> March. TheNVA surrounded the base and fired rockets and shells in an unending stream,but the base was well constructed and secure, and was never seriouslythreatened. Only four <strong>of</strong> the transport planes were destroyed on the ground, sosupply was never a problem. The only ground the NVA took was the specialforces base at Lang Vei, which was drastically undermanned and should havebeen abandoned or strengthened at the start.The NVA suffered a major defeat at Khe Sanh. The Marine lost 205 dead and 800wounded, whereas estimated NVA losses were 10,000 dead.8. HUE76"But by the middle <strong>of</strong> February, he [the NVAJ was through. He hadnot gained the popular support he expected. The Americanpresence in Vietnam was unshaken. The Vietnamese armed forces... had done surprisingly well ... not a single ARVN unit defected. Hehad won no battle field victories, held no new territory, and in I Corpsalone had used up the equivalent <strong>of</strong> three divisions"GeneralWestmorelandHue was another story. The beautiful ancient capital had always been something<strong>of</strong> an open city thus far in the war, and was not properly defended. In less than aday seven Communist battalions took almost the entire city. The only holdoutswere the MACV (Military Assistance Command, Vietnam) compound south <strong>of</strong> theriver, and the headquarters <strong>of</strong> the 1st ARVN Division within the imperial citadel.Early on the 31st <strong>of</strong> January, A/1/1st Company Marines arrived at the MACVcompound. They were soon joined by G/215th Company and a tank platoon. Thecompound was safe. Reinforcements composed <strong>of</strong> F and H/215th Marines joinedthem on the 1st and 2nd <strong>of</strong> February respectively, followed by B/1/1st Companyon the 4th. The five companies were organized into two (understrength)battalions, the 1/5th and 215th.The ARVN commander <strong>of</strong> I Corps, Lieutenant General Lam, soon asked them tohelp retake the city, despite the devastation and civilian casualties the USfirepower would inevitably cause. The street fighting was the hardest combat theMarine Corps had seen since Seoul, 18 years before. To minimize collateraldamage, fire support was mostly limited to direct fire weapons: Rocket launchersrecoilless rifles, and even tear gas. Not until February 9th did the Marine~recapture the whole city south <strong>of</strong> the river.Meanwhile, north <strong>of</strong> the river, the 3rd ARVN Regiment reinforced by threeairborne battalions was making slow steady progress, moving from the northeastcorner (where the ARVN HQ was located) towards the southwest.Three days later, after further calls from the ARVN, the Marines moved into the oldcity north <strong>of</strong> the river. Monsoon rains nullified airpower. The US Marines took theleft flank, the ARVN Marines the right, with the 3rd ARVN Regiment in the centre.It was eleven days <strong>of</strong> hard house-to-house, block-by-block combat before thebulk <strong>of</strong> the NVA in the city had been eliminated.By agreement, the Marines stood aside and let the ARVN retake the ImperialPalace (aka The Palace <strong>of</strong> Peace) on the 24th, with the elite Black PantherCompany leading the way. The last NVA remnants were mopped up on the 2nd<strong>of</strong> March - over a month after the original incursion.The NVA had committed between eight and eleven battalions to the battle, underthe aegis <strong>of</strong> the 6th NVA Regiment. Facing them were three understrength~attalions <strong>of</strong> Marines and thirteen ARVN battalions, although not all at the sametime. West <strong>of</strong> the city five US Army battalions had been used to cut the NVAsupply lines to the hills.Militarily speaking, the Tet <strong>of</strong>fensive in general and the Hue battle in particularw~re a disaster for the North Vietnamese. The Viet Cong organization in SouthVietnam was shattered, the NYA severely battered, and no lasting results wereobtained. But politically it must be counted a success. The US public were77
shaken to discover that an enemy supposed to be on the brink <strong>of</strong> defeat coulddeal such a blow. It must have been a contributing factor to President Johnson'sdecision not to run for a second term, and thus to Nixon's promises to end the war_which did end the war, in 1975 when the NVA finally overran Saigon.Scenario NotesThe scenario starts after the NVA had swept away the negligible resistance withinHue and occupied the city. It begins on the 31st <strong>of</strong> January and continues for 99turns until the 24th <strong>of</strong> February, when the Palace. the last stronghold <strong>of</strong>organized resistance. fell.The Marine 'division' has objectives in the MACV compound, school and hospitalin the southern part <strong>of</strong> the city. The ARVN division has objectives <strong>of</strong> the ARVNcompound, airfield, Palace <strong>of</strong> Peace and flagpole, in the city north <strong>of</strong> the river.The NVA have no divisional objectives as their aim was to stay alive as long aspossible and cause maximum damage to the US/ARVN units, not to hold territoryper se.Player'S NotesAS THE US you can do nothing the first day but allo?ate your aBS 'poi~ts and holdon. As your reinforcements trickle in you must bUild your <strong>of</strong>fenSive In the northand south slowly and carefully. Use your aBS points in probes rather than all-outassaults. The game is very long so you have plenty <strong>of</strong> time.AS THE NVA you must not make last-ditch stands, but use your superior mobilityto move around the city. You can make hit-and-run attacks. but assaults areprobably not on. Be prepared to lose all your men towards the end.C)cenario Variants1. Assume the US/ARVN player had not been caught by surprise. Place the rest<strong>of</strong> the 'regiment' (battalion actually) plus the tank asset with the lone US unit nearthe MACV compound. Move the NVA units to make room.2. Assume the NVA command structure had not been disrupted by a B52. s.tr!ke(as it was). Increase all NVA admin, leadership and supply values by 1 at diVISionand regiment levels.The extensive damage that the NVA had suffered during the Tet <strong>of</strong>fensiveseemed an ideal opportunity to mount a counter-<strong>of</strong>fensive to drive them out <strong>of</strong>south Vietnam. The VC would then decline or collapse without their militarybacking. But it was not to be.The political victory in America had clearly gone to the NVA. President Johnsonstopped the air strikes on North Vietnam and stemmed the flow <strong>of</strong> reinforcementsto the US forces. Talk <strong>of</strong> truce began, and the new President, Nixon, promised toend the war and withdraw all US troops.Meanwhile the Marines used the lull in NVA activity caused by their losses to gointo the attack. Khe Sanh was relieved and several operations were conducted inI Corps area to destroy base camps, some in areas never penetrated by the USbefore. By 1969 the Marines estimated they had control over 90% <strong>of</strong> the civilianpopulation in their area. In the middle <strong>of</strong> that year US troops started leavingVietnam, never to return. The last Marines left Saigon as the NVA tanks rolled intothe US embassy.The war had a deleterious effect upon the Corps, both in quality and in the publiceye. No longer did they enjoy the special relationship with the media and publicthat they had since Belleau Wood 50 years before. The elite nature <strong>of</strong> the Corpshad been diluted by the acceptance <strong>of</strong> draftees to make up the enlargementcalled for by the war. The Corps had been shaken by the Vietnam war, and itsaftermath. It was time to rebuild the FMF, so that the United States Marine Corpscould once again truly say that it was 'Ready to Fight'.Looking back at the history <strong>of</strong> the USMC, we can see that, from uncertainbeginnings, it evolved into an organization that acquired, through its exploits, areputation for military skill and determination unexcelled by any force <strong>of</strong>comparable size in the world.To a great extent it has been able to live up to its billing. Its popularity is bothdeserved and necessary. There is no doubt that without the support fromCongress and the general public that the Corps has enjoyed in the past andenjoys today, the armed forces <strong>of</strong> the USA would long ago have been deprived<strong>of</strong> an elite fighting arm that has always been 'The First to Fight'.o o o o oCONCLUSION78"We're pr<strong>of</strong>essional soldiers. We fight any enemy the Presidentdesignates"Commandant David M. Shoup, 196179
PART THREETHE DESIGN ROUTINES1. INTRODUCTIONThe following notes are meant as a guide to Warplan. The information theycontain will also provide some insights into how the game works, and should beread at some stage even if you never construct your own scenarios.Varying an existing scenario is fairly straight-forward and we provide an example <strong>of</strong>how to do this in Chapter 4. Variations are the easiest way to get the most out <strong>of</strong>your game. All <strong>of</strong> the scenarios in the game come with suggested variations whichcan be easily implemented. However, designing a full scenario will require areasonable degree <strong>of</strong> familiarity with the game itself.All games in the Battlefront Game System use what are essentially similar designroutines. However there are a number <strong>of</strong> enhancements to <strong>Halls</strong> <strong>of</strong> <strong>Montezuma</strong>and the Warpalnt graphics editor is completely new. The issue <strong>of</strong> compatibility isdiscussed in Chapter 7.We publish complete scenarios for the Battlefront Game System in our magazineRun 5. These contain all the information required to create entire new gamesusing Warplan and Warpalnt. For details on our Run 5 magazine, please see theinside front cover <strong>of</strong> this manual.2. USING THE DESIGN MENUSThe data card contains a schematic display <strong>of</strong> the design menus. They operate inthe same way as the Game menus that you have already used.In <strong>Halls</strong> <strong>of</strong> <strong>Montezuma</strong> there is no distinction for editing purposes between ascenario and a game in progress. A game can be saved to disk, edited as you seefit and then restarted.80This is a feature to be used with restraint. While you can change sides with thecomputer, for instance, it will generally take until the end <strong>of</strong> the next game turn forthe computer to readjust.3. PREPARING A DISKWhether making a variation to an historical scenario or creating an originalscenario, the procedure for preparing a save game disk is essentially the same.Examine the Start and Design menus.If you have not formatted a <strong>Halls</strong> <strong>of</strong> <strong>Montezuma</strong> save game disk, prepare oneusing the procedure given in Chapter 3 <strong>of</strong> the Game Routines.When making a change to an historical scenario, select the line fromMenu A and type (RET) to obtain Menu B.If the template which is providing the source for the variation is on a scenario disk,select the line and type (RET). Select the chosen scenario fromMenu C. The computer will automatically process you through to Menu J (CreateMaster).If the template which is providing the source for the variation is on a save gamedisk, select the line and type (RET). Load the chosen file from Menu D.The computer will automatically process you through to Menu J (Create Master).Use WarpIan and Warpalnt to make whatever changes you wish to the data andthen come back to Menu J.Select the line to go to Menu D. Select the line. Locate thed~sired save location in the catalog with the arrow keys and then type (RET). YouWill be <strong>of</strong>fered an opportunity to enter a comment. Use it if you wish, otherwiseselect the line and type (RET).When you wish to create an original scenario, repeat the above procedure butbefore entering data use the line in Menu J to erase the data bases.4. VARVING A SCENARIOVarying a scenario is a way <strong>of</strong> exploring historical options. It is much easier thancreating a new scenario from scratch and is a good way to become familiar with thedesign mechanics.As an example we can undertake a task both useful and instructive, that <strong>of</strong> givingthe United States some more marines at Iwo Jima.81
·1 D· ··..·nAP LOC....., xx .: 12:· sea 3a ARn (17)1..!.~.~..1 I(•.................................8!, 17:· sea 3b ARn (22)..·3rd DIY .. 3 sea 3rd INF (21)(8 ..·13)·.. ......................................... ..·nARIHE 2 sea 12d ART (27)Class::: 8 infantry .................................. I ..................................( ... •I'" IIHF ~~,e sea 1st INF (26)node::: 3 a hi ous EDIT ,"R':"c':'i:"j""'1 sea 1st I (26) D YISI H(8·..31 ) ... nARIN sea 3rd INF (27)••••••••••••••••••••••••••••••1E~uipRent ::: 1 narine CLEA sea 12a ART (27) REGT 1. oveRent ::: 12 •........................................ nAP REGT 2(8·..99) ..·r i :··c·:..Y·:..9.... ·1sea 1st INF ( 9) REGT 3Arri vaI ::: 26 S ORE sea 2nd INF ( 9) REGT 4( ... 5) ... RECALL nARIHE sea 3rd IHF (18),·.····••••••••••••••••••••••• 1naxilllluR stren~th ::: 12 sea 12b ART (11)C rrent streng h::: 12 ........................ ~........• ••••••••••••••••••••••••••••••••• 1Ra In~::: 12sea 1st INF (21)Ran!le::: 8 I'R':"c':"y':"2"1"'1 sea 2nd IHF (22)(8 ..·7 :.... nARIHE sea 3rd IHF (22)Fat i gue ::: 1···········..................1 sea 12c ART (23)Exper I ce::: 71"····........·..···..·........1 ( ... )( '" )I ••••••••••••••••••••••••••••••((... )... )Use the instructions from Chapter 3 to set up a copy <strong>of</strong> the Iwo Jima scenario towork on. Select from Menu J to obtain Menu 4. From Menu 4 select then . Select Allied and then .Regiment 1 is currently blank, a deficiency we are about to rectify._Select and then . We will now create the regimental HQ. The cursor should beflashing in the box labelled HQ ID at the top left <strong>of</strong> the screen.Type (R.C.T.3) (RET) (MARINE) (RET) (6) (RET) (7) (RET) (7) (RET) (0) (RET). Thecursor should be back in the HQ ID box. Type (ESC/f1) twice and select then . Type (1st) (RET) (8) (RET) (17) (RET) (0) (RET) (3) (RET) (1) (RET)(12) (RET) (26) (RET) (12) (RET) (12) (RET) (12) (RET) (0) (RET) (7) (RET) (7)(RET). The cursor should be back in the ID box and the screen should look like fig7. If it doesn't use the (RET) key to cycle through the parameters and make theappropriate changes.There are two more infantry battalions to enter but we can make short work <strong>of</strong>these using the and features. Type (ESC/f1) to return to82Fig 7. Battalion Creation ScreenFig 8. Division SummaryScreenthe edit menu and select . This makes a special copy <strong>of</strong> the battalion.Type (ESCIf1) again and select and then . A copy <strong>of</strong> has been entered. Select and change the ID to (2nd) and Map Loc to(9,16).Similarly use in and change its ID to (3rd) and its Map Loc to(8,17) and arrival to (27).To create the artillery battalion select and type (12a) (RET) (9) (RET) (16)(RET) (13) (RET) (3) (RET) (4) (RET) (14) (RET) (27) (RET) (4) (RET) (4) (RET) (9)(RET) (15) (RET) (7) (RET) (6) (RET). .That's all you have to do. Type (ESC/f1) three times to return to Menu 12 whichshould look like fig 8. The R.C.T. 3 regiment which we have created is loc'ated in!he fi.rst regimental slot. The fact that there are two 1st bns tells you that we're notInfallible! Type (ESC/f1) until you return to Menu J (Master Create). Save all yourchanges to disk using the option.83
5. THE WARPLAN DESIGN MENUSThis section describes the various menus in Warplan together with explanations<strong>of</strong> their functions. The order in which they are presented represents a convenientsequence for the creation <strong>of</strong> a new scenario.5.1 MAP DATA5.11 Map Size (Menu 8)The map size in <strong>Halls</strong> <strong>of</strong><strong>Montezuma</strong> is variable. Each map element is 13 hexeswide by 7 hexes deep. There may be up to three elements across and four down.Thus, the maximum size <strong>of</strong> a battlefield is 39 by 28 hexes. At a suggested groundscale <strong>of</strong> 1 kilometre per hex, this represents an area <strong>of</strong> a little over 1,000 squarekilometres.In creating a scenario, map size must be set before anything else. Select thesmallest map size that can comfortably support the action you wish to represent.Apart from being less work, smaller maps will mean faster games.5.12 Define Terrain (Menu 7)There are sixteen terrain shapes in <strong>Halls</strong> <strong>of</strong> <strong>Montezuma</strong>. The shapes arecompletely editable in Warpalnt. The names and the effects on both combat andmovement for any terrain shape can be defined for each terrain type. It is possibleto represent the ground conditions <strong>of</strong> any battlefield by judicious use <strong>of</strong> namesand combaUrnovement effects. Use the (RET) key to advance the cursor throughthe screen.Examine any (or all) <strong>of</strong> the game scenarios and the blank design form in AppendixA. As an example, we have selected the Iwo Jima scenario. See fig 9.Fifteen <strong>of</strong> the 16 terrain shapes available have been used in this scenario. Foreach terrain shape you wish to use, enter a 1-10 letter name.Every battalion in the game is assigned a movement allowance in the TroopCreation routines. The movement section <strong>of</strong> this display is used to determinehow many movement points each type <strong>of</strong> terrain will cost when that battalionenters a hex <strong>of</strong> that type.Mechanized battalions are those primarily moved by tracked or wheeled vehicles.Non-mechanized battalions primarily move on foot. Enter a number between 0and 31. Note that 0 signifies the hex is impassable to that type <strong>of</strong> battalion and willappear on the screen as a dotted line.In the above example, terrain costs 24 MPs for mech bns and 12 MPsfor non-mech bns. The terrain symbol on the top <strong>of</strong> the screen corresponds tothe line currently being edited by the cursor.na"eOCEANOPENBROKENGULLIESPLATEAUBLUFFSAIRFIELDBEACH/ASHAIRFIELDAIRFIELDHILLTOPCLIFFSAIRFIELDAIRFIELDnOUNTAINFig 9. Terrain Effects ChartTerrain affects combat by reducing the effectiveness with which an enemybattalion will attack a particular hex type. Since armoured, artillery and infantryunits playa different role in combat, there is a separate effect for each type. Entera value between 0 and 7. A value <strong>of</strong> 7 means that the terrain has no adverseeffect on combat. A value <strong>of</strong> 0 means an incredibly tough position to assault.From the same example you will ote that artillery will not be very effective in.Have a look at the different types <strong>of</strong> terrain. They are combined onscreen to produce the multi-hex runways that you see on the game 'map <strong>of</strong> IwoJima.5.13 Define Misc Factors (Menu 6)t~ t~ ... t ..... , t~ t~"H "H "H "H "H"ove"ent co"bat.: 8 ..·31:' (8·..7 :'non"ech "ech ARn ART INF... ... ...2 2 7 7 76 4 5 618 6 4 7 4 6 5 528 9 5 3 46 1 6 6 28 4 7 7 6 1 6 6 79 3 1 3III~12 4 2 31 6 6 76 1 6 6 712 2 1 3... ... ... ..There are 3 components to this screen. Examine any (or all) <strong>of</strong> the gamescenarios and the blank design form in Appendix A. As an example, we haveselected the Iwo Jima scenario. See fig 10.84 85
nove"ent Co"bat.: 9 ..·15 :. (9,..7 :.,Honnech "ech ARn ART IHFROAD 3 2 + + + + + +lORT + 4 8 2CITY + + + + 5 4 5(+ :. BRIDGE 9 9 9 8 8(+ :. RIYER + + 4 3 1 3(9·..15) ..· Adjacent controlled hex penalty.: 1 ) ·'2'1 , . 1'3'1 , . .: 4) ·'5', , . .: 6)(+ :. Axis 9 8 1 1 2 2(+ :. Allied 1 4 6 8 19 18(9 ..,15 :1'" yp!I S per stren~th pointHonnech "echAxis 3 3Allied 15 6Fig 10. Miscellaneous Factors1. Roads, Forts and Cities must have their movement and combat effects definedin the same way as terrain types. Note that forts and cities cannot affectmovement and roads cannot affect combat. Mechanized units cannot cross riversexcept at bridges. Notice how Forts, as defined, severely reduce the combateffectiveness <strong>of</strong> all three troop types, especially artillery.2. Every hex on the map is controlled either by the Axis or Allied player. This is setwhen the scenario is created. Control then changes when a battalion enters anenemy controlled hex. This change is automatic except for enemy forts andminefields. They take a variable amount <strong>of</strong> time to demolish/clear and untilrendered inetfective they will function as normal for their original owners. Inessence, you do not really control a fort or minefield hex until you have clearedthat hex. Hexes occupied but uncleared at the end <strong>of</strong> the game remain enemycontrolled for victory point purposes.Progress is always slower when moving in enemy territory. Just how much sloweris determined by the values entered for adjacent enemy controlled hexes. The86parameters from (1) to (6) are the number <strong>of</strong> surrounding hexes which are enemycontrolled. The values underneath each parameter (whiich may range from 0 to15) specify the movement point penalty, for entering a1 hex surrounded by anyparticular number <strong>of</strong> enemy hexes. Note that the penalty is specified for eachside. Thus the AXIS line specifies the penalties for Axis, units in Allied controlledhexes and vice versa.From the example in fig 4, Axis units in hexes surrounded by 1 or 2 Alliedcontrolled hexes suffer no penalty. Those hexes surro unded by 3 or 4 enemycontrolled hexes suffer a 1 MP penalty and 5 or 6 hexes a 2 MP penalty. note howmuch more difficult it is for the Allies to move in terrain co ntrolled by the Axis.3. The size <strong>of</strong> a battalion is measured in strength points as described in the TroopCreation routines. Each player receives victory points for destroying enemybattalion strength points. A value between 0 and 15 must be entered for both themech and non-mech categories. The AXIS line reflects the number <strong>of</strong> VPsearned by the Allies for killing Axis strength points in eaclh category.5.14 Map reate Ut I ty ( enu 9)It's probably a good idea to make a draft version <strong>of</strong>f your battlefield beforecompleting the rest <strong>of</strong> the map data. However, we strongly advise you not to editthe map screen until all the information in Menus 6-8 has been compiled andentered into the program.A 13 hex by 7 hex section <strong>of</strong> the map will appear with a white flashing cursor. Inthe bottom left <strong>of</strong> the screen you will find the hex co-ordinate <strong>of</strong> the cursor'scurrent location. The middle section contains the terrain name and the iconsapplicable to the current hex, as they appear in the map> walk routines. If the hexhas been defined as an objective the name appears at tlhe bottom <strong>of</strong> this section.There is a schematic display <strong>of</strong> the map in the lower rightt which indicates the mapsize and the current location <strong>of</strong> the cursor in relation to thle full map.There are 16 terrain types which can be entered. River and bridge hex-sides canbe entered. Roads, cities, forts and minefields can be added to a hex in anycombination. Every hex must be identified as Axis or Allied controlled.The I,J,K,M and 1-6 keys will move the cursor around the chosen battlefield. 0 willcentre the screen on the cursor.To create a terrain type in a hex, type (T)(n) where n = a number between 0 and15. Please see the blank terrain effects chart in AplPendix A. Note that thesecond terrain type (the clear icon) requires you to type (T) (1) (RET). This is todistinguish it from terrain types T1 0-T15.To add a road, city, fort or minefield to the hex, type (R), (C), (F) or (X) while thecursor is over the hex. Type the same letter to remove th e feature.To create a river hex-side, you must type three keys. The first is (S). This identifiesa hex-side. The second is a number between 1 and 3. Tl1is identifies north, north-87
eastern and south-eastern hex-sides respectively. Note that the south hex-side<strong>of</strong> one hex is the north hex-side <strong>of</strong> the hex directly below it. In this way, all 6 hexsidescan be edited. The third is a number between 1 and 2. (1) identifies a river.(2) identifies a bridge. Type (SO) to clear all hex-sides from a particular hex.To set control <strong>of</strong> a hex to Axis or Allied, type (RET) to bring up the map menu andselect . Select or as appropriate. All hexes,except TOs, will have their terrain icon replaced by the Axis or Allied control icon.As the cursor moves, it will leave a trail <strong>of</strong> the appropriate control icons behind it.To change control, type (RET) to bring up the map menu and select . You are back at square one and can repeat the procedure using the othercontrol icon. When editing hex control from scratch, the default value is Axis.For convenience, you can set the cursor to automatically produce a terrain shape.With the cursor flashing on the chosen terrain, type (RET). This brings up the mapmenu in the bottom right <strong>of</strong> the screen. Selecting from this menuwill lock the current terrain shape to the cursor. You may now move the cursor andthe selected shape will be created wherever the cursor is moved. Type (RET)again to go back to the menu and select to turn <strong>of</strong>f the shape.We sU~Jgest you keep the map size as small as possible for your first originalscenano.All maps are compromises between the actuality <strong>of</strong> the terrain and itsrepresentation. Do not feel afraid to be creative with terrain to make the map workproperly within the game system.5.2 UNIT DATA5.21 Troop Creation (Menu 14)Examine the blank division roster in Appendix A. One <strong>of</strong> these should beprepared for each division in the game. Do not attempt to edit the screen untilthese rosters have been completed.Armed with your completed roster and using the information in Chapter 4 (Varyinga Scenario), you can create the units in the division.The following notes will explain the factors which must be valued or rated. See fig7 for a partial example. A design perspective is attempted in the Design Overviewat the end <strong>of</strong> this section.HeadquartersHQ 1.0. Enter a 1-8 character name to identify the division or regiment.UNIT TYPE. Enter a 1-8 character name to describe the type <strong>of</strong> division orregiment.HQ ADMIN. Enter a value between 0 and 7. Admin affects the efficiency <strong>of</strong> every88function the HQ carries out. The higher the value, the better. Divisional HQ adminnever varies in the course <strong>of</strong> a game. Regimental HQ admin rises and falls inresponse to the current situation.LEADERSHIP. Enter a value between 0 and 7. Leadership is always important inbattle. The higher the value, the better. Neither divisional HQ leadership norregimental HQ leadership will change in the course <strong>of</strong> a game. Both are importantto the effectiveness <strong>of</strong> a formation.HQ SUPPLY. Enter a value between 0 and 7. Divisional HQ supply is fixed ineach scenario and represents the overall supply status <strong>of</strong> the formation.Regimental HQ supply usage is dependent upon combat while resupply isdependent upon the divisional supply value.The more fighting, especially assaulting or exploiting that a unit does the greaterthe supply consumption. An adequate regimental HQ supply level is vital foreffective combat. Values between 4 and 7 are satisfactory for all purposes, values<strong>of</strong> 2 or 3 will result in certain penalties in combat while values <strong>of</strong> 0 and 1 aredisastrous. Thus a unit with very low divisional supply will be severely restricted inthe amount <strong>of</strong> effective combat it can undertake.BRITTLE. Enter a value <strong>of</strong> 1 if the HQ is brittle. Brittleness is a factor for divisionaland/or regimental HQs. A unit suffers the effects <strong>of</strong> brittleness only if theregiment or division is designated as brittle and its casualty figure reaches thebrittleness level set in the scenario briefing. Once this happens then thedivisional or regimental HQs supply and admin values are set to zero and attachedbattalions suffer attrition each turn. For divisional HQs the affected battalions arethe divisional assets, while for regimental HQs they are the regular battalions <strong>of</strong>that regiment.HQ MOVEMENT. Enter a value between 0 and 31. RegUlar divisions with theusual provision <strong>of</strong> wheeled or horse-drawn vehicles should be given a movementallowance at least equal to the mech. min. value, even if they are basically legdivisions. Only those divisions which arrive by an air or amphibious route shouldhave a movement allowance lower than the mech. min. Resupply by XX HQs witha movement allowance lower than the mech. min. will not be as good as theirconventional brethren in most circumstances. Resupply across rivers is lessrestricted for XX HQs with a movement allowance lower than the mech. min. If aunit was tied to a single supply source (such as an airborne drop zone),consideration should be given to using a zero movement point HQ to reflect this.ARRIVAL (XX HQ ONLY). Enter a number between 0 and 99. This is the turn thatthe divisional HQ will arrive on the map. An arrival number <strong>of</strong> 0 means the HQbegins the game deployed on the map. Units without a divisional HQ will have noline <strong>of</strong> supply. Delaying the arrival <strong>of</strong> a HQ beyond that <strong>of</strong> its battalions is a veryuseful way <strong>of</strong> restricting the operations <strong>of</strong> units until an appropriate time.LOCATION (XX HQ ONLY). Enter the x,y map co-ordinates <strong>of</strong> the HQs start orarrival hex.89
SaonUNIT 1.0. Enter a 1-3 character name to identify the battalilon.LOCATION. Enter the x,y map co-ordinates <strong>of</strong> the battaliion's start or arrival hex.Note that amphibious reinforcements must be given an ocean hex adjacent to theintended beach-head. Do not place two battalions in the same hex.CLASS. Enter a number from 0 to 13. These 14 numbers correspond to thefourteen different types <strong>of</strong> battalions you may create.
!Note that all asset battalions which are intended as reinforcements should beassigned to a regiment when created and not placed in reserve. This will stopthem from clogging up a reinforcement hex while they get their bearings.A Design OverviewUnitsThe process <strong>of</strong> creating a scenario should be regarded as an art rather than ascience. While some armies, notably those <strong>of</strong> the United States, came close t<strong>of</strong>ighting with a homogeneous organization, a lot didn't. The circumstances <strong>of</strong> warusually bear little relation to paper organizations. Do not be afraid to combine unitsand manipulate strengths and ratings to get the desired affect. A scenario is muchmore than the sum <strong>of</strong> its parts.CombatThe various battalion types, as defined by the CLASS entry under Battalions,have different effects in the combat routines. Choice <strong>of</strong> the CLASS for a unitshould bear these in mind. The types are listed below.0= leg infantry, 1 = motorized infantry, 2 = mechanized infantry, 3 = paratroopers(airborne infantry), 4 = heavy weapons or mortars, 5 = cavalry, 6 =reconnaissance, 7 = engineer, 8 = anti-air, 9 = anti-tank, 10 = tank destroyer, 11 =armour, 12 = assault gun, 13 = artillery.Numbers 0-1,3-9 are INFantry types, 2,10-12 are ARMour types and 13 is anARTillery type.Any combat having both the INF types 0-3,5-7 and ARM types 11-12 gains acombined arms bonus. When defending, there is an additional bonus for thepresence <strong>of</strong> an anti-tank type unit (8-10).Any unit with a range greater than zero gains a bonus when used in conjunctionwith a 0 range unit. For example, a US infantry regiment usually mustered threeinfantry battalions and an artillery battalion. The heavy weapons and mortars werein separate companies organic to the infantry battalions. To represent thesupporting fire <strong>of</strong> these companies, enter a range value <strong>of</strong> 1 for one <strong>of</strong> theinfantry battalions. This will ensure that the combined arms bonus is realized.Note that the artillery bonus is in addition to the above.The presence <strong>of</strong> ART or OBS also confers a bonus, irrespective <strong>of</strong> the actualeffectiveness <strong>of</strong> those points. ART and OBS points work with full effectivenessonly in or . All other orders are only 50% effective.Engineer units ignore terrain when they attack, and are hence extremely usefulfor attacking forts.92Supply. Supply consumption is dependent on the level <strong>of</strong> fighting a unitengages in. Normal resupply depends on regimental and divisional admin anddivisional supply. There must also be a Line <strong>of</strong> Supply (LOS) between theregimental and divisional HQs and the Div HQ must not be adjacent to any enemyunit. If their is no LOS then resupply can still occur but at much reduced levels.5.22 Equipment Roster (Menu 15)The use <strong>of</strong> this menu has already been explained in the previous section.5.23 AxisI'Allied Objectives (Menu 16)Axis and Allied objectives are created in the same way. Examine the blankobjective chart in Appendix A as well as fig 7.Each side may have a maximum <strong>of</strong> 12 objectives. The and lines in the menu window are used to bring up the next objective. The line is used to enter the objective and set its parameters. The lineis an alternative method <strong>of</strong> positioning the objective on the map.Each objective must be given a 1-11 character name and an x,y map location.An objective may have a division, numbered 1 to 3, assigned to it. If a side iscomputer controlled, the computer will attempt to take an objective with aregiment from the nominated division. This regiment will be assigned divisionalassets and will head for the objective at every opportunity. If a number <strong>of</strong>objectives are given to one division it will attempt the closest and work its waythrough the others as they arise. In this way a line <strong>of</strong> advance may be specified fora division. Non divisional objectives will not be ignored and regiments may beassigned to take them during the course <strong>of</strong> the game.This control is only valid for the turns that an objective is earning points. If anobjective is assigned which starts in friendly territory, Le. is already owned, then itis ignored and the division will follow the normal rules.However, if such an objective is taken by the enemy, then the computer will makea concerted effort to recapture it.The ability to control troops conferred by the divisional objective is very useful.Scenario creators now have a lot more power at their disposal.Victory points can be awarded for the possession <strong>of</strong> an objective on a turn by turnbasis throughout the game and/or at the end <strong>of</strong> the game.When awarding points throughout the game, you must select the turn that pointscoring will begin and the turn on which it will end.If you wish to create an objective simply as a signpost for the direction <strong>of</strong> yourtroops, then don't assign any VPs for its possession. The Objective or Enemy IIcommands are the only way to move men freely around the map. If you wanttroops to be able to go somewhere, put in an objective.93
5.3 BRIEFING5.31 Corps Details (Menu 18)Examine the blank briefing form in Appendix A as well as any <strong>of</strong> the scenarios.For each nationality you must enter a 1-16 character name for the Side, the Corpsand the Commander.Support points are assigned in two categories; those available in daylight turnsand those available at night. Each point <strong>of</strong> air support is equivalent to 1 SP <strong>of</strong>artillery. Reliability measures how likely the support points are to be available foruse each tum. 0 =unlikely, 3 =almost certain.Rating is a measure <strong>of</strong> the effectiveness <strong>of</strong> the support. Sixteen inch naval shellsdeserve the highest rating, 251b WWI surplus bombs the lowest.Air superiority is measured on a scale <strong>of</strong> 0-7. 0 = strong Axis, 7 = strong Allied.Reliability measures how likely this air superiority is to remain throughout thescenario. A reliability <strong>of</strong> 0 means the air superiority condition could fluctuatefrequently throughout the scenario. A reliability <strong>of</strong> 7 means there is little chance <strong>of</strong>any change to the air superiority condition.5.32 Scenario Details (Menu 19)The blank briefing form in Appendix A illustrates this routine.Enter a 1-16 character name for the scenario. There are up to three 26 characterlines you can use for a sub-title to the scenario.Enter the turn, day, month, year and century that the scenario begins.Enter the number <strong>of</strong> days the scenario will last. The maximum is 25. Every gameends on a pm turn.Enter the initial weather. 0 = precipitation (rain or snow as appropriate), 1 = heavyovercast, 2 =light overcast, 3 =clear. Note that this is atmospheric weather only.To reflect the effect <strong>of</strong> mud or snow on ground movement, you must makeappropriate provision in the terrain effects routine.Enter the current weather forecast. 0,1 =stormy, 2,3 = building, 4,5 = stable, 6,7= clearing.Enter the climate. This sets the basic parameters on which the weather forecastwill operate to produce the weather. The default type 0 is EUropean, identical tothe Battlefront system. The other climates are Arid, (suitable for desert battl~s),Monsoon, Tropical, Arctic (clear only 25% <strong>of</strong> the time, cloudy or precipitation therest) and Temperate (perfect weather, just like Sydney).Enter the Mech Min. All battalions with a movement allowance greater than orequal to this number pay mechanized terrain costs. All others use the nonmechanizedvalues.94Enter the separate casualty levels at which units <strong>of</strong> each side become brittle (if sodesignated). These are percentage casualties in increments <strong>of</strong> 10%. The defaultvalue reads 00%. This is actually zero percent, Le. any unit designated as brittle isimmediately brittle.Enter for each side whether it is night capable. Night capable units conduct minorcombat at night and always receive their allocated OBS points.6. WARPAINTWarpalnt is entirely new to wargame construction. Even we are amazed at justhow versatile it is. Every useful icon in the game can be edited, including all unitand terrain icons.6.1 Warpaint (Menu 20)The line gives access to the icon editor. The and lines are used to install or extract a graphics set from any BattlefrontGame System save game or scenario disk.For example. Suppose that you liked the Iwo Jima graphics so much that youwanted to use them in the Saipan scenario from Battlefront. To transfer thegraphics you would execute the following steps. Load the two Jima scenario, anduse the line to load the Iwo Jima graphics set into memory. Removethe Iwo Jima disk and insert a Saipan disk. Load the Saipan scenario and use to place the new graphics set into the Saipan data base. The graphicsthat were in Iwo Jima are now in Saipan. Save the Saipan game and the change ispermanent. (Remember you cannot save to a scenario disk, so you would havehad to have used a Saipan save game disk).What has happened is this. In the older Battlefront Game Systems, a basicgraphics set resided in the game master. They did not reside in the scenario data.With <strong>Halls</strong> <strong>of</strong><strong>Montezuma</strong>, there is a graphics set in the master disk as well as a setin the scenario data. The computer will use the scenario data set whenever it ispresent. You cannot alter (or corrupt) the graphics set in the master disk.6.2 Graphics (Menu 21).The screen shows a large boxed section on the left. This shows a pixel by pixel,(dot by dot), representation <strong>of</strong> an icon. Below it the icon is shown in white and theallowable colors as it would look upon the screen. The icon number is shownabove the menu box. The current selected color is shown below the menu box.Selecting the line shows a flashing cursor in the top left <strong>of</strong> the icon box.95
•.........................................................•...............................................................';','111"',,I.',::..:: :..:''I',,I.',.:...:.Fig 11. Warpaint Editor...................................EDITCOLORCLEARrORUARDBACKGOTOSTORERECALL....................................Axis Rine~"HITEThe box is 14 elements across by 16 elements down. The presence <strong>of</strong> a pixel isshown by a white square and its absence by a white dash.The I J K and M keys or the arrow keys are used to move the cursor around theicon bo~. At any location the (RET) key creat~s a pixel if ~one is present andremoves it if one is. As you make changes In the large ,con box these arereflected in the small icons at the bottom <strong>of</strong> the screen.Examine fig 11. this shows the Warpalnt editor and the A~is. min~field sym~ol,rendered here (<strong>Apple</strong> version) as a skull and crossbones. This Icon IlIu~trates Justwhat can be achieved. Note that the color is specified at the bottom right <strong>of</strong> thescreen.There are a few points that you need to be aware <strong>of</strong> to get the best result.s. Thesemay vary from computer to computer and ~~e explained in d~tail below. It IS best tomake frequent saves to disk when editing Icons as mistakes can produceunintended consequences.96£After using the edit function type (ESC) to leave. You will be asked to or your changes and must make this choice before returning to Menu21. Choosing incorporates any changes you have made while returns the icon to its previous shape.The option allows you to change the selected color <strong>of</strong> the icon. The and options allow you transfer an icon between differenticon numbers, alloWing easy variations. The option blanks the screen,TECHN~ALNOTESFORAPPLEANDCOMMODOREP e U r.Welcome to the wonderful world <strong>of</strong> color mixing. There are a number <strong>of</strong>restrictions in the <strong>Apple</strong> graphics as some random experimentation will makeobvious. Vertical white lines must be at least two pixels wide, otherwise they turnout either orange or blue. Depending on which column they are in, vertical linesone pixel wide can appear in two colors and are invisible in the other two.Essentially, any shape that looks good in both white and a color must be multiples<strong>of</strong> two pixels 'across, unless you like the weird color mixing you get by defying thisrule. Some icons are designed to be used only in white.Since the color <strong>of</strong> a dot can change depending on exactly where on the screen ithappens to be located, designing non white icons also demands care.Sometimes icons will appear brown but the text will insist they are white. Simplychange the color to brown again and all will be well.Continuing icons to the edges can cause color mixing problems, especially at thecorners.CoresThe Commodore does not have the restrictions <strong>of</strong> the <strong>Apple</strong> with regard to pixelcombinations. Its icon resolution is 16 x 16. However the Commodore does havesome color mixing problems <strong>of</strong> its own, especially at the top and bottom <strong>of</strong> hexes.There are blank layout sheets for graphic design for both the <strong>Apple</strong> II Family andthe C-64/128 in Appendix A. Make photocopies <strong>of</strong> them or draw up somethingsimilar; they are an essential aid to graphic design.con FunctionsAll icons have a particular function. In the case <strong>of</strong> the terrain icons (numbers 0 to15) the functions and the name are defined in the terrain menu. All other iconsserve a particular purpose which does not change. If you edit an infantry battalionicon to look like a tank, the system still treats it as an infantry battalion. A list <strong>of</strong> iconfunctions is found in AppendiX A.97
7. EDITOR'S NOTESCompatibilityEven with all the enhancements to <strong>Halls</strong> <strong>of</strong> Montezum~, everything remain.scompatible. You can still use any scenario with any maste~ disk and the system willwork everything out for itself. If running an older scenano under a newer gamesystem, the game system simply ignor~s the absence <strong>of</strong> t~e extra data, or makesan appropriate allowance for it. If running a n~w~r scen~no under an older gamesystem, the game will ignore the extra scenano Information. Please note that thesystem does this at startup. If you load a Battlefront or B~ttles In Normandyscenario into a later version game while it is actually running, then some verystrange things could occur.While you can run new scenarios .u~der old g~me systems, clearly the bestcourse <strong>of</strong> action is to upgrade the onglnal scenanos so as take advantag~ <strong>of</strong> theenhancements. Below is a list <strong>of</strong> all the changes that have been made In bothBattles In Nonnandy and <strong>Halls</strong> <strong>of</strong><strong>Montezuma</strong>.Battles in NormandySeparate movement allowances for divisional HQs.Different climate types.Variable scenario start turn.Landing craft attrition rule.Decreased artillery effectiveness in combat except major attacks.Improved artillery deploymentImproved regimental cohesiveness.<strong>Halls</strong> <strong>of</strong> <strong>Montezuma</strong>Brittleness.Night capable units.Maximum unit strength as well as current strength.Increased scenario length ( 99 turns, 25 days max).Divisional assets will not normally trigger comcat states.New minefield and fort rules.Separate Enemy Controlled Hex movement penalty per side.Divisional Objectives.Warpaint graphics editor with the ability to change graphics in all older scenarios.PlayingOlder ScenariosWe would liketo warn you that play balance in many <strong>of</strong> the older scenarios haschanged con~derably with the introduction <strong>of</strong> these improvements. Amphibiousscenarios arethe most likely to need adjustment. We intend to rebalance thesescenarios who time permits and all the information needed to upgrade the olderscenarios willlppear in our Run 5 magazine, beginning with Issue 9.When Battleront came out it was a truly unique program. It still is. Nothingremotely appoaching its power and flexibility has been produced by anyoneelse. Battlesln Normandy improved upon Battlefront. Now with <strong>Halls</strong> <strong>of</strong><strong>Montezuma</strong> ve have even more enhancements, all due to its programmer, RogerKeating. EveMhing we scenario designers asked for he gave us, and more. Hegave us capbilities we hadn't asked for because we didn't think they werepossible, and>thers we hadn't even been able to imagine.All the time hehas maintained complete compatibility with the original Battlefront.That approacl is rare enough in the l<strong>of</strong>ty spheres <strong>of</strong> business programming andunheard <strong>of</strong> in be game world. Warpalnt and the rest <strong>of</strong> the enhancements to <strong>Halls</strong><strong>of</strong>Montezumlare not only a delight to work with but a real tribute to Roger's skills.BIBLI:>GRAPHYAMERICAN Bale Monuments Com. 2nd Division Operations in the WorldWar. US Government Printing Office,1944American Armies and Battlefields inEurope. US Govenment Printing Office,1938BAUER, K. Jad< The Mexican War 1846-1848.Collier MacMillan, London, 1974FOSS, Christa>her F.Tanks and Rghting Vehicles.Salamander Books, London, 1977FUNCKEN, Lili,ne &Fred Arms &Uniforms: WWI Part 1.Ward Lock Ltd,London,1974HAYASHI, Sabro and coax, Alvin D. Kogun: The Japanese Army in thePacific War. The Marine CorpsAssociation, Quantico VA, 195999
APPEN DIX A !!!!!!!!!!!!!!!!!!!!!!!!!!!!!!!!!!!!!!!!~HEINL, Robert DebsHOGG,lanKRULAK, Victor H.MILLEn, Allan R.NORD, RodgerO'BALLANCE, EdgarSTANTON, Shelby L.Victory at High Tide: The Inchon-SeoulCampaign. Nautical and AviationPublishing Co, 1979Artillery in Colour 1920-1963.Blandford Press,poole Dorset, 1980First to Fight. Naval Institute Press,Annapolis,1984Semper Fidelis: The History <strong>of</strong> theUSMC. MacMillan, NY, 1980Belleau Wood.Games, 1980Historical AlternativesThe Wars in Vietnam. Hippocrene, NY,1981Vietnam Order <strong>of</strong> Battle. U.S. NewsBooks, Washington DC,1981ACKNOWLEDGEMENTSMalcolm Power, who did the research and playtesting <strong>of</strong> the WWII scenarios, anddesigned the new graphic symbols in the game.Andrew Taubman, who wrote the historical articles and did the research andplaytesting <strong>of</strong> the other scenarios.Gregor Whiley, who provided encouragement and support, edited and wrote therule book, and managed the whole project.Stephen Hart, Stella Axiak and Lyn Keating, who again kindly pro<strong>of</strong>read the copy.Tony Green and Ken Zaris (USMC Ret.), without whose help the historicalresearch would have been virtually impossible.BRIEFINGI Q~:'~ r:.jl~lI~it~n!fwttWIli!TERRAIN EFFECTS CHART•.•.•......... ····.·..CSCENARIO[16]j:.>;•...... J BRIEFING [26]----·._.-l •••••••••••.••••••••···..·······..····························rf}:::~:?:··:~·~· :
.H ..AJPENDIX AlDIVISION ROSTER,SCENARiO)··' ··,ratlonallty .., •..•·•. D~~"""",,~~~~ 0••••••••;•••••••••• :••;.>.;.: ::.: •.•• . .:. ..: ;:.• :: ·.. ·;2··nd·········'··iid( ·>4·..·\··ti·::.:I;·n···d··.\.rilJ'~b;' •...... . ..;~rld:f CJ CJ·~--~········I~~·~········I•••••••••F~..;..:::--;·td ~igtlH.!--~~ frd Reg\ IH .~~~t h Rew r~_.·....aI!il:~li;:F ~..-.·.·.·.·.~·.·.·.·.·...........",""""">..•.;..1.•••••••3 rd102HEADQUARTERS DATAFORMATION XXHQ······ 1/RHQ ·2/RHQ . 3/RHQ ··4/RHQHQI.D. 181 . . .......UNIT TYPE 181 .HQADMIN 0·7 ....LEADERSHIP 0-7 ....HQ SUPPLY 0.7 "'HBRITTLE 0·1 I.·······················.. ····MOVEMENT 0·31 :'. :............... NlA NlA NiA NiAARRIVAL 0·99 NlA NiA NiA NiALOCATION IX,vl . NlA NlA NlA NlABATTALlO~ DATAFORMATION HlIII 1/1 2/1 3/1· 4/1 112· 212 ··3/2' 412 1/3 2/3 3/3 4/3 1/4'· 2/4 3/4 4/4 1k 2/. 3/· 4/.UNIT 1.0. [31 ::::>.:.:.- ..........; ............ i··.·.··...... ..............LOCATION (x.v) .;"':> .;..;;.. .;...... ....... ....... ...... ..CLASS 0-13 .:> .• .......... ..::. .. .... ....MODE 0-3 ........ ......EQU'PM'T 0-31 ....... ..'"..... ....MOVEMENT 0-31 :.......... .....;.. I'" ..... .... ..ARRIVAL 0·99 .............. I··.;···· .. ......:'":;:>:::" ..;.....;.. ............. .:..... ...... ..... .........MAXSTREN. 0·15CUR.STREN. 0-15 .......... ....... '......RATING 0-15· ;............: .........RANGE 0·15FATIGUE 0·7EXPERIENCE 0·7H.....ATTACHM'T..·.·.·.•...•.•.I.i.1 ...•.•.•.•...•..·.n .•.••".•••.....I.I..I...I..I.I..I.:'.· .•.B.•.•.•. :.1..:.•.1: ••••.••1.•••••.1:1.••...•1... $;.•.•••.••.:•.••••.••..••••••.•••••••.••••.• :................ • ...... 1..::, .. 1) : bd.d• F..::.....·::",····::3rd·Brf;·;·;··;·..;: ..·• . ···.··3rd Bn: ....:::: ••;•••••;.... . ·•··..··3rd Bn········· •••::.••••·Ḃ•.• ṅ•.••••.••'.·••·•• •.·.•;:~::~I']!"! ';:~:I;;J!:;11.< .••..........•·.••.•.• . ..--4..•;......... II .... II..• ).F;.,,"..-~ .. L-....J L-....J L-....J L-....JI...r-...;..::.,;.;.;",· .... :·4iil Bn.:'. :.... 41h Bn 41h Bn 41h Bn.;••;•.~C] CJ. CJ·· CJ...... ...0-4 NlA NlA NlA N/A N/A N/A N/A N/A N/A NlA N/A N/A N/A N/A N/A N/AO~JECTIVES AND MISC. FACTORS4~X)aX)~ijolX)~Xrax)"lIX)}ax).~x.):1(\X)~ ....1 )1~X)1\h)aL)'>:ll,ji4L)allaL)t~h)·&L)Name[11]MapLoc[X,y]Qhfl:); i •••.•- .•.•);···I:....••:·:.m::.:••:.::::·.1~9.1~br1~L):::=IDiv.(0-3)Start End Points per Points at(0-63) (0-63) Turn (0-30) End (0-255)•··.....·........•. •• ~3.~·······;·················;J~~:!D~~1«~3)::',::;:,"::-:: ::~;::"103
!!!!!~~~~~~~~APPENDIX AWARPAINT BLANKSSTSUPERIOR COMPUTER CAMES FROMrECle STUDIES CROUPREACH FOR THE STARSNow available for the <strong>Apple</strong> II family and the C-64/128APPLE II FAMILYCOMMODORE 64/128104ICON INDEXNumber Function .... 0-15.··)16Terrain St1~~esCity ... ..... 17~~::JrJ~~ft>lll!~~··.·llll.F~~:7'c:arqMr!>( .••• 21 Allied Boat ....22 .. Axis Airborne .23 Allied Airborne24 Axis Div HQ25 Allied Div HQ26 Axis Mine27 Allied Mine28 Axis Flee29 Allied Flee30 Axis Plane·31 Allied Plane32-46 Specific Bn Icons47 Axis Infantry48 Axis Armour49 Axis Artillery .>/50 . .. Axis HQ ... ... ..•.lill:t;i~\;::!!!;~~~~· ••.54 Allied HQ .55Moce IconBAnLEFROavailable for the App!e II familY and Ih8NC-641128 Recommended Retail $40.00"sse have d~ne their usual fine job <strong>of</strong> cIeS/gII os WllII os~ ~Iholoughly enjoyed BottteIront and loOk lIorWOrd to new scenartos: ...Mov ment Magan".·'Bo'lfefront certainly gMls a very goad 'ft88/' for corps IMI opinIIIOlIL ItIs.,' , Interesnng. weD destgned and _ presented: a lIIIIlIIIIlrsuc llSsor to Camers at war. ,,_out.and soon for the Macintosh. Recommended Retail $45.00R90Cfl fOI the Stars. is jusl about me best science lIetlon gome lor ftle thmklng person oYOiloble on any micr<strong>of</strong>compU1erScience D1f16Sf..once mOSiered thIS mlghl be ltIe only game you II 8Y8r wonl fo bUy 'Of your C-64 Indeed If would be worthbUying a computer fa ploy it Deflnitety one 01 my mosr foyourlfe games and 0 claSSIc. Commodore Magazine.