AII 41008 - 2009 Element Hatch Tent Kit - H and A Accessories
AII 41008 - 2009 Element Hatch Tent Kit - H and A Accessories
AII 41008 - 2009 Element Hatch Tent Kit - H and A Accessories

You also want an ePaper? Increase the reach of your titles
YUMPU automatically turns print PDFs into web optimized ePapers that Google loves.
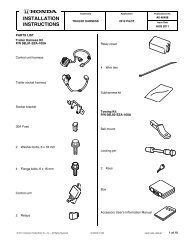
INSTALLATIONINSTRUCTIONSAccessoryHATCH TENT KITApplication<strong>2009</strong> ELEMENTPublications No.<strong>AII</strong> <strong>41008</strong>Issue DateDEC 2008PARTS LIST<strong>Tent</strong> bag13 Stakes4 Guide ropes<strong>Tent</strong>2 Awning pole capsGear loft2 Tie strapsRain coverUSE AND CARECAUTION:Pole bag• Never smoke inside the tent. Never use c<strong>and</strong>les, lightmatches or allow any type of open flame in or near thetent.• Do not cook inside the tent.• Do not store flammable liquids inside the tent.2 <strong>Tent</strong> poles• Allow adequate ventilation inside the tent at all times.• Never run the engine when the tent is attached to thevehicle.2 Awning polesStake bagWARNING:Keep all flame <strong>and</strong> heat sources away from this tentfabric. This tent is made with flame-resistant fabricwhich meets CPAI-84 specifications. It is not fireproof.The fabric will burn if left in continuous contact with anyflame source. The application of any foreign substanceto the tent fabric may render the flame-resistantproperties ineffective.© 2008 American Honda Motor Co., Inc. – All Rights Reserved. <strong>AII</strong> <strong>41008</strong> (0812)08Z04-SCV-1B00-91 1 of 8
INSTALLATIONAttaching the <strong>Tent</strong> to the VehicleNOTE:• Leaving the tailgate open for an extended amount oftime will drain the battery.• Allow the exhaust pipe to cool down for at least 20minutes before you attach the tent to the vehicle.• The tent is designed to add additional space to yourvehicle while parked. It is not intended to be used inwhen the vehicle is moving.• The tent can also be used as a st<strong>and</strong>ard ground tent bysimply zipping up the rear sock.• If the tent is not going to be attached to the vehicle,assemble the tent as described, but move it away fromthe vehicle.• Make sure the vehicle <strong>and</strong> tent are clean <strong>and</strong>completely dry before installation. If moisture under thetent is allowed to dry, it may cloud the paint. If the tentgets wet, remove it <strong>and</strong> allow it to air-dry completely.1. Park the vehicle on smooth level ground, with thetransmission in Park (auto transmission), or neutral(manual transmission). Apply the parking brake.2. With the tent approximately 5 feet away from the rearof the vehicle, prepare to set-up the tent.• Remove the tent from the tent bag, <strong>and</strong> lay it flaton the ground with the straps facing the rear ofthe vehicle, <strong>and</strong> “H” emblem away from thevehicle. Do not stake the tent at this time.• Unfold the tent poles (11 poles each) <strong>and</strong>assemble each of the connected poles into onelong pole. Assemble the other connected tentpole the same way.2 TENTPOLES• Slide each connected pole through the sleevesin the roof of the tent.1.5 m (5 ft)TENTPOLETENTTENTPOLE“H” EMBLEMTENT2 of 8 <strong>AII</strong> <strong>41008</strong> (0812)© 2008 American Honda Motor Co., Inc. – All Rights Reserved.
3. With the help of an assistant, set-up the tent:• Starting at any corner, insert the corner tent pininto the bottom of the tent pole.• When the tent is st<strong>and</strong>ing, attach the plastic clipsat each corner around the tent poles.TENTPOLETENTPOLETENTPINPLASTICCLIPSTENT• At the opposite corner of the tent, walk towardsthe tent while you flex the tent pole <strong>and</strong> st<strong>and</strong> thecenter of the tent up. Insert the corner tent pininto the bottom of the tent pole.• Repeat this procedure to insert the remainingtent pole.TENTTENTPINTENTPOLETENT© 2008 American Honda Motor Co., Inc. – All Rights Reserved. <strong>AII</strong> <strong>41008</strong> (0812)3 of 8
4.Move the tent towards the rear of the vehicle, <strong>and</strong>slip the sock over the roof <strong>and</strong> around the sides ofthe vehicle. The magnetic strips will hold the sock tothe vehicle. Install the magnetic strips carefullybecause the magnets are very strong.MAGNETICSTRIPSSOCKTENT6. Stretch the bottom elastic strap across the rear faceof the bumper. Make sure the tent material is tightagainst the rear face of the bumper, with the exhaustpipe outside the tent. Go outside of the tent, <strong>and</strong>visually inspect the location of the exhaust pipe toverify its location.WARNING• Exhaust contains poisonous carbon monoxidegas that can build up to dangerous levels inenclosed areas.Breathing carbon monoxide can causeunconsciousness or death.• Never start or run the vehicle’s engine whenthe tent is attached to the vehicle.5. From inside the tent, unzip the rear door <strong>and</strong> rearscreen that face the vehicle. Roll up the screen <strong>and</strong>the door material, <strong>and</strong> secure them to the tent withthe sewn-in T-straps.TENTEXHAUSTPIPESCREEN ANDDOOR MATERIALT-STRAPS4 of 8 <strong>AII</strong> <strong>41008</strong> (0812)© 2008 American Honda Motor Co., Inc. – All Rights Reserved.
7. Attach the outside straps to the rear fenderwell <strong>and</strong>tighten the straps.NOTE: If the vehicle is equipped with splash guard,install the lower strap to the splash guard.8. Along the roof of the vehicle attach the straps to theroof rack (if equipped), or extend the long strapsforward <strong>and</strong> attach the hooks to the hood hinge orhood frame. Tighten the straps to secure the tent.WITH ROOF RACK (SIDE RAIL TYPE ONLY)STRAPSROOF RACKSIDE RAILSTRAPSREARFENDERWELLWITHOUT ROOF RACKLONGSTRAPSSTRAPSHOOKHOODHOODHINGESHOOKSHOOKHOODIt is also OKto attachboth strapsin one hole.© 2008 American Honda Motor Co., Inc. – All Rights Reserved. <strong>AII</strong> <strong>41008</strong> (0812)5 of 8
WHEN USING THE HATCH TENT WITH TAILGATEOPEN10. At each of the four corners, stake the tent down withone tent stake through the tab.NOTE: Leaving the tailgate open for an extended amountof time will drain the battery.9. Inside the tent, attach the two outer S-hooks from thetent to the tailgate latches, or to the cargo tie-downhooks inside the vehicle. Attach the center S-hook tothe tailgate latch hook.WITHOUT TAILGATE LATCHS-HOOKCARGOTIE-DOWNHOOKCARGOTIE-DOWNHOOKHOOPSTAKETAILGATELATCHTAB11. Drape the rain cover over the tent, <strong>and</strong> position theawning portion over the front door opening.S-HOOKS-HOOKFRONTTAILGATELATCH HOOKRAINCOVERS-HOOKTENT6 of 8 <strong>AII</strong> <strong>41008</strong> (0812)© 2008 American Honda Motor Co., Inc. – All Rights Reserved.
12. Attach the hook on each corner of the rain cover toeach loop on the tent. Wrap the Velcro tabs aroundeach pole to hold the rain cover in place.RAINCOVERTENT POLE14. With the help of an assistant, place the tip of oneawning pole through the grommet at the corner ofthe awning. Insert the ring of the guide rope aroundthe tip of the awning pole, <strong>and</strong> stake the other end toground using one stake.RINGSAWNINGPOLECAPSGROMMETSVELCRO TABAWNINGPOLESTENTAWNINGGUIDEROPE13. Assemble the two awning poles.TENTRINGHOOKSTAKES15. Pull the awning tight, adjust the height of the awningusing the telescopic pole, <strong>and</strong> secure the awning tothe ground using an addition stake <strong>and</strong> guide rope.Secure the other pole using the same procedure. Ifnecessary, adjust the guide rope length using theadjuster on the rope.AWNINGPOLE© 2008 American Honda Motor Co., Inc. – All Rights Reserved. <strong>AII</strong> <strong>41008</strong> (0812)7 of 8
16. Install the four hooks of the gear loft to the four hoopsof the tent.4 HOOPS4 HOOKSGEAR LOFT8 of 8 <strong>AII</strong> <strong>41008</strong> (0812)© 2008 American Honda Motor Co., Inc. – All Rights Reserved.