MINIRATOR MR1
MINIRATOR MR1
MINIRATOR MR1

You also want an ePaper? Increase the reach of your titles
YUMPU automatically turns print PDFs into web optimized ePapers that Google loves.
Introduction<br />
Battery Replacement<br />
After unpacking, insert<br />
two batteries into the<br />
battery compartment.<br />
• Hinge out the XLR<br />
connector by pressing<br />
the thumb on the<br />
release button. Turn<br />
out the gripped plug<br />
until it locks in the<br />
open position.<br />
8<br />
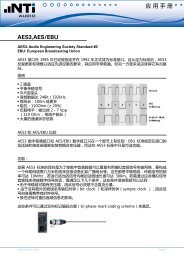
Fig 1 Insertion of batteries<br />
• Open the battery compartment flap with your fingernails<br />
or any appropriate tool.<br />
• Insert two 1.5 V AA size alkaline batteries as shown in<br />
Fig 1. The direction is labeled on the rear side of the<br />
instrument.<br />
• Close the battery compartment flap.<br />
Notes • We do not recommend to use NiCd or NiMh<br />
rechargeable batteries.<br />
• Do not insert batteries of different types.<br />
• Note the correct polarities of the inserted<br />
batteries. Wrongly polarized batteries may<br />
cause permanent damages to the electronics<br />
inside!<br />
• Remove the batteries as soon as they are<br />
flat.