

Free-to-Air Digital Satellite Kit - Philex
Free-to-Air Digital Satellite Kit - Philex
Free-to-Air Digital Satellite Kit - Philex

Create successful ePaper yourself
Turn your PDF publications into a flip-book with our unique Google optimized e-Paper software.
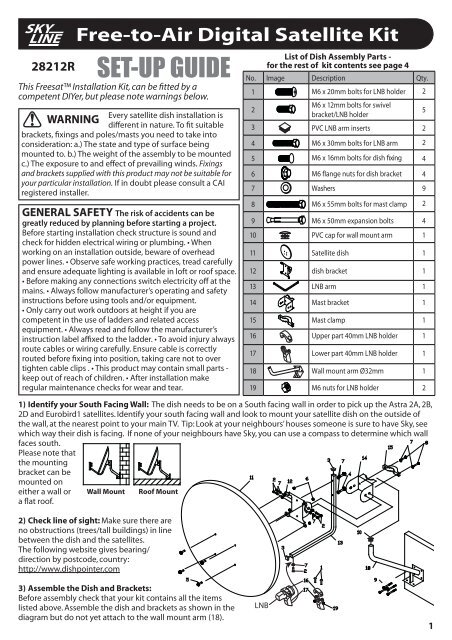
28212R<br />
<strong>Free</strong>-<strong>to</strong>-<strong>Air</strong> <strong>Digital</strong> <strong>Satellite</strong> <strong>Kit</strong><br />
SET-UP GUIDE<br />
This <strong>Free</strong>sat Installation <strong>Kit</strong>, can be fitted by a<br />
competent DIYer, but please note warnings below.<br />
Every satellite dish installation is<br />
WARNING different in nature. To fit suitable<br />
brackets, fixings and poles/masts you need <strong>to</strong> take in<strong>to</strong><br />
consideration: a.) The state and type of surface being<br />
mounted <strong>to</strong>. b.) The weight of the assembly <strong>to</strong> be mounted<br />
c.) The exposure <strong>to</strong> and effect of prevailing winds. Fixings<br />
and brackets supplied with this product may not be suitable for<br />
your particular installation. If in doubt please consult a CAI<br />
registered installer.<br />
GENERAL SAFETY The risk of accidents can be<br />
greatly reduced by planning before starting a project.<br />
Before starting installation check structure is sound and<br />
check for hidden electrical wiring or plumbing. • When<br />
working on an installation outside, beware of overhead<br />
power lines. • Observe safe working practices, tread carefully<br />
and ensure adequate lighting is available in loft or roof space.<br />
• Before making any connections switch electricity off at the<br />
mains. • Always follow manufacturer’s operating and safety<br />
instructions before using <strong>to</strong>ols and/or equipment.<br />
• Only carry out work outdoors at height if you are<br />
competent in the use of ladders and related access<br />
equipment. • Always read and follow the manufacturer’s<br />
instruction label affixed <strong>to</strong> the ladder. • To avoid injury always<br />
route cables or wiring carefully. Ensure cable is correctly<br />
routed before fixing in<strong>to</strong> position, taking care not <strong>to</strong> over<br />
tighten cable clips . • This product may contain small parts -<br />
keep out of reach of children. • After installation make<br />
regular maintenance checks for wear and tear.<br />
List of Dish Assembly Parts -<br />
for the rest of kit contents see page 4<br />
No. Image Description Qty.<br />
1 M6 x 20mm bolts for LNB holder 2<br />
2<br />
M6 x 12mm bolts for swivel<br />
bracket/LNB holder<br />
5<br />
3 PVC LNB arm inserts 2<br />
1) Identify your South Facing Wall: The dish needs <strong>to</strong> be on a South facing wall in order <strong>to</strong> pick up the Astra 2A, 2B,<br />
2D and Eurobird1 satellites. Identify your south facing wall and look <strong>to</strong> mount your satellite dish on the outside of<br />
the wall, at the nearest point <strong>to</strong> your main TV. Tip: Look at your neighbours’ houses someone is sure <strong>to</strong> have Sky, see<br />
which way their dish is facing. If none of your neighbours have Sky, you can use a compass <strong>to</strong> determine which wall<br />
faces south.<br />
Please note that<br />
the mounting<br />
bracket can be<br />
mounted on<br />
either a wall or Wall Mount Roof Mount<br />
a flat roof.<br />
2) Check line of sight: Make sure there are<br />
no obstructions (trees/tall buildings) in line<br />
between the dish and the satellites.<br />
The following website gives bearing/<br />
direction by postcode, country:<br />
http://www.dishpointer.com<br />
3) Assemble the Dish and Brackets:<br />
Before assembly check that your kit contains all the items<br />
listed above. Assemble the dish and brackets as shown in the<br />
diagram but do not yet attach <strong>to</strong> the wall mount arm (18).<br />
4 M6 x 30mm bolts for LNB arm 2<br />
5 M6 x 16mm bolts for dish �xing 4<br />
6 M6 �ange nuts for dish bracket 4<br />
7 Washers 9<br />
8 M6 x 55mm bolts for mast clamp 2<br />
9 M6 x 50mm expansion bolts 4<br />
10 PVC cap for wall mount arm 1<br />
11 <strong>Satellite</strong> dish 1<br />
12 dish bracket 1<br />
13 LNB arm 1<br />
14 Mast bracket 1<br />
15 Mast clamp 1<br />
16 Upper part 40mm LNB holder 1<br />
17 Lower part 40mm LNB holder 1<br />
18 Wall mount arm Ø32mm 1<br />
19 M6 nuts for LNB holder 2<br />
LNB<br />
1
4) Mount the Wall Bracket: Mount the wall bracket (15) using the expansion bolts (16). Make sure that the<br />
mounting holes are drilled in<strong>to</strong> brick or s<strong>to</strong>ne and not in<strong>to</strong> the mortar. Also ensure that the wall mount is horizontal<br />
and perfectly level (check using a spirit level).<br />
5) Attach Dish Assembly <strong>to</strong> Wall Bracket:<br />
The complete dish assembly can now be attached <strong>to</strong> the wall bracket.<br />
6) Prepare <strong>Digital</strong> Coax Cable: Firstly fit the LNB rubber weather boot provided, <strong>to</strong> the dish end of the cable.<br />
Fitting the F connec<strong>to</strong>r: Strip the end of the cable as shown below. Once you have stripped the cable, twist the braid<br />
and pull it back on itself, make sure that no braid is <strong>to</strong>uching the copper core, this will cause a short on the cable<br />
and you will not get any signal. Now, simply twist on the ‘F’ connec<strong>to</strong>r and connect <strong>to</strong> the LNB making sure that the<br />
weather boot is correctly secured over the LNB connec<strong>to</strong>r.<br />
2<br />
remove<br />
foil<br />
fold braid back<br />
over sheath<br />
8mm<br />
6.5mm<br />
inner<br />
wire<br />
screw connec<strong>to</strong>r<br />
body on<strong>to</strong> cable<br />
7) Run Cable Down the Wall: Once you have installed the dish you<br />
need <strong>to</strong> run the cable <strong>to</strong> the room in which your receiver is going <strong>to</strong> be<br />
installed. Start at the <strong>to</strong>p and work down, you should clip the cable<br />
every 50cm, always run the cable horizontally or vertically, never<br />
diagonally across a wall.<br />
8) Connect Cable <strong>to</strong> <strong>Satellite</strong> Receiver: The cable can be run in<strong>to</strong> the<br />
room by drilling a hole in through the window frame or the wall.<br />
Once you have run the cable through <strong>to</strong> where you intend <strong>to</strong> position<br />
the receiver, cut off any surplus cable and then fit the ‘F’ connec<strong>to</strong>r<br />
following the instructions in step 6. Screw the ‘F’ connec<strong>to</strong>r <strong>to</strong> the LNB-in<br />
terminal on your decoder.<br />
9) Connect <strong>Satellite</strong> Receiver <strong>to</strong> your TV: Use a SCART lead and tune<br />
the TV in<strong>to</strong> AV1.<br />
end of<br />
insulation<br />
should be<br />
flush with<br />
this face<br />
2mm approx.<br />
10) Align <strong>Satellite</strong> Dish: To obtain accurate settings go <strong>to</strong> the website: http://www.dishpointer.com<br />
Enter your location and select satellite 28.2E Astr 2A, 2B, 2C and 2D. By locating your area on the map on the website,<br />
the programme will give the precise settings that you will require <strong>to</strong> align <strong>to</strong> the satellites. If you do not have access<br />
<strong>to</strong> the internet we have enclosed a chart showing settings for the key areas in the UK and Republic of Ireland.<br />
Identify the <strong>to</strong>wn nearest <strong>to</strong> you and work on those settings.<br />
Three settings are required:<br />
a) Dish elevation - this is the angle that the dish has <strong>to</strong> be pointed at the sky.<br />
This is done by aligning <strong>to</strong> the correct angle on the elevation bracket.<br />
b) Polarisation angle - this is the angle at which the LNB needs <strong>to</strong> be set at<br />
in its mount. The LNB angle can be adjusted by loosening the screws of Dish elevation<br />
the LNB mount and twisting the LNB <strong>to</strong> the correct position.<br />
c) Azimuth angle - This is the compass direction required. For initial setting<br />
you can use the compass supplied and then the satellite finder.<br />
For fine tuning you will need two people, one person <strong>to</strong> align the dish and<br />
the other <strong>to</strong> watch the TV screen for a signal quality and strength.<br />
Azimuth angle
11) A satellite finder and a compass: have been included in the kit<br />
<strong>to</strong> help you locate the satellite and set your dish in the optimum position.<br />
a. First disconnect the downlead from the LNB mounted on your<br />
satellite dish and connect the jumper lead supplied in its place,<br />
connect the other end of the jumper lead <strong>to</strong> the F connection<br />
on your <strong>Satellite</strong> Finder marked “<strong>Satellite</strong> LNB”.<br />
b. Next connect the downlead (connected <strong>to</strong> the receiver) <strong>to</strong> the<br />
“Receiver” connection on your <strong>Satellite</strong> Finder.<br />
c. Ensure that your satellite receiver is switched on. The <strong>Satellite</strong> Finder’s power and signal strength LEDs will light<br />
up, using the level control peg adjust the level control <strong>to</strong> reduce the number of lit red LEDs <strong>to</strong> 2 or 3 by turning<br />
the control anti-clockwise (the pitch of the audible <strong>to</strong>ne will also reduce).<br />
d. Set your satellite dish <strong>to</strong> the correct azimuth and elevation settings. Using the compass supplied align the red<br />
arrow <strong>to</strong> North 0˚ and then read off the correct azimuth angle.<br />
e. Slowly scan the sky with the satellite dish (side <strong>to</strong> side movement) from around 5˚ either side of the correct<br />
azimuth angle. The number of LEDs lit and the pitch of the <strong>to</strong>ne will increase/decrease, if it does not then adjust<br />
the elevation by half a degree and repeat the scan.<br />
f. Keep adjusting the azimuth and elevation of the satellite dish so that you obtain the highest reading possible.<br />
An audio signal also indicates the signal strength. If the signal reading goes beyond ‘6’ on the scale turn the<br />
Level Control anti-clockwise <strong>to</strong> reduce the reading <strong>to</strong> ‘2’.<br />
PLEASE NOTE: Do not use the <strong>Satellite</strong> Finder directly in front of your satellite dish - this can result in a continuous<br />
full scale reading (ie. above ‘6’ LEDs). If the meter reading keeps jumping then adjust the Level Control on the<br />
<strong>Satellite</strong> Finder. Turn anti-clockwise <strong>to</strong> lower the sensitivity.<br />
12) Fine Tuning: Once you have set the dish position using the satellite finder you can fine tune the position using<br />
the satellite receiver. Locate the signal levels function on your satellite receiver’s menu<br />
You will probably notice that there is some signal strength straight away, don’t get excited, this is only reading ‘noise’<br />
from the atmosphere. It is the signal quality that you need <strong>to</strong> concentrate on; this is reading a specific transponder<br />
from the Astra 2A, 2B, 2D and Eurobird satellites.<br />
With one person watching the screen, the other person needs <strong>to</strong> move the dish slowly around until the signal<br />
quality and strength display starts <strong>to</strong> read a decent signal level, about 50% should be fine. The dish needs <strong>to</strong> be<br />
within 0.1 of a degree of the satellite position (about 1mm in movement terms) when making these adjustments,<br />
the signal strength meter on the screen takes up <strong>to</strong> 5 seconds <strong>to</strong> register the signal, so you can’t just sweep the dish<br />
around the sky, you need <strong>to</strong> make very precise, very subtle movements of the dish, s<strong>to</strong>pping for a few seconds after<br />
each movement. PLEASE NOTE Do not scan or search until you have a good signal quality reading (50%+).<br />
If the Signal Quality reading is low on screen (less than 50%), but the Signal Strength is high then you are aligned<br />
<strong>to</strong> the wrong satellite. Use the keys on the remote <strong>to</strong> select other available satellites that may be giving a<br />
high signal strength like Hotbird 13 E or Astra 1 19.2E. If Hotbird 13E shows high Signal Strength and Quality level<br />
readings on screen, you need <strong>to</strong> turn the dish 14 degrees <strong>to</strong>wards the East <strong>to</strong> find the Astra 2 satellite, you may find<br />
another satellite as you turn the dish, which is Astra 1 19.2E, If Astra 1 19.2E shows high Signal Strength and Quality<br />
level readings on screen, you need <strong>to</strong> turn the dish 9 degrees <strong>to</strong>wards the East <strong>to</strong> find Astra 2.<br />
Once you have some signal quality and strength, make tiny movements of the dish horizontally and vertically <strong>to</strong><br />
find the best signal quality. When you have at least 50% signal quality, tighten the dish up, your dish installation is<br />
complete.<br />
Should you experience any difficulty in setting up your <strong>Free</strong>-<strong>to</strong>-<strong>Air</strong> <strong>Digital</strong> <strong>Satellite</strong> <strong>Kit</strong>, download: technical.philex.<br />
com/downloads/<strong>Free</strong> <strong>to</strong> <strong>Air</strong> <strong>Satellite</strong> Installation Instructions.pdf<br />
or call our Cus<strong>to</strong>mer Careline: 0901 293 0038.<br />
Calls are charged at £1 per minute from a BT landline. Call charges from other networks may vary.<br />
To locate a CAl approved <strong>Satellite</strong> Installer in you area you can connect <strong>to</strong> the CAl website<br />
http://cai.org.uk/asp/installer.asp<br />
Other useful websites: http://www.liveonsat.com http://www.lyngsat.com http://www.satcodx.com<br />
http://www.dishpointer.com<br />
Suggested list of useful <strong>to</strong>ols not included:<br />
Masonry drill and bit, adjustable wrench or spanners,<br />
crosshead screwdriver, spirit level, hammer and cable strippers.<br />
To<br />
Receiver<br />
Level Control Peg<br />
Insert Peg To<br />
Control Level<br />
To<br />
LNB<br />
3
<strong>Kit</strong> Contents:<br />
•<br />
4<br />
<strong>Digital</strong> satellite receiver – with au<strong>to</strong>matic tuning<br />
Remote Control Unit (RCU)<br />
<strong>Digital</strong> Low Noise Block (LNB)<br />
10 Metres of <strong>Digital</strong> Coaxial Cable<br />
2x F type connec<strong>to</strong>rs<br />
Weather boot<br />
Scart Lead – <strong>to</strong> connect satellite receiver <strong>to</strong> TV<br />
Cable clips<br />
60 cm satellite dish with fixings and wall mount<br />
<strong>Satellite</strong> finder<br />
Full Instructions
<strong>Satellite</strong> alignment settings for Astra 2A, 2B, 2D and Eurobird 1<br />
28.2 Degrees East for the UK and Eire (English Language Channels)<br />
For other satellite settings see www.dishpointer.com<br />
Mainland UK<br />
Town County Elevation Azimuth Polarization<br />
Aberdeen Aberdeenshire 19.76 145.17 -10.55<br />
Abergavenny Gwent 23.96 142.37 -14.66<br />
Aberystwyth Dyfed 23.05 141.46 -14.84<br />
Alnwick Northumberland 21.39 145.06 -11.48<br />
Ampthill Bedfordshire 24.77 145.24 -13.03<br />
Athlone West Meath 20.62 137.71 -16.14<br />
Aviemore Highland 19.12 143.34 -11.37<br />
Ayr Ayrshire 20.32 141.85 -13.04<br />
Banff Aberdeenshire 19.16 144.87 -10.43<br />
Barnstaple Devon 24.16 140.96 -15.81<br />
Basings<strong>to</strong>ke Hampshire 25.22 144.29 -13.92<br />
Bath Avon 24.61 142.91 -14.61<br />
Belfast Antrim 20.53 140.27 -14.24<br />
Berwick-Upon-Tweed Northumberland 20.96 144.86 -11.38<br />
Birmingham West Midlands 23.84 143.83 -13.57<br />
Blackpool Lancashire 22.27 143.06 -13.28<br />
Bodmin Cornwall 24.38 139.98 -16.66<br />
Bos<strong>to</strong>n Lincolnshire 24.10 146.10 -12.12<br />
Bournemouth Dorset 25.37 143.19 -14.80<br />
Brecon Powys 23.71 142.02 -14.79<br />
Brigh<strong>to</strong>n & Hove East Sussex 25.95 145.16 -13.65<br />
Bris<strong>to</strong>l Avon 24.44 142.68 -14.70<br />
Bude Cornwall 24.17 140.33 -16.29<br />
Burnley Lancashire 22.59 143.95 -12.84<br />
Bury Saint Edmunds Suffolk 25.02 146.66 -12.16<br />
Caernarfon Gwynedd 22.36 141.52 -14.41<br />
Cambridge Cambridgeshire 24.85 145.97 -12.56<br />
Campbel<strong>to</strong>wn Argyll & Bute 19.96 140.89 -13.47<br />
Cardiff Mid Glamorgan 24.19 142.06 -15.01<br />
Cardigan Ceredigion 23.08 140.69 -15.41<br />
Carlisle Cumbria 21.40 143.56 -12.48<br />
Carmarthen Carmarthenshire 23.42 140.98 -15.39<br />
Cavan Cavan 20.41 138.52 -15.41<br />
Chelmsford Essex 25.37 146.21 -12.64<br />
Chester Cheshire 22.86 143.01 -13.63<br />
Colwyn Clwyd 22.43 142.12 -14.03<br />
Cork Cork 21.57 136.57 -17.60<br />
Coventry West Midlands 24.05 144.26 -13.37<br />
Crainlarich Stirlingshire 19.53 142.26 -12.31<br />
Dingwall Highland 18.58 142.81 -11.40<br />
Dolgellau Gwynedd 22.84 141.78 -14.49<br />
Douglas Isle of Man 21.44 141.64 -13.81<br />
Dover Kent 26.23 146.91 -12.53<br />
Dublin(Baile Atha Cliath) Dublin 21.36 139.47 -15.30<br />
Dundee Angus 20.02 144.02 -11.43<br />
Edinburgh Midlothian 20.39 143.60 -11.91<br />
Elgin Grampian 18.91 144.01 -10.83<br />
Exeter Devon 24.69 141.40 -15.76<br />
Felixs<strong>to</strong>we Suffolk 25.51 147.27 -11.96<br />
Fishguard Dyfed 23.02 140.32 -15.65<br />
5
Town County Elevation Azimuth Polarization<br />
Folkes<strong>to</strong>ne Kent 26.24 146.76 -12.64<br />
Fort William Highland 19.00 141.86 -12.26<br />
Gairloch Highland 18.08 141.56 -11.90<br />
Galway/Gaillimh Galway 20.28 136.52 -16.80<br />
Glasgow Lanarkshire 20.09 142.45 -12.50<br />
Gloucester Gloucestershire 24.24 143.22 -14.20<br />
Great Yarmouth Norfolk 25.04 147.96 -11.29<br />
Grimsby Lincolnshire 23.61 146.25 -11.78<br />
Guildford Surrey 25.45 144.84 -13.64<br />
Hastings East Sussex 26.22 146.01 -13.17<br />
Hereford Hereford and Worcester 23.89 142.79 -14.33<br />
Holyhead Gwynedd 22.09 141.17 -14.51<br />
Ipswich Suffolk 25.35 147.08 -12.02<br />
Kendal Cumbria 21.95 143.56 -12.77<br />
Killarney Kerry 20.99 135.57 -17.99<br />
Kilmarnock Ayrshire 20.22 142.13 -12.79<br />
King’s Lynn Norfolk 24.45 146.46 -12.04<br />
Kings<strong>to</strong>n upon Hull Humberside 23.30 145.98 -11.82<br />
Kyle of Lochalsh Highland 18.42 141.37 -12.23<br />
Lancaster Lancashire 22.17 143.40 -12.99<br />
Largs Ayrshire 19.97 141.80 -12.86<br />
Larne Antrim 20.35 140.47 -14.00<br />
Leeds Yorkshire 22.83 144.69 -12.45<br />
Leicester Leicestershire 24.00 144.74 -13.00<br />
Limerick Limerick 20.93 136.72 -17.07<br />
Lincoln Lincolnshire 23.70 145.62 -12.26<br />
Liverpool Merseyside 22.63 142.99 -13.52<br />
London Greater London 25.37 145.48 -13.15<br />
Londonderry Londonderry 19.65 138.93 -14.64<br />
Ludlow Shropshire 23.63 142.89 -14.12<br />
Lu<strong>to</strong>n Bedfordshire 24.93 145.26 -13.09<br />
Lyme Regis Dorset 24.92 142.04 -15.41<br />
Maids<strong>to</strong>ne Kent 25.83 146.07 -12.95<br />
Mallaig Highland 18.59 141.16 -12.47<br />
Manchester Greater Manchester 22.87 143.85 -13.05<br />
Middlebrough North Yorkshire 22.30 145.38 -11.73<br />
Moffat Dumfries and Galloway 20.85 143.14 -12.46<br />
Montrose Angus 20.01 144.64 -11.02<br />
Newark upon Trent Nottinghamshire 23.74 145.24 -12.53<br />
Newcastle upon Tyne Tyne and Wear 21.78 145.03 -11.69<br />
Newhaven East Sussex 26.07 145.35 -13.57<br />
Newry Down 20.70 139.69 -14.75<br />
New<strong>to</strong>wn Isle of Wight 25.58 143.72 -14.51<br />
Northamp<strong>to</strong>n Northamp<strong>to</strong>nshire 24.45 144.93 -13.09<br />
Norwich Norfolk 24.89 147.45 -11.56<br />
Nottingham Nottinghamshire 23.69 144.81 -12.81<br />
Oban Argyll & Bute 19.21 141.36 -12.71<br />
Oxford Oxfordshire 24.75 144.27 -13.71<br />
Peebles Borders 20.69 143.56 -12.09<br />
Pembroke Pembrokeshire 23.30 140.27 -15.84<br />
Penrith Cumbria 21.68 143.70 -12.53<br />
Perth Perth & Kinross 19.94 143.52 -11.71<br />
Peterborough Cambridgeshire 24.40 145.70 -12.54<br />
Peterhead Aberdeenshire 19.54 145.63 -10.16<br />
Pitlochry Perth & Kinross 19.57 143.31 -11.65<br />
6
Town County Elevation Azimuth Polarization<br />
Plymouth Devon 24.69 140.59 -16.37<br />
Portree Skye 18.13 140.90 -12.37<br />
Reading Berkshire 25.10 144.44 -13.76<br />
Rosslare Wexford 22.20 138.93 -16.21<br />
Scarborough Yorkshire 22.82 146.12 -11.49<br />
Settle Yorkshire 22.35 144.00 -12.68<br />
Sevenoaks Kent 25.70 145.72 -13.13<br />
Sheffield South Yorkshire 23.22 144.63 -12.70<br />
Shrewsbury Shropshire 23.32 143.02 -13.87<br />
Sligo Sligo 19.74 137.48 -15.74<br />
Southamp<strong>to</strong>n Hampshire 25.40 143.80 -14.37<br />
Stafford Staffordshire 23.49 143.74 -13.45<br />
Stirling Stirlingshire 19.99 142.84 -12.18<br />
S<strong>to</strong>ke on Trent Staffordshire 23.28 143.71 -13.36<br />
Stranraer Dumfries and Galloway 20.61 141.31 -13.56<br />
Stratford-upon-Avon Warwickshire 24.18 143.95 -13.65<br />
Swansea (Abertawe) Swansea 23.76 141.28 -15.35<br />
Swindon Wiltshire 24.24 143.41 -14.06<br />
Tain Highland 18.54 143.28 -11.08<br />
Thirsk North Yorkshire 22.55 145.07 -12.06<br />
Thurso Highland 18.05 144.11 -10.28<br />
Torquay Devon 24.92 141.31 -15.96<br />
Tralee (Tra Li) Kerry 20.73 135.45 -17.92<br />
Truro Cornwall 24.40 139.56 -17.00<br />
Uig Skye 17.20 140.31 -12.17<br />
Ullapool Highland 18.08 142.14 -11.54<br />
Waterford Waterford 21.90 138.12 -16.62<br />
Watford Hertfordshire 25.13 145.20 -13.24<br />
Westport Mayo 19.65 136.21 -16.62<br />
Weymouth Dorset 25.22 142.51 -15.22<br />
Wick Highland 18.32 144.51 -10.19<br />
Worcester Hereford and Worcester 23.97 143.38 -13.95<br />
Working<strong>to</strong>n Cumbria 21.37 142.79 -12.98<br />
Yeovil Somerset 24.86 142.45 -15.08<br />
York North Yorkshire 22.88 145.25 -12.10<br />
7
For further information, please contact:<br />
Cus<strong>to</strong>mer Careline: 0901 293 0038.<br />
Calls are charged at £1 per minute from a BT landline.<br />
Call charges from other networks may vary.<br />
Technical Support: http://technical.philex.com<br />
8<br />
Waste electrical and electronic products must<br />
not be disposed of with household waste.<br />
Please recycle where facilities exist. Check with<br />
your Local Authority for recycling advice.<br />
© <strong>Philex</strong> Electronic Ltd. 2009. v1.5


![Freesat Installation kit [35.pdf] - Philex](https://img.yumpu.com/43505801/1/184x260/freesat-installation-kit-35pdf-philex.jpg?quality=85)

![(HD) Satellite kit [28260R_28261R_IM_1_3nonpaySlx.pdf] - Philex](https://img.yumpu.com/35201073/1/184x260/hd-satellite-kit-28260r-28261r-im-1-3nonpayslxpdf-philex.jpg?quality=85)

![48 element aerial Gold [27884LAB_IM_v1_5.pdf] - Philex](https://img.yumpu.com/29233381/1/188x260/48-element-aerial-gold-27884lab-im-v1-5pdf-philex.jpg?quality=85)
![7 Day Electronic Timer Switch [76933R_IM_V1_3.pdf] - Philex](https://img.yumpu.com/23209791/1/190x136/7-day-electronic-timer-switch-76933r-im-v1-3pdf-philex.jpg?quality=85)


