Experiment RP-3: The Effect of Breathing on Heart Rate - iWorx
Experiment RP-3: The Effect of Breathing on Heart Rate - iWorx
Experiment RP-3: The Effect of Breathing on Heart Rate - iWorx

You also want an ePaper? Increase the reach of your titles
YUMPU automatically turns print PDFs into web optimized ePapers that Google loves.
<str<strong>on</strong>g>Experiment</str<strong>on</strong>g> <str<strong>on</strong>g>RP</str<strong>on</strong>g>-3: <str<strong>on</strong>g>The</str<strong>on</strong>g> <str<strong>on</strong>g>Effect</str<strong>on</strong>g> <str<strong>on</strong>g>of</str<strong>on</strong>g> <str<strong>on</strong>g>Breathing</str<strong>on</strong>g> <strong>on</strong> <strong>Heart</strong> <strong>Rate</strong>Before Starting1. Please read the procedures for each exercise completely before beginning the experiment. Youshould have a good understanding <str<strong>on</strong>g>of</str<strong>on</strong>g> how to perform these exercises before making recordings.2. <str<strong>on</strong>g>The</str<strong>on</strong>g> spirometer will m<strong>on</strong>itor breathing from a subject. It is important that the subject is healthyand has no history <str<strong>on</strong>g>of</str<strong>on</strong>g> respiratory or cardiovascular problems.3. On the flow head, the outlets c<strong>on</strong>nected to the airflow tubing should always be pointed up toavoid problems with c<strong>on</strong>densati<strong>on</strong> developing within the tubing.4. To reduce turbulence within the flow head, place a disposable cardboard mouthpiece, thatc<strong>on</strong>tains a screen, over the opening <str<strong>on</strong>g>of</str<strong>on</strong>g> the flow head5. Use a clip to prevent air from entering or leaving the nose as the subject is breathing. air thatpasses through the nose is not included in the volume measurements and causes errors in thesevalues.6. <str<strong>on</strong>g>The</str<strong>on</strong>g> settings file, Exercise-<str<strong>on</strong>g>Breathing</str<strong>on</strong>g>, programs LabScribe to record the breathing <str<strong>on</strong>g>of</str<strong>on</strong>g> the subject<strong>on</strong> the Air Flow channel. <str<strong>on</strong>g>The</str<strong>on</strong>g> computed functi<strong>on</strong> used <strong>on</strong> the Volume channel c<strong>on</strong>verts the datarecorded <strong>on</strong> the Air Flow channel to lung volume measurements.7. Enter the calibrati<strong>on</strong> voltage <str<strong>on</strong>g>of</str<strong>on</strong>g> your SP-304 spirometer into the Spirometry computed functi<strong>on</strong>used <strong>on</strong> the Volume channel:• Click <strong>on</strong> the words Spirometry (AirFlow), that are next to the title <str<strong>on</strong>g>of</str<strong>on</strong>g> the Volume channel, toopen the computed functi<strong>on</strong> pull-down menu.• Select Setup from this pull-down menu to open the Spirometer Calibrati<strong>on</strong> Dialog window.• Enter the calibrati<strong>on</strong> voltage, that is listed <strong>on</strong> the label <str<strong>on</strong>g>of</str<strong>on</strong>g> your SP-304 spirometer unit, intothe equati<strong>on</strong> that sets the calibrati<strong>on</strong> voltage equal to <strong>on</strong>e liter <str<strong>on</strong>g>of</str<strong>on</strong>g> lung volume.• Make sure the reset time is set to 'No Reset' and the first 10 sec<strong>on</strong>ds <str<strong>on</strong>g>of</str<strong>on</strong>g> the recording areused to zero the baseline <str<strong>on</strong>g>of</str<strong>on</strong>g> the Volume channel. Click OK.8. Allow the SP-304 to warm up for 10 minutes before recording for the first time.Note:Do not hold the spirometer amplifier in your hand; the heat <str<strong>on</strong>g>of</str<strong>on</strong>g> your hand will alter thevolumes recorded.9. When spirometry data is recorded in the c<strong>on</strong>venti<strong>on</strong>al manner, inhalati<strong>on</strong> is always displayed asan upward deflecti<strong>on</strong>. To determine if the subject is breathing through the correct end <str<strong>on</strong>g>of</str<strong>on</strong>g> theflow head.• Click <strong>on</strong> the Save to Disk butt<strong>on</strong> in the lower left corner <str<strong>on</strong>g>of</str<strong>on</strong>g> the Main window to switch theLabScribe s<str<strong>on</strong>g>of</str<strong>on</strong>g>tware into Preview mode. When LabScribe is in Preview mode, there is a redX across the Save to Disk butt<strong>on</strong>. In Preview mode, the <strong>iWorx</strong> recording system workswithout recording data <strong>on</strong> the hard drive or any other storage media which allows a subjectto become comfortable with breathing through a spirometer.Respiratory Physiology-<str<strong>on</strong>g>Breathing</str<strong>on</strong>g><strong>Heart</strong><strong>Rate</strong>-Labs<str<strong>on</strong>g>RP</str<strong>on</strong>g>-3-1
• Click <strong>on</strong> the Preview butt<strong>on</strong>. Have the subject inhale through the spirometer flow headClick <strong>on</strong> the AutoScale butt<strong>on</strong> at the upper margin <str<strong>on</strong>g>of</str<strong>on</strong>g> the Air Flow and Volume channels. Ifthe flow head is oriented properly, the traces <strong>on</strong> the Air Flow and Volume channels will goup during inhalati<strong>on</strong>. If the traces <strong>on</strong> these channels go down during inhalati<strong>on</strong>, have thesubject breathe through the other end <str<strong>on</strong>g>of</str<strong>on</strong>g> the flow head, or reverse the positi<strong>on</strong>s <str<strong>on</strong>g>of</str<strong>on</strong>g> theairflow tubes at the outlets <str<strong>on</strong>g>of</str<strong>on</strong>g> the flow headNote: If the user clicks the Preview butt<strong>on</strong> and an error window appears the Main windowindicating the <strong>iWorx</strong> hardware cannot be found, make sure the <strong>iWorx</strong> unit is turned <strong>on</strong> andc<strong>on</strong>nected to the USB port <str<strong>on</strong>g>of</str<strong>on</strong>g> the computer. <str<strong>on</strong>g>The</str<strong>on</strong>g>n, click <strong>on</strong> the OK butt<strong>on</strong> in the error window.Pull down the LabScribe Tools menu, select the Find Hardware functi<strong>on</strong>, and follow thedirecti<strong>on</strong>s <strong>on</strong> the Find Hardware dialogue window10. Click <strong>on</strong> the Stop butt<strong>on</strong>.11. Before proceeding to the actual exercises, make sure the LabScribe s<str<strong>on</strong>g>of</str<strong>on</strong>g>tware in set to Recordmode. Click <strong>on</strong> the Save to Disk butt<strong>on</strong>, in the lower left corner <str<strong>on</strong>g>of</str<strong>on</strong>g> the Main window, to changeLabScribe from Preview mode to Record mode. When LabScribe is in Record mode, there is agreen arrow <strong>on</strong> the Save to Disk butt<strong>on</strong>.Exercise 1: <strong>Heart</strong> <strong>Rate</strong> While <str<strong>on</strong>g>Breathing</str<strong>on</strong>g> at RestAim: To determine the effect <str<strong>on</strong>g>of</str<strong>on</strong>g> breathing while at rest <strong>on</strong> the subject’s heart rate and the changein heart rate during respiratory sinus arrhythmia (RSA).Procedure1. Instruct the subject to:• Sit quietly and become accustomed to breathing through the spirometer flow head• Breathe normally before any recordings are made.• Hold the flow head so that its outlets are pointed up.• Remove the flow head from his or her mouth and hold it at the mouth level in a positi<strong>on</strong> thatprevents a breath from moving through the flow headNote: <str<strong>on</strong>g>The</str<strong>on</strong>g> LabScribe s<str<strong>on</strong>g>of</str<strong>on</strong>g>tware will zero the Volume channel during the first ten sec<strong>on</strong>ds <str<strong>on</strong>g>of</str<strong>on</strong>g>recording. No air should be moving through the flow head during this time.2. Type Resting in the Mark box that is to the right <str<strong>on</strong>g>of</str<strong>on</strong>g> the Mark butt<strong>on</strong>.3. Click <strong>on</strong> the Record butt<strong>on</strong>. After waiting ten sec<strong>on</strong>ds for the Volume channel to zero, have thesubject place the flow head in his or her mouth and begin breathing. Press the Enter key <strong>on</strong> thekeyboard to mark the recording.4. Click the AutoScale butt<strong>on</strong>s <str<strong>on</strong>g>of</str<strong>on</strong>g> the Air Flow and Volume channels. Notice the slowly movingwave <strong>on</strong> the Volume channel. Record ten breaths, which normally takes about 90 sec<strong>on</strong>ds torecord.Respiratory Physiology-<str<strong>on</strong>g>Breathing</str<strong>on</strong>g><strong>Heart</strong><strong>Rate</strong>-Labs<str<strong>on</strong>g>RP</str<strong>on</strong>g>-3-2
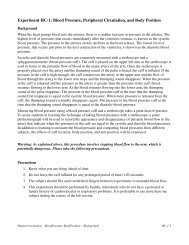
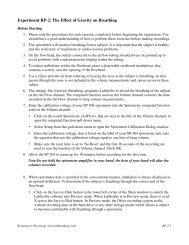
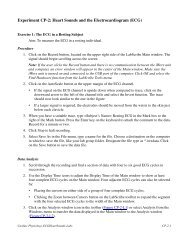
5. Click Stop to halt recording. Your data may look like Figure <str<strong>on</strong>g>RP</str<strong>on</strong>g>-3-L1.6. Select Save As in the File menu, type a name for the file. Choose a destinati<strong>on</strong> <strong>on</strong> the computerin which to save the file, like your lab group folder). Designate the file type as *.iwxdata. Click<strong>on</strong> the Save butt<strong>on</strong> to save the data file.Figure <str<strong>on</strong>g>RP</str<strong>on</strong>g>-3-L1: Pulse, air flow, lung volumes, and heart rate during breathing at rest, displayed <strong>on</strong>the Main window. An upward deflecti<strong>on</strong> <strong>on</strong> the Volume channel indicates inhalati<strong>on</strong>.Data Analysis1. Scroll to the recording <str<strong>on</strong>g>of</str<strong>on</strong>g> the subject’s breathing and heart rate while at rest. Display fouradjacent breathing cycles that are free <str<strong>on</strong>g>of</str<strong>on</strong>g> artifacts in the Main window.2. Use the Display Time ic<strong>on</strong>s to adjust the Display Time <str<strong>on</strong>g>of</str<strong>on</strong>g> the Main window to show the fourcomplete breathing cycles <strong>on</strong> the Main window. <str<strong>on</strong>g>The</str<strong>on</strong>g> four adjacent breathing cycles can also beselected by:• Placing the cursors <strong>on</strong> either side <str<strong>on</strong>g>of</str<strong>on</strong>g> a group <str<strong>on</strong>g>of</str<strong>on</strong>g> four complete breathing cycles; and• Clicking the Zoom between Cursors butt<strong>on</strong> <strong>on</strong> the LabScribe toolbar (Figure <str<strong>on</strong>g>RP</str<strong>on</strong>g>-3-L2) toexpand the four selected breathing cycles to the width <str<strong>on</strong>g>of</str<strong>on</strong>g> the Main window.Figure <str<strong>on</strong>g>RP</str<strong>on</strong>g>-3-L2: <str<strong>on</strong>g>The</str<strong>on</strong>g> LabScribe toolbar.Respiratory Physiology-<str<strong>on</strong>g>Breathing</str<strong>on</strong>g><strong>Heart</strong><strong>Rate</strong>-Labs<str<strong>on</strong>g>RP</str<strong>on</strong>g>-3-3
3. Click <strong>on</strong> the Analysis window ic<strong>on</strong> in the toolbar (Figure <str<strong>on</strong>g>RP</str<strong>on</strong>g>-3-L2) or select Analysis from theWindows menu to transfer the data displayed in the Main window to the Analysis window(Figure <str<strong>on</strong>g>RP</str<strong>on</strong>g>-3-L6).4. Look at the Functi<strong>on</strong> Table that is above the uppermost channel displayed in the Analysiswindow. <str<strong>on</strong>g>The</str<strong>on</strong>g> mathematical functi<strong>on</strong>s, Max-Min, Max, Min, and Mean, should appear in thistable. Values for these four parameters <strong>on</strong> each channel are seen in the table across the topmargin <str<strong>on</strong>g>of</str<strong>on</strong>g> each channel.5. Secti<strong>on</strong>s <str<strong>on</strong>g>of</str<strong>on</strong>g> the data displayed <strong>on</strong> the <strong>Heart</strong> <strong>Rate</strong> channel may be calculated incorrectly if pulses<strong>on</strong> the raw data (Pulse) channel have low amplitudes. <str<strong>on</strong>g>The</str<strong>on</strong>g>se pulses with low amplitudes mightnot be identified by the rate functi<strong>on</strong> <strong>on</strong> the <strong>Heart</strong> <strong>Rate</strong> channel and used in the calculati<strong>on</strong> <str<strong>on</strong>g>of</str<strong>on</strong>g>the subject’s heart rate. Pulses used in the rate calculati<strong>on</strong> can be properly identified by eitheradjusting the positi<strong>on</strong> <str<strong>on</strong>g>of</str<strong>on</strong>g> the trace <strong>on</strong> the Pulse channel or adjusting the positi<strong>on</strong> <str<strong>on</strong>g>of</str<strong>on</strong>g> thethreshold, a parameter in the rate functi<strong>on</strong> dialogue window which identifies the pulses to becounted in the rate calculati<strong>on</strong>.• To raise the level <str<strong>on</strong>g>of</str<strong>on</strong>g> the trace <strong>on</strong> the Pulse channel, use the mouse to click <strong>on</strong> and drag thetrace higher <strong>on</strong> the screen. If the pulse trace is moved up by the proper amount, the peaks <str<strong>on</strong>g>of</str<strong>on</strong>g>the missed pulse will intersect the invisible threshold level set by the rate functi<strong>on</strong> dialoguewindow. <str<strong>on</strong>g>The</str<strong>on</strong>g> pulses or waves that used to be missed in the rate calculati<strong>on</strong> will now beincluded in the calculati<strong>on</strong>. On the <strong>Heart</strong> <strong>Rate</strong> channel, the revised plot <str<strong>on</strong>g>of</str<strong>on</strong>g> the ratecalculati<strong>on</strong> will be displayed automatically. If the rate is still not displayed properly, thepulse trace can be moved up again.Note: Setting the proper threshold level also prevents small artifacts in the data from being countedas pulse waves.• To adjust the level <str<strong>on</strong>g>of</str<strong>on</strong>g> the threshold parameter for the <strong>Heart</strong> <strong>Rate</strong> channel, click <strong>on</strong> theChannel Functi<strong>on</strong>/Mode area to the right <str<strong>on</strong>g>of</str<strong>on</strong>g> the Channel Title <strong>on</strong> the <strong>Heart</strong> <strong>Rate</strong> channel.Select Setup from the menu to open the rate functi<strong>on</strong> dialogue window. Change the level <str<strong>on</strong>g>of</str<strong>on</strong>g>the threshold: by typing a new value in the box; or, by clicking <strong>on</strong> the up or down arrows <strong>on</strong>the right side <str<strong>on</strong>g>of</str<strong>on</strong>g> the box; or, by clicking <strong>on</strong> and sliding the threshold line, that is displayed<strong>on</strong> the graph <str<strong>on</strong>g>of</str<strong>on</strong>g> the pulse data at the bottom <str<strong>on</strong>g>of</str<strong>on</strong>g> the dialogue window, up or down.6. <str<strong>on</strong>g>The</str<strong>on</strong>g>re may be secti<strong>on</strong> <str<strong>on</strong>g>of</str<strong>on</strong>g> data <strong>on</strong> the Volume channel where the baseline is sloped. <str<strong>on</strong>g>The</str<strong>on</strong>g> slopingoccurs when the temperature inside the spirometer increases while the subject breathes throughthe unit. Ultimately, the change in temperature inside the spirometer affects the computedfuncti<strong>on</strong> <strong>on</strong> the Volume channel that initially sets the baseline <str<strong>on</strong>g>of</str<strong>on</strong>g> that channel to zero.• <str<strong>on</strong>g>The</str<strong>on</strong>g> easiest way to flatten the slope <str<strong>on</strong>g>of</str<strong>on</strong>g> the baseline <strong>on</strong> the Volume channel is to increase thelength <str<strong>on</strong>g>of</str<strong>on</strong>g> time used to set that baseline. When more data points are used to establish thebaseline, the slope <str<strong>on</strong>g>of</str<strong>on</strong>g> the baseline will get closer to zero and become easier to use as a point<str<strong>on</strong>g>of</str<strong>on</strong>g> reference for measuring lung volumes.• To increase the length <str<strong>on</strong>g>of</str<strong>on</strong>g> the recording used in set the baseline <strong>on</strong> the Volume channel, click<strong>on</strong> the Channel Functi<strong>on</strong>/Mode area to the right <str<strong>on</strong>g>of</str<strong>on</strong>g> the Channel Title <strong>on</strong> the Volume channel.Select Setup from the menu to open the Spirometer Calibrati<strong>on</strong> dialogue window. Changethe amount <str<strong>on</strong>g>of</str<strong>on</strong>g> time used to set the slope <str<strong>on</strong>g>of</str<strong>on</strong>g> the baseline <strong>on</strong> the Volume channel from 5sec<strong>on</strong>ds to the length <str<strong>on</strong>g>of</str<strong>on</strong>g> the largest block <str<strong>on</strong>g>of</str<strong>on</strong>g> recorded data. For example, if a subject’srespirati<strong>on</strong> was recorded in data blocks that are between 30 and 300 sec<strong>on</strong>ds l<strong>on</strong>g, set theRespiratory Physiology-<str<strong>on</strong>g>Breathing</str<strong>on</strong>g><strong>Heart</strong><strong>Rate</strong>-Labs<str<strong>on</strong>g>RP</str<strong>on</strong>g>-3-4
length <str<strong>on</strong>g>of</str<strong>on</strong>g> time used in setting the baseline slope to 300 sec<strong>on</strong>ds.7. Once the cursors are placed in the correct positi<strong>on</strong>s for determining the tidal volume and heartrate during inhalati<strong>on</strong> and exhalati<strong>on</strong>, the values for these parameters can be recorded in the <strong>on</strong>linenotebook <str<strong>on</strong>g>of</str<strong>on</strong>g> LabScribe by typing their names and values directly into the Journal.8. <str<strong>on</strong>g>The</str<strong>on</strong>g> functi<strong>on</strong>s in the channel pull-down menus <str<strong>on</strong>g>of</str<strong>on</strong>g> the Analysis window can also be used to enterthe names and values <str<strong>on</strong>g>of</str<strong>on</strong>g> these parameters from the recording to the Journal. To use thesefuncti<strong>on</strong>s:• Place the cursors at the locati<strong>on</strong>s used to measure the tidal volume and heart rates during thebreath cycle.• Transfer the names <str<strong>on</strong>g>of</str<strong>on</strong>g> the mathematical functi<strong>on</strong>s used to determine the volumes and ratesto the Journal using the Add Title to Journal functi<strong>on</strong> in the Volume Channel pull-downmenu.• Transfer the values for the volumes and rates to the Journal using the Add All Data toJournal functi<strong>on</strong> in the Volume Channel pull-down menu.9. Use the mouse to click <strong>on</strong> and drag <strong>on</strong>e cursor to the trough before the first breath cycledisplayed <strong>on</strong> the Volume channel, and the other cursor to the trough before the sec<strong>on</strong>d breathcycle (Figure <str<strong>on</strong>g>RP</str<strong>on</strong>g>-3-L3).10. <str<strong>on</strong>g>The</str<strong>on</strong>g> values for the following parameters <strong>on</strong> a breath cycle are determined when the cursors areplaced at the two positi<strong>on</strong>s described in Step 9:• Tidal Volume (TV), which is the value for Max-Min <strong>on</strong> the Volume Channel.• Minimum <strong>Heart</strong> <strong>Rate</strong>, which is the value for Min <strong>on</strong> the <strong>Heart</strong> <strong>Rate</strong> channel.• Maximum <strong>Heart</strong> <strong>Rate</strong>, which is the value for Max <strong>on</strong> the <strong>Heart</strong> <strong>Rate</strong> channel.• Respiratory Sinus Arrhythmia (RSA) Prominence or the difference between the minimumand maximum heart rates during a breath cycle, which is the value for Max-Min <strong>on</strong> the<strong>Heart</strong> <strong>Rate</strong> channel.• Mean <strong>Heart</strong> <strong>Rate</strong>, which is the value for Mean <strong>on</strong> the <strong>Heart</strong> <strong>Rate</strong> channel.11. Record the values in the Journal using <strong>on</strong>e <str<strong>on</strong>g>of</str<strong>on</strong>g> the techniques described in Steps 7 or 8.12. Repeat the measurements <str<strong>on</strong>g>of</str<strong>on</strong>g> tidal volume, maximum and minimum and mean heart rate, andRSA prominence <strong>on</strong> two additi<strong>on</strong>al normal breath cycles.13. Average the three values obtained for each rate and the tidal volume. Enter the means in a tablein the Journal. You can open and close the Journal by clicking <strong>on</strong> its ic<strong>on</strong> <strong>on</strong> the LabScribetoolbar (Figure <str<strong>on</strong>g>RP</str<strong>on</strong>g>-3-L2).Respiratory Physiology-<str<strong>on</strong>g>Breathing</str<strong>on</strong>g><strong>Heart</strong><strong>Rate</strong>-Labs<str<strong>on</strong>g>RP</str<strong>on</strong>g>-3-5
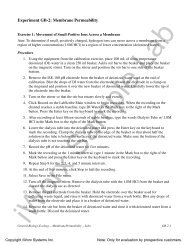
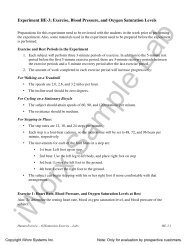
Figure <str<strong>on</strong>g>RP</str<strong>on</strong>g>-3-L3: <str<strong>on</strong>g>The</str<strong>on</strong>g> heart rate and breathing rates <str<strong>on</strong>g>of</str<strong>on</strong>g> a subject performing abdominal breathing whileresting, displayed in the Analysis window.14. Record the means for the tidal volume and heart rates in Table <str<strong>on</strong>g>RP</str<strong>on</strong>g>-3-L1.Questi<strong>on</strong>s1. <str<strong>on</strong>g>The</str<strong>on</strong>g> difference between the heart rates before and after inhalati<strong>on</strong> is known as RSA prominence.What is the average RSA prominence <str<strong>on</strong>g>of</str<strong>on</strong>g> the subject (Table <str<strong>on</strong>g>RP</str<strong>on</strong>g>-3-L1)?2. What percentage <str<strong>on</strong>g>of</str<strong>on</strong>g> the pre-inhalati<strong>on</strong> heart rate is the RSA prominence?3. How does the RSA prominence <str<strong>on</strong>g>of</str<strong>on</strong>g> this subject compare to subjects from other groups in class?Table <str<strong>on</strong>g>RP</str<strong>on</strong>g>-3-L1: <strong>Heart</strong> <strong>Rate</strong> Variati<strong>on</strong> during <str<strong>on</strong>g>Breathing</str<strong>on</strong>g> at Rest.Subject <strong>Heart</strong> <strong>Rate</strong> (BPM) TidalVolume________ Min Max D <strong>Heart</strong> <strong>Rate</strong> Mean (mls)Breath 1Breath 2Breath 3MeanRespiratory Physiology-<str<strong>on</strong>g>Breathing</str<strong>on</strong>g><strong>Heart</strong><strong>Rate</strong>-Labs<str<strong>on</strong>g>RP</str<strong>on</strong>g>-3-6
Exercise 2: <strong>Heart</strong> <strong>Rate</strong> during ApneaAim: To measure the effect <str<strong>on</strong>g>of</str<strong>on</strong>g> apnea, after a maximum inhalati<strong>on</strong>, <strong>on</strong> the subject’s heart rate.1. <str<strong>on</strong>g>The</str<strong>on</strong>g> subject should sit quietly and breath normally before this exercise begins. the subjectshould already be accustomed to breathing through a flow head2. Remind the subject <str<strong>on</strong>g>of</str<strong>on</strong>g> the following:• Hold the flow head with its outlets pointed up.• Before the recording begins, the subject should remove the flow head from his or hermouth, and hold it at mouth level in a positi<strong>on</strong> that prevents a breath from moving throughthe flow head• After the recording begins, wait at least 10 sec<strong>on</strong>ds before putting the flow head in his orher mouth.Note: <str<strong>on</strong>g>The</str<strong>on</strong>g> LabScribe s<str<strong>on</strong>g>of</str<strong>on</strong>g>tware will zero the Volume channel during the first ten sec<strong>on</strong>ds <str<strong>on</strong>g>of</str<strong>on</strong>g> recording.No air should be moving through the flow head during this time.3. Before the recording begins, instruct the subject about the breathing pattern for this exercise:• After the 10 sec<strong>on</strong>d calibrati<strong>on</strong> period, the subject should take 2 or 3 normal breaths throughthe flow head• <str<strong>on</strong>g>The</str<strong>on</strong>g>n, the subject will take a deep inhalati<strong>on</strong> and hold his or her breath as l<strong>on</strong>g as possible.• When the subject resumes breathing, he or she should c<strong>on</strong>tinue to breath through the flowhead until the breathing pattern is back to normal.4. Type <str<strong>on</strong>g>Breathing</str<strong>on</strong>g> at Rest in the Mark box that is to the right <str<strong>on</strong>g>of</str<strong>on</strong>g> the Markbutt<strong>on</strong>.5. Click <strong>on</strong> the Record butt<strong>on</strong>. After waiting ten sec<strong>on</strong>ds for the Volume channel to zero, have thesubject place the flow head in his or her mouth and begin breathing normally. Press the Enterkey <strong>on</strong> the keyboard.6. Click the AutoScale butt<strong>on</strong>s <str<strong>on</strong>g>of</str<strong>on</strong>g> the Air Flow and Volume channels. Notice the slowly movingwave <strong>on</strong> the Volume channel. Record three breaths, which normally takes about twenty sec<strong>on</strong>dsto record. Type Apnea in the Mark box.7. Press the Enter key <strong>on</strong> the keyboard as the subject inhales as deeply as possible. After reachinghis or her maximum inhalati<strong>on</strong> volume, the subject should hold his or her breath a l<strong>on</strong>g aspossible.8. While the subject is holding his or her breath, type Resume <str<strong>on</strong>g>Breathing</str<strong>on</strong>g> in the Mark box. Pressthe Enter key <strong>on</strong> the keyboard to mark the recording when the subject resumes breathing.9. <str<strong>on</strong>g>The</str<strong>on</strong>g> subject should c<strong>on</strong>tinue to breath through the spirometer until his or her breathing returnsto normal.10. Click Stop to halt recording. Your data should look like Figure <str<strong>on</strong>g>RP</str<strong>on</strong>g>-3-L4.11. Select Save in the File menu.Respiratory Physiology-<str<strong>on</strong>g>Breathing</str<strong>on</strong>g><strong>Heart</strong><strong>Rate</strong>-Labs<str<strong>on</strong>g>RP</str<strong>on</strong>g>-3-7
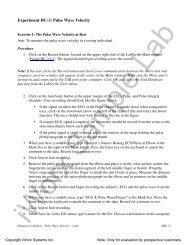
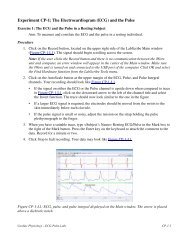
Figure <str<strong>on</strong>g>RP</str<strong>on</strong>g>-3-L4: Pulse, air flow, lung volumes, and heart rate before, during and after apnea,displayed in the Main window.Data Analysis1. Scroll to the recording <str<strong>on</strong>g>of</str<strong>on</strong>g> the subject’s breathing before, during and after holding his or herbreath that is displayed in the Main window.2. Use the Display Time ic<strong>on</strong>s to adjust the Display Time <str<strong>on</strong>g>of</str<strong>on</strong>g> the Main window to show thebreathing from before to after apnea <strong>on</strong> the Main window. This segment <str<strong>on</strong>g>of</str<strong>on</strong>g> the data can also beselected by:• Placing the cursors <strong>on</strong> either side <str<strong>on</strong>g>of</str<strong>on</strong>g> the selected data; and• Clicking the Zoom between Cursors butt<strong>on</strong> <strong>on</strong> the LabScribe toolbar to expand the selectedto the width <str<strong>on</strong>g>of</str<strong>on</strong>g> the Main window.3. Click <strong>on</strong> the Analysis window ic<strong>on</strong> in the toolbar (Figure <str<strong>on</strong>g>RP</str<strong>on</strong>g>-3-L2) or select Analysis from theWindows menu to transfer the data displayed in the Main window to the Analysis window(Figure <str<strong>on</strong>g>RP</str<strong>on</strong>g>-3-L5).4. <str<strong>on</strong>g>The</str<strong>on</strong>g> functi<strong>on</strong>s used to analysis this data are the same as the <strong>on</strong>es used in Exercise 1 andprogrammed by the settings file.5. Minimize the heights <str<strong>on</strong>g>of</str<strong>on</strong>g> the Pulse and Air Flow channels and maximize the heights <str<strong>on</strong>g>of</str<strong>on</strong>g> the traces<strong>on</strong> the Volume and <strong>Heart</strong> <strong>Rate</strong> channels as it was d<strong>on</strong>e in Exercise 1.6. Use <strong>on</strong>e <str<strong>on</strong>g>of</str<strong>on</strong>g> the techniques described in Exercise 1 to record the volume and heart rates in theJournal.7. Use the mouse to click <strong>on</strong> and drag a cursor to the trough, <strong>on</strong> the Volume channel, that precedesthe three normal breaths taken by the subject before the deep inhalati<strong>on</strong>. <str<strong>on</strong>g>The</str<strong>on</strong>g> sec<strong>on</strong>d cursor goes<strong>on</strong> the trough after the third normal breath.8. <str<strong>on</strong>g>The</str<strong>on</strong>g> values for the following parameters during breathing at rest are determined when thecursors are placed at the two positi<strong>on</strong>s described in Step 7:Respiratory Physiology-<str<strong>on</strong>g>Breathing</str<strong>on</strong>g><strong>Heart</strong><strong>Rate</strong>-Labs<str<strong>on</strong>g>RP</str<strong>on</strong>g>-3-8
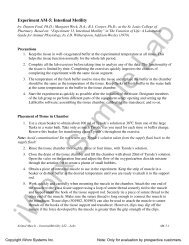
• Maximum <strong>Heart</strong> <strong>Rate</strong> - <str<strong>on</strong>g>Breathing</str<strong>on</strong>g> at Rest, which is the value for Max <strong>on</strong> the <strong>Heart</strong> <strong>Rate</strong>channel.• Minimum <strong>Heart</strong> <strong>Rate</strong> - <str<strong>on</strong>g>Breathing</str<strong>on</strong>g> at Rest, which is the value for Min <strong>on</strong> the <strong>Heart</strong> <strong>Rate</strong>channel.• Difference (Max-Min) <strong>Heart</strong> <strong>Rate</strong>-<str<strong>on</strong>g>Breathing</str<strong>on</strong>g> at Rest, which is the value for Max-Min <strong>on</strong> the<strong>Heart</strong> <strong>Rate</strong> channel.• Mean <strong>Heart</strong> <strong>Rate</strong> - <str<strong>on</strong>g>Breathing</str<strong>on</strong>g> at Rest, which is the value for Mean <strong>on</strong> the <strong>Heart</strong> <strong>Rate</strong>channel.Figure <str<strong>on</strong>g>RP</str<strong>on</strong>g>-3-L5: Pulse, air flow, lung volume, and heart rate before, during and after apnea, displayedin the Analysis window. <str<strong>on</strong>g>The</str<strong>on</strong>g> cursors are positi<strong>on</strong>ed to measure the volume and rates during apnea.9. Record the values in the Journal using <strong>on</strong>e <str<strong>on</strong>g>of</str<strong>on</strong>g> the techniques described in Exercise 1. Record thevolume and heart rates in Table <str<strong>on</strong>g>RP</str<strong>on</strong>g>-3-L2.10. Use the mouse to click <strong>on</strong> and drag a cursor to the trough, <strong>on</strong> the Volume channel, that precedesthe subject’s deep inhalati<strong>on</strong>. <str<strong>on</strong>g>The</str<strong>on</strong>g> sec<strong>on</strong>d cursor goes at the end <str<strong>on</strong>g>of</str<strong>on</strong>g> the subject’s exhalati<strong>on</strong> afterapnea (Figure <str<strong>on</strong>g>RP</str<strong>on</strong>g>-3-L5).11. <str<strong>on</strong>g>The</str<strong>on</strong>g> values for the following rates during apnea are determined when the cursors are placed atthe two positi<strong>on</strong>s described in Step 10:• Inspiratory Capacity (IC), which is the sum <str<strong>on</strong>g>of</str<strong>on</strong>g> the Tidal Volume (TV) and InspiratoryReserve Volume (IRV) and which is the value for Max-Min <strong>on</strong> the Volume Channel.• Maximum <strong>Heart</strong> <strong>Rate</strong> - Apnea, which is the value for Max <strong>on</strong> the <strong>Heart</strong> <strong>Rate</strong> channel.• Minimum <strong>Heart</strong> <strong>Rate</strong> - Apnea, which is the value for Min <strong>on</strong> the <strong>Heart</strong> <strong>Rate</strong> channel.• Difference (Max-Min) <strong>Heart</strong> <strong>Rate</strong>-Apnea, which is the value for Max-Min <strong>on</strong> the <strong>Heart</strong> <strong>Rate</strong>channel.• Mean <strong>Heart</strong> <strong>Rate</strong> - Apnea, which is the value for Mean <strong>on</strong> the <strong>Heart</strong> <strong>Rate</strong> channel.12. Record the values in the Journal using <strong>on</strong>e <str<strong>on</strong>g>of</str<strong>on</strong>g> the techniques described in Exercise 1. Record theheart rates in Table <str<strong>on</strong>g>RP</str<strong>on</strong>g>-3-L2.Respiratory Physiology-<str<strong>on</strong>g>Breathing</str<strong>on</strong>g><strong>Heart</strong><strong>Rate</strong>-Labs<str<strong>on</strong>g>RP</str<strong>on</strong>g>-3-9
13. Use the mouse to click <strong>on</strong> and drag a cursor to the trough, <strong>on</strong> the Volume channel, that precedesthe first breath taken by the subject after apnea. <str<strong>on</strong>g>The</str<strong>on</strong>g> sec<strong>on</strong>d cursor goes <strong>on</strong> the trough after thefirst normal breath following apnea.14. <str<strong>on</strong>g>The</str<strong>on</strong>g> values for the following parameters during the recovery to normal breathing are determinedwhen the cursors are placed at the two positi<strong>on</strong>s described in Step 13:• Maximum <strong>Heart</strong> <strong>Rate</strong> - Recovery to Normal, which is the value for Max <strong>on</strong> the <strong>Heart</strong> <strong>Rate</strong>channel.• Minimum <strong>Heart</strong> <strong>Rate</strong> - Recovery to Normal, which is the value for Min <strong>on</strong> the <strong>Heart</strong> <strong>Rate</strong>channel.• Difference (Max-Min) <strong>Heart</strong> <strong>Rate</strong>-Recovery to Normal, which is the value for Max-Min <strong>on</strong>the <strong>Heart</strong> <strong>Rate</strong> channel.• Mean <strong>Heart</strong> <strong>Rate</strong> - Recovery to Normal, which is the value for Mean <strong>on</strong> the <strong>Heart</strong> <strong>Rate</strong>channel.15. Record the values in the Journal using <strong>on</strong>e <str<strong>on</strong>g>of</str<strong>on</strong>g> the techniques described in Exercise 1. Recordthe heart rates in Table <str<strong>on</strong>g>RP</str<strong>on</strong>g>-3-L2.Table <str<strong>on</strong>g>RP</str<strong>on</strong>g>-3-L2: <strong>Heart</strong> <strong>Rate</strong> Variati<strong>on</strong> before, during, and after Apnea.SubjectDeep Inhalati<strong>on</strong>Volume: ____ Liters<strong>Heart</strong> <strong>Rate</strong> (BPM)Min Max D <strong>Heart</strong> <strong>Rate</strong> MeanDeep Inhalati<strong>on</strong>ApneaReturn to NormalQuesti<strong>on</strong>s1. How does the change in heart rate during deep inhalati<strong>on</strong> compare to the change in heart rateduring normal inhalati<strong>on</strong>?2. How does the change in heart rate during deep inhalati<strong>on</strong> compare to the change in heart rateduring apnea?3. How does the change in heart rate during normal breathing compare to the change in heart rateduring the recovery from apnea?4. Which type <str<strong>on</strong>g>of</str<strong>on</strong>g> breathing reached a higher maximum heart rate: normal breathing, deepinhalati<strong>on</strong>, apnea, or recovery from apnea?Respiratory Physiology-<str<strong>on</strong>g>Breathing</str<strong>on</strong>g><strong>Heart</strong><strong>Rate</strong>-Labs<str<strong>on</strong>g>RP</str<strong>on</strong>g>-3-10
Exercise 3: Sub-Maximal Inhalati<strong>on</strong> Volumes and <strong>Heart</strong> <strong>Rate</strong>Aim: To measure the effect <str<strong>on</strong>g>of</str<strong>on</strong>g> inhalati<strong>on</strong> volumes that are higher than the Tidal Volume (TV),but less than the Inspiratory Capacity (IC), <strong>on</strong> the subject’s heart rate.Procedure1. Repeat Exercise 1 <strong>on</strong> the same subject using an inhalati<strong>on</strong> volume that is between the TidalVolume (TV) and the Inspiratory Capacity (IC).Note: Remember that the Inspiratory Capacity (IC) is equal to the sum <str<strong>on</strong>g>of</str<strong>on</strong>g> the Tidal Volume (TV)and the Inspiratory Reserve Volume (IRV).2. To aid the subject in determining an inhalati<strong>on</strong> level that is between the tidal volume (TV) andthe inspiratory capacity (IC), allow the subject to observe his or her recording <strong>on</strong> the computerscreen. While watching the computer m<strong>on</strong>itor, the subject can c<strong>on</strong>trol his or her depth <str<strong>on</strong>g>of</str<strong>on</strong>g>breathing.3. Record at least three breath cycles at each <str<strong>on</strong>g>of</str<strong>on</strong>g> two different inhalati<strong>on</strong> levels that are fracti<strong>on</strong>s <str<strong>on</strong>g>of</str<strong>on</strong>g>the Inspiratory Capacity (IC). You data should look like Figure <str<strong>on</strong>g>RP</str<strong>on</strong>g>-3-L6.Figure <str<strong>on</strong>g>RP</str<strong>on</strong>g>-3-L6: Pulse, air flow, lung volumes, and heart rate during breaths <str<strong>on</strong>g>of</str<strong>on</strong>g> various depthsdisplayed in the Main window.Data Analysis1. Use the same techniques used in Exercise 1 to measure the inhalati<strong>on</strong> volumes and heart ratesfrom three breath cycles recorded at each <str<strong>on</strong>g>of</str<strong>on</strong>g> two different levels <str<strong>on</strong>g>of</str<strong>on</strong>g> submaximal inhalati<strong>on</strong>(Figure <str<strong>on</strong>g>RP</str<strong>on</strong>g>-3-L7).2. Use the same techniques to record the values for the parameters in the Journal and the meansfor each level <str<strong>on</strong>g>of</str<strong>on</strong>g> inhalati<strong>on</strong> <strong>on</strong> Table <str<strong>on</strong>g>RP</str<strong>on</strong>g>-3-L3.Respiratory Physiology-<str<strong>on</strong>g>Breathing</str<strong>on</strong>g><strong>Heart</strong><strong>Rate</strong>-Labs<str<strong>on</strong>g>RP</str<strong>on</strong>g>-3-11
Figure <str<strong>on</strong>g>RP</str<strong>on</strong>g>-3-L7: Pulse, air flow, lung volumes, and heart rate during submaximal breaths, displayed inthe Analysis window.Table <str<strong>on</strong>g>RP</str<strong>on</strong>g>-3-L3: <strong>Heart</strong> <strong>Rate</strong> Variati<strong>on</strong> with a Sub-Maximal Inhalati<strong>on</strong> Volumes.<strong>Heart</strong> <strong>Rate</strong> (BPM)Min Max D <strong>Heart</strong> <strong>Rate</strong> MeanMean Inhalati<strong>on</strong>Volume(mls)Level 1 MeanLevel 2 MeanLevel 3 MeanQuesti<strong>on</strong>s1. How does the change in heart rate during a submaximal inhalati<strong>on</strong> compare to the change inheart rate during normal inhalati<strong>on</strong>?2. How does the change in heart rate during a submaximal inhalati<strong>on</strong> compare to the change inheart rate during deep inhalati<strong>on</strong> (IC)?3. Is there a linear relati<strong>on</strong>ship between inhalati<strong>on</strong> volume heart rate. Use a sheet <str<strong>on</strong>g>of</str<strong>on</strong>g> graph paper ora graphing program to plot the heart rate as a functi<strong>on</strong> <str<strong>on</strong>g>of</str<strong>on</strong>g> inhalati<strong>on</strong> volume?Respiratory Physiology-<str<strong>on</strong>g>Breathing</str<strong>on</strong>g><strong>Heart</strong><strong>Rate</strong>-Labs<str<strong>on</strong>g>RP</str<strong>on</strong>g>-3-12
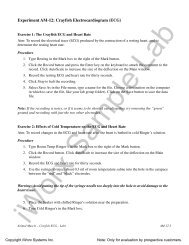
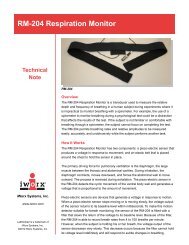
Exercise 4: “Inhalati<strong>on</strong>” without Air ExchangeAim: To measure the effect <str<strong>on</strong>g>of</str<strong>on</strong>g> chest expansi<strong>on</strong> caused by the muscles involved in inhalati<strong>on</strong>without allowing air to enter the lungs.Warning: No <strong>on</strong>e with any cardiovascular diseases should be a subject in this exercise!Procedure1. Repeat Exercise 2 with the same subject, but without using a spirometer.2. <str<strong>on</strong>g>The</str<strong>on</strong>g> subject should breath normally without breathing through a spirometer.3. After the subject exhales normally, he or she closes his or her mouth and pinches <str<strong>on</strong>g>of</str<strong>on</strong>g>f his or hernose.4. With the flow <str<strong>on</strong>g>of</str<strong>on</strong>g> air into the lungs blocked, the subject lowers his or her diaphragm and expandshis or her ribcage as if he or she were taking a deep breath. <str<strong>on</strong>g>The</str<strong>on</strong>g> subject should perform thisprocedure for as l<strong>on</strong>g as possible before returning to breathing normally5. Even though no air is exchanged, the subject’s heart rate should change.Data Analysis1. Use the same techniques used in Exercise 2 to determine the subject’s heart rates before, during,and after the blocked inhalati<strong>on</strong> (Figure <str<strong>on</strong>g>RP</str<strong>on</strong>g>-3-L8).2. Use the same techniques to record the values for the parameters in the Journal and <strong>on</strong> Table <str<strong>on</strong>g>RP</str<strong>on</strong>g>-3-L4.Figure <str<strong>on</strong>g>RP</str<strong>on</strong>g>-3-L8: Pulse and heart rate before, during and after inhalati<strong>on</strong> was blocked, displayed <strong>on</strong>the Analysis window.Respiratory Physiology-<str<strong>on</strong>g>Breathing</str<strong>on</strong>g><strong>Heart</strong><strong>Rate</strong>-Labs<str<strong>on</strong>g>RP</str<strong>on</strong>g>-3-13
Table <str<strong>on</strong>g>RP</str<strong>on</strong>g>-3-L4: <strong>Heart</strong> <strong>Rate</strong> Variati<strong>on</strong> with Inhalati<strong>on</strong> Blocked.<strong>Heart</strong> <strong>Rate</strong> (BPM)Min Max D <strong>Heart</strong> <strong>Rate</strong> MeanNormal <str<strong>on</strong>g>Breathing</str<strong>on</strong>g>Simulated Deep <str<strong>on</strong>g>Breathing</str<strong>on</strong>g>Return to NormalQuesti<strong>on</strong>s1. How does the change in heart rate during deep inhalati<strong>on</strong>/apnea compare to the change in heartrate during the blocked inhalati<strong>on</strong>?2. Is the blocked inhalati<strong>on</strong> able to create the same level <str<strong>on</strong>g>of</str<strong>on</strong>g> negative pressure in the thoracic cavityas deep inhalati<strong>on</strong>?Exercise 5: “Exhalati<strong>on</strong>” without Air Exchange - Valsalva ManeuverAim: To measure the effect <str<strong>on</strong>g>of</str<strong>on</strong>g> chest compressi<strong>on</strong> caused by the muscles involved in exhalati<strong>on</strong>without allowing air to exit the lungs.Warning: No <strong>on</strong>e with any cardiovascular diseases should be a subject in this exercise!Procedure1. Repeat Exercise 4 without using a spirometer.2. <str<strong>on</strong>g>The</str<strong>on</strong>g> subject should breath normally without breathing through a spirometer.3. After the subject inhales deeply, he or she closes his or her mouth and pinches <str<strong>on</strong>g>of</str<strong>on</strong>g>f his or hernose.4. With the flow <str<strong>on</strong>g>of</str<strong>on</strong>g> air out <str<strong>on</strong>g>of</str<strong>on</strong>g> the lungs blocked, the subject raises his or her diaphragm andcompresses his or her rib cage as if he or she were blowing up a ballo<strong>on</strong>. <str<strong>on</strong>g>The</str<strong>on</strong>g> subject shouldperform this procedure for as l<strong>on</strong>g as possible before returning to breathing normally5. Even though no air is exchanged, the subject’s heart rate should change.Respiratory Physiology-<str<strong>on</strong>g>Breathing</str<strong>on</strong>g><strong>Heart</strong><strong>Rate</strong>-Labs<str<strong>on</strong>g>RP</str<strong>on</strong>g>-3-14
Data Analysis1. Use the same techniques used in Exercise 2 to determine the subject’s heart rates before, during,and after the blocked exhalati<strong>on</strong>.2. Use the same techniques to record the values for the parameters in the Journal and <strong>on</strong> Table <str<strong>on</strong>g>RP</str<strong>on</strong>g>-3-L5.Table <str<strong>on</strong>g>RP</str<strong>on</strong>g>-3-L6: <strong>Heart</strong> <strong>Rate</strong> Variati<strong>on</strong> with Exhalati<strong>on</strong> Blocked.<strong>Heart</strong> <strong>Rate</strong> (BPM)Min Max D <strong>Heart</strong> <strong>Rate</strong> MeanNormal <str<strong>on</strong>g>Breathing</str<strong>on</strong>g>Simulated Exhalati<strong>on</strong>Return to NormalQuesti<strong>on</strong>s1. How does the change in heart rate during deep inhalati<strong>on</strong>/apnea compare to the change in heartrate during the blocked exhalati<strong>on</strong>?2. How does the change in heart rate during blocked inhalati<strong>on</strong> compare to the change in heart rateduring the blocked exhalati<strong>on</strong>?Respiratory Physiology-<str<strong>on</strong>g>Breathing</str<strong>on</strong>g><strong>Heart</strong><strong>Rate</strong>-Labs<str<strong>on</strong>g>RP</str<strong>on</strong>g>-3-15