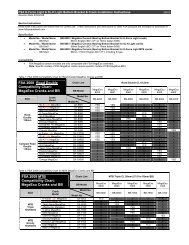
DualDrive Ins EDFNlDkSv 12/02 - Sram
DualDrive Ins EDFNlDkSv 12/02 - Sram
DualDrive Ins EDFNlDkSv 12/02 - Sram

You also want an ePaper? Increase the reach of your titles
YUMPU automatically turns print PDFs into web optimized ePapers that Google loves.
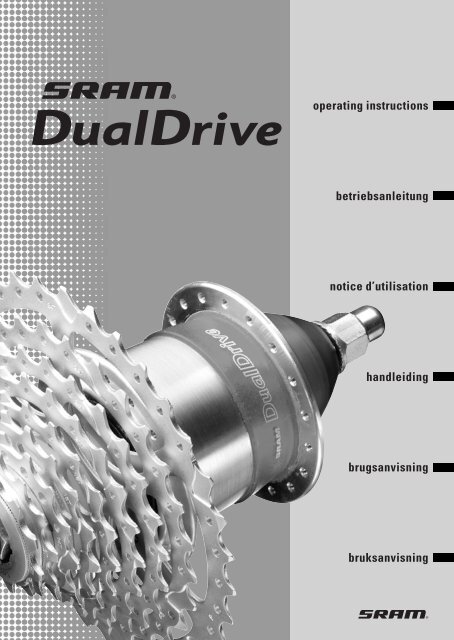
operating instructionsbetriebsanleitungnotice d’utilisationhandleidingbrugsanvisningbruksanvisning
These instructions contain importantinformation on your <strong>DualDrive</strong>system.Cycling with <strong>DualDrive</strong> is easy. It’strue. It may surprise you just howmany features your <strong>DualDrive</strong>system has.To make the best possible use ofyour <strong>DualDrive</strong> please take the timeto read these operating instructionscarefully.Your <strong>DualDrive</strong> system is almostmaintenance-free. Should you haveany queries that are not answered inthese operating instructions, yourqualified bicycle specialist will bepleased to help you.Have a nice time and enjoy”dualdriving”.Please take particular note of thefollowing:Precautionary measures,which protect from possibleaccident, injury or danger tolife, or which prevent possibledamage to the bicycle.Special advice to assist inthe better handling of theoperation, control and adjustmentprocedures.© Copyright SRAM Corporation 20<strong>02</strong>Publ. No. 5000 E/D/F/Nl/Dk/SvInformation may be enhancedwithout prior notice.Released December 20<strong>02</strong>SRAM Technical Documentation,Schweinfurt/GermanyShimano is a trademark of Shimano Inc., Japan.2<strong>DualDrive</strong> · December 20<strong>02</strong>
CONTENTSETHE DUALDRIVE SYSTEM 4OPERATION 7MAINTENANCE AND CARE» Gear adjustment 8» Remove and fit rear wheel 10» Cleaning and Lubrication 11» Cable change <strong>12</strong>ASSEMBLY OF COMPONENTS 14TECHNICAL DATA 18ADDRESSES 110<strong>DualDrive</strong> · December 20<strong>02</strong> 3
THE DUALDRIVE SYSTEMWHAT IS DUALDRIVEThe general perception is that shiftingrequires a Zen-like touch from yearsof trial and error . . . mostly error.Many riders wanted somethingeasier. We really love this kind ofchallenge. And <strong>DualDrive</strong> exceedsall the expectations.<strong>DualDrive</strong> is a drive train consistingof a self-energized internal hub andrear derailleur for smooth adjustment.It’s the market’s most revolutionarytransmission.RIDING MODES<strong>DualDrive</strong> has 3 intuitive shiftingmodes. Hill mode, standard mode, andfast mode. Each mode is designed toallow the rider to be in the propermode wherever you go.HillOPERATING PRINCIPLESingle-side shifting allows the rider touse one-hand to easily click througha 27-, 24- or 21 gear option. And<strong>DualDrive</strong>’s superior gear indication,featuring three intuitive riding modes,creates a smooth, comfortable ridefor novice and masters alike. Easyshifting.Advanced performance. Missionaccomplished.StandardFast4<strong>DualDrive</strong> · December 20<strong>02</strong>
THE DUALDRIVE SYSTEME<strong>DualDrive</strong> hub and cassetteSuper light shifting forces,load shiftable. Stand-still shifting(mode selector): easy re-start ata traffic light<strong>DualDrive</strong> single-sided shifterSimple gear indication:one view for all information.Intuitive logical shifting.<strong>DualDrive</strong> ClickboxEasy wheel removal:pre-adjusted gears for simplicity.<strong>DualDrive</strong> rear derailleurLight, precise shifting.Larger pivots, links and cages:increased rigidity and durability.<strong>DualDrive</strong> · December 20<strong>02</strong> 5
THE DUALDRIVE SYSTEMHOW LONG DID ITTAKE TO FINISHDUALDRIVE?A big team of 25 engineers from allaround the world worked for twoyears on this project.HOW DID WE TESTDUALDRIVE?Enthusiastic trekking riders did testthe system under all weather circumstancefor more than a year.Within these tests we finetuned thefunction of the system to perform to100% of the comfort trekking ridersexpectations.WHAT PARTS DO I NEEDTO COMPLETE A DUAL-DRIVE TRAIN?A <strong>DualDrive</strong> train contains thefollowing products:» <strong>DualDrive</strong> hub: in either withoutbrake and disc brake version.» Cassette: 11-34 teeth, 9 speed for<strong>DualDrive</strong> 27 or 11-32 teeth, 8speed for <strong>DualDrive</strong> 24 or <strong>12</strong>-32teeth, 7 speed for <strong>DualDrive</strong> 21.» Derailleur: <strong>DualDrive</strong> 9 speed for<strong>DualDrive</strong> 27, <strong>DualDrive</strong> 8 speedfor <strong>DualDrive</strong> 24 or <strong>DualDrive</strong> 7speed for <strong>DualDrive</strong> 21.6» Shifter with Clickbox: 27 speedwith gear indication window or24 and 21 speed without gearindication window.» Spoke protector: There are twoversions available: in versions for36 or 32 spoke hole hubs.» Crank: <strong>DualDrive</strong> cranks offer thebest performance with the Dual-Drive system.I BELIEVE A DUAL-DRIVE SYSTEM HASTO BE HEAVIER THANA NORMAL EXTERNALDRIVE SYSTEM!In fact the <strong>DualDrive</strong> system weighsaround 250 gr less than a standardderailleur drive train system.WHAT IS THE BENEFITOF THE SINGLE SIDEDSHIFTER?It is more intuitive due to the ridingmodes which explain the driverdirectly what mode to use in whichterrain.<strong>DualDrive</strong> · December 20<strong>02</strong>
OPERATIONRIDING MODESUse the thumb shifter to1 choose the gear ratio. You canoperate it in stand still or whileriding. The smoothest and fastestgear change happens whenchanging gears while pedaling.EDERAILLEURUse the rotating grip (to theright) to change gear of thederailleur system. The smoothestand fastest gear change happenswhen changing gears whilepedaling with low force.2 <strong>12</strong><strong>DualDrive</strong> · December 20<strong>02</strong> 7
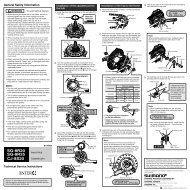
MAINTENANCE AND CAREGEAR ADJUSTMENTGEAR HUBPlace thumb shift lever3 in standard mode.Match up the yellow marks in4 the Clickbox viewing windowby twisting the barrel adjuster.3DERAILLEURLimit screw adjustment:View the rear derailleur and5 pulleys from behind the rear ofthe bicycle.» Turn the limit screw marked ’H’ onthe outer link of the derailleur toalign the upper guide pulley centerwith the outboard edge of thesmallest cog – clockwise movesthe guide pulley inboard towardsthe wheel.» While turning the crank, push therear derailleur towards the largercogs by hand.» Align the upper guide pulley underthe largest cog, by turning thelimit screw marked ’L’ on the outerlink – clockwise moves the guidepulley outboard away from thespokes.458<strong>DualDrive</strong> · December 20<strong>02</strong>
MAINTENANCE AND CAREGEAR ADJUSTMENTChain gap adjustment:Chain gap is the distance between theupper guide pulley and the cog thechain is riding on. Optimal chain gapallows quick, efficient shifts.6E» While turning the crank, push therear derailleur inboard by hand tothe largest cog.6 mm( 1 / 4 ")» Hold the derailleur in this positionwhile making the following adjustment.Use a 3 mm hex wrench, turn6 the b-adjust screw until thechain gap equals approximately6 mm ( 1 / 4 ”).– Turn the b-adjust screw clockwiseto increase the chain gap.– Turn the b-adjust screwcounterclockwise to decreasethe chain gap.Do not use the b-adjust screwto adjust the rear derailleurto act as a chain-tensioning deviceor to prevent chain suck. Thisincreases the chain gap causingpoor shifting performance.Index shifting adjustment:» Make sure the chain is located onthe smallest sprocket.3 mm» Shift the chain to the second cog.– If the chain hesitates or does notshift, increase the cable tensionby turning the shifter barreladjuster counterclockwise.– If the chain shifts beyond thesecond cog, decrease the cabletension by turning the shifterbarrel adjuster clockwise.» Repeat the two former steps untilshifting and cable tension isaccurate.» While turning the crank, shift thechain up and down the cassetteseveral times to ensure that yourderailleur is indexing smoothly.<strong>DualDrive</strong> · December 20<strong>02</strong> 9
MAINTENANCE AND CAREREMOVE AND FIT REAR WHEELREMOVE REAR WHEEL» Rotate the twist shifter to the highestgear position (speed „7/8/9“).7810Place thumb shift leverin hill riding mode.Push Clickbox button down.» Pull Clickbox off the axle.» Dismantle wheel.9Unscrew shifting rod (1)FIT REAR WHEEL» Fit wheel in frame dropouts.Place retaining washers (2) on9 both sides of the axle – theserrations must bear against thedropout (washers with lugs: thesemust engage in the dropout slots).» Tighten up axle nuts. Tighteningtorque 30 – 40 Nm (266 – 350 in. lbs.).» Screw shifting rod (1) into the hubaxle and thigthen it with 0.2 Nm(1.8 in. lbs.).» Push on Clickbox to the stop onthe hub axle. The thumb shift levermust be positioned in the hill ridingmode and Clickbox button must bepushed down.» Bring Clickbox button back to initialsetting by pushing it up from underneath.» Check the gear settings.78910,2 Nm<strong>DualDrive</strong> · December 20<strong>02</strong>2
MAINTENANCE AND CARECLEANING AND LUBRICATIONCLEANINGYour <strong>DualDrive</strong> components10 are well protected againstadverse environmental influences.In order to avoid malfunction dueto water penetration, pressurizedjets (high pressure cleaners etc.)should not be used when cleaningthe bicycle.» When using the bike during thewinter more frequent cleaning isnecessary to prevent damagecaused by de-icing salt.» Do not use solvants or corrosivematerials to clean the components.» Clean dirty chains before oiling.Do not use any grease-dissolvingor acidic agents. Cleaning agentmust be rinsed off after a fewminutes with water. Apply oil afterchain is completely dried.1011Lubricate theshifting jointsregularlyELUBRICATION» <strong>DualDrive</strong> hubs are provided withpermanent lubrication andmaintenance-free under normalconditions.Lubricate the shifting joints11 regularly. Grease any cableguides (e.g. beneath the bottombracket).» Regular lubrication will extend thechain’s service life.<strong>DualDrive</strong> · December 20<strong>02</strong> 11
MAINTENANCE AND CARECABLE CHANGECABLE CHANGELeave the shifter on thehandlebar.» No need to move other components.The shifter does not need to beopened.» Use only new high quality cable(stainless) and compressionlesscable housing with end caps.<strong>12</strong>21Twist shifter (rear derailleur):» Detach the cable from thederailleur.» Cut cable off 15 cm (6") fromshifter barrel adjuster. Discard oldcable and cable housing.Remove screw (1) and pull open<strong>12</strong> the cable change sleeve (2).Rotate the shifter fully in the13 cable release direction (gearposition “7/8/9“). Look for cablehead entry (3).» Push cable up/out of the shifterand discard.» Feed the new cable through thecable entry.Pull cable snug.<strong>Ins</strong>tall cable change sleeve (2)<strong>12</strong> and fit screw (1).<strong>12</strong>1314<strong>DualDrive</strong> · December 20<strong>02</strong>534
MAINTENANCE AND CARECABLE CHANGE» Feed the cable through the newcable housing and frame stops.» Attach cable to the derailleur andadjust indexing.Thumb shifter (gear hub):Place thumb shift lever7 in hill riding mode.» Remove Clickbox from the axle(see Page 10).Snap open Clickbox-cover (6)15 as shown.» Unscrew clamping bolt (7), hexwrench 4 mm.Remove the shifter escape14 hatch (4).» Remove and discard the old cable.» Feed the new cable through thecable entry (5), the new cablehousing and pull the cable snug.» Attach the escape hatch.Pull the cable tight and15 position it under the cableanchor washer (8).» Tighten the 4 mm hex cable anchorbolt to 2.5 – 4 Nm (22 – 35 in.lbs.).» Cut off cable end to 1 – 2 mm.» Snap in Clickbox-cover.» <strong>Ins</strong>tall Clickbox (see Page 10).» Adjust gearshift.156 7REPAIR WORKArrange for any work, whichmay become necessary onthe <strong>DualDrive</strong> gear hub and shifterto be carried out by your qualifiedspecialist dealer.» Non-authorized work on your<strong>DualDrive</strong> system could put you indanger and also lead to the loss ofyour guaranteed rights.» If you have questions or problemsplease contact your qualifiedspecialist dealer.<strong>DualDrive</strong> · December 20<strong>02</strong> 1384 mm2.5 – 4 Nm22 – 35 in.lbs.E
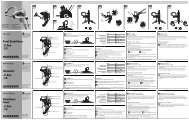
ASSEMBLYOF COMPONENTSASSEMBLY HUB» Spoke the hub as normal.16Place spoke protector disc (1)on shoulder of hub, fitcassette (2) onto driver profile.Screw lock nut (3) with cassettetool (Park Tool FR-5 or SRAM PartNo. 4624 411 010), tighteningtorque: 40 Nm (350 in.lbs.).16<strong>12</strong>317Screw shifting rod (1) into thehub axle and tighten it with0.2 Nm (1.8 in.lbs.).» Fit wheel in frame dropouts.17Place retaining washers (2) onboth sides of the axle – theserrations must bear against thedropout.– Version for horizontal dropouts (2):the lug must engage in thedropout slot.– Version for vertical dropouts (3):without lug.172» Tighten up axle nuts. Tighteningtorque 30 – 40 Nm (266 – 350 in. lbs.).310,2 Nm14<strong>DualDrive</strong> · December 20<strong>02</strong>
ASSEMBLYOF COMPONENTSASSEMBLY DERAILLEURCheck the rear derailleurhanger alignment. A bent rearderailleur hanger will result ininaccurate index shifting.Attach the rear derailleur to18 the frame’s rear derailleurhanger.Check that the b-adjust19 washer tab (b-adjust screw at<strong>DualDrive</strong> 24 and 21) is clear of therear derailleur dropout tab.» Tighten the 5 mm hex hanger boltto 8 – 10 Nm (70–85 in.lbs.).CHAIN LENGTHBypassing the rear derailleur,20 run the chain around thelargest cog chainring combination.Add 4 LINKS or 3 links +connecting link to this length forproper chain length.» For rear suspension frames,position the rear suspension forthe greatest chain lengthrequired.181920<strong>DualDrive</strong> 275 mm8 – 10 Nm70 – 85in.lbs.<strong>DualDrive</strong> 24 / 21E(4 links)<strong>DualDrive</strong> · December 20<strong>02</strong> 15
ASSEMBLYOF COMPONENTS2<strong>12</strong>1 5ASSEMBLY SHIFTERSlide the shifter (5) onto thehandlebar.» Rotate the shifter until the barreladjuster (6) is beneath (but out ofthe way of) the brake lever.» Tighten the 3 mm hex clamp bolt (7)to 1.9 – 2.5 Nm (17 – 22 in.lbs.).» Slide the handlebar grip (8) ontothe handlebar.Never use lubricants orsolvents to install handlebargrips. Handlebar grips provide anaxial safety function. For thisreason, they should be mounted insuch a way as to make sure theydo not slip off handlebar.» Check that the shifter and brakelever function properly and areunobstructed.» Never ride without the handlebargrips, this can result in severeinjury or death.67816<strong>DualDrive</strong> · December 20<strong>02</strong>
ASSEMBLYOF COMPONENTSINSTALLING CLICKBOX» Fit the cable and avoid smallradius.» Cable housing must be movableinside attachment.Place thumb shift lever22 in hill riding mode.Push Clickbox23 button down.» Push on Clickbox to the stop onthe hub axle.» Bring Clickbox button back to initialsetting by pushing it up fromunderneath.2223EGEAR ADJUSTMENTSee MAINTENANCE AND CARE<strong>DualDrive</strong> · December 20<strong>02</strong> 17
TECHNICAL DATA182,6135Chain line67,54,6 / 4,6 / 9,5331867GEAR HUBSpoke AxleRatioOver Locknut Dim.LengthEnds Diameter FG 10.5Holes 36 or 32Hole Diameter 2.6 mmHole Ref. ø 67 mm<strong>DualDrive</strong> 27 <strong>DualDrive</strong> 24 <strong>DualDrive</strong> 21135 mm182.6 mmFlange Dist. to 1 / 2 OLD 33 mm / 18 mmTotally 576 % 542 % 509 %Totally hub 186 %Speed 1 73 %Speed 2 100 %Speed 3 136 %Chainline 45 mm 45 mm 42 mmCrankset 33 / 38 TeethCogset 9 / 8 / 7 speed, 11-34 / 11-32 / <strong>12</strong>-32 TeethCogset Compatib. <strong>DualDrive</strong> 27 <strong>DualDrive</strong> 24 <strong>DualDrive</strong> 21Shifter Compatib. <strong>DualDrive</strong> 27 <strong>DualDrive</strong> 24 <strong>DualDrive</strong> 21Tandem compatib. Not suitable for tandems and delivery bicycles18<strong>DualDrive</strong> · December 20<strong>02</strong>
TECHNICAL DATACASSETTE<strong>DualDrive</strong> 27 <strong>DualDrive</strong> 24 <strong>DualDrive</strong> 21ELargest Cog 34 Teeth 32 Teeth 32 TeethSpeeds 9 8 7Cogs 11/34 11/32 <strong>12</strong>/32Spacers Blue Black GreyChain compatib. 9spd, SRAM/Shim. 8spd, SRAM/Shim. 7spd, SRAM/Shim.DERAILLEUR<strong>DualDrive</strong> 27 <strong>DualDrive</strong> 24 <strong>DualDrive</strong> 21Speeds 9 8 7Shifter Compatibility <strong>DualDrive</strong> 27 <strong>DualDrive</strong> 24 <strong>DualDrive</strong> 21Cage Length Short, 75 mm Short, 75 mm Short, 75 mmSprocket, max. 34 Teeth 32 Teeth 32 TeethSprocket, min. 11 Teeth 11 Teeth 11 TeethPulleys Exchangea. / BushingDirect Mount ● ● ●SHIFTER<strong>DualDrive</strong> 27 <strong>DualDrive</strong> 24 <strong>DualDrive</strong> 21Shifter Type SRS Twistring-Thumbshifter-Combo (2in1)Gear Hub <strong>DualDrive</strong>Derailleur <strong>DualDrive</strong> 27 <strong>DualDrive</strong> 24 <strong>DualDrive</strong> 21Gear Indication Der. Window Printed PrintedRiding Mode Indic. Printed Printed PrintedBarrel Adj. Derailleur IndexClamping Diameter 22,3 mmCompat.Handlebar, Straight AreaCable Routing, Gear HubCable Routing, Der.Minimum length = 150mmContinuous housing (preassembled)Open or continuous<strong>DualDrive</strong> · December 20<strong>02</strong> 19➔
ADDRESSESEUROPEDANMARKDan AgenturStationsvej 775792 ÅrslevTel.: +45 65 99 24 11Fax: +45 65 99 28 42DEUTSCHLANDEpple Zweirad GmbHMittereschweg 187700 MemmingenTel.: +49 (0) 83 31 7 51 411Fax: +49 (0) 83 31 7 51 450Hermann Hartje KGDeichstraße <strong>12</strong>0-<strong>12</strong>227318 Hoya/WeserTel.: +49 (0) 42 51 81 <strong>12</strong> 40Fax: +49 (0) 42 51 81 <strong>12</strong> 49ESPAÑACasa Masferrer, s.a.Pol. Ind. Congost.Avda.San Julian, s/nE-08400 Granollers (Barcelona)Tel.: +34 9 38 46 60 51Fax: +34 9 38 46 53 56110FRANCESavoye, S.A.Rue de l’industrie01470 Serrières de BriordTel.: +33 4 74 36 13 77Fax: +33 4 74 36 15 14ITALIAA.M.G. s.r.l.Via Piave 1<strong>02</strong>3871 Lomagna (Como)Tel.: +39 039 5 30 11 67Fax: +39 039 9 22 <strong>02</strong> 70NEDERLANDKoch Kleeberg B.V.Dukdalfweg 251332 BJ AlmereTel.: +31 36 532 05 04Fax: +31 36 532 25 48Vertex Cycle Systems BVDelfweg <strong>12</strong>2211 VM NoordwijkerhoutTel.: +31 252 340611Fax: +31 252 345030<strong>DualDrive</strong> · December 20<strong>02</strong>
ADDRESSESÖSTERREICHKTM Fahrrad GmbHHarlochnerstrasse 135230 MattighofenTel.: +43 7742 409 10Fax: +43 7742 409 172SCHWEIZAmsler & CO AGLindenstraße 168245 FeuerthalenTel.: +41 5 26 47 36 36Fax: +41 5 26 47 36 66UNITED KINGDOMFisher Outdoor Leisure PlcUnit 8/9 Brick Knoll ParkAshley Road Industrial EstateAshley RoadSt. Albans, HertfordshireAL1 5UGTel.: +44 1727 798345Fax: +44 8009 807<strong>12</strong>9SUOMIJ. Syväranta OyNervanderinkatu 5E 47/PL 64F-00101 HelsinkiTel.: +358 9 434 2030Fax: +358 9 493 890SVERIGEUNITED STATESVartex ABBatterivägen 1443232 VarbergTel.: +46 340 64 60 00Fax: +46 340 61 11 90World HeadquartersChicago, Illinois U.S.A.SRAM Corporation1333 North Kingsbury, 4th floorChicago, Illinois 60622Tel.: +1-3<strong>12</strong>-664-8800Fax: +1-3<strong>12</strong>-664-8826<strong>DualDrive</strong> · December 20<strong>02</strong> 111
WORLD HEADQUARTERSChicago, Illinois U.S.A.SRAM Corporation1333 North Kingsbury, 4th floorChicago, Illinois 60622phone: +1-3<strong>12</strong>-664-8800fax: +1-3<strong>12</strong>-664-8826EUROPEAN HEADQUARTERSAmersfoort, The NetherlandsSRAM EuropeBasicweg <strong>12</strong>-D3821 BR AmersfoortThe Netherlandsphone: +31-33+-450-6060fax: +31-33-457-<strong>02</strong>00ASIAN HEADQUARTERSTaichung, TaiwanSRAM TaiwanNo. 1598-8 Chung Shan RoadShen Kang Hsiang, TaichungCounty 429Taiwan R.O.C.phone: +886-4-2561-3678fax: +886-4-2561-3686www.sram.com