PING)))TM Bracket Kit (#570-28015) - Parallax Inc
PING)))TM Bracket Kit (#570-28015) - Parallax Inc
PING)))TM Bracket Kit (#570-28015) - Parallax Inc

Create successful ePaper yourself
Turn your PDF publications into a flip-book with our unique Google optimized e-Paper software.
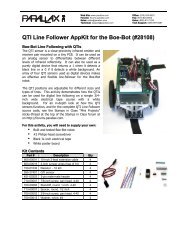
Web Site: www.parallax.comForums: forums.parallax.comSales: sales@parallax.comTechnical: support@parallax.comOffice: (916) 624-8333Fax: (916) 624-8003Sales: (888) 512-1024Tech Support: (888) 997-8267<strong>PING</strong>))) <strong>TM</strong> <strong>Bracket</strong> <strong>Kit</strong>(<strong>#570</strong>-<strong>28015</strong>)The <strong>PING</strong>))) <strong>Bracket</strong> <strong>Kit</strong> includes a standardservo and all mounting hardware required toattach the <strong>PING</strong>))) ultrasonic sensor to the frontof the <strong>Parallax</strong> Boe-Bot ® robot (or any custommaderobot chassis with a flat mounting spot onthe front).You may also purchase additional hardwarefrom <strong>Parallax</strong> to mount the HM55B CompassModule to the same mounting bracket. Thathardware is not included in this kit but isavailable from a hardware store or the <strong>Parallax</strong>web site. See page 4 for more information.Features• <strong>Parallax</strong> Standard Servo provides 180 degrees of ultrasonic scanning ability• Clean and sturdy connection provides reliable use on mobile robots• Example BASIC Stamp ® code for using the mounted <strong>PING</strong>))) sensor with a Boe-Bot robot can bedownloaded for free from http://www.parallax.com/detail.asp?product_id=570-<strong>28015</strong>Bill of MaterialsPart# Qty Description700-00003 7 4/40 nut, zinc plated700-00015 3 Nylon washer (size 4)700-00025 1 Rubber grommet – 13/32” size700-00028 5 4/40 ¼” long panhead Phillips screw700-00062 2 2/56 ¼” long panhead Phillips screw710-00006 2 4/40 ½” long panhead Phillips screw711-00001 2 2/56 nut713-00005 2 Nylon spacer ¼” long (size 4)720-00012 2 Straight bracket720-<strong>28015</strong> 1 <strong>PING</strong>))) mounting bracket805-00001 1 Servo extension cable 10”900-00005 1 <strong>Parallax</strong> Standard ServoTools Required• A 3/32” drill bit or an X-Acto ® knife• A #2 Philips screwdriver (such as the<strong>Parallax</strong> screwdriver included in theBoe-Bot Robot <strong>Kit</strong>)Assembly InstructionsStep 1:Enlarge two holes on the standard servo horn with a 3/32” (2.0mm) drill bit or the tip of an X-Acto knife. Use caution in thisstep since the servo horn plastic is quite brittle and can crack ifit is enlarged with a screw.Copyright © <strong>Parallax</strong>, <strong>Inc</strong>. • <strong>PING</strong>))) <strong>Bracket</strong> <strong>Kit</strong> (<strong>#570</strong>-<strong>28015</strong>) • v1.1 8/10/2007 Page 1 of 4
Step 2:Attach the <strong>PING</strong>))) mounting bracket to theservo horn using (2) 2/56 ¼” long screwsand nuts. Put the rubber grommet in thebracket’s larger hole.Step 3:The mounting holes on the <strong>PING</strong>)))mounting bracket accommodate bothFutaba and Hitec servo sizes and locations.Identify the proper holes for your servo.Step 4:As viewed from the top, attach the <strong>PING</strong>)))ultrasonic sensor to the <strong>PING</strong>))) mountingbracket using (2) 4/40 ½” long screws, (2)¼” long nylon spacers and (2) 4/40 nuts.Step 5:Disconnect power, then remove the Boardof Education ® and four standoffs from theBoe-Bot chassis. The Board of Education’sfront right mounting position will be usedfor the straight bracket attachments; theother one will mount on one of thechassis’s front slots using a 4/40 ¼” screwand nut. Install (3) nylon washers underthe other three standoffs and replace theBoard of Education on the chassis so itremains level.Copyright © <strong>Parallax</strong>, <strong>Inc</strong>. • <strong>PING</strong>))) <strong>Bracket</strong> <strong>Kit</strong> (<strong>#570</strong>-<strong>28015</strong>) • v1.1 8/10/2007 Page 2 of 4
Step 6:Attach the <strong>PING</strong>))) Mounting <strong>Bracket</strong> andservo to the straight brackets using (4)4/40 screws and (4) 4/40 nuts. Replace theservo’s shaft screw once the <strong>PING</strong>)))Mounting <strong>Bracket</strong> is installed.Important: Before using the servoscrew, adjust the Ping))) bracket torotate 90° left and right.Step 7:Set the Servo Port Jumper on the Board ofEducation to Vdd, then plug the servo intoservo port 14.Note: If your board has no servo ports, orno servo port jumper, or if you want tokeep the servos connected to Vin instead ofVdd, follow the Breadboard Connectionsection on page 3.Step 8:Connect the servo extension cable to the<strong>PING</strong>))) sensor: Black to GND, Red to 5 V,and White to SIG.Plug the other end of the Ping))) sensor’scable into servo port 15.You can download sample BASIC Stamp 2 source code and videos ofthe Boe-Bot robot autonomously roaming with the Ping))) sensorfrom the 570-<strong>28015</strong> product page at www.parallax.comCopyright © <strong>Parallax</strong>, <strong>Inc</strong>. • <strong>PING</strong>))) <strong>Bracket</strong> <strong>Kit</strong> (<strong>#570</strong>-<strong>28015</strong>) • v1.1 8/10/2007 Page 3 of 4