1134 & 1135 Web User Guide rev2.0 - OneAccess extranet
1134 & 1135 Web User Guide rev2.0 - OneAccess extranet 1134 & 1135 Web User Guide rev2.0 - OneAccess extranet
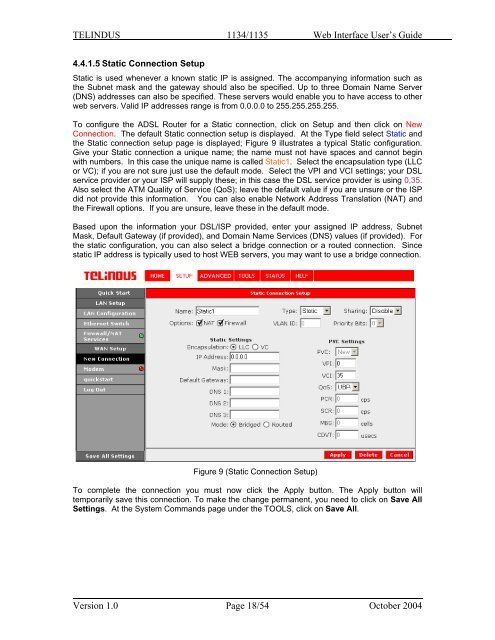
TELINDUS 1134/1135 Web Interface User’s Guide4.4.1.5 Static Connection SetupStatic is used whenever a known static IP is assigned. The accompanying information such asthe Subnet mask and the gateway should also be specified. Up to three Domain Name Server(DNS) addresses can also be specified. These servers would enable you to have access to otherweb servers. Valid IP addresses range is from 0.0.0.0 to 255.255.255.255.To configure the ADSL Router for a Static connection, click on Setup and then click on NewConnection. The default Static connection setup is displayed. At the Type field select Static andthe Static connection setup page is displayed; Figure 9 illustrates a typical Static configuration.Give your Static connection a unique name; the name must not have spaces and cannot beginwith numbers. In this case the unique name is called Static1. Select the encapsulation type (LLCor VC); if you are not sure just use the default mode. Select the VPI and VCI settings; your DSLservice provider or your ISP will supply these; in this case the DSL service provider is using 0,35.Also select the ATM Quality of Service (QoS); leave the default value if you are unsure or the ISPdid not provide this information. You can also enable Network Address Translation (NAT) andthe Firewall options. If you are unsure, leave these in the default mode.Based upon the information your DSL/ISP provided, enter your assigned IP address, SubnetMask, Default Gateway (if provided), and Domain Name Services (DNS) values (if provided). Forthe static configuration, you can also select a bridge connection or a routed connection. Sincestatic IP address is typically used to host WEB servers, you may want to use a bridge connection.Figure 9 (Static Connection Setup)To complete the connection you must now click the Apply button. The Apply button willtemporarily save this connection. To make the change permanent, you need to click on Save AllSettings. At the System Commands page under the TOOLS, click on Save All.Version 1.0 Page 18/54 October 2004
TELINDUS 1134/1135 Web Interface User’s Guide4.4.1.6 Classical IP over ATM (CLIP, defined in RFC1577) Connection SetupThe Classical IP over ATM (CLIP) support provides the ability to transmit IP packets over an ATMnetwork, CLIP support will encapsulate IP in an AAL5 Packet Data Unit (PDU) frame usingRFC1577and it utilizes an ATM aware version of the ARP protocol (ATMARP only allows for PVCsupport; it does not support SVC).To configure the ADSL Router for a CLIP connection, click on Setup and then click on NewConnection. The default CLIP connection setup is displayed. At the Type field select CLIP andthe CLIP connection setup page is displayed; Figure 10 illustrates a typical CLIP configuration.Give your CLIP connection a unique name; the name must not have spaces and cannot beginwith numbers. In this case the unique name is called CLIP1. Select the VPI and VCI settings;your DSL service provider or your ISP will supply these; in this case the DSL service provider isusing 0,101. Also select the ATM Quality of Service (QoS); leave the default value if you areunsure or the ISP did not provide this information. You can also enable Network AddressTranslation (NAT) and the Firewall options. If you are unsure, leave these in the default mode.Based upon the information your DSL/ISP provided, enter your assigned IP address, SubnetMask, Default Gateway (if provided), and ARP server IP address.Figure 10 (CLIP Connection Setup)To complete the connection you must now click the Apply button. The Apply button willtemporarily save this connection. To make the change permanent, you need to click on Save AllSettings. At the System Commands page under the TOOLS, click on Save All.Version 1.0 Page 19/54 October 2004
- Page 1 and 2: TELINDUS 1134/1135 Web Interface Us
- Page 3 and 4: TELINDUS 1134/1135 Web Interface Us
- Page 5 and 6: TELINDUS 1134/1135 Web Interface Us
- Page 7 and 8: TELINDUS 1134/1135 Web Interface Us
- Page 9 and 10: TELINDUS 1134/1135 Web Interface Us
- Page 11 and 12: TELINDUS 1134/1135 Web Interface Us
- Page 13 and 14: TELINDUS 1134/1135 Web Interface Us
- Page 15 and 16: TELINDUS 1134/1135 Web Interface Us
- Page 17: TELINDUS 1134/1135 Web Interface Us
- Page 21 and 22: TELINDUS 1134/1135 Web Interface Us
- Page 23 and 24: TELINDUS 1134/1135 Web Interface Us
- Page 25 and 26: TELINDUS 1134/1135 Web Interface Us
- Page 27 and 28: TELINDUS 1134/1135 Web Interface Us
- Page 29 and 30: TELINDUS 1134/1135 Web Interface Us
- Page 32: TELINDUS 1134/1135 Web Interface Us
- Page 35 and 36: TELINDUS 1134/1135 Web Interface Us
- Page 37 and 38: TELINDUS 1134/1135 Web Interface Us
- Page 39 and 40: TELINDUS 1134/1135 Web Interface Us
- Page 41 and 42: TELINDUS 1134/1135 Web Interface Us
- Page 43 and 44: TELINDUS 1134/1135 Web Interface Us
- Page 45 and 46: TELINDUS 1134/1135 Web Interface Us
- Page 47 and 48: TELINDUS 1134/1135 Web Interface Us
- Page 49 and 50: TELINDUS 1134/1135 Web Interface Us
- Page 51 and 52: TELINDUS 1134/1135 Web Interface Us
- Page 53 and 54: TELINDUS 1134/1135 Web Interface Us
TELINDUS <strong>1134</strong>/<strong>1135</strong> <strong>Web</strong> Interface <strong>User</strong>’s <strong>Guide</strong>4.4.1.5 Static Connection SetupStatic is used whenever a known static IP is assigned. The accompanying information such asthe Subnet mask and the gateway should also be specified. Up to three Domain Name Server(DNS) addresses can also be specified. These servers would enable you to have access to otherweb servers. Valid IP addresses range is from 0.0.0.0 to 255.255.255.255.To configure the ADSL Router for a Static connection, click on Setup and then click on NewConnection. The default Static connection setup is displayed. At the Type field select Static andthe Static connection setup page is displayed; Figure 9 illustrates a typical Static configuration.Give your Static connection a unique name; the name must not have spaces and cannot beginwith numbers. In this case the unique name is called Static1. Select the encapsulation type (LLCor VC); if you are not sure just use the default mode. Select the VPI and VCI settings; your DSLservice provider or your ISP will supply these; in this case the DSL service provider is using 0,35.Also select the ATM Quality of Service (QoS); leave the default value if you are unsure or the ISPdid not provide this information. You can also enable Network Address Translation (NAT) andthe Firewall options. If you are unsure, leave these in the default mode.Based upon the information your DSL/ISP provided, enter your assigned IP address, SubnetMask, Default Gateway (if provided), and Domain Name Services (DNS) values (if provided). Forthe static configuration, you can also select a bridge connection or a routed connection. Sincestatic IP address is typically used to host WEB servers, you may want to use a bridge connection.Figure 9 (Static Connection Setup)To complete the connection you must now click the Apply button. The Apply button willtemporarily save this connection. To make the change permanent, you need to click on Save AllSettings. At the System Commands page under the TOOLS, click on Save All.Version 1.0 Page 18/54 October 2004


