DI-50E Data Sheet - K - Tech, Inc.
DI-50E Data Sheet - K - Tech, Inc.
DI-50E Data Sheet - K - Tech, Inc.
You also want an ePaper? Increase the reach of your titles
YUMPU automatically turns print PDFs into web optimized ePapers that Google loves.
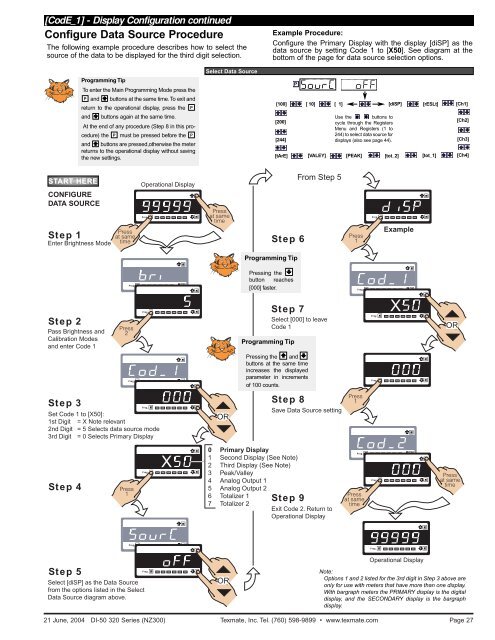
[CodE_1] Initial Setup - Display Procedures Configuration continuedConfigure <strong>Data</strong> Source ProcedureThe following example procedure describes how to select thesource of the data to be displayed for the third digit selection.Example Procedure:Configure the Primary Display with the display [diSP] as thedata source by setting Code 1 to [X50]. See diagram at thebottom of the page for data source selection options.Select <strong>Data</strong> SourceProgramming TipTo enter the Main Programming Mode press theP and buttons at the same time.To exit andreturn to the operational display, press the Pand buttons again at the same time.At the end of any procedure (Step 8 in this procedure)the P must be pressed before the Pand buttons are pressed,otherwise the meterreturns to the operational display without savingthe new settings.[100][200][244][tArE]P[ 10][VALEY][ 1]Use the buttons tocycle through the RegistersMenu and Registers (1 to244) to select data source fordisplays (also see page 44).[PEAK][diSP][tot_2][rESLt][tot_1][Ch1][Ch2][Ch3][Ch4]STARART T HERECONFIGUREDATA SOURCEStep 1Enter Brightness ModePressat sametimeOperational DisplayProg. SP1 SP2 SP3 SP4 SP5 SP6Pressat sametimeStep 6From Step 5Press1Prog. SP1 SP2 SP3 SP4 SP5 SP6ExampleProgramming TipProg. SP1 SP2 SP3 SP4 SP5 SP6Pressing thebutton reaches[000] faster.Prog. SP1 SP2 SP3 SP4 SP5 SP6Step 2Pass Brightness andCalibration Modesand enter Code 1Press2Prog. SP1 SP2 SP3 SP4 SP5 SP6Step 7Programming TipSelect [000] to leaveCode 1XProg. SP1 SP2 SP3 SP4 SP5 SP6ORProg. SP1 SP2 SP3 SP4 SP5 SP6Pressing the andbuttons at the same timeincreases the displayedparameter in incrementsof 100 counts.Prog. SP1 SP2 SP3 SP4 SP5 SP6Step 3Set Code 1 to [X50]:1st Digit = X Note relevant2nd Digit = 5 Selects data source mode3rd Digit = 0 Selects Primary DisplayProg. SP1 SP2 SP3 SP4 SP5 SP6ORStep 8Save <strong>Data</strong> Source settingPress1Step 4Press1XProg. SP1 SP2 SP3 SP4 SP5 SP60 Primary Display1 Second Display (See Note)2 Third Display (See Note)3 Peak/Valley4 Analog Output 15 Analog Output 26 Totalizer 17 Totalizer 2Step 9Exit Code 2. Return toOperational DisplayPressat sametimeProg. SP1 SP2 SP3 SP4 SP5 SP6Prog. SP1 SP2 SP3 SP4 SP5 SP6Pressat sametimeProg. SP1 SP2 SP3 SP4 SP5 SP6Prog. SP1 SP2 SP3 SP4 SP5 SP6Step 5Select [diSP] as the <strong>Data</strong> Sourcefrom the options listed in the Select<strong>Data</strong> Source diagram above.Prog. SP1 SP2 SP3 SP4 SP5 SP6OROperational DisplayNote:Options 1 and 2 listed for the 3rd digit in Step 3 above areonly for use with meters that have more than one display.With bargraph meters the PRIMARY display is the digitaldisplay, and the SECONDARY display is the bargraphdisplay.21 June, 2004 <strong>DI</strong>-50 320 Series (NZ300) Texmate, <strong>Inc</strong>. Tel. (760) 598-9899 • www.texmate.comPage 27


