


You also want an ePaper? Increase the reach of your titles
YUMPU automatically turns print PDFs into web optimized ePapers that Google loves.
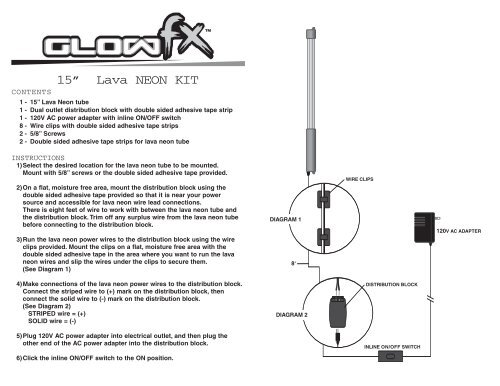
CONTENTS15” <strong>Lava</strong> NEON KIT1 - 15” <strong>Lava</strong> <strong>Neon</strong> tube1 - Dual outlet distribution block with double sided adhesive tape strip1 - 120V AC power adapter with inline ON/OFF switch8 - Wire clips with double sided adhesive tape strips2 - 5/8” Screws2 - Double sided adhesive tape strips for lava neon tubeINSTRUCTIONS1)Select the desired location for the lava neon tube to be mounted.Mount with 5/8” screws or the double sided adhesive tape provided.2)On a flat, moisture free area, mount the distribution block using thedouble sided adhesive tape provided so that it is near your powersource and accessible for lava neon wire lead connections.There is eight feet of wire to work with between the lava neon tube andthe distribution block. Trim off any surplus wire from the lava neon tubebefore connecting to the distribution block.3)Run the lava neon power wires to the distribution block using the wireclips provided. Mount the clips on a flat, moisture free area with thedouble sided adhesive tape in the area where you want to run the lavaneon wires and slip the wires under the clips to secure them.(See Diagram 1)DIAGRAM 18‘WIRE CLIPS120V AC ADAPTER4)Make connections of the lava neon power wires to the distribution block.Connect the striped wire to (+) mark on the distribution block, thenconnect the solid wire to (-) mark on the distribution block.(See Diagram 2)STRIPED wire = (+)SOLID wire = (-)DIAGRAM 2DISTRIBUTION BLOCK5)Plug 120V AC power adapter into electrical outlet, and then plug theother end of the AC power adapter into the distribution block.INLINE ON/OFF SWITCH6)Click the inline ON/OFF switch to the ON position.
All <strong>Glow</strong> FX products are covered by a comprehensive warranty.<strong>Glow</strong> FX products are warranted against defective materials and workmanship for one year from date of purchase.Proof of purchase is required. All warranty claims are to be handled by selling agents. Accident, abuse, neglect,modifications, broken glass, labor, transportation, improper installation and the use of products other than for theirintended purposes are not covered.NEITHER SELLER NOR THE MANUFACTURER SHALL BE LIABLE FORANY INJURY, LOSS OR DAMAGE, DIRECT, INCIDENTAL OR CONSEQUENTIAL (INCLUDING, BUTNOT LIMITED TO, INCIDENTAL OR CONSEQUENTIAL DAMAGES FOR LOST PROFITS, LOST SALES,INJURY TO PERSON OR PROPERTY OR ANY OTHER INCIDENTAL OR CONSEQUENTIAL LOSS),ARISING OUT OF THE USE OR THE INABILITY TO USE THE PRODUCT AND THE USER AGREESTHAT NO OTHER REMEDY SHALL BE AVAILABLE TO IT. Before using, the user shall determine thesuitability of the product for the intended use, and user assumes all risk and liability whatsoever in connectiontherewith. Some states and countries do not allow the exclusion or limitation of incidental or consequentialdamages, so the above limitations or exclusions may not apply to you. This warranty gives you specific legal rightsand you may also have other rights, which vary from state to state and from country to country. DISCLAIMER:THE FOREGOING WARRANTY IS AN EXCLUSIVE WARRANTY IN LIEU OF ANY OTHER EXPRESSWARRANTIES.ANY IMPLIED WARRANTIES (INCLUDING, BUT NOT LIMITED TO ANY IMPLIED WARRANTY OFMERCHANTABILITY OR FITNESS FOR A PARTICULAR PURPOSE) TO THE EXTENT THAT IT COULDAPPLY TO ANY OF THE PRODUCTS MANUFACTURED BY THE COMPANY SHALL BE LIMITED INDURATION TO THE PERIODS OF THE EXPRESS WARRANTY GIVEN ABOVE.15” LAVA NEON KITstreetglow.com<strong>Street</strong><strong>Glow</strong>, Inc., 2006
CONTENTS20” <strong>Lava</strong> NEON KIT1 - 20” <strong>Lava</strong> <strong>Neon</strong> tube1 - Dual outlet distribution block with double sided adhesive tape strip1 - 120V AC power adapter with inline ON/OFF switch8 - Wire clips with double sided adhesive tape strips2 - 5/8” Screws2 - Double sided adhesive tape strips for lava neon tubeINSTRUCTIONS1)Select the desired location for the lava neon tube to be mounted.Mount with 5/8” screws or the double sided adhesive tape provided.2)On a flat, moisture free area, mount the distribution block using thedouble sided adhesive tape provided so that it is near your powersource and accessible for lava neon wire lead connections.There is eight feet of wire to work with between the lava neon tube andthe distribution block. Trim off any surplus wire from the lava neon tubebefore connecting to the distribution block.3)Run the lava neon power wires to the distribution block using the wireclips provided. Mount the clips on a flat, moisture free area with thedouble sided adhesive tape in the area where you want to run the lavaneon wires and slip the wires under the clips to secure them.(See Diagram 1)4)Make connections of the lava neon power wires to the distribution block.Connect the striped wire to (+) mark on the distribution block, thenconnect the solid wire to (-) mark on the distribution block.(See Diagram 2)STRIPED wire = (+)SOLID wire = (-)DIAGRAM 18‘DIAGRAM 2WIRE CLIPSDISTRIBUTION BLOCK120V AC ADAPTER5)Plug 120V AC power adapter into electrical outlet, and then plug theother end of the AC power adapter into the distribution block.6)Click the inline ON/OFF switch to the ON position.INLINE ON/OFF SWITCH


