

Chapter 1 Routine maintenance and servicing
Chapter 1 Routine maintenance and servicing
Chapter 1 Routine maintenance and servicing

You also want an ePaper? Increase the reach of your titles
YUMPU automatically turns print PDFs into web optimized ePapers that Google loves.
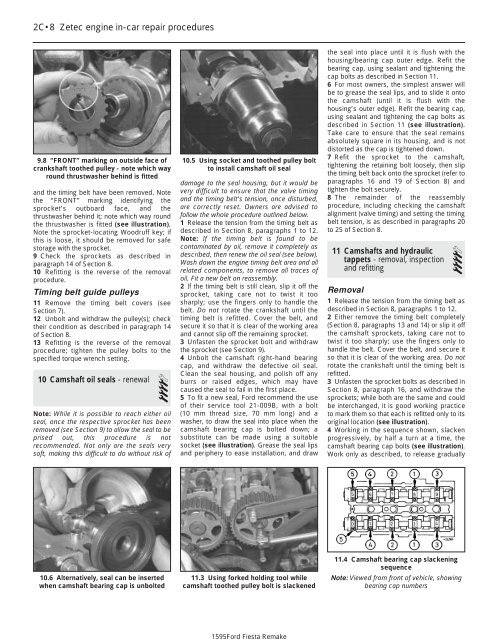
1595Ford Fiesta Remake2C•8 Zetec engine in-car repair procedures9.8 “FRONT” marking on outside face ofcrankshaft toothed pulley - note which wayround thrustwasher behind is fitted<strong>and</strong> the timing belt have been removed. Notethe “FRONT” marking identifying thesprocket’s outboard face, <strong>and</strong> thethrustwasher behind it; note which way roundthe thrustwasher is fitted (see illustration).Note the sprocket-locating Woodruff key; ifthis is loose, it should be removed for safestorage with the sprocket.9 Check the sprockets as described inparagraph 14 of Section 8.10 Refitting is the reverse of the removalprocedure.Timing belt guide pulleys11 Remove the timing belt covers (seeSection 7).12 Unbolt <strong>and</strong> withdraw the pulley(s); checktheir condition as described in paragraph 14of Section 8.13 Refitting is the reverse of the removalprocedure; tighten the pulley bolts to thespecified torque wrench setting.10 Camshaft oil seals - renewal4Note: While it is possible to reach either oilseal, once the respective sprocket has beenremoved (see Section 9) to allow the seal to beprised out, this procedure is notrecommended. Not only are the seals verysoft, making this difficult to do without risk of10.5 Using socket <strong>and</strong> toothed pulley boltto install camshaft oil sealdamage to the seal housing, but it would bevery difficult to ensure that the valve timing<strong>and</strong> the timing belt’s tension, once disturbed,are correctly reset. Owners are advised tofollow the whole procedure outlined below.1 Release the tension from the timing belt asdescribed in Section 8, paragraphs 1 to 12.Note: If the timing belt is found to becontaminated by oil, remove it completely asdescribed, then renew the oil seal (see below).Wash down the engine timing belt area <strong>and</strong> allrelated components, to remove all traces ofoil. Fit a new belt on reassembly.2 If the timing belt is still clean, slip it off thesprocket, taking care not to twist it toosharply; use the fingers only to h<strong>and</strong>le thebelt. Do not rotate the crankshaft until thetiming belt is refitted. Cover the belt, <strong>and</strong>secure it so that it is clear of the working area<strong>and</strong> cannot slip off the remaining sprocket.3 Unfasten the sprocket bolt <strong>and</strong> withdrawthe sprocket (see Section 9).4 Unbolt the camshaft right-h<strong>and</strong> bearingcap, <strong>and</strong> withdraw the defective oil seal.Clean the seal housing, <strong>and</strong> polish off anyburrs or raised edges, which may havecaused the seal to fail in the first place.5 To fit a new seal, Ford recommend the useof their service tool 21-009B, with a bolt(10 mm thread size, 70 mm long) <strong>and</strong> awasher, to draw the seal into place when thecamshaft bearing cap is bolted down; asubstitute can be made using a suitablesocket (see illustration). Grease the seal lips<strong>and</strong> periphery to ease installation, <strong>and</strong> drawthe seal into place until it is flush with thehousing/bearing cap outer edge. Refit thebearing cap, using sealant <strong>and</strong> tightening thecap bolts as described in Section 11.6 For most owners, the simplest answer willbe to grease the seal lips, <strong>and</strong> to slide it ontothe camshaft (until it is flush with thehousing’s outer edge). Refit the bearing cap,using sealant <strong>and</strong> tightening the cap bolts asdescribed in Section 11 (see illustration).Take care to ensure that the seal remainsabsolutely square in its housing, <strong>and</strong> is notdistorted as the cap is tightened down.7 Refit the sprocket to the camshaft,tightening the retaining bolt loosely, then slipthe timing belt back onto the sprocket (refer toparagraphs 16 <strong>and</strong> 19 of Section 8) <strong>and</strong>tighten the bolt securely.8 The remainder of the reassemblyprocedure, including checking the camshaftalignment (valve timing) <strong>and</strong> setting the timingbelt tension, is as described in paragraphs 20to 25 of Section 8.11 Camshafts <strong>and</strong> hydraulictappets - removal, inspection4<strong>and</strong> refittingRemoval1 Release the tension from the timing belt asdescribed in Section 8, paragraphs 1 to 12.2 Either remove the timing belt completely(Section 8, paragraphs 13 <strong>and</strong> 14) or slip it offthe camshaft sprockets, taking care not totwist it too sharply; use the fingers only toh<strong>and</strong>le the belt. Cover the belt, <strong>and</strong> secure itso that it is clear of the working area. Do notrotate the crankshaft until the timing belt isrefitted.3 Unfasten the sprocket bolts as described inSection 8, paragraph 16, <strong>and</strong> withdraw thesprockets; while both are the same <strong>and</strong> couldbe interchanged, it is good working practiceto mark them so that each is refitted only to itsoriginal location (see illustration).4 Working in the sequence shown, slackenprogressively, by half a turn at a time, thecamshaft bearing cap bolts (see illustration).Work only as described, to release gradually10.6 Alternatively, seal can be insertedwhen camshaft bearing cap is unbolted11.3 Using forked holding tool whilecamshaft toothed pulley bolt is slackened11.4 Camshaft bearing cap slackeningsequenceNote: Viewed from front of vehicle, showingbearing cap numbers


