

Chapter 1 Routine maintenance and servicing
Chapter 1 Routine maintenance and servicing
Chapter 1 Routine maintenance and servicing

Create successful ePaper yourself
Turn your PDF publications into a flip-book with our unique Google optimized e-Paper software.
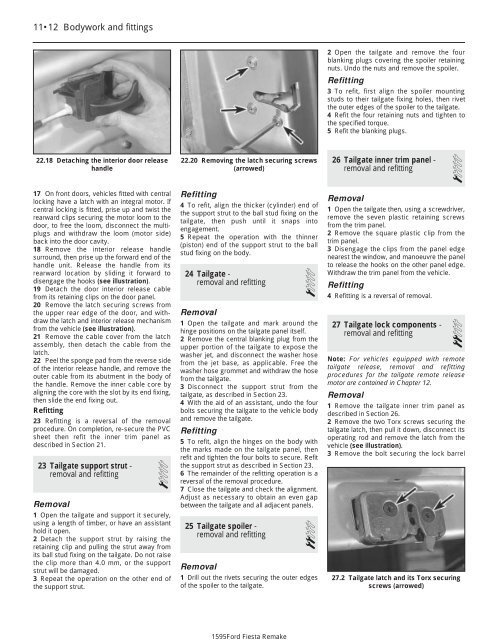
1595Ford Fiesta Remake11•12 Bodywork <strong>and</strong> fittings2 Open the tailgate <strong>and</strong> remove the fourblanking plugs covering the spoiler retainingnuts. Undo the nuts <strong>and</strong> remove the spoiler.Refitting3 To refit, first align the spoiler mountingstuds to their tailgate fixing holes, then rivetthe outer edges of the spoiler to the tailgate.4 Refit the four retaining nuts <strong>and</strong> tighten tothe specified torque.5 Refit the blanking plugs.22.18 Detaching the interior door releaseh<strong>and</strong>le22.20 Removing the latch securing screws(arrowed)26 Tailgate inner trim panel -removal <strong>and</strong> refitting 117 On front doors, vehicles fitted with centrallocking have a latch with an integral motor. Ifcentral locking is fitted, prise up <strong>and</strong> twist therearward clips securing the motor loom to thedoor, to free the loom, disconnect the multiplugs<strong>and</strong> withdraw the loom (motor side)back into the door cavity.18 Remove the interior release h<strong>and</strong>lesurround, then prise up the forward end of theh<strong>and</strong>le unit. Release the h<strong>and</strong>le from itsrearward location by sliding it forward todisengage the hooks (see illustration).19 Detach the door interior release cablefrom its retaining clips on the door panel.20 Remove the latch securing screws fromthe upper rear edge of the door, <strong>and</strong> withdrawthe latch <strong>and</strong> interior release mechanismfrom the vehicle (see illustration).21 Remove the cable cover from the latchassembly, then detach the cable from thelatch.22 Peel the sponge pad from the reverse sideof the interior release h<strong>and</strong>le, <strong>and</strong> remove theouter cable from its abutment in the body ofthe h<strong>and</strong>le. Remove the inner cable core byaligning the core with the slot by its end fixing,then slide the end fixing out.Refitting23 Refitting is a reversal of the removalprocedure. On completion, re-secure the PVCsheet then refit the inner trim panel asdescribed in Section 21.23 Tailgate support strut -removal <strong>and</strong> refitting 1Removal1 Open the tailgate <strong>and</strong> support it securely,using a length of timber, or have an assistanthold it open.2 Detach the support strut by raising theretaining clip <strong>and</strong> pulling the strut away fromits ball stud fixing on the tailgate. Do not raisethe clip more than 4.0 mm, or the supportstrut will be damaged.3 Repeat the operation on the other end ofthe support strut.Refitting4 To refit, align the thicker (cylinder) end ofthe support strut to the ball stud fixing on thetailgate, then push until it snaps intoengagement.5 Repeat the operation with the thinner(piston) end of the support strut to the ballstud fixing on the body.24 Tailgate -removal <strong>and</strong> refitting 1Removal1 Open the tailgate <strong>and</strong> mark around thehinge positions on the tailgate panel itself.2 Remove the central blanking plug from theupper portion of the tailgate to expose thewasher jet, <strong>and</strong> disconnect the washer hosefrom the jet base, as applicable. Free thewasher hose grommet <strong>and</strong> withdraw the hosefrom the tailgate.3 Disconnect the support strut from thetailgate, as described in Section 23.4 With the aid of an assistant, undo the fourbolts securing the tailgate to the vehicle body<strong>and</strong> remove the tailgate.Refitting5 To refit, align the hinges on the body withthe marks made on the tailgate panel, thenrefit <strong>and</strong> tighten the four bolts to secure. Refitthe support strut as described in Section 23.6 The remainder of the refitting operation is areversal of the removal procedure.7 Close the tailgate <strong>and</strong> check the alignment.Adjust as necessary to obtain an even gapbetween the tailgate <strong>and</strong> all adjacent panels.25 Tailgate spoiler -removal <strong>and</strong> refitting 2Removal1 Drill out the rivets securing the outer edgesof the spoiler to the tailgate.Removal1 Open the tailgate then, using a screwdriver,remove the seven plastic retaining screwsfrom the trim panel.2 Remove the square plastic clip from thetrim panel.3 Disengage the clips from the panel edgenearest the window, <strong>and</strong> manoeuvre the panelto release the hooks on the other panel edge.Withdraw the trim panel from the vehicle.Refitting4 Refitting is a reversal of removal.27 Tailgate lock components -removal <strong>and</strong> refitting 2Note: For vehicles equipped with remotetailgate release, removal <strong>and</strong> refittingprocedures for the tailgate remote releasemotor are contained in <strong>Chapter</strong> 12.Removal1 Remove the tailgate inner trim panel asdescribed in Section 26.2 Remove the two Torx screws securing thetailgate latch, then pull it down, disconnect itsoperating rod <strong>and</strong> remove the latch from thevehicle (see illustration).3 Remove the bolt securing the lock barrel27.2 Tailgate latch <strong>and</strong> its Torx securingscrews (arrowed)


