

Chapter 1 Routine maintenance and servicing
Chapter 1 Routine maintenance and servicing
Chapter 1 Routine maintenance and servicing

You also want an ePaper? Increase the reach of your titles
YUMPU automatically turns print PDFs into web optimized ePapers that Google loves.
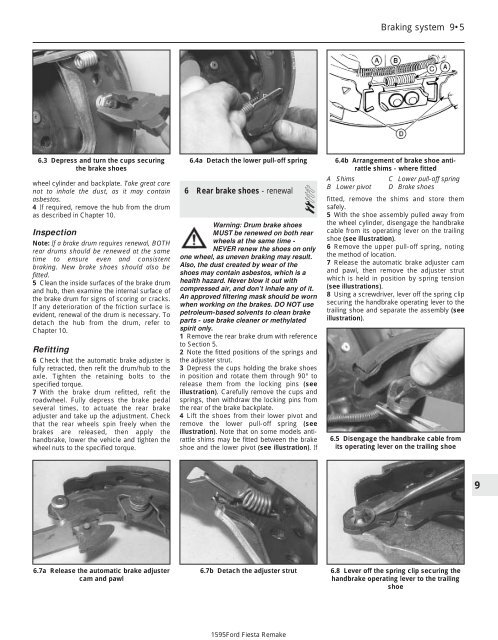
Braking system 9•56.3 Depress <strong>and</strong> turn the cups securingthe brake shoeswheel cylinder <strong>and</strong> backplate. Take great carenot to inhale the dust, as it may containasbestos.4 If required, remove the hub from the drumas described in <strong>Chapter</strong> 10.InspectionNote: If a brake drum requires renewal, BOTHrear drums should be renewed at the sametime to ensure even <strong>and</strong> consistentbraking. New brake shoes should also befitted.5 Clean the inside surfaces of the brake drum<strong>and</strong> hub, then examine the internal surface ofthe brake drum for signs of scoring or cracks.If any deterioration of the friction surface isevident, renewal of the drum is necessary. Todetach the hub from the drum, refer to<strong>Chapter</strong> 10.Refitting6 Check that the automatic brake adjuster isfully retracted, then refit the drum/hub to theaxle. Tighten the retaining bolts to thespecified torque.7 With the brake drum refitted, refit theroadwheel. Fully depress the brake pedalseveral times, to actuate the rear brakeadjuster <strong>and</strong> take up the adjustment. Checkthat the rear wheels spin freely when thebrakes are released, then apply theh<strong>and</strong>brake, lower the vehicle <strong>and</strong> tighten thewheel nuts to the specified torque.6.4a Detach the lower pull-off spring6 Rear brake shoes - renewal2Warning: Drum brake shoesMUST be renewed on both rearwheels at the same time -NEVER renew the shoes on onlyone wheel, as uneven braking may result.Also, the dust created by wear of theshoes may contain asbestos, which is ahealth hazard. Never blow it out withcompressed air, <strong>and</strong> don’t inhale any of it.An approved filtering mask should be wornwhen working on the brakes. DO NOT usepetroleum-based solvents to clean brakeparts - use brake cleaner or methylatedspirit only.1 Remove the rear brake drum with referenceto Section 5.2 Note the fitted positions of the springs <strong>and</strong>the adjuster strut.3 Depress the cups holding the brake shoesin position <strong>and</strong> rotate them through 90° torelease them from the locking pins (seeillustration). Carefully remove the cups <strong>and</strong>springs, then withdraw the locking pins fromthe rear of the brake backplate.4 Lift the shoes from their lower pivot <strong>and</strong>remove the lower pull-off spring (seeillustration). Note that on some models antirattleshims may be fitted between the brakeshoe <strong>and</strong> the lower pivot (see illustration). If6.4b Arrangement of brake shoe antirattleshims - where fittedA ShimsC Lower pull-off springB Lower pivot D Brake shoesfitted, remove the shims <strong>and</strong> store themsafely.5 With the shoe assembly pulled away fromthe wheel cylinder, disengage the h<strong>and</strong>brakecable from its operating lever on the trailingshoe (see illustration).6 Remove the upper pull-off spring, notingthe method of location.7 Release the automatic brake adjuster cam<strong>and</strong> pawl, then remove the adjuster strutwhich is held in position by spring tension(see illustrations).8 Using a screwdriver, lever off the spring clipsecuring the h<strong>and</strong>brake operating lever to thetrailing shoe <strong>and</strong> separate the assembly (seeillustration).6.5 Disengage the h<strong>and</strong>brake cable fromits operating lever on the trailing shoe96.7a Release the automatic brake adjustercam <strong>and</strong> pawl6.7b Detach the adjuster strut6.8 Lever off the spring clip securing theh<strong>and</strong>brake operating lever to the trailingshoe1595Ford Fiesta Remake


