

Chapter 1 Routine maintenance and servicing
Chapter 1 Routine maintenance and servicing
Chapter 1 Routine maintenance and servicing

You also want an ePaper? Increase the reach of your titles
YUMPU automatically turns print PDFs into web optimized ePapers that Google loves.
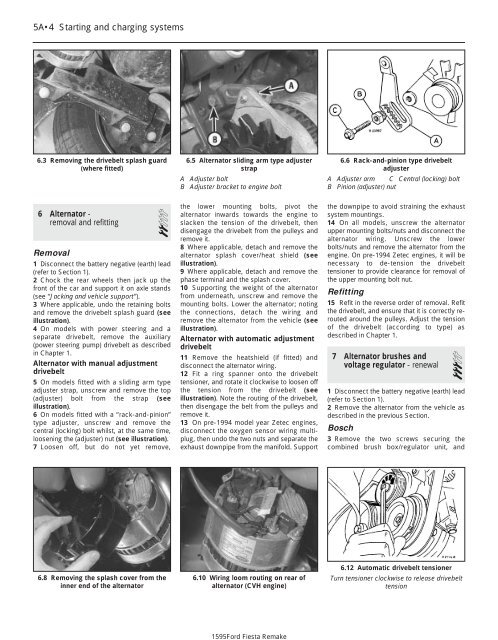
1595Ford Fiesta Remake5A•4 Starting <strong>and</strong> charging systems6.3 Removing the drivebelt splash guard(where fitted)6 Alternator -removal <strong>and</strong> refitting2Removal1 Disconnect the battery negative (earth) lead(refer to Section 1).2 Chock the rear wheels then jack up thefront of the car <strong>and</strong> support it on axle st<strong>and</strong>s(see “Jacking <strong>and</strong> vehicle support”).3 Where applicable, undo the retaining bolts<strong>and</strong> remove the drivebelt splash guard (seeillustration).4 On models with power steering <strong>and</strong> aseparate drivebelt, remove the auxiliary(power steering pump) drivebelt as describedin <strong>Chapter</strong> 1.Alternator with manual adjustmentdrivebelt5 On models fitted with a sliding arm typeadjuster strap, unscrew <strong>and</strong> remove the top(adjuster) bolt from the strap (seeillustration).6 On models fitted with a “rack-<strong>and</strong>-pinion”type adjuster, unscrew <strong>and</strong> remove thecentral (locking) bolt whilst, at the same time,loosening the (adjuster) nut (see illustration).7 Loosen off, but do not yet remove,6.5 Alternator sliding arm type adjusterstrapA Adjuster boltB Adjuster bracket to engine boltthe lower mounting bolts, pivot thealternator inwards towards the engine toslacken the tension of the drivebelt, thendisengage the drivebelt from the pulleys <strong>and</strong>remove it.8 Where applicable, detach <strong>and</strong> remove thealternator splash cover/heat shield (seeillustration).9 Where applicable, detach <strong>and</strong> remove thephase terminal <strong>and</strong> the splash cover.10 Supporting the weight of the alternatorfrom underneath, unscrew <strong>and</strong> remove themounting bolts. Lower the alternator; notingthe connections, detach the wiring <strong>and</strong>remove the alternator from the vehicle (seeillustration).Alternator with automatic adjustmentdrivebelt11 Remove the heatshield (if fitted) <strong>and</strong>disconnect the alternator wiring.12 Fit a ring spanner onto the drivebelttensioner, <strong>and</strong> rotate it clockwise to loosen offthe tension from the drivebelt (seeillustration). Note the routing of the drivebelt,then disengage the belt from the pulleys <strong>and</strong>remove it.13 On pre-1994 model year Zetec engines,disconnect the oxygen sensor wiring multiplug,then undo the two nuts <strong>and</strong> separate theexhaust downpipe from the manifold. Support6.6 Rack-<strong>and</strong>-pinion type drivebeltadjusterA Adjuster arm C Central (locking) boltB Pinion (adjuster) nutthe downpipe to avoid straining the exhaustsystem mountings.14 On all models, unscrew the alternatorupper mounting bolts/nuts <strong>and</strong> disconnect thealternator wiring. Unscrew the lowerbolts/nuts <strong>and</strong> remove the alternator from theengine. On pre-1994 Zetec engines, it will benecessary to de-tension the drivebelttensioner to provide clearance for removal ofthe upper mounting bolt nut.Refitting15 Refit in the reverse order of removal. Refitthe drivebelt, <strong>and</strong> ensure that it is correctly reroutedaround the pulleys. Adjust the tensionof the drivebelt (according to type) asdescribed in <strong>Chapter</strong> 1.7 Alternator brushes <strong>and</strong>voltage regulator - renewal31 Disconnect the battery negative (earth) lead(refer to Section 1).2 Remove the alternator from the vehicle asdescribed in the previous Section.Bosch3 Remove the two screws securing thecombined brush box/regulator unit, <strong>and</strong>6.8 Removing the splash cover from theinner end of the alternator6.10 Wiring loom routing on rear ofalternator (CVH engine)6.12 Automatic drivebelt tensionerTurn tensioner clockwise to release drivebelttension


