DATA BOOK - BVT Partners OÃ
DATA BOOK - BVT Partners OÃ
DATA BOOK - BVT Partners OÃ

You also want an ePaper? Increase the reach of your titles
YUMPU automatically turns print PDFs into web optimized ePapers that Google loves.
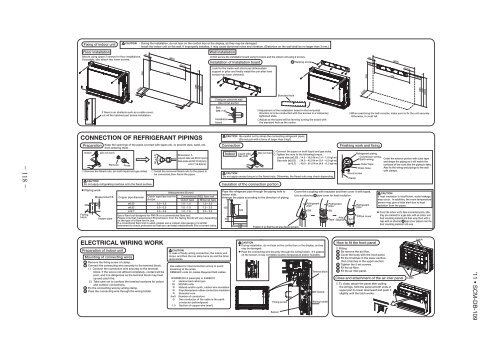
Fixing of indoor unitFloor installationSecure using upper 2 screws for floor installations.If possible, also attach two lower screws.CAUTION During the installation, do not lean on the control box or the display, as they may be damaged.Install the indoor unit on flat wall. If improperly installed, it may cause abnormal noise and vibration. (Distortion on the wall shall be no larger than 3 mm.)58530.5726(860)103.55Wall installationAt first secure the installation board using 5 screws and the indoor unit using 2 screws.Installation of Installation boardLook for the inside wall structures (Intersediatssupport or pillar and finally install the unit after levelsurface has been checked.)Tapping screw58530.583.5726(860)103.5156.55(238)198If there is an obstacle such as a cable cover,cut off the hatched part before installation.30.5 25.5185585595(600)Fixing on concrete wallUse of nut anchorBolt(M6 12) Adjustment of the installation board in the horizontaldirection is to be conducted with five screws in a temporarytightened state.InstallationboardStandard holeAdjust so the board will be level by turning the board withthe standard hole as the center.(238)585595(600)When practicing the half-console, make sure to fix the unit securely.Otherwise, it could fall.CONNECTION OF REFRIGERANT PIPINGSPreparationIndoorKeep the openings of the pipes covered with tapes etc. to prevent dust, sand, etc.from entering them.(Do not turn)RemovePress Remove the flared nuts. (on both liquid and gas sides)CAUTIONDo not apply refrigerating machine oil to the flared surface.• Flaring workFlaringblockMeasurement BCopper pipeCopper pipe diameterø6.35ø9.52ø12.790 ± 0.5°ADimension ALiquid side ø6.35:9.1(mm)Gas side ø9.52:13.2(mm)ø12.7:16.6(mm) Install the removed flared nuts to the pipes tobe connected,then flared the pipes.Clutch type flare tool forR410A0.0 - 0.50.0 - 0.50.0 - 0.5Measurement B (mm)Conventional (R22) flare toolClutch type Wing nut type1.0 - 1.5 1.5 - 2.01.0 - 1.51.0 - 1.51.5 - 2.02.0 - 2.5Use a flare tool designed for R410A or a conventional flare tool.Please note that measurement B (protrusion from the flaring block) will vary dependingon the type of a flare tool in use.If a coventional flare tool is used, please use a copper pipe gauge or a similarinstrument to check protrusion so that you can keep measurement B to a correct value.- 118 - '11 • SCM-DB-109CAUTIONDo not apply excess torque to the flared nuts. Otherwise, the flared nuts may check depending.155CAUTIONConnectionIndoor Liquid sideGas side45Be careful not to stress the connecting refrigerant pipes.(Do not pull with a force of larger than 5 kgf.)Insulation of the connection portion105130140(Do not turn)Pass the refrigerant pipe through the piping hole toindoor side.Arrange the pipes according to the direction of piping. Connect the pipes on both liquid and gas sides. Tighten the nuts to the following torque.Liquid side (ø6.35) : 14.0 - 18.0 N·m (1.4 - 1.8 kgf·m)Gas side (ø9.52) : 34.0 - 42.0 N·m (3.4 - 4.2 kgf·m)(ø12.7) : 49.0 - 61.0 N·m (4.9 - 6.1 kgf·m)Position it so that the slit area faces upward.Finishing work and fixingClampCover the coupling with insulator and then cover it with tapes.Use an attached pipe cover for heat insulation.RefrigerantpipeSlitRefrigerantpipeSlitAddTape 10bandRefrigerant pipingConnection wiring,Earth wiring Cover the exterior portion with outer tapeand shape the piping so it will match theOuter tape contours of the route that the piping to take.Drain hoseAlso fix the wiring and pipings to the wallwith clamps.Wood screwRefrigerantpipe9Pipe coverCAUTIONIf heat insulation is insufficient, water leakagemay occur. In addition, the room temperaturesensor may give a false alert due to heatradiation from the pipes.• Cover the indoor unit’s flare-connected joints, afterthey are checked for a gas leak, with an indoor unitheat insulating material and then wrap them with atape with an attached pipe cover placed over theheat insulating material’s slit area.ELECTRICAL WIRING WORKPreparation of indoor unitMounting of connecting wires1 Remove the fixing screw of clamp.2 Connect the connecting wire securely to the terminal block.1 ) Connect the connection wire securely to the terminalblock. If the wire is not affixed completely, contact will bepoor, and it is dangerous as the terminal block may heatup and catch fire.2 ) Take care not to confuse the terminal numbers for indoorand outdoor connections.3 Fix the connecting wire by wiring clamp.4 Pass the connecting wire through the wiring holder.CAUTIONIn case of faulty wiring connection, the indoor unitstops, and then the run lamp turns on and the timerlamp blinks.Use cables for interconnection wiring to avoidloosening of the wires.CENELEC code for cables Required field cables.H05RNR4G1.5 (example) or 245IEC57H Harmonized cable type05 300/500 voltsR Natural-and/or synth, rubber wire insulationN Polychloroprene rubber conductors insulationR Stranded coreCAUTION• During installation, do not lean on the control box or the display, as theymay be damaged.• Pass the connecting wire securely through the wiring holder. If it passeson the sensor, it may not detect suction temperature and/or humidity.Terminal blockClampHow to fit the front panel Fitting1 Do remove the air filter.2 Cover the body with the front panel.3 Fit the 6 latches in the lower section.then 3 latches in the upper section.4 Tighten the 5 set screws.5 Fit the air filter.6 Fit the air inlet panel.Close and attachment of the air inler panel To close, attach the panel after pullingthe strings, hold the panel at both ends ofupper part to lower downward and push itslightly until the latch works.LatchLatch4or5 Number of conductorsG One conductor of the cable is the earthconductor (yellow/green)Fixing screwWiring holder1.5 Section of copper wire (mm 2 )Sensor