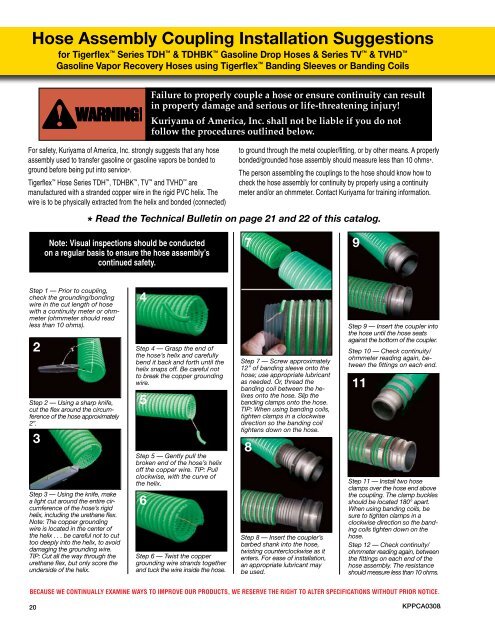
Hose Assembly Coupling Installation Suggestions<strong>for</strong> Tigerflex Series TDH & TDHBK Gasoline Drop <strong>Hoses</strong> & Series TV & TVHD Gasoline Vapor Recovery <strong>Hoses</strong> using Tigerflex B<strong>and</strong>ing Sleeves or B<strong>and</strong>ing CoilsFor safety, Kuriyama of America, Inc. strongly suggests that any hoseassembly used to transfer gasoline or gasoline vapors be bonded toground be<strong>for</strong>e being put into service*.Tigerflex Hose Series TDH , TDHBK , TV <strong>and</strong> TVHD aremanufactured with a str<strong>and</strong>ed copper wire in the rigid PVC helix. Thewire is to be physically extracted from the helix <strong>and</strong> bonded (connected)*Note: Visual inspections should be conductedon a regular basis to ensure the hose assembly’scontinued safety.Failure to properly couple a hose or ensure continuity can resultin property damage <strong>and</strong> serious or life-threatening injury!Kuriyama of America, Inc. shall not be liable if you do notfollow the procedures outlined below.to ground through the metal coupler/fitting, or by other means. A properlybonded/grounded hose assembly should measure less than 10 ohms*.The person assembling the couplings to the hose should know how tocheck the hose assembly <strong>for</strong> continuity by properly using a continuitymeter <strong>and</strong>/or an ohmmeter. Contact Kuriyama <strong>for</strong> training in<strong>for</strong>mation.Read the Technical Bulletin on page 21 <strong>and</strong> 22 of this catalog.79Step 1 — Prior to coupling,check the grounding/bondingwire in the cut length of hosewith a continuity meter or ohmmeter(ohmmeter should readless than 10 ohms).2 Step 4 — Grasp the end ofthe hose’s helix <strong>and</strong> carefullybend it back <strong>and</strong> <strong>for</strong>th until thehelix snaps off. Be careful notto break the copper groundingwire.Step 2 — Using a sharp knife,cut the flex around the circumferenceof the hose approximately2”.3Step 3 — Using the knife, makea light cut around the entire circumferenceof the hose’s rigidhelix, including the urethane flex.Note: The copper groundingwire is located in the center ofthe helix . . . be careful not to cuttoo deeply into the helix, to avoiddamaging the grounding wire.TIP: Cut all the way through theurethane flex, but only score theunderside of the helix.45Step 5 — Gently pull thebroken end of the hose’s helixoff the copper wire. TIP: Pullclockwise, with the curve ofthe helix.6Step 6 — Twist the coppergrounding wire str<strong>and</strong>s together<strong>and</strong> tuck the wire inside the hose.Step 7 — Screw approximately12” of b<strong>and</strong>ing sleeve onto thehose; use appropriate lubricantas needed. Or, thread theb<strong>and</strong>ing coil between the helixesonto the hose. Slip theb<strong>and</strong>ing clamps onto the hose.TIP: When using b<strong>and</strong>ing coils,tighten clamps in a clockwisedirection so the b<strong>and</strong>ing coiltightens down on the hose.8Step 8 — Insert the coupler’sbarbed shank into the hose,twisting counterclockwise as itenters. For ease of installation,an appropriate lubricant maybe used.Step 9 — Insert the coupler intothe hose until the hose seatsagainst the bottom of the coupler.Step 10 — Check continuity/ohmmeter reading again, betweenthe fittings on each end.11Step 11 — Install two hoseclamps over the hose end abovethe coupling. The clamp bucklesshould be located 180° apart.When using b<strong>and</strong>ing coils, besure to tighten clamps in aclockwise direction so the b<strong>and</strong>ingcoils tighten down on thehose.Step 12 — Check continuity/ohmmeter reading again, betweenthe fittings on each end of thehose assembly. The resistanceshould measure less than 10 ohms.BECAUSE WE CONTINUALLY EXAMINE WAYS TO IMPROVE OUR PRODUCTS, WE RESERVE THE RIGHT TO ALTER SPECIFICATIONS WITHOUT PRIOR NOTICE.20KPPCA0308KPPCA0109
Technical Bulletin1How23Whatare Tigerflex BIOFUEL FRIENDLY PRODUCTS hosesdifferent from other br<strong>and</strong> hoses?Tigerflex br<strong>and</strong> hoses are well known <strong>for</strong> their lightweight,easy-to-h<strong>and</strong>le <strong>and</strong> long-life features.Tigerflex br<strong>and</strong> BIOFUEL FRIENDLY PRODUCTS drop <strong>and</strong>vapor recovery hoses are revolutionary! They are constructedwith non-permeable thermoplastic polyurethane (TPU)tubes. Traditional thermoplastics, while providing exceptionallightweight <strong>and</strong> flexibility features, were not chemicallycompatible <strong>for</strong> fuels of more than 30% ethanol blended (E30).But the new Tigerflex br<strong>and</strong> BIOFUEL FRIENDLYPRODUCTS hoses, utilizing the latest advancements in TPUdevelopment, have been lab <strong>and</strong> field proven to remain crack<strong>and</strong> leak resistant under the harshest conditions. They easilyh<strong>and</strong>le conventional oxygenated <strong>and</strong> re<strong>for</strong>mulated gasolineblends; ethanol blends (up to E98); ultra low sulfur (ULS) diesel;<strong>and</strong> bio-diesels (up to B100 which meet ASTM D 6751 criteria).The Tigerflex BIOFUEL FRIENDLY PRODUCTS hoses aretruly revolutionary!What are ethanol blends – E10, E85, E98, E100?E10 (gasohol) is a fuel blend containing 10% ethanol <strong>and</strong> 90%gasoline; E85 is 85% ethanol <strong>and</strong> 15% gasoline; E95 is 95%ethanol <strong>and</strong> 5% gasoline; <strong>and</strong> so on. E100 is ethyl alcohol (grainalcohol). Many common plastics <strong>and</strong> rubbers are chemicallycompatible with E100. Yet, E100 is almost never used ortransported in the U.S. fuel industry because E100 is taxed asalcohol (liquor). Gasoline is added to render the fuel unsuitable<strong>for</strong> human consumption, <strong>and</strong> thus not subject to alcohol taxes.Adding gasoline changes the chemical composition whereasmaterials that are compatible with E100 are not compatible withan E98 fuel blend.Kuriyama ® BIOFUEL FRIENDLY PRODUCTS products can beused with all percentage blends of ethanol fuel.Metal couplings compatibility: Aluminum (good), Stainless Steel(excellent).is biodiesel – B20, B100?Biodiesel is a non-fossil fuel alternative to petroleum diesel.ASTM International has developed st<strong>and</strong>ard D6751 as thespecification st<strong>and</strong>ard <strong>for</strong> 100% biodiesel (B100). Biodiesel isgenerally used <strong>for</strong> blending with petroleum diesel. For example,B20 is a fuel blend of approximately 20% biodiesel <strong>and</strong> 80%traditional petroleum diesel. ASTM D6751 is the specification<strong>for</strong> biodiesel fuels that needs to be met, irrespective of thefeedstock source <strong>and</strong>/or processing method. Biodieselswhich meet the ASTM D6751 criteria have the same chemicalcompatibilities to hoses <strong>and</strong> accessories as traditional petroleumdiesel.It is suggested that biodiesel fuels be sourced from accreditedBQ-9000 Producers <strong>and</strong> BQ-9000 Marketers to assure thebiodiesel fuel meets the ASTM D6751 criteria.Kuriyama ® BIOFUEL FRIENDLY PRODUCTS hose productscan be used with all percentage blends of biodiesels meetingthe ASTM D6751 criteria.Metal couplings compatibility: Aluminum (excellent), StainlessSteel (excellent).4What5Can6Dotype of hose should be used <strong>for</strong> denatured ethanol(E95-E98) unloading at terminals?We suggest our Alfagomma ® series-T629AA – 150 PSI BlackBiofuel <strong>Petroleum</strong> Suction Hose <strong>for</strong> bulk ethanol terminals.The Alfagomma ® T629AA is a specially blended, heavy dutyneoprene hose, well suited <strong>for</strong> these types of applications.The Tigerflex Tigerdrop drop hose is a lightweight,user-friendly hose, designed <strong>for</strong> tank truck applications.However, it also has been used successfully at well maintainedbulk ethanol facilities.IMPORTANT: Extra care must be taken when h<strong>and</strong>lingdenatured ethanol (E95-E98) – even more so than withtraditional petroleum based fuels. The following proceduresmust be followed to ensure maximum hose service life:1. Hose should be drained <strong>and</strong> unhooked from the pumpafter each use. Properly draining <strong>and</strong> unhooking the hose willprotect it from damaging denatured ethanol vapors. American<strong>Petroleum</strong> Institute Recommended Practices No. 1007, section5.4, states that, “When pumping is finished the driver shouldwalk the suction hose to the pump... Place any residual productinto approved container.”2. Hose should be kept in a properly designed, ( shaped),storage rack when not in use. Use of storage rack will helpensure the hose is properly drained after each use; as wellprotect the hose from being accidentally run over!3. Keep hose in a shaded area when in use. Do not exposehose to direct sunlight. Excessive UV exposure can damageany hose.4. Thoroughly inspect hose be<strong>for</strong>e, during <strong>and</strong> after each use.If the hose is not fully drained after each use the denaturedethanol remaining in the hose can release damaging vapors,this is especially true at high temperatures. When the airtemperature exceeds 90° F, the temperature of ground,concrete, asphalt or stone surface upon which the hose maybe lying can be in excess of 150° F. At temperatures in excessof 110°F denatured ethanol has been shown to percolate,releasing damaging vapors. These vapors can permeatethe hose at a much higher rate than the liquid fuel, <strong>and</strong> cansubstantially reduce the service life of the hose. Ethanol vaporsare extremely damaging, more so than petroleum based fuelvapors.I leave gasoline or E85 inside the hoses when not in use?We strongly recommend that all fuel transfer hoses are fullydrained after each use. Per American <strong>Petroleum</strong> InstituteRecommended Practices No. 1007, Section 4, when unloadingto underground storage tanks, to “Disconnect the delivery hoseat the tank truck <strong>and</strong> “roll” it to the receiving tank to be sure it iscompletely drained.” In addition, vapor recovery hoses used indistribution terminal loading racks must be regularly inspected<strong>and</strong> drained as fuel will tend to collect in the hoses. At hightemperatures these fuels can percolate, releasing damagingvapors which can attack the hose <strong>and</strong> shorten service life.drop <strong>and</strong> vapor recovery hose need to be grounded?For added safety, Kuriyama of America, Inc. strongly suggeststhat any hose assembly used to transfer fuel or fuel vapors bebonded to ground be<strong>for</strong>e being put into service. (Refer to HoseAssembly Coupling Installation Suggestions in the catalog.)Embedded grounding wires should be physically extracted fromthe hose <strong>and</strong> bonded (connected) to ground through the metalcoupler, or by other means.UBECAUSE WE CONTINUALLY EXAMINE WAYS TO IMPROVE OUR PRODUCTS, WE RESERVE THE RIGHT TO ALTER SPECIFICATIONS WITHOUT PRIOR NOTICE.KPPCA0409KPPCA0109 21