INSTRUCTION AND MAINTENANCE MANUAL FOR JABIRU 2200 ...
INSTRUCTION AND MAINTENANCE MANUAL FOR JABIRU 2200 ...
INSTRUCTION AND MAINTENANCE MANUAL FOR JABIRU 2200 ...

Create successful ePaper yourself
Turn your PDF publications into a flip-book with our unique Google optimized e-Paper software.
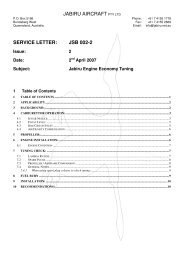
Jabiru Aircraft Pty LtdInstruction & Maintenance ManualJabiru <strong>2200</strong> Aircraft EngineHydraulic Valve Lifter ModelsFigure 37. Drawing 9431064 – Gearbox & Distributor RotorsNote: When gear case goes on1) Make sure No. 1 is 25 ° before T.D.C. compression. Both valves should beseated.2) The rotors point to the No. 1 position on the rotor caps. Fit cap screws withloctite 242 and torque.H12 1. Fit flywheel with the magnets horizontal (they then should line up with the coils).Note: The small hole in the flywheel will line up with the hole in the crankcase. (Itmay not line up with the hole in the gear if it has been moved for cam timing.) Putloctite 620 on new flywheel cap screws and torque to 24 nm (18 ft lbs).2. Fit coil mount posts and alternator mount.3. Fit coils and set gap to 0.25mm (0.010")Note: A strip of 0.25mm (0.010") card is best because it is not magnetic. Coildirection lead follows prop rotation.H13 Fit Carburettor assemblyNote: It is very important to make sure hose clamp is at the outside end ofcoupling, the coupling and carby are free of oil and the carburettor goes fully intocoupling, clamp is of 10mm wide stainless type.H14 Fit Fuel Pump AssemblyNote: Use loctite 242 on cap screws. Use molybdenum disulphide grease on pushrodThis document is controlled while it remains on the Jabiru server. Once this no longer applies the document becomes uncontrolled.REVISION 0 1 2 3 4 5 6 7 8 9 Dated : June 2010 Issued By: DPS Page: 72 of 116L:\files\Manuals_For_Products\Engine_Manuals\Transition\JEM2204-9_I&M_unsigned.docx