PROFESSIONAL CD PLAYER DN-C620 - D+M Pro
PROFESSIONAL CD PLAYER DN-C620 - D+M Pro
PROFESSIONAL CD PLAYER DN-C620 - D+M Pro

Create successful ePaper yourself
Turn your PDF publications into a flip-book with our unique Google optimized e-Paper software.
<strong>PROFESSIONAL</strong> <strong>CD</strong> <strong>PLAYER</strong><strong>DN</strong>-<strong>C620</strong>OPERATING INSTRUCTIONS
IMPORTANT TO SAFETYWARNING:To reduce the risk of fire and electric shock, this apparatus should not beexposed to rain or moisture and objects filled with liquids, such as vases,should not be placed on this apparatusCAUTION1. Handle the power supply cord carefullyDo not damage or deform the power supply cord. If it is damaged or deformed,it may cause electric shock or malfunction when used. When removing from walloutlet, be sure to remove by holding the plug attachment and not by pulling the cord.2. Do not open the rear coverIn order to prevent electric shock, do not open the top cover.If problems occur, contact your DENON DEALER.3. Do not place anything insideDo not place metal objects or spill liquid inside the system.Electric shock or malfunction may result.Please, record and retain the Model name and serial number of your set shown onthe rating label.Model No. <strong>DN</strong>-<strong>C620</strong>Serial No.CAUTIONRISK OF ELECTRIC SHOCKDO NOT OPENCAUTION:TO REDUCE THE RISK OF ELECTRIC SHOCK, DO NOT REMOVE COVER(OR BACK). NO USER-SERVICEABLE PARTS INSIDE. REFER SERVICINGTO QUALIFIED SERVICE PERSONNEL.The lightning flash with arrowhead symbol, within an equilateraltriangle, is intended to alert the user to the presence of uninsulated“dangerous voltage” within the product’s enclosure that may be ofsufficient magnitude to constitute a risk of electric shock to persons.The exclamation point within an equilateral triangle is intendedto alert the user to the presence of important operating andmaintenance (servicing) instructions in the literature accompanyingthe appliance.NOTE:This <strong>CD</strong> Player uses the semiconductor laser. To allow you to enjoy music at a stableoperation, it is recommended to use this in a room of 5°C (41°F) ~ 35°C (95°F).LABELS (for U.S.A. model only)CERTIFICATIONTHIS PRODUCT COMPLIES WITH DHHS RULES 21 CFR SUBCHAPTER JAPPLICABLE AT DATE OF MANUFACTURE.CAUTION:USE OF CONTROLS OR ADJUSTMENTS OR REFOR-MANCE OF PROCEDURESOTHER THAN THOSE SPECIFIED HEREIN MAY RESULT IN HAZARDOUSRADIATION EXPOSURE.THE COMPACT DISC <strong>PLAYER</strong> SHOULD NOT BE ADJUSTED OR REPAIRED BYANYONE EXCEPT PROPERLY QUALIFIED SERVICE PERSONNEL.FCC INFORMATION(For US customers)1. PRODUCTThis product complies with Part 15 of the FCC Rules. Operation is subject to thefollowing two conditions: (1) this product may not cause harmful interference, and(2) this product must accept any interference received, including interference thatmay cause undesired operation.2. IMPORTANT NOTICE: DO NOT MODIFY THIS PRODUCTThis product, when installed as indicated in the instructions contained in thismanual, meets FCC requirements. Modification not expressly approved by DENONmay void your authority, granted by the FCC, to use the product.3. NOTEThis product has been tested and found to comply with the limits for a Class B digitaldevice, pursuant to Part 15 of the FCC Rules. These limits are designed to providereasonable protection against harmful interference in a residential installation.This product generates, uses and can radiate radio frequency energy and, if not installedand used in accordance with the instructions, may cause harmful interference to radiocommunications. However, there is no guarantee that interference will not occur in aparticular installation. If this product does cause harmful interference to radio or televisionreception, which can be determined by turning the product OFF and ON, the user isencouraged to try to correct the interference by one or more of the following measures:• Reorient or relocate the receiving antenna.• Increase the separation between the equipment and receiver.• Connect the product into an outlet on a circuit different from that to which the receiveris connected.• Consult the local retailer authorized to distribute this type of product or anexperienced radio/TV technician for help.This Class B apparatus complies with Canadian ICES-003.Cet appareil numérique de la classe B est conforme à la norme NMB-003 du Canada.i
IMPORTANT SAFETY INSTRUCTIONSREAD BEFORE OPERATING EQUIPMENTThis product was designed and manufactured to meet strict quality and safety standards. There are, however, some installation and operation precautions which you should be particularly aware of.1. Read these instructions.2. Keep these instructions.3. Heed all warnings.4. Follow all instructions.5. Do not use this apparatus near water.6. Clean only with dry cloth.7. Do not block any ventilation openings. Install in accordance with the manufacture's instructions.8. Do not install near any heat sources such as radiators, heat registers, stoves, or other apparatus(including amplifiers) that produce heat.9. Do not defeat the safety purpose of the polarized or grounding-type plug. A polarized plug has twoblades with one wider than the other. A grounding type plug has two blades and a third groundingprong. The wide blade or the third prong are provided for your safety. If the provided plug doesnot fit into your outlet, consult an electrician for replacement of the obsolete outlet.10. <strong>Pro</strong>tect the power cord from being walked on or pinched particularly at plugs, conveniencereceptacles, and the point where they exit from the apparatus.11. Only use attachments/accessories specified by the manufacturer.12. Use only with the cart, stand, tripod, bracket, or table specified by themanufacturer, or sold with the apparatus. When a cart is used, use cautionwhen moving the cart/apparatus combination to avoid injury from tip-over.13. Unplug this apparatus during lightning storms or when unused for longperiods of time.14. Refer all servicing to qualified service personnel. Servicing is requiredwhen the apparatus has been damaged in any way, such as power-supplycord or plug is damaged, liquid has been spilled or objects have fallen intothe apparatus, the apparatus has been exposed to rain or moisture, does not operate normally, orhas been dropped.Additional Safety Information!15. Marked terminals are HAZARDOUS LIVE and that the external wiring connected to thoseterminal requires installation by an instructed person or the use of ready-made leads orcords.16. This product is equipped with a three-wire grounding type plug, a plug having a third (grounding)pin.This plug will only fit into a grounding-type power outlet.If you are unable to insert the plug into the outlet, contact your electrician to replace your obsoleteoutlet. Do not defeat the safety purpose of the grounding-type plug.ii
CAUTION:(English)To completely disconnect this product from the mains, disconnect the plugfrom the wall socket outlet.The mains plug is used to completely interrupt the power supply to the unitand must be within easy access by the user.Do not expose batteries to excessive heat such as sunshine, fire or the like.PRECAUCIÓN:(Español)Para desconectar completamente este producto de la alimentación eléctrica,desconecte el enchufe del enchufe de la pared.El enchufe de la alimentación se utiliza para interrumpir por completo elsuministro de alimentación a la unidad y debe de encontrarse en un lugar alque el usuario tenga fácil acceso.No exponga las pilas a calor excesivo, como a la luz solar, el fuego, etc.VORSICHT:(Deutsch)Um dieses Gerät vollständig von der Stromversorgung abzutrennen, trennenSie bitte den Netzstecker von der Wandsteckdose ab.Die Hauptstecker werden verwendet, um die Stromversorgung zum Gerät völligzu unterbrechen; er muss für den Benutzer gut und einfach zu erreichen sein.Setzen Sie Batterien nicht übermäßiger Wärme aus, z. B. Sonnenstrahlung,Feuer oder dergleichen.VOORZICHTIGHEID:(Nederlands)Om de voeding van dit product volledig te onderbreken moet de stekker uithet stopcontact worden getrokken.De netstekker wordt gebruikt om de stroomtoevoer naar het toestel volledig teonderbreken en moet voor de gebruiker gemakkelijk bereikbaar zijn.Stel de batterijen niet bloot aan felle zonneschijn, brand, enzovoorts.PRECAUTION:(Français)Pour déconnecter complètement ce produit du courant secteur, débranchez laprise de la prise murale.La prise secteur est utilisée pour couper complètement l’alimentation de l’appareil et l’utilisateur doit pouvoir y accéder facilement.N’exposez pas les batteries à une chaleur excessive telle que le soleil, le feuou autre.ATTENZIONE:(Italiano)Per scollegare definitivamente questo prodotto dalla rete di alimentazioneelettrica, togliere la spina dalla relativa presa.La spina di rete viene utilizzata per interrompere completamente l’alimentazione all’unità e deve essere facilmente accessibile all’utente.Non esporre le batterie a un calore eccessivo, per esempio al sole, al fuoco oaltre fonti.FÖRSIKTIHETSMÅTT:(Svenska)Koppla loss stickproppen från eluttaget för att helt skilja produkten från nätet.Stickproppen används för att helt bryta strömförsörjningen till apparaten, ochden måste vara lättillgänglig för användaren.Utsätt inte batterierna för stark hetta såsom solsken, eld eller liknande.ATENÇÃO:(Português)Para desligar completamente este produto da corrente, desligue a ficha datomada eléctrica.A ficha eléctrica é utilizada para interromper completamente a alimentação daunidade e deve estar num local onde o utilizador lhe possa aceder facilmente.Não exponha as pilhas a fontes de calor excessivo, como luz solar, fogo ousemelhantes.iii
NOTE ON USE / HINWEISE ZUM GEBRAUCH / OBSERVATIONS RELATIVES A L’UTILISATION / NOTE SULL’USO /NOTAS SOBRE EL USO / ALVORENS TE GEBRUIKEN / OBSERVERA / NOTA SOBRE UTILIZAÇÃO• Avoid high temperatures.Allow for sufficient heat dispersion when installed on a rack.• Vermeiden Sie hohe Temperaturen.Beachten Sie, daß eine ausreichend Luftzirkulation gewährleistet wird,wenn das Gerät auf ein Regal gestellt wird.• Eviter des températures élevéesTenir compte d’une dispersion de chaleur suffisante lors de l’installationsur une étagère.• Evitate di esporre l’unità a temperature alte.Assicuratevi che ci sia un’adeguata dispersione del calore quandoinstallate l’unità in un mobile per componenti audio.• Evite altas temperaturasPermite la suficiente dispersión del calor cuando está instalado en la consola.• Vermijd hoge temperaturen.Zorg voor een degelijk hitteafvoer indien het apparaat op een rek wordt geplaatst.• Undvik höga temperaturer.Se till att det finns möjlighet till god värmeavledning vid montering i ett rack.• Evite temperaturas altas.Se instalar o aparelho num suporte, deixe espaço suficiente para adispersão do calor.• Handle the power cord carefully.Hold the plug when unplugging the cord.• Gehen Sie vorsichtig mit dem Netzkabel um.Halten Sie das Kabel am Stecker, wenn Sie den Stecker herausziehen.• Manipuler le cordon d’alimentation avec précaution.Tenir la prise lors du débranchement du cordon.• Manneggiate il filo di alimentazione con cura.Agite per la spina quando scollegate il cavo dalla presa.• Maneje el cordón de energía con cuidado.Sostenga el enchufe cuando desconecte el cordón de energía.• Hanteer het netsnoer voorzichtig.Houd het snoer bij de stekker vast wanneer deze moet worden aan- of losgekoppeld.• Hantera nätkabeln varsamt.Håll i kabeln när den kopplas från el-uttaget.• Manuseie o cabo de alimentação com cuidado.Segure a ficha quando desligar o cabo de alimentação.iv• Keep the set free from moisture, water, and dust.• Halten Sie das Gerät von Feuchtigkeit, Wasser und Staub fern.• <strong>Pro</strong>téger l’appareil contre l’humidité, l’eau et lapoussière.• Tenete l’unità lontana dall’umidità, dall’acqua e dalla polvere.• Mantenga el equipo libre de humedad, agua y polvo.• Laat geen vochtigheid, water of stof in het apparaat binnendringen.• Utsätt inte apparaten för fukt, vatten och damm.• Mantenha o aparelho livre de humidade, água e pó.• Unplug the power cord when not using the set for long periods of time.• Wenn das Gerät eine längere Zeit nicht verwendet werden soll, trennenSie das Netzkabel vom Netzstecker.• Débrancher le cordon d’alimentation lorsque l’appareil n’est pas utilisépendant de longues périodes.• Disinnestate il filo di alimentazione quando avete l’intenzione di non usareil filo di alimentazione per un lungo periodo di tempo.• Desconecte el cordón de energía cuando no utilice el equipo por mucho tiempo.• Neem altijd het netsnoer uit het stopkontakt wanneer het apparaatgedurende een lange periode niet wordt gebruikt.• Koppla ur nätkabeln om apparaten inte kommer att användas i lång tid.• Desligue o cabo de alimentação da tomada quando não utilizar o aarelhodurante longos períodos de tempo.* (For sets with ventilation holes)• Do not obstruct the ventilation holes.• Die Belüftungsöffnungen dürfen nicht verdeckt werden.• Ne pas obstruer les trous d’aération.• Non coprite i fori di ventilazione.• No obstruya los orificios de ventilación.• De ventilatieopeningen mogen niet worden beblokkeerd.• Täpp inte till ventilationsöppningarna.• Não obstrua as aberturas de ventilação.• Do not let foreign objects in the set.• Keine fremden Gegenstände in das Gerät kommen lassen.• Ne pas laisser des objets étrangers dans l’appareil.• E’ importante che nessun oggetto è inserito all’interno dell’unità.• No deje objetos extraños dentro del equipo.• Laat geen vreemde voorwerpen in dit apparaat vallen.• Se till att främmande föremål inte tränger in i apparaten.• Não deixe que entrem objectos estranhos para o aparelho.• Do not let insecticides, benzene, and thinner come in contact with the set.• Lassen Sie das Gerät nicht mit Insektiziden, Benzin oderVerdünnungsmitteln in Berührung kommen.• Ne pas mettre en contact des insecticides, du benzène et un diluant avec l’appareil.• Assicuratevvi che l’unità non venga in contatto con insetticidi, benzolo o solventi.• No permita el contacto de insecticidas, gasolina y diluyentes con el equipo.• Laat geen insektenverdelgende middelen, benzine of verfverdunner metdit apparaat in kontakt komen.• Se till att inte insektsmedel på spraybruk, bensen och thinner kommer ikontakt med apparatens hölje.• Não deixe que insecticidas, benzeno e diluente entrem em contacto com o aparelho.• Never disassemble or modify the set in any way.• Versuchen Sie niemals das Gerät auseinander zu nehmen oder aufjegliche Art zu verändern.• Ne jamais démonter ou modifier l’appareil d’une manière ou d’une autre.• Non smontate mai, nè modificate l’unità in nessun modo.• Nunca desarme o modifique el equipo de ninguna manera.• Nooit dit apparaat demonteren of op andere wijze modifiëren.• Ta inte isär apparaten och försök inte bygga om den.• Nunca desmonte nem modifique o aparelho.
CAUTION• The ventilation should not be impeded by covering the ventilation openings with items, such as newspapers, tablecloths, curtains, etc.• No naked flame sources, such as lighted candles, should be placed on the apparatus.• Attention should be drawn to the environmental aspects of battery disposal.• The apparatus shall not be exposed to dripping or splashing for use.• No objects filled with liquids, such as vases, shall be placed on the apparatus.• DECLARATION OF CONFORMITY(English)We declare under our sole responsibility that this product, to which this declaration relates, isin conformity with the following standards:EN60065, EN55013, EN55020, EN61000-3-2 and EN61000-3-3.Following the provisions of 2006/95/EC and 2004/108/EC Directive.• ÜBEREINSTIMMUNGSERKLÄRUNG(Deutsch)Wir erklären unter unserer Verantwortung, daß dieses <strong>Pro</strong>dukt, auf das sich diese Erklärungbezieht, den folgenden Standards entspricht:EN60065, EN55013, EN55020, EN61000-3-2 und EN61000-3-3.Entspricht den Bestimmungen der Richtlinien 2006/95/EG und 2004/108/EG.• DECLARATION DE CONFORMITE(Français)Nous déclarons sous notre seule responsabilité que l’appareil, auquel se réfère cettedéclaration, est conforme aux standards suivants:EN60065, EN55013, EN55020, EN61000-3-2 et EN61000-3-3.Conforme aux dispositions des directives 2006/95/EC et 2004/108/EC.• DICHIARAZIONE DI CONFORMITÀ(Italiano)Dichiariamo con piena responsabilità che questo prodotto, al quale la nostra dichiarazione siriferisce, è conforme alle seguenti normative:EN60065, EN55013, EN55020, EN61000-3-2 e EN61000-3-3.Conforme alle norme delle direttive 2006/95/EC e 2004/108/EC.QUESTO PRODOTTO E’ CONFORMEAL D.M. 28/08/95 N. 548• DECLARACIÓN DE CONFORMIDAD(Español)Declaramos bajo nuestra exclusiva responsabilidad que este producto al que hace referenciaesta declaración, está conforme con los siguientes estándares:EN60065, EN55013, EN55020, EN61000-3-2 y EN61000-3-3.Siguiendo las disposiciones de las Directivas 2006/95/CE y 2004/108/CE.• EENVORMIGHEIDSVERKLARING(Nederlands)Wij verklaren uitsluitend op onze verantwoordelijkheid dat dit produkt, waarop deze verklaringbetrekking heeft, in overeenstemming is met de volgende normen:EN60065, EN55013, EN55020, EN61000-3-2 en EN61000-3-3.Voldoet aan de bepalingen van de EC-richtlijnen 2006/95/EC en 2004/108/EC.• ÖVERENSSTÄMMELSESINTYG(Svenska)Härmed intygas helt på eget ansvar att denna produkt, vilken detta intyg avser, uppfyllerföljande standarder:EN60065, EN55013, EN55020, EN61000-3-2 och EN61000-3-3.Följer bestämmelserna i Direktiv 2006/95/EC och 2004/108/EC.• DECLARAÇÃO DE CONFORMIDADE(Português)Declaramos sob nossa exclusiva responsabilidade que este produto, ao qual se refere estadeclaração, se encontra em conformidade com as seguintes normas:EN60065, EN55013, EN55020, EN61000-3-2 e EN61000-3-3.De acordo com as disposições da Directiva 2006/95/CE e 2004/108/CE.CLASS 1 LASER PRODUCTLUOKAN 1 LASERLAITEKLASS 1 LASERAPPARATCLASS 1LASER PRODUCT ,,,ATTENZIONE: QUESTO APPARECCHIO E’ DOTATO DI DISPOSITIVO OTTICOCON RAGGIO LASER.L’USO IMPROPRIO DELL’APPARECCHIO PUO’ CAUSARE PERICOLOSEESPOSIZIONI A RADIAZIONI!ADVARSEL: USYNLIG LASERSTRÅLING VED ÅBNING, NÅR SIKKERHEDSAFBRYDEREER UDE AF FUNKTION.UNDGÅ UDSAETTELSE FOR STRÅLING.VAROITUS! LAITTEEN KÄYTTÄMINEN MUULLA KUIN TÄSSÄ KÄYTTÖOHJEESSAMAINITULLA TAVALLA SAATTAA ALTISTAA KÄYTTÄJÄNTURVALLISUUSLUOKAN 1 YLITTÄVÄLLE NÄKYMÄMTTÖMÄLLELASERSÄTEILYLLE.VARNING– OM APPARATEN ANVÄNDS PÅ ANNAT SÄTT ÄN I DENNA BRUKSANVISNINGSPECIFICERATS, KAN ANVÄNDAREN UTSÄTTAS FÖR OSYNLIGLASERSTRÅLNING SOM ÖVERSKRIDER GRÄNSEN FÖR LASERKLASS 1.CAUTION:USE OF CONTROLS OR ADJUSTMENTS OR PERFORMANCE OFPROCEDURES OTHER THAN THOSE SPECIFIED HEREIN MAY RESULT INHAZARDOUS RADIATION EXPOSURE.THIS PRODUCT SHOULD NOT BE ADJUSTED OR REPAIRED BY ANYONEEXCEPT PROPERLY QUALIFIED SERVICE PERSONNEL.v
• Use compact discs that include the mark.<strong>CD</strong>’s with special shapes (heart-shaped <strong>CD</strong>’s, octagonal <strong>CD</strong>’s etc.) cannot be played on thisset.Attempting to do so may damage the set. Do not use such <strong>CD</strong>’s.• Benutzen Sie Compact Discs, die das Zeichen tragen.Speziell geformte <strong>CD</strong>’s (herzförmige <strong>CD</strong>s, achteckige <strong>CD</strong>s, usw.) können auf dieser Anlagenicht abgespielt werden.Der Versuch derartige <strong>CD</strong>s abzuspielen kann die Anlage beschädigen. Verzichten Sie auf dieBenutzung solcher <strong>CD</strong>s.• Utiliser des disques compacts portant le logo .Des <strong>CD</strong> avec des formes spéciales (<strong>CD</strong> en forme de coeur, des <strong>CD</strong> octogonaux, etc.) nepeuvent pas être lus sur cet appareil.Le fait de l’essayer, risque d’endommager le lecteur. Ne pas utiliser de tels <strong>CD</strong>.• Usare compact disc che includono il marchio .I <strong>CD</strong> con forme particolari (<strong>CD</strong> a forma di cuore, <strong>CD</strong> ottogonali ecc.) non possono essereriprodotti su questo apparecchio.L’apparecchio si potrebbe danneggiare se si cerca di farlo. Non utilizzare questi <strong>CD</strong>.• Use discos compactos con la marca .En este equipo no es posible reproducir <strong>CD</strong>s con formas especiales (<strong>CD</strong>s con forma decorazón, <strong>CD</strong>s octagonales, etc.).Si intenta hacerlo, el equipo podrá resultar dañado. No use este tipo de <strong>CD</strong>s.• Gebruik compact discs voorzien van het logo .<strong>CD</strong>’s met speciale vormen (bijv. <strong>CD</strong>’s in de vorm van een hart, achthoekige <strong>CD</strong>’s, enz.)kunnen met dit toestel niet worden afgespeeld.Wanneer u dit toch probeert, zal u het toestel beschadigen. Speel dergelijke <strong>CD</strong>’s dus niet af.• Använd <strong>CD</strong>-skivor med -märket.Specialformade <strong>CD</strong>-skivor (hjärtformade, åttkantiga, m m) går inte att spela på den härapparaten.Utrustningen kan skadas om du försöker göra detta. Använd inte <strong>CD</strong>-skivor av denna typ.• Utilize discos compactos que tenham o símbolo .Não é possível reproduzir neste aparelho <strong>CD</strong>s com formatos especiais (<strong>CD</strong>s em formato decoração, <strong>CD</strong>s octogonais, etc.).Qualquer tentativa de os reproduzir poderá danificar o aparelho. Não utilize esses <strong>CD</strong>s.DiscResidueRückstandRésiduResiduoResiduosOneffenheidPlastresterSujidade• The disc may not play normally if there is residue along the edges of the center hole.• When using new discs in particular, use a pen, etc., to remove the residue.• Die Disk kann nicht normal abgespielt werden, wenn sich ein Rückstand entlang derMittellochenden befindet.• Insbesondere, wenn Sie neue Disks benutzen, dann entfernen Sie mit einem Stift, etc.den Rückstand.• Le disque peut ne pas être lu normalements s’il y a un résidu le long des bord du troucentral.• Lors de l’utilisation de nouveaux disques en particulier, utiliser un stylo à bille, etc., pourenlever le résidu.• Il disco può non essere riprodotot in modo normale se ci sono dei residui lungo I bordidel foro centrale.• Usate una penna, ecc., per rimuovere I residui, specialmente quando usate dischi nuovi.• El disco no puede ser reproducido normalmente debido a la terminación deficiente delos bordes del agujero central.• Para quitar estos residuos de material, especialmente cuando vaya a re-producir discosnuevos, utilice un bolígrafo, o algo similar.• Het is mogelijk dat de disc niet normaal wordt weergegeven als de randen van hetmiddengat van de schijf oneffenheden vertonen.• Verwijder vooral bij gebruik van nieuwe discs de oneffenheden met een pen of ietsdergelijks.• Det kan uppstå fel vid <strong>CD</strong>-avspelningen om det finns plastrester kvar i mitthålet.• Tänk på att bort dessa med en penna, e d, särskilt om <strong>CD</strong>-skivan är ny.• O disco poderá não ser reproduzido normalmente se existir sujidade ao longo dasextremidades do orifício central.• Principalmente quando estiver a utilizar discos novos, utilize uma caneta, etc., pararemover a sujidade.vi
• This unit can display text information on the display when playing <strong>CD</strong> text discs whichcontain text information in English category.The <strong>CD</strong> text disc includes the mark shown above.NOTE:• This unit can provide a text display of the following types of characters. Other types ofcharacters will result in “ ” being displayed.• AlphabetAB<strong>CD</strong>EFGHIJKLMNOPQRSTUVWXYZabcdefghijklmnopqrstuvwxyz• Numbers0123456789• SymbolsSPACE• Bei der Wiedergabe von <strong>CD</strong>-Textdiscs, die Funktionstasten in englischer Kategorie enthalten,kann dieses Gerät auf dem Display Funktionstasten anzeigen.Die <strong>CD</strong>-Textdiscs sind mit dem rechts dargestellten Logo versehen.HINWEIS:• Dieses Gerät kann aus den nachfolgend aufgeführten Zeichenarten bestehende Texteanzeigen. Bei anderen Zeichenarten wird “ ” angezeigt.• AlphabetAB<strong>CD</strong>EFGHIJKLMNOPQRSTUVWXYZabcdefghijklmnopqrstuvwxyz• Zahlen0123456789• SymboleSPACE• Cet appareil peut afficher les textes d'information lors de la lecture de <strong>CD</strong> qui comportentces textes, dans la catégorie anglaise.Les <strong>CD</strong> avec texte se repèrent à la marque indiquée à droite.REMARQUE:• Cet appareil permet l’affichage de textes composés avec les types de caractère suivants.Tous les autres types de caractère seront affichés ainsi “ ”.• AlphabétiquesAB<strong>CD</strong>EFGHIJKLMNOPQRSTUVWXYZabcdefghijklmnopqrstuvwxyz• Chiffres0123456789• SymbolesSPACE• Quest’unità può visualizzare dei testi sul display durante la riproduzione di <strong>CD</strong> checontengono dei testi in inglese.Il disco <strong>CD</strong> con testi include il marchio mostrato qui a destra.NOTA:• Quest’unità è in grado di fornire una visualizzazione dei testi usando i seguenti tipi dicaratteri. Altri tipi di caratteri causeranno la visualizzazione dell’indicazione “ ”.• AlfabetoAB<strong>CD</strong>EFGHIJKLMNOPQRSTUVWXYZabcdefghijklmnopqrstuvwxyz• Numeri0123456789• SimboliSPACE• Esta unidad puede mostrar información de texto en la pantalla cuando se reproducen discos<strong>CD</strong> de Texto que contengan información de texto en la categoría de Inglés.Los discos <strong>CD</strong> de Texto incluyen la marca indicada a la derecha.NOTA:• Esta unidad puede mostrar visualizaciones de texto de los siguientes tipos de caracteres.Otros tipos de caracteres harán que se visualice “ ”.• AlfabetoAB<strong>CD</strong>EFGHIJKLMNOPQRSTUVWXYZabcdefghijklmnopqrstuvwxyz• Números0123456789• SímbolosSPACE• Dit toestel kan tekstinformatie op het display tonen bij het weergeven van <strong>CD</strong>-Text discs mettekstinformatie in de categorie Engels.Een <strong>CD</strong>-Text disc is voorzien van het logo rechts.OPMERKING:• Dit toestel kan de volgende tekens als tekst weergeven. Voor andere types van tekens verschijnt“ ” op het display.• AlfabetAB<strong>CD</strong>EFGHIJKLMNOPQRSTUVWXYZabcdefghijklmnopqrstuvwxyz• Getallen0123456789• SymbolenSPACEvii
• Denna apparat kan visa text på displayen när du spelar <strong>CD</strong>-textskivor innehållande informationpå engelska.<strong>CD</strong> text-skivor bär märket som anges på höger sida.OBSERVERA:• Apparaten kan visa text med följande teckentyper. För övriga tecken kommer “ ” att visas.• AlfabetiskaAB<strong>CD</strong>EFGHIJKLMNOPQRSTUVWXYZabcdefghijklmnopqrstuvwxyz• Siffror0123456789• SymbolerSPACE• Este leitor pode mostrar informações de texto no visor durante a reprodução de discos <strong>CD</strong>Text que contenham informações de texto na categoria de Inglês.O disco <strong>CD</strong> Text apresenta o símbolo mostrado acima.NOTA:• Este leitor permite a visualização de texto com os tipos de caracteres que se seguem.Qualquer outro tipo de caracteres resultará na visualização de “ ”.• AlfabetoAB<strong>CD</strong>EFGHIJKLMNOPQRSTUVWXYZabcdefghijklmnopqrstuvwxyz• Números0123456789• SímbolosSPACEviii
– TABLE OF CONTENTS –1. GENERAL INFORMATION ......................................................................... 2FEATURES ........................................................................................................... 2PART NAMES AND FUNCTIONS ....................................................................... 22. PREPARATIONS .......................................................................................... 9INSTALLATION .................................................................................................... 9CONNECTIONS .................................................................................................103. DEVICE OPERATION ................................................................................ 11SUPPORTED AUDIO <strong>CD</strong> ..................................................................................11INSERTING AND EJECTING A DISC ................................................................11NORMAL <strong>CD</strong> PLAYBACK .................................................................................12ADVANCED <strong>CD</strong> PLAYBACK ..............................................................................15PLAYING AUDIO FILES .....................................................................................21PRESET FUNCTIONS AND OPERATIONS .......................................................254. CONTROL FEATURES .............................................................................. 32RS-232C CONTROL ..........................................................................................32GPIO (Parallel) CONTROL .................................................................................39RC In Control IR FLASHJack ............................................................................405. TROUBLESHOOTING ............................................................................... 416. SPECIFICATIONS ...................................................................................... 42■ ACCESSORIESCheck that the following parts are included in addition to the main unit:q Remote Control Unit (RC-1061) ........................................................................................1w Size “AAA” batteries ........................................................................................................2e Audio Cord (Stereo) ...........................................................................................................1r AC Power Cord .................................................................................................................1(Europe models) ................................................................................................................2t Operating Instructions.......................................................................................................1y <strong>CD</strong>-ROM ............................................................................................................................1u Warranty card ....................................................................................................................1ENGLISHA NOTE ABOUT RECYCLING:This product’s packaging materials are recyclable and can be reused. Please dispose of anymaterials in accordance with the local recycling regulations.When discarding the unit, comply with local rules or regulations.Batteries should never be thrown away or incinerated but disposed of inaccordance with the local regulations concerning chemical waste.This product and the accessories packed together constitute the applicableproduct according to the WEEE directive except batteries.1
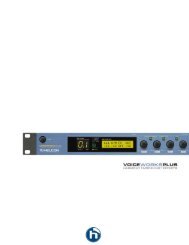
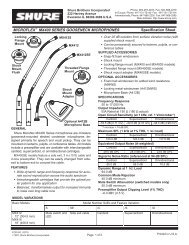
0 10ENGLISH1. GENERAL INFORMATIONFEATURES■ Standard Functions of <strong>Pro</strong>fessional <strong>CD</strong> PlayerSlot-In Disc DriveReads and Displays <strong>CD</strong> TEXT & MP3 ID3 TagsQuick Track Search with Jog WheelCue to MusicBalanced Audio Output with Trim2 Sets of Unbalanced Audio Outputs (1 Fixed / 1 Variable level)SPDIF Digital Audio OutputPlays Back Audio Files from a <strong>CD</strong> Data DiscReads <strong>CD</strong>-R / <strong>CD</strong>-RW discsSupports <strong>CD</strong>-DA, WAVE, MPEG-1 Layer III (MP3)■ Advanced <strong>CD</strong> PlaybackQuick Replay (Skip Back) (Time programmable)+/– 12% Variable Pitch Control<strong>Pro</strong>gram PlaySingle, All, A-B Repeat modesRandom Play modeUser – Selectable Play Mode(Stop, Next, Recue, Continuous, Random)Auto CueEnd MonitorEnd of Message (EOM) indicator■ 19-inch 1U rack space■ IR Remote Control (Remote controller RC-1061 included)■ External Remote ControlSerial control (RS232C)Parallel controlRC In Control (IR FLASH)PART NAMES AND FUNCTIONS(1) Front panel1POWER ON/OFF2 4 6 - = ~ ! @LEVELPHONES<strong>CD</strong> <strong>PLAYER</strong>EJECT<strong>DN</strong>-<strong>C620</strong>SHIFTMENU/STOREDISPLAYLOCK3 5 7 8 9 0 # $ % ^ &q POWER ON/OFF switch and indicator• Press this to turn the Power ON or OFF.• The indicator lights when the power is turned on.w LEVEL control• Use this to adjust the output level of the headphones.Warning!• When using headphones, take care not to turn the volume too high. Listening at highvolumes for extended periods of time may result in permanent hearing damage.e PHONES Jack• For private listening, you can connect your headphones to this jack.r DISC slot• Insert a <strong>CD</strong> into the slot, label side upwards.t EJECT button• Press this to eject the disc. The EJECT button is locked when Eject Lock is on in thepreset menu and the unit is in PLAY mode.PITCHCANCELA-BREPEATSKIP BACKPLAYMODETEXTCUE- INDEX/DIR +END MONPITCHPUSHENTER2
y Display unit• Refer to page 5 for details.u Remote control sensori SHIFT button• Press and hold while you press other controls to activate alternate functions.o MENU/STORE button• Press to enter the preset menu or to store changes in the preset menu.!0 DISPLAY/LOCK button• Press this to change the time mode on the display.• Press this button while pressing the SHIFT button to lock or unlock the controls on thefront panel.!1 PITCH button and indicator (Amber)• Press this button to switch the PITCH on or off.!2 A-B/REPEAT button• Use this to play a set section repeatedly. When the button is pressed once duringplayback, that position is set as the A point and the “A-” indicator flashes on thedisplay.• When the button is pressed again, that position is set as the B point, the “A-B” indicatorstops flashing (remaining lit), and the A-B section begins playing repeatedly.• When the button is pressed again, A-B repeat is canceled and the mode returns to thenormal play mode.• Press this button while pressing the SHIFT button to select the repeat mode.!3 PLAY MODE/TEXT button• Press this button to select the play mode.• Press this button while pressing the SHIFT button to display the text information.1. GENERAL INFORMATION!4 !5 5 6 / – INDEX/DIR + button• These buttons are used to accurately change the positions where playback will start oroperate as FF or FR when held down.• Use this button while pressing the SHIFT button to select the index (Audio <strong>CD</strong>s) ordirectory (music file discs).!6 9 /CANCEL button• Press this button to stop playback.• Press this to cancel a selection in program setting.• During preset setting operations, press to cancel all entries made and return to stopmode.!7 SKIP BACK button• Press this button for instant replay at the currently playing audio. The amount of timeskipped back is adjustable in the preset menu.!8 CUE button and indicator (Amber)• When pressed during playback, the pickup returns to the position at which playback laststarted or the next track and the CUE mode is set.• When pressed during manual search, the CUE mode is set at that position.!9 2 / ; /END MON button and indicator (Green)• Use this button to start playback or pause playback. (play or panse button)• Press this button while pressing the SHIFT button to start the End Monitor.@0 Jog wheel with PUSH/ENTER button• Turn the jog wheel clockwise by one click to move one track forward, counterclockwiseby one click to move one track backward.• In the preset mode, turn the jog wheel to select the preset item and push to enter.• Use this jog wheel while pressing the SHIFT button to set the pitch value.• In the stop mode or in the play/pause mode, push this to start playback.ENGLISH3
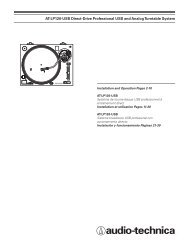
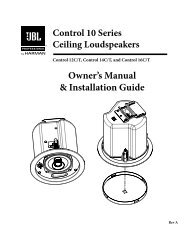
ENGLISH1. GENERAL INFORMATION(2) Rear panel1 GND2 HOT(+)3 COLD(-)LEVELRBALANCEDLANALOG OUTPUTLEVELLRFIXEDVARIABLELRSPDIFAES/EBUDIGITAL OUTPUTRS232C PARALLEL IR FLASHx z c v b n m ,.z ANALOG (Balanced) OUTPUT• These are active balanced outputs using XLR type connections. The <strong>CD</strong>'s audio playbacksignals are output from these connectors.• Pin layout : 1. GND / 2. Hot / 3. Cold• Applicable connector :Cannon XLR-3-31 or equivalent.REMOTENOTE :• Do not short-circuit the hot or cold pin with the common pin.x LEVEL Control• Use these controls to adjust the level of the audio signals from the BALANCED OUTconnectors.c ANALOG (Unbalanced) OUTPUT• These are unbalanced outputs using RCA type jacks.• VARIABLEUse the remote control unit or web GUI to adjust the output level.v DIGITAL (SPDIF) OUTPUT• This is a coaxial output using an RCA type jack.• Signal format : SPDIF(IEC-958 Type II )Onlyb DIGITAL (AES/EBU) OUTPUT• This is a balanced output using an XLR type jack.1.Common / 2.Hot / 3.Cold.• Signal format : SPDIF Only• Applicable connector: cannon XLR-3-31 or equivalentNOTE :• Do not short-circuit the hot or cold pin with the common pin.n RS232C connectorConnector for serial control from an external device.m PARALLEL connectorConnector for parallel control from an external device., IR FLASH (RC In Control) Jack (1/8” stereo mini jack)Basic functions can be controlled.PLAY, PAUSE, CUE,FWD, FF, SKIPBACK, TRACK JUMP-,TRACK JUMP+, STOP.. AC inletConnect the included power cord here.4
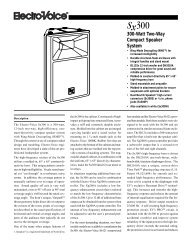
(3) DisplaySpecific Icons and Character displays inform you of the current operating status and menu items of the device.1. GENERAL INFORMATIONENGLISH[Basic <strong>CD</strong> Operation]“TOTAL” illuminates to indicate that the time displayed is the TOTAL time of the track or file.“TOTAL” can also be lit with “TRACK” in stop mode to indicate the total number of tracks or files in the current disc or directory.“REMAIN” illuminates to indicate that the time displayed is the remaining time of the currently playing track.“REMAIN” can also be lit with the “TOTAL” icon to indicate the TOTAL REMAINING time of the disc.Both icons off indicates that the time displayed is the ELAPSED time of the currently playing track or file.Lights in repeatplayback mode.Lights in randomplayback mode.Light when auto cue mode is on.Lights when program playback mode is on.Lights when single playback mode is on.Either of icons lights according to the play mode.Flashing while end of message is working.Displays the pitch control setting.Track number /Total number of TracksIndex numberPlaying time (minute and second)Displays various information and text messageFrame number5
ENGLISH1. GENERAL INFORMATION[Audio file Operation]Lights when selected audio file is in root directory of the disc.Lights when the audio data disc is loaded.(4) Remote control unit (RC-1061)Lights when the sampling frequency or bitrate of the file playing is availableand displayed.Lights when the playing time is displayed in thecharacter display.q!4w!5er!6!7!8Track number /Total number of TracksPlaying time (hour, minute, second and frame number)Displays file information, recorded time, and the other informationytui!9@1@3@0@2o@4!0!1@5!2@6!3 @76
q POWER buttonPress this to turn the power on or off.w PITCH +/– buttonsPress these buttons to adjust the Pitch up(+) or down(-).PITCH ON/OFF buttonPress this to turn the pitch control function on or off.e 0-9 buttonsPress these to select the desired track in the stop mode.r DISPLAY buttonPress this to change the time mode on the display.t TEXT buttonPress this to display the <strong>CD</strong> Text or ID3 tag information.y A-B buttonPress this to set or cancel the A-B repeat function.u END MON buttonPress this to start the End Monitor funciton.i UTILITY buttonThis button is invalid for the <strong>DN</strong>-<strong>C620</strong>.o 3 / 4 / 1 / 2 buttonsUse these for menu selection and 1 / 2 for track selection.!0 INDEX+/– buttonsPress this to select the index (Audio <strong>CD</strong>s) or directory (Audio data discs).!1 STOP buttonPress this to stop the playback.!2 SKIP BACK buttonPress this for instant replay of the currently playing audio.!3 ∞ / § buttonsPress these to skip from track to track or file to file.!4 EJECT buttonPress this to eject the disc.!5 LOCK buttonPress this to lock or unlock the buttons on the front panel.!6 RANDOM buttonPress this to set the random playback mode.!7 PROGRAM buttonPress this to enter the program mode.!8 RECALL buttonPress this to recall the programmed track.!9 CANCEL buttonPress this to cancel a selection in program setting.@0 REPEAT buttonPress this to set repeat playback.@1 NETWORK buttonThis button is invalid for the <strong>DN</strong>-<strong>C620</strong>.1. GENERAL INFORMATION@2 MENU/STORE buttonPress this to enter the preset menu or to store changes made in the preset menu.@3 VOL+/– buttonsPress these to change the playback volume output through the unbalanced VARIABLEOutput jacks.@4 ENTER buttonPress this to confirm selections in the menus.@5 2 / ; buttonPress this to start playback or pause playback.@6 CUE buttonPress this to return to the position at which playback started or the next track.@7 5 / 6 buttonsPress this to accurately change the positions where playback will start or operate as FF orFR when held down.ENGLISH7
PLAYMODEENGLISH1. GENERAL INFORMATION• Operational rangeAs shown in the figure below, the player can be operated by the remote control unit in arange which of about 5 meters from the player’s remote sensor and over an angle up to 30degrees to the left and 30 degrees to the right of the position directly in front.2. Load the two new size “AAA” batteries inside the battery compartment while taking careto align their polarities correctly with the polarity markings ( with and with ).Size “AAA” (UU-4) batteries × 25m60°3. Push the battery cover down in the direction of the arrow to close it.• Loading batteriesBefore using the supplied remote control unit for the first time, load the batteries in theremote control unit. The batteries provided are used to verify the operations of the remotecontrol unit only.1. Take hold of the tab on the battery cover which is found on the back side of the remotecontrol unit, and pull it up.CAUTION:Misuse of the batteries can result in electrolyte leakage, rupturing, corrosion, etc.Bear in mind the following points when using batteries.• Remove the batteries from the remote control unit if the unit is not going to be used for aprolonged period (a month or more).• Do not use an old battery together with a new one.• Insert the batteries while ensuring that their + and – poles are properly aligned with thecorresponding markings on the remote control unit.• Batteries with the same shape may have different voltages. Do not use different types ofbatteries together.• If electrolyte has leaked, thoroughly wipe the inside of the battery compartment, and theninsert new batteries.8
2. PREPARATIONSINSTALLATION■ Mounting in a rack• The <strong>DN</strong>-<strong>C620</strong> is of 1U size, allowing it to be mounted in EIA standard 19-inch racks.When mounting the <strong>DN</strong>-<strong>C620</strong> in a rack, use guide rails or shelf boards, etc., on the rack sideto prevent weight from being applied to the front of the <strong>DN</strong>-<strong>C620</strong>. The fittings alone cannotsupport the weight of the <strong>DN</strong>-<strong>C620</strong> (4.3 kg).Do not cover the top of the unit. Remember, heat is dispersed from the <strong>DN</strong>-<strong>C620</strong>’s uppersurface.• Set up the installation environment carefully. For example, take care to protect the <strong>DN</strong>-<strong>C620</strong> from heat from other devices. If necessary, use forced ventilation. The surroundingconditions must meet the specifications described in “SPECIFICATIONS” on Page 43.• The <strong>DN</strong>-<strong>C620</strong> will work normally when the player unit is mounted with the front panel within10 degrees of the vertical plane. If the unit is tilted excessively, discs may not load or unloadproperly.ENGLISHMax. 10°<strong>DN</strong>-<strong>C620</strong>• If the <strong>DN</strong>-<strong>C620</strong> is placed near an amplifier, tuner or other components, noise (induced hum)or beat interference may result (especially during AM or FM reception).If this occurs, separate the <strong>DN</strong>-<strong>C620</strong> from other components or reorient its position.9
ENGLISH2. PREPARATIONSCONNECTIONSLeave your entire system (including the <strong>DN</strong>-<strong>C620</strong>) turned off until all connections between the <strong>DN</strong>-<strong>C620</strong> and other components have been completed.■ Connection precautions• Before proceeding with connections or disconnections of cables and power cords, be sure to turn all system components off.• Ensure that all cables are connected properly to the L (left) and R (right) jacks.• Insert plugs fully into the terminals.• Connect the <strong>CD</strong> output jacks to the amplifier <strong>CD</strong> or AUX input jacks.• Connect one end of a straight-through RS-232 serial cable into Communication Port on the back of the <strong>DN</strong>-<strong>C620</strong> and connect the other end into the “RS-232C” port on the back of thecomputer.■ Basic connectionAnalog audio output (balanced) toconnect to analog audio equipment.If necessary, adjust output level withtrim volume.Analog audio output (unbalanced) toconnect to analog audio equipment.If necessary to adjust output level, youshould connect to “VARIABLE” andadjust by remote control.D-Sub Female 25-Pin Parallel Interfaceto connect to external input triggerdevice.Connect the included power cord intoan outlet providing the right voltage.1 GND2 HOT(+)3 COLD(-)RBALANCEDLFIXED VARIABLELLSPDIFAES/EBURS232C PARALLEL IR FLASHLEVELLEVELRRANALOG OUTPUTDIGITAL OUTPUTREMOTEDigital audio output (unbalanced and balanced) to connect to digitalaudio equipment.(Both unbalanced and balanced terminal output same signal format.)D-Sub Female 9-Pin RS-232Serial Interface to connectdirectly to a computer usinga straight-through cable.RC In Control Jack Interface to connect to externalinputdevice.CAUTIONS:• Before connecting, the POWER ON/OFF switch should be set the OFF position.• Do not touch the power cord with wet hands.• When disconnecting the power cord, always make sure that you take hold of the plug. Yanking out or bending the cord can damage it and/or cause electric shocks or a fire.10
3. DEVICE OPERATIONSUPPORTED AUDIO <strong>CD</strong>In addition to standard <strong>CD</strong>-DA discs, the <strong>DN</strong>-<strong>C620</strong> can read several other <strong>CD</strong>-DA formats.Please refer to page 22 for detail of reading and operation of data discs.Compact Disc Digital Audio (<strong>CD</strong>-DA)INSERTING AND EJECTING A DISCInserting and Ejecting a disc is only available when the unit is powered on.1. If the unit is OFF, press the POWER ON/OFF switch to turn on the power.2. Hold the disc by the edges and insert it in the DISC slot.(Do not touch the signal surface, i.e., glossy side.)3. Press the EJECT button to eject the disc.ENGLISHCompact Disc TEXT (<strong>CD</strong> TEXT)Enhanced Music <strong>CD</strong> (<strong>CD</strong> EXTRA)NOTE:• Some copy-controlled <strong>CD</strong>s may not conform to official <strong>CD</strong> standards. They are specialdiscs and may not play on the <strong>DN</strong>-<strong>C620</strong>.PLAYMODE■ MessagesMessages may appear on the display while using the <strong>DN</strong>-<strong>C620</strong>.The meanings of the messages are explained below.No DiscEject LockedMessageMeaningNo disc is inserted.Unit is playing and Eject lock is on in thepreset menu.CAUTIONS:• Do not push in the disc manually when the power is off as this may cause malfunctionand damage the <strong>CD</strong> player.11
ENGLISH3. DEVICE OPERATIONNORMAL <strong>CD</strong> PLAYBACK(1) Before Starting Playback1. Press the POWER ON/OFF switch to turn on the power.(3) Pausing playback at any pointPlayback can be temporarily halted and then continued from the same point in the track.1. Press the 2 / ; /END MON button on the front panel or the 2 / ; button on the remotecontrol unit during playback. (Button Flashes when in PAUSE mode)<strong>CD</strong> <strong>PLAYER</strong><strong>DN</strong>-<strong>C620</strong>PITCHA-BPLAYMODE0 10LEVELEJECTREPEATTEXTCUE- INDEX/DIR +PUSHENTERPOWER ON/OFFPHONESCANCELSKIP BACKEND MONPITCH2. Load the disc you want to play.3. Make sure the Preset Menu settings are set accordingly for the intended use. (See Page25.)(2) Starting Playback1. Press the 2 / ; /END MON button on the front panel or the 2 / ; button on the remotecontrol unit.2. To continue playback, press the 2 / ; /END MON button on the front panel or the 2 / ;button on the remote control unit.(4) Returning to the position at which playback startedSet the CUE mode to RECUE in the preset menu and press the CUE button during playback,the pickup returns to the position at which playback started and the pause mode is set.PITCHA-BPLAYMODEPITCHA-BPLAYMODEREPEATTEXT- INDEX/DIR +PUSHENTERCUEREPEATTEXT- INDEX/DIR +PUSHENTERCANCELSKIP BACKEND MONPITCHCUECANCELSKIP BACKEND MONPITCHPress the3 buttonPress the; buttonPress the 3 buttonPress theCUE buttonPlay internalPlay internalBack cue operationPositionon thedisc(5) Stopping playback1. Press the STOP/CANCEL button.12
(6) Advancing to the next track during playback1. Turn the jog wheel clockwise or press the § button during playback.PITCHCANCELA-BREPEATSKIP BACK• The pickup will advance to the beginning of the next track and playback will continuewhen the Start mode is set to “Play” in the preset menu.• The pickup will advance to the beginning of the next track and remain in CUE mode whenthe Start mode is set to “Stop” or “Cue” in the preset menu.(See Page 27 for Start Mode Settings)NOTE:• When the Next track reserve mode is set to "ON" in the preset menu, if you turn the jogwheel during playback, the track number indication of the display will blink and you canselect the track to play next.PLAYMODETEXTCUE- INDEX/DIR +END MONPITCHPUSHENTER(8) Audible quick search3. DEVICE OPERATION• Using this function, you can search for a desired point quickly within a track in the bothforward or reverse direction.• When a SEARCH button is pressed during the pause mode and the button is released, thepause mode is cancelled at that point with the sound being output.Manual search forward1. Press the SEARCH (6) button during playback.PITCHCANCELA-BREPEATSKIP BACKPLAYMODETEXTCUE- INDEX/DIR +END MONPITCH• The playback mode is cancelled, and the search point is reproduced repeatedly.• Every time the SEARCH (6) button is pressed the playback point advances one frame.• Playback of the track is sped up while the SEARCH (6) button is pressed.Manual search in reverse1. Press the SEARCH (5) button during playback.PUSHENTERENGLISHPITCHA-BPLAYMODE(7) Returning to the beginning of the current track during playbackREPEATTEXTCUE- INDEX/DIR +PUSHENTER1. Turn the jog wheel counterclockwise or press the ∞ button during playback.PITCH A-B PLAYMODEREPEAT TEXT - INDEX/DIR +PUSHENTERCUECANCELSKIP BACKEND MONPITCH• The playback mode is cancelled, and the search point is reproduced repeatedly.• Every time the SEARCH (5) button is pressed the playback point retreats one frame.• Playback of the track is sped up while the SEARCH (5) button is pressed.CANCELSKIP BACKEND MONPITCH• The pickup will return to the beginning of the current track and playback will continuewhen the Start mode is set to “Play” in the preset menu.• The pickup will return to the beginning of the current track and remain in CUE mode whenthe Start mode is set to “Stop” or “Cue” in the preset menu.NOTE:• When the Next track reserve mode is set to "ON" in the preset menu, if you turn the jogwheel during playback, the track number indication of the display will blink and you canselect the track to play next.13
ENGLISH3. DEVICE OPERATION(9) Index SkipAn index search can be performed during the play of a track whose index has been recorded.This function is useful for starting play at a specific location of a long track. It returns play to aprevious index which is equivalent to the number of times the INDEX – button on the unit or IRcontrol was pressed; alternatively, it advances play to a subsequent index which is equivalentto the number of times the INDEX + button on the unit or IR control was pressed.If the index skip function is operated for a <strong>CD</strong> with no indexes recorded, the “No Index”message appears on the main display, and play returns to the start of the track now playing.NOTE:• The index skip function cannot be used for discs recorded with audio files. In that instance,the index button navigate directories.(10) Direct JumpSelect the number of the track to be played directly during the stop mode by pressing thenumeric buttons (0 to 9) on the remote control unit.To select track number 10 or above, use the numeric buttons to select the higher digit first andthen select the lower digit.The operation after the number of the track is selected depends on the start mode settings.Example: To play track 121. Set the start mode to “Play”.2. Press the “1” numeric button.3. Within 1 second, press the “2” numeric button.14
ADVANCED <strong>CD</strong> PLAYBACK(1) Repeating playback of a desired interval(Single track repeat)1. Press the PLAY MODE/TEXT button to select “Single Stop”, “Single Next” or “SingleRecue”.2. Press the A-B/REPEAT button on the front panel while pressing the SHIFT button.3. DEVICE OPERATION(All track repeat)1. Press the PLAY MODE/TEXT button to select “Continuous”.2. Press the A-B/REPEAT button on the front panel while pressing the SHIFT button.• The “REPEAT” indicators light on the display and the all track repeat mode is set.3. Press the 2 / ; /END MON button on the front panel or the 2 / ; button on the remotecontrol unit.ENGLISHPITCHA-BPLAYMODE• The “REPEAT 1” indicators light on the display and the single track repeat mode is set.3. Use the select knob to select the track to be played repeatedly.4. Press the 2 / ; /END MON button on the front panel or the 2 / ; button on the remotecontrol unit.PITCHCANCELA-BREPEATSKIP BACKPLAYMODETEXTCUE- INDEX/DIR +END MONPITCHPUSHENTER• Playback starts.• Once the selected track ends, it is played again from the beginning.• The single track repeat mode can also be set by pressing the A-B/REPEAT button on thefront panel while pressing the SHIFT button during playback. The current track is playedrepeatedly.• To cancel the single track repeat mode, press the A-B/REPEAT button on the front panelwhile pressing the SHIFT button repeatedly until the “REPEAT 1” indicator turns off.CANCELREPEATSKIP BACKTEXTCUE- INDEX/DIR +END MONPITCHPUSHENTER• The disc is played repeatedly.• The all track repeat mode can also be set by pressing the A-B/REPEAT button on the frontpanel while pressing the SHIFT button during playback.• If the repeat function is activated during program play, the tracks are played repeatedly inthe programmed order.• To cancel the all track repeat mode, press the A-B/REPEAT button on the front panelwhile pressing the SHIFT button repeatedly until the “REPEAT” indicator turns off.15
ENGLISH3. DEVICE OPERATION(2) Repeating playback a specific section within a track(A-B repeat)1. During playback, press the A-B button at the point where you want to start repeatedplayback (A point).PITCHA-BREPEATPLAYMODETEXTCUE- INDEX/DIR +PUSHENTER(3) Playing specific tracks in a specific order (<strong>Pro</strong>gram play)With this function, you can choose any of the tracks on the disc and program them to play inany order. Up to 99 tracks can be programmed.Creating the program1. Press the PROGRAM button on the remote control unit.CANCELSKIP BACKEND MONPITCH• The “A-” indicator flashes on the display.2. Press the A-B button again at the point where you want to end repeated playback (Bpoint).• The “A-B” indicator stops flashing (remaining lit), and the A-B section begins playingrepeatedly.• If no B point is set before the current track ends, the end of the track is set as the Bpoint.3. To cancel A-B repeat playback, press the A-B button again.• The “PGM” indicator flashes, and the program number and track number are shown onthe display.2. Press the ∞ or § button on the remote control unit to select the first track of theprogram.3. Press the ENTER button on the remote control unit to select the track.NOTE:• The A-B points must be separated by at least 1 seconds time to work.• Skip to the next desired track and press the ENTER button again.• Repeat steps 2 and 3 to program the tracks in the desired order.4. Press the PROGRAM button to exit the program input mode.• “PGM” indicator lights, and the <strong>DN</strong>-<strong>C620</strong> is ready to play your program.16
Editing the program1. Press the RECALL button on the remote control unit while the “PXX” is displayed.6. Press the PROGRAM button to exit the program edit mode.3. DEVICE OPERATIONENGLISH2. Press the UP or DOWN button on the remote control unit to select the program numberyou want to edit.• “PGM” indicator lights, and the <strong>DN</strong>-<strong>C620</strong> is ready to play your program.Playing the programs1. Press the PLAY/PAUSE button.PITCHA-BPLAYMODEREPEATTEXT- INDEX/DIR +PUSHENTERCUECANCELSKIP BACKEND MONPITCH• <strong>Pro</strong>gram play starts.3. Press the ∞ or the § button on the remote control unit to select the track of the programnumber.4. Press the CANCEL button on the remote control unit to delete a track in the program.Exit the program mode1. Press the PROGRAM button.• “PGM” indicator turns off.• The program is also cleared when the EJECT button is pressed.5. Press the ENTER button on the remote control unit to add a track.• To enter the next track, press the ENTER button again.• Repeat steps 2 and 3 to program the tracks in the desired order.17
ENGLISH3. DEVICE OPERATION(4) Pitch ControlPitch Control allows the playback of audio at faster (+) or slower speeds(–).1. Turning PITCH CONTROL On and OFF.Press the PITCH button.(5) Skip BackSKIP BACK is a feature that allows instant replay of the currently playing track. When the SKIPBACK button on the unit or SKIP BACK button on the remote control unit is pressed duringplayback, play will skip back by the number of seconds set in the PRESET MENU and playbackwill resume from that point.PITCHA-BPLAYMODEPITCHA-BPLAYMODEREPEATTEXT- INDEX/DIR +PUSHENTERREPEATTEXTCUE- INDEX/DIR +PUSHENTERCUECANCEL SKIP BACKEND MONPITCHCANCEL SKIP BACKEND MONPITCH• Factory default SKIP BACK time is 10 seconds.• For details on how to set the SKIP BACK time (See Page 28).• The PITCH button lights up amber indicating PITCH CONTROL is ON.• The play speed increases or decreases depending on the pitch control setting as indicatedin the display.• Press the PITCH button again to turn PITCH CONTROL Off.• The PITCH button light turns off.2. Adjusting the PITCH CONTROL speed.With the unit in SHIFT mode, turn the jog wheel counterclockwise ← to reduce the Pitchand speed or turn the jog wheel clockwise → to increase the Pitch and speed.(6) End MonitorEND MONITOR is a feature that plays back the final seconds of the current track. If the PlayMode is set to “Continuous” the <strong>DN</strong>-<strong>C620</strong> plays back the last track of the current disc. To usethis feature, press the 2/;/END MON button while pressing the SHIFT button during in CUEmode on the device or remote control unit and the unit will start playback from the positionbefore the end of the current track as set in the PRESET MENU.PITCHA-BREPEATPLAYMODETEXTCUE- INDEX/DIR +PUSHENTERCANCELSKIP BACKEND MONPITCHPITCHA-BPLAYMODEREPEATTEXT- INDEX/DIR +PUSHENTERCANCEL SKIP BACKCUEEND MONPITCH• Factory default END MONITOR time is 10 seconds.• For details on how to set the END MONITOR time (See Page 28).18
(7) Play ModePlay Mode lets you choose what happens when the end of a track is reached during playback.Set ValueContinuous (Default)Single NextSingle ReCueSingle StopRandomDescriptionWhen playback reaches the end of a track it automaticallybegins the next track until all tracks have been played.The unit advances to the next track and waits in Cue Mode.The unit returns to the beginning of the current track and waitsin Cue Mode.The unit returns to stop mode after the track has played.The unit plays all the tracks in random sequence.(Continuous)1. Press the PLAY MODE/TEXT button on the front panel.• The “Continuous” is displayed on the display and the continuous mode is set.2. Use the select knob to select the track to be played.3. Press the 2 / ; /END MON button on the front panel or the 2 / ; button on the remotecontrol unit.PITCHCANCELA-BREPEATSKIP BACKPLAYMODETEXTCUE- INDEX/DIR +END MONPITCHPUSHENTER3. DEVICE OPERATION(Single Next)1. Press the PLAY MODE/TEXT button on the front panel.• The “Single Next” is displayed on the display and the Single Next mode is set.2. Use the select knob to select the track to be played.3. Press the 2 / ; /END MON button on the front panel or the 2 / ; button on the remotecontrol unit.PITCHCANCELA-BREPEATSKIP BACKPLAYMODETEXTCUE- INDEX/DIR +END MONPITCHPUSHENTER• Playback starts.• When the playback reaches the end of a track the unit advances to the next track andwaits in Cue Mode.(Single Recue)1. Press the PLAY MODE/TEXT button on the front panel.• The “Single Recue” is displayed on the display and the Single Recue mode is set.2. Use the select knob to select the track to be played.3. Press the 2 / ; /END MON button on the front panel or the 2 / ; button on the remotecontrol unit.ENGLISHPITCHA-BPLAYMODE• Playback starts.• When playback reaches the end of a track it automatically begins the next track until alltracks have been played.• After the last track ends, playback stops. The <strong>DN</strong>-<strong>C620</strong> returns to stop mode.CANCELREPEATSKIP BACKTEXTCUE- INDEX/DIR +END MONPITCHPUSHENTER• Playback starts.• When the playback reaches the end of a track the unit returns to the beginning of thecurrent track and waits in Cue Mode.19
ENGLISH3. DEVICE OPERATION(Single Stop)1. Press the PLAY MODE/TEXT button on the front panel.• The “Single Stop” is displayed on the display and the Single Stop mode is set.2. Use the select knob to select the track to be played.3. Press the 2 / ; /END MON button on the front panel or the 2 / ; button on the remotecontrol unit.PITCHA-BPLAYMODEREPEATTEXT- INDEX/DIR +PUSHENTERCUECANCELSKIP BACKEND MONPITCH• Playback starts.• When the playback reaches the end of a track the unit returns to stop mode.(Random)1. Press the PLAY MODE/TEXT button on the front panel.• The “Random” is displayed on the display and the Random playback mode is set.2. Press the 2 / ; /END MON button on the front panel or the 2 / ; button on the remotecontrol unit.PITCHA-BPLAYMODEREPEATTEXT- INDEX/DIR +PUSHENTERCUECANCELSKIP BACKEND MONPITCH• Playback starts.• The unit plays all the tracks in random sequence.20
PLAYING AUDIO FILES3. DEVICE OPERATIONIn addition to standard <strong>CD</strong>-DA discs, the <strong>DN</strong>-<strong>C620</strong> can read audio files from two different types of Data discs. For a list of compatible compressed and uncompressed audio files, see followingsection: Audio File Format Specifications.ENGLISH■ Supported data discsCompact Disc Recordable (<strong>CD</strong>-R)Compact Disc ReWritable (<strong>CD</strong>-RW)NOTE:• The <strong>DN</strong>-<strong>C620</strong> supports following file system for the data discs.ISO9660 Level1 and Level2, Joliet, UDF version 1.50 and 2.00• The <strong>DN</strong>-<strong>C620</strong> cannot read unfinalized <strong>CD</strong>-R disc.• The <strong>DN</strong>-<strong>C620</strong> can only read the 1st session of a multi-session disc.• There are the following conditions in the data discs that can be read.– Maximum number of directories: 254– Maximum number of files: 999If there are more than 1,000 files, only the first 999 files are played.– Folder layers: 8 layers, including root• The <strong>DN</strong>-<strong>C620</strong> does not support two byte character sets.■ Audio file format specificationsThe <strong>DN</strong>-<strong>C620</strong> supports PCM, MP3 audio formats.File Extension System Sample Rate Bit Rate ResolutionPCM wav 16-Bit Linear PCM 48kHz, 44.1kHz, 32kHz – 16-bitMP3 mp3 ISO/IEC11172-3 MPEG1- L3 48kHz, 44.1kHz, 32kHz 32 kbps – 320 kbps 16-bit21
ENGLISH3. DEVICE OPERATION■ Functions not supported by playing audio fileThe following functions are not supported when the <strong>DN</strong>-<strong>C620</strong> encounters discs recordedwith these types of audio files.• Index skip function is not available.• Playback of half-rate audio files MPEG2-L3 (24 kHz, 22.05 kHz, 16 kHz) is not available.• If an audio file includes content protection, it may not be played.■ Handled audio files as “track” and playing audio fileA directory (also called a “folder”) is a hierarchical level on disc media.After loading a data disc and searching all audio files, the <strong>DN</strong>-<strong>C620</strong> assigns each audio filea track number.Only the files within the selected directory will be the target of your operations, and functionssuch as program playback and repeat playback will all occur within the same directory.For example in the illustration below, at first each audio file is assigned a track number.Directory-AAA, directory-BBB and directory-DDD contain audio files and can be selected foroperations, but directory-CCC is excluded from operations.If directory-AAA is selected, <strong>CD</strong> operations such as program playback are effective only toaudio files of directory-AAA, it means aaa001.mp3/track# 003 and bbb001.mp3/track# 004are effective for operation.ROOT (Dir01)AAA (Dir02)BBB (Dir03)bbb001.mp3 (Track# 004)■ Displays informationWhen a data disc is inserted into the <strong>DN</strong>-<strong>C620</strong>, various kind of information are displayed onthe 13-digit alphanumeric part of the display unit.When in play, pause, search, end mon. or cue state, the following information is displayed inorder by pressing the DISPLAY/LOCK button.– Elapsed time– Remaining time– File name– File information: sample frequency, bit rate or resolution, and file format(PCM, MP3)- Recorded date: year, month and day. [MMMDD YYY]- Recorded time: hour, minute and second. [HH:mm:SS]- Channel: “Stereo” or “Mono”CCCbbb003.txtaaa001.mp3 (Track# 003)DDD (Dir04)ddd001.mp2 (Track# 005)rrr001.mp3 (Track# 001)rrr002.wav (Track# 002)22
■ Text informationWhen a data disc with MP3 files, is inserted into the <strong>DN</strong>-<strong>C620</strong>, in addition to aboveinformation various kind of text information are displayed on the 13-digit alphanumeric partof the display unit. This information is recorded in a MP3 file as ID3 tag.When in play, pause, search, end mon. or cue state, the following information is displayed inorder by pressing the PITCH/TEXT button with the unit in SHIFT mode.– [Above information]3. DEVICE OPERATIONENGLISH– Title– Artist– AlbumNOTE:• Only standard ID3 information that has been accurately recorded in the file will bedisplayed.23
ENGLISH3. DEVICE OPERATION(1) Playing audio files on a disc1. Load a disc containing audio files.• The display will change to “Loading.”. When the contents of the disc have been read, thetotal number of tracks will be displayed.2. Turn the jog wheel to select a file you want to listen to.• The file name scrolls and back to the number of track on the display.3. Press the 2 / ; / END MON button.(2) Advanced music files playbackThe following "Advanced <strong>CD</strong> playback" functions are possible with audio files on a disc in thesame way as a standard <strong>CD</strong>-DA disc.See page 16 for detail of an operation.■ Single track repeat■ All track repeat■ A-B repeat■ <strong>Pro</strong>gram play■ Pitch control■ Skip back■ End monitor(Directory skip)1. In shift mode, press the INDEX/DIR +/– button to select a folder.• The display will indicate each name of all folders including sub-folders.2. Press the 2 / ; / END MON button.• Playback will be started from the top file within the selected folder.24
PRESET FUNCTIONS AND OPERATIONS(1) Changing the PRESETS[ Using the front panel ]1. With the unit in stop mode, press the MENU/STORE button.[ Using the remote control unit ]1. With the unit in stop mode, press the MENU/STORE button.The last active preset item appears on the display.3. DEVICE OPERATIONENGLISH<strong>CD</strong> <strong>PLAYER</strong><strong>DN</strong>-<strong>C620</strong>0 10LEVELPHONESEJECTThe last active preset item appears on the display.2. Turn the jog wheel to select the preset item you wish to modify.3. Press the jog wheel to confirm your selection.Preset setting data appears on the display. You will now be able to edit the preset item.For details of each preset item, see page 27.4. Turn the jog wheel to adjust the parameters for that item.Press the jog wheel to confirm your setting/action.Repeat steps 2-4 as needed.5. Press the MENU/STORE button to save changes or STOP/CANCEL button to cancel allchanges and return to stop mode.SHIFTMENU/STOREDISPLAYLOCK2. Press the 3 button or the 4 button to select the preset item you wish to modify.3. Press the ENTER button to confirm your selection.Preset setting data appears on the display. You will now be able to edit the preset item.For details of each preset item, see page 27.4. Press the 3 button or the 4 button to adjust the parameters for that item.Press the ENTER button to confirm your setting/action.Repeat steps 2-4 as needed.5. Press the MENU/STORE button to save changes or STOP button to cancel all changesand return to stop mode.25
ENGLISH3. DEVICE OPERATION(2) Table of Preset Items and Default settingsNo (Order) Display (Preset item) Selection Range Default Reference1. Power On Play /Stop Stop Page 272. Start Mode Play /Stop /Cue CUE Page 273. Cue Mode Recue /Next Recue Page 274. Auto Cue Off /–48dB /–42dB /–36dB Off Page 275. Fade In Off /0.5sec - 10.0sec (0.5second steps) Off Page 286. Fade Out Off /0.5sec - 10.0sec (0.5second steps) Off Page 287. Skip Back 1.0 – 30.0 sec (0.5 second steps) 10.0 Page 288. End Monitor 5 /10 /15 /20 /25 /30 /35 sec 10 Page 289. EndOfMessage Off /0 /5 /10 /15 /20 /30 /60 sec 10 Page 2910. NextTrReserve On /Off Off Page 2911. Fader Start Play /Play-Pause Play-Pause Page 3012. Index Tally Index2 /Index3 Index2 Page 3013. Mono On /Off Off Page 3014. Auto Sleep OFF /30sec /10 min /20 min /30min 30 min Page 3015. Eject lock On /Off On Page 3116. F/W Version Displays the units FW version – Page 3117. Default – – Page 3126
(3) Detailed description of the Preset items1. Power on playback (Power On)This feature allows you to decide the status of the unit after the TOC has been read or the DIR structure has been identified.Set valuePlayStop (default)Unit starts to play after boot procedure is completedUnit sits in stop mode after boot procedure is completed2. Start mode (Start Mode)This feature allows you to decide what the <strong>DN</strong>-<strong>C620</strong> will do after a track is selected with the track search operation.Description3. DEVICE OPERATIONENGLISHSet valueInserting a new disc<strong>Pro</strong>cessingSwitching tracks or index pointsPlay Unit starts playback at the first track of the disc Unit starts to play the desired track or index or fileCue (default) Unit cues to the first track of the disc Unit Cues to the selected track or index or fileStop Unit sits in stop mode Unit Cues to the selected track or index or file3. Cue mode (Cue Mode)This feature allows you to decide what the <strong>DN</strong>-<strong>C620</strong> will do when the CUE button is pressed.Set valueRecue (default)Next<strong>Pro</strong>cessingUnit returns to the previously cued start position of the currently playing fileUnit cues to the next track4. Auto Cue (Auto Cue)This feature allows you to decide at what level of music the <strong>DN</strong>-<strong>C620</strong>’s Auto Cue feature will detect.Set value<strong>Pro</strong>cessingAuto CueDetecting level is less thanOff (default) Off ---–48dB On –48dB–42dB On –42dB–36dB On –36dBNOTE:• If an audio signal isn’t detected within the maximum period of time (20 seconds) then the <strong>DN</strong>-<strong>C620</strong> will most likely Cue to the beginning of index 01.27
ENGLISH3. DEVICE OPERATION5. Fade in time (Fade In)This feature allows you to adjust the length of time for the <strong>DN</strong>-<strong>C620</strong>’s Fade In feature.Set value<strong>Pro</strong>cessingFade inFade in timeOff (default) Off ---0.5sec – 10.0sec(0.5second step)On0.5second – 10.0seconds6. Fade out time (Fade Out)This feature allows you to adjust the length of time for the <strong>DN</strong>-<strong>C620</strong>’s Fade Out feature.Set value<strong>Pro</strong>cessingFade outFade out timeOff (default) Off ---0.5sec – 10.0sec(0.5second step)On0.5second – 10.0seconds7. Skip back time (Skip Back)This feature allows you to set the amount of time that the <strong>DN</strong>-<strong>C620</strong> will instantly replay when SKIP BACK is pressed on the unit or IR control.Set value1.0sec – 30.0sec (Default 10.0sec)(0.5second step)<strong>Pro</strong>cessingSkip Back time1.0second – 30.0seconds8. End monitor time (End Monitor)This feature allows you to set the amount of time at the end of the track that the <strong>DN</strong>-<strong>C620</strong> will play when the END MON button is pressed on the unit or IR control while in standby.In the MP3 play mode, the time of monitor may not be correctly.Set value5sec – 35sec (Default 10sec)(5seconds step)<strong>Pro</strong>cessingEnd Monitor time5seconds – 35seconds28
3. DEVICE OPERATION9. End of message time (EndOfMessage)This feature allows you to set the amount of time at the end of the track where the End of Message will be displayed. When less than the user selected time is left at the end of the currentlyplaying track, the “END” on the display will begin to flash until the track has completed.Set value<strong>Pro</strong>cessingEnd of MessageEnd of Message timeOff Off ---0/ 5 /10 /15 /20 /30 /60sec(Default 10sec)On0/ 5 /10 /15 /20 /30 /60secondsENGLISH10. Next track reserve (NextTrReserve)This feature allows you to decide what the <strong>DN</strong>-<strong>C620</strong> will do at the end of a track.Play mode setting is “Single Stop”Set valueOnOff (default)<strong>Pro</strong>cessing at the end of track(Reserved a next track): Cue at the playback stating position of index 01 of reserved track(Not reserved a next track): StopStopPlay mode setting is “Single Next”Set valueOnOff (default)<strong>Pro</strong>cessing at the end of track(Reserved a next track): Cue at the playback stating position of index 01 of reserved track(Not reserved a next track): Cue at the beginning of index 01 of next trackCue at the beginning of index 01 of next trackPlay mode setting is “Single Recue”Set valueOnOff (default)<strong>Pro</strong>cessing at the end of track(Reserved a next track): Cue at the beginning of index 01 of reserved track(Not reserved a next track): Cue at the playback starting positionCue at the playback starting positionPlay mode setting is “Continuous”Set valueOnOff (default)<strong>Pro</strong>cessing at the end of track(Reserved a next track): Start playback at index 01 of reserved track. If the reserved track is next track of the current track, it willstart playback at index 00.(Not reserved a next track): Start playback at index 00. If the current track is final track of the disc, It will stop.Start playback at index 00. If the current track is final track of the disc, It will stop.29
ENGLISH3. DEVICE OPERATION11. Fader start mode (Fader Start)This feature allows you to decide how the <strong>DN</strong>-<strong>C620</strong> behaves when the Fader Start pins are short-circuited.Set valuePlayPlay-Pause (default)<strong>Pro</strong>cessingUnit starts playback when the remote fader pins (9-23) are short circuited and remains playing when the pins openUnit starts playback when the remote fader pins (9-23) are short circuited and pauses playback when the pins open12. Index tally (Index Tally)This feature allows you to select the processing of INDEX tally pin (17) of the parallel control terminal.Set valueIndex2 (default) Output index 2 tally signal to INDEX tally pin (17).Index3 Output index 3 tally signal to INDEX tally pin (17).<strong>Pro</strong>cessing13. Mono mode (Mono)This feature allows you to force playback of stereo audio into a mono signal sent out both the L and R terminals.Set valueOff (default)On<strong>Pro</strong>cessingOutput L and R original signals from the output terminals.Output mixed L and R stereo signals from the output terminals.14 Auto sleep mode (Auto Sleep)You can select the behavior that the servo functions will automatically turn off if no operation is performed for set-up time while in stop, pause or cue.When in the sleep mode, if the 2 / ; / END MON button is pressed, playback will be started from the beginning of the track in which the sleep mode was set. If the CUE button is pressed,it will standby for the beginning of the track in which the auto sleep was set.Set valueOff30sec10min20min30min(default)Unit never goes into sleep mode<strong>Pro</strong>cessingUnit will goes into sleep mode if no servo functions occur for longer than the user-designated time30
15. Eject lock mode (Eject Lock)This feature allows you to prohibit ejecting a disc during playback.Set valueOn (default)Off16. <strong>Pro</strong>cedure for Displaying the Unit’s F/W Version (F/W Version)[ Using the front panel ]1. While in stop and shift mode, press the MENU/STORE/UTILITY button.2. Turn the jog wheel until “FW version” appear in the display.<strong>Pro</strong>cessingUnit will not allow anyone to eject a disc while in the Play ModeUnit will allow a disc to be ejected while in the Play Mode3. DEVICE OPERATIONENGLISH3. Press the jog wheel. The Display switches to the firmware version.4. Press the STOP/CANCEL button to cancel.[ Using the remote control unit ]1. While in stop mode, press the UTILITY button.2. Press the 3 button or the 4 button until “F/W version” appear in the display.3. Press the ENTER button. The Display switches to the firmware version.4. Press the STOP button to cancel.17. Default (Default)Setting this feature allows you to reset all of the unit’s preset items to their default values.31
ENGLISH4. CONTROL FEATURESRS-232C CONTROLConnect a male (D-Sub 9 Pin) to female (D-Sub 9 Pin) straight cable for RS-232C external controlby host equipment.• The RS-232C host can control functions of the <strong>DN</strong>-<strong>C620</strong> externally.• The <strong>DN</strong>-<strong>C620</strong> automatically transmits status data when status is changed.• The <strong>DN</strong>-<strong>C620</strong> will respond to status requests by transmitting the associated status data RS-232C specifications.(1) Interface Condition• Applicable connector : 9-pin D-sub (male)• Baud rate : 9600 bps• Data Bit : 8bit• Parity : None• Stop bit : 1bit• Flow control : None• Pin layoutRS-232CPin No Signal Name1 Ground6 NC2 TxD7 NC3 RxD8 NC4 NC9 NC5 S. Ground(2) Control command codesThe control command packets have a data length of 7 bytes or more. ASCII codes from 0x00 to0x7F are used to receive serial data. At the transmission end, take steps to convert the ASCIIcodes into HEX data to set the data in the data packets. CR (0x0D) is added as the data packetdelimiter.Example: Control command code for number 5 (ASCII code @02005CR)When transmitting commands consecutively, put more than 100ms blank betweencommands.@ 0 2 0 0 5 CR0 × 40 0 × 30 0 × 32 0 × 30 0 × 30 0 × 35 0 × 0d(3) Status Request and Status Information codesThe status data packets have a data length of 7 bytes or more.ASCII codes from 0×00 to 0×7F are used to transmit serial data. For this reason, the ASCIIcodes are converted into HEX data before the data is set in the data packets and transmitted.CR (0×0D) is added as the data packet delimiter.Example: Status Information code “Disc In” (ASCII code @0 <strong>CD</strong>CI CR)@ 0 C D C I CR0 × 40 0 × 30 0 × 43 0 × 44 0 × 43 0 × 49 0 × 0d32
(4) Table of Control command codes4. CONTROL FEATURESENGLISHCode Command Comment“@02000”+CR 0“@02001”+CR 1“@02002”+CR 2“@02003”+CR 3“@02004”+CR 4“@02005”+CR 5“@02006”+CR 6“@02007”+CR 7“@02008”+CR 8“@02009”+CR 9“@02011”+CRDISPLAY“@02012”+CRPower Standby“@020PW”+CRPower On“@02016”+CRVolume Up“@02017”+CRVolume Down“@02028ON”+CRRANDOM ON“@02028OF”+CRRANDOM OFF“@02029ON”+CRREPEAT ON“@02029OF”+CRREPEAT OFF“@02032”+CR Track Jump §“@02033”+CRTrack Jump ∞“@02034”+CR INDEX +“@02035”+CR INDEX –“@02037ON”+CRPITCH ON“@02037OF”+CRPITCH OFF“@02038”+CR PTICH +“@02039”+CR PITCH –“@02045”+CREJECT“@02048”+CRPAUSE33
ENGLISH4. CONTROL FEATURESCode Command Comment“@02050”+CRF. REVERSE“@02052”+CRF. FORWARD“@02053”+CRPLAY“@02054”+CRSTOP“@02059”+CRA-B“@020CU”+CRCUE“@020EM”+CREND MON“@020SB”+CRSKIP BACK“@020KL”+CRLock Panel's Key“@020KU”+CRUnlock Panel's Key“@020DJXXXXXXXXXXXX”+CR Direct Jump XXXXXXXXXXXX=ttthhhmmssff ttt is Track Number“@0PMSS”+CRPlay Mode - Single Stop“@0PMSN”+CRPlay Mode - Single Next“@0PMSR”+CRPlay Mode - Single Recue“@0FMCT”+CRPlay Mode - Continuous“@0PMRD”+CRPlay Mode - Random“@0POPL”+CRPower On - Play“@0POST”+CRPower On - Stop“@0SAPL”+CRStart Mode Play“@0SACU”+CRStart Mode Cue“@0SAST”+CRStart Mode Stop“@0CURC”+CRCue Mode Recue“@0CUNT”+CRCue Mode Next“@0AC00”+CRAuto Cue - OFF“@0AC48”+CRAuto Cue - – 48dB“@0AC42”+CRAuto Cue - – 42dB“@0AC36”+CRAuto Cue - – 36dB“@0FIXXX”+CRFade In - 000:OFF, 005:0.5sec, 010:1.0sec, ··· 100:10.0sec“@0FOXXX”+CRFade Out - 000:OFF, 005:0.5sec, 010:1.0sec, ··· 100:10.0sec“@0SBXXX”+CRSkipBack - 010:1.0sec, 015:1.5sec, ··· 300:30.0sec“@0EMXX”+CREnd Mon - 05:5sec, 10:10sec, 15:15sec, ··· 35:35sec34
Code Command Comment4. CONTROL FEATURESENGLISH“@0EDXX”+CR“@0NRXX”+CR“@0FDPL”+CR“@0FDPU”+CR“@0ITI2”+CR“@0ITI3”+CR“@0MOXX”+CR“@0ASXXXX”+CR“@0ELXX”+CR“@0DEFL”+CREOM - OF:OFF, 05:5sec, 10:10sec, 15:15sec, 20:20sec,30:30sec, 60:60secNext Reserve - 00:ON, 01:OFFFader Start -PlayFader Start -PlayPauseIndex Tally Index2Index Tally Index3Mono - 00:ON, 01:OFFSleep-0000:OFF,0030:0.5min,1000:10min, 2000:20min,3000:30minEject Lock - 00:ON, 01:OFFGeneral Preset Default35
ENGLISH4. CONTROL FEATURES(5) Table of Status Request and Status information codesWhen a Status Request Command from the host is received by the <strong>DN</strong>-<strong>C620</strong>, the <strong>DN</strong>-<strong>C620</strong> sends the Status Information to the host. When the <strong>DN</strong>-<strong>C620</strong> changes status, the <strong>DN</strong>-<strong>C620</strong> automaticallysends Status Information to the host.Mode Request Code StatusPower Mode “@0?PW”+CR On “@0PW00”+CRStandby“@0PW01”+CROff –Disc “@0?<strong>CD</strong>”+CR No Disc “@0<strong>CD</strong>NC”+CRLoading“@0<strong>CD</strong>RE”+CRDisc In“@0<strong>CD</strong>CI”+CRExecuting“@0<strong>CD</strong>EX”+CRDiscError(Unformat)“@0<strong>CD</strong>CE”+CRStatus “@0?ST”+CR Stop Stop “@0STST”+CRCue“@0STCU”+CRSleep“@0STSL”+CRPlay Playback “@0STPL”+CRPlayback Pause“@0STPP”+CRFF“@0STFF”+CRRWD“@0STRW”+CREND MON“@0STEM”+CROther Ulitity / Preset “@0STED”+CROperation Error“@0STER”+CRTime Mode “@0?TM”+CR Time Mode TotalDiscTime “@0TMTD”+CRTrack Elapse Time“@0TMTT”+CRTrack Remain Time“@0TMTR”+CRFile Name“@0TMFN”+CRFile Information“@0TMFI”+CRRecorded Date“@0TMRD”+CRRecorded Time“@0TMRT”+CRRecorded Channel“@0TMCH”+CRTrack Number “@0?TR”+CR Track Number “@0TRXXX”+CR36
Mode Request Code Status4. CONTROL FEATURESENGLISHDisplay Time “@0?TI”+CR Time “@0TIhhhmmssff”+CRVolume “@0?VM”+CR Volume “@0VMXXX”+CRPitch “@0?PT”+CR Pitch “@0PTXXXX”+CRText Title “@0?T1”+CR Text Title “@0T1XXX...”+CR ✽1Text Artist “@0?T2”+CR Text Artist “@0T2XXX...”+CR ✽1Text Album “@0?T3”+CR Text Album “@0T3XXX...”+CR ✽1POS Code “@0?C1”+CR POS Code “@C1XXXXXXXXXXXXX”+CRISRC Code “@0?C1”+CR ISRC Code “@C2XXXXXXXXXXXX”+CRPlay Mode “@0?PM”+CR Single Stop “@0PMSS”+CRSingle Next“@0PMSN”+CRSingle Recue“@0PMSR”+CRContinuous“@0FMCT”+CRRandom“@PMRD”+CRPower On “@0?PO”+CR Play “@0POPL”+CRStop“@0POST”+CRStart Mode “@0?SA”+CR Play “@0SAPL”+CRCue“@0SACU”+CRStop“@0SAST”+CRCue Mode “@0?CU”+CR Recue “@0CURC”+CRNext“@0CUNT”+CRAuto Cue “@0?AC”+CR Off “@0AC00”+CR–48dB“@0AC48”+CR–42dB“@0AC42”+CR–36dB“@0AC36”+CRFade In “@0?FI”+CR Time “@0FIXXX”+CRFade Out “@0?FO”+CR Time “@0FOXXX”+CRSkip Back “@0?SB”+CR Time “@0SBXXX”+CREnd Mon “@0?EM”+CR Time “@0EMXX”+CREnd Of Message “@0?ED”+CR Time “@0EDXX”+CR✽1: 0 to 255 digits37
ENGLISH4. CONTROL FEATURESMode Request Code StatusNext Tr Reserve “@0?NR”+CR On “@0NR00”+CROff“@0NR01”+CRFader Start “@0?FD”+CR Play “@0FDPL”+CRPlayPause“@0FDPU”+CRIndex Tally “@0?IT”+CR Index2 “@0ITI2”+CRIndex3“@0ITI3”+CRMono “@0?MO”+CR On “@0MO00”+CROff“@0MO01”+CRSleep “@0?AS”+CR Time “@0ASXXXX”+CREject Lock “@0?EL”+CR On “@0EL00”+CROff“@0EL01”+CRDigital FS “@0?DF”+CR Fs “@0DFXX”+CR38
GPIO (Parallel) CONTROLUse this to control the <strong>DN</strong>-<strong>C620</strong> with dry contact circuit connections.(2) Remote control circuit• Remote control connections4. CONTROL FEATURESENGLISH(1) Interface Condition• Applicable connector: 25-pin D-sub (male)• Connecting signal layoutTRACK (–) TRACK (+) FADER SWITCH2362352391234567891011Pin No. Signal Name I/O1 FG –14 PLAY tally O2 PLAY command I15 PAUSE tally O3 PAUSE command I16 CUE tally O4 CUE command I17 INDEX2/INDEX3 O5 TRACK (+) command I18 Reserved –6 TRACK (–) command I19 Reserved –7 SEARCH (Fwd) command I20 Reserved –8 SEARCH(Rev) command I21 Reserved –9 FADER START command I22 Tally power supply –10 Command common –23 Command common –11 SKIPBACK command I24 EOM tally O12 Reserved –25 Reserved –13 Reserved –231 SEARCH ¡823722232241624141516222317318CUE PAUSE PLAYEOM152223222223214INDEX2/INDEX31724SKIP BACKNOTE:• The rating of REMOTE connector pin 22 (TALLY POWER SUPPLY) is +5 VDC, 100 mAmaximum.Avoid currents in excess of the rating, or it may cause a malfunction or a risk of fire.2311NOTE:• The tally output pin has open collector IC specifications (Imax. 48mA, Vmax. 5.5V).• The tally input pin has LVTTL IC specifications (Vcc 3.3V).• Maximum current for Tally power supply (Pin 22) is 100mA.39
ENGLISH4. CONTROL FEATURESRC In Control IR FLASHJackThis is a stereo mini jack for wired remote control.(1) Circuit DiagramFirst UnitL-CHR-CHGNDφ3.5 STEREOMINI PLUGR00120Ω/ohmsR00235Ω/ohmsSW101 PLAYSW102Second and Subsequent UnitsR00331Ω/ohmsR00441Ω/ohmsR00556Ω/ohmsL-CH : Vcc (3.3 VOLT)R-CH : SIGNALSW001~009 : Momentary ContactSW101, 102 : Toggle SwitchR00681Ω/ohmsR007 R008 R009127Ω/ohms 227Ω/ohms 530Ω/ohmsSW001 SW002 SW003 SW004 SW005 SW006 SW007 SW008 SW009PAUSE CUE SKIP RWD FF TRKJUMP–TRKJUMP+STOP• Do not connect the left channel of the plug (Vcc) with R001 (20ohms) in the second andsubsequent units.• Use resistors having a tolerance of with ±5%.Use of resistors having a poorer tolerance will cause incorrect operation.• Never short circuit the left-channel line (Vcc). Doing so will damage the main unit.GND(3) Cable LengthThe longer the length of the cable, the more susceptible the system will be to the effects ofexternal noise.Keep cable lengths to 2 m or less.Do not locate equipment that produces electrical noise in the vicinity of the cable.Doing so might lead to incorrect operation due to the noise.• Do not disconnect or connect the remote control plug during operation of the unit.The pins of the plug might cause a short circuit of the pins inside the jack which can stopthe operation.• Pressing more than one button of the wired remote control box at the same time (forcombined operations) is not possible.• Pressing a button of the wired remote control box and a button of the main unit, <strong>DN</strong>-<strong>C620</strong>, (for combined operations) is not possible.Note on Connecting the Remote Control Box• When multiple sets are connected to a single remote control box, the other sets mayoperate erroneously when this set's power is turned on or off or when the cord isconnected or disconnected from the remote control jack.• Turn off the remote control box's toggle switched (SW101, 102, ...) when turning thisset's power on or off or when connecting or disconnecting the cord from the remotecontrol jack while other sets are connected to the remote control box.(2) Operation with Parallel ConnectionsA number of <strong>DN</strong>-<strong>C620</strong> units can be simultaneously operated in parallel with one button.Operation with parallel connections can be used with a maximum of 5 units.Connection of 6 or more units will lead to indicator operation.40
5. TROUBLESHOOTINGMake sure of the followings before you consider as any malfunctions :1. Are all the connections correct?2. Are all system components being operated correctly in accordance with the operating instructions?3. Are the speakers and amplifier/receiver functioning correctly?If the Unit still does not function properly, check the symptom against the list below. If the symptom does not correspond to the check list, please contact your dealer.ENGLISH<strong>Pro</strong>blem Cause RemedyDisc is not ejected. • Power operation switch is not turned on. • Turn the power operation switch on.When a disc is loaded, “TOC Error” or "No Disc" is displayed. • Disc is not properly loaded. • Reload the disc.When a disc is loaded, “Disc Error” is displayed. • The disc is not properly recorded. • Turn the power off and on again to eject the disc.When the PLAY button is pressed, playback does not start. • Disc is dirty or scratched. • Clean the disc.There is no sound, or it is distorted.• Output cord is not properly connected.• Amplifier adjustment is inappropriate.• Connect the output cord properly.• Readjust the amplifier.A specific section of the disc will not play. • Disc is dirty or scratched. • Clean the disc.<strong>Pro</strong>gram play does not work. • <strong>Pro</strong>gram play operation has been performed improperly. • Restart <strong>Pro</strong>gram play.Remote control is not working. • No batteries or flat batteries. • Ensure that batteries are correctly inserted.• Replace the batteries with a flesh set.File does not play. • Decoding Error. • Check that the file you are trying to play has a supported fileextension and is a format that the <strong>DN</strong>-<strong>C620</strong> supports.41
POWER ON/OFF0 10LEVELPHONES<strong>CD</strong> <strong>PLAYER</strong>EJECTSHIFTMENU/STOREDISPLAYLOCKPITCHCANCELA-BREPEATSKIP BACKPLAYMODETEXTCUE- INDEX/DIR +END MONPITCHPUSHENTERENGLISH6. SPECIFICATIONS■ GENERALDisc type :■ AUDIO SECTIONAudio channel :Frequency response :Dynamic range :Signal-to-noise Ratio :Channel separation :Total Harmonic Distortion :Analog output :Unbalanced output (RCA) :Variable range(VARIABLE) :Balanced output (XLR) :Variable range :Digital output :Unbalanced output (RCA) :Balanced output (XLR) :Signal Format :Headphone Output :Variable Pitch Control :Frame Search Accuracy :■ SIGNAL SYSTEMSampling Frequency:Quantization :Standard compact discs (12 cm and 8 cm)<strong>CD</strong>-R, <strong>CD</strong>-RW2 channel stereo10 to 20,000Hz ± 1.0 dB98 dB100 dB (1kHz, 0 dB playback, A filter)96 dB (1kHz, 0 dB playback, A filter)0.004 % (1kHz, 0 dB playback, A filter)2.0 Vrms at 0 dB disc, 10 kohms4.0 Vrms at 0dB disc, volume max.+18 dBu at 0 dB disc, 600 ohms+24 dBu to +0 dBu at 0 dB disc0.5 Vp-p, 75 ohms3.5 Vp-p, 110 ohmsSPDIF or IEC-958 Type II20 mW, 33 ohms±12 % max.1/75 second44.1 kHz at Normal Pitch16-bit Linear■ CABINET, etc.Installation :Maximum Dimensions :Weight :■ ENVIRONMENTAL CONDITIONSOperating temperature :Operating humidity :Storage temperature :Storage humidity :■ DIMENSIONS434mm (17.1”)19-inch 1U rack space482.6 (W) × 44 (H) × 325 (D)mm19” (W) × 1.7” (H) × 12.8” (D)4.3 kg, 9.5 lbs+5°C to +35°C25% to 85%, non condensing–20°C to +60°C25% to 85%, non condensing324.9mm (000”)332.9mm (000”)■ REMOTE CONTROLSerial remote :Parallel remote :IR control input :IR FLASH :RS232C, D-Sub 9-pinD-Sub 25-pinIR sensorRC In Control Jack (1/8”stereo mini Jack)■ POWER SUPPLYU.S.A. & Canada models :120 V AC ±10 %, 60 HzEuropean, U.K. and Asia/Pacific models : 230 V AC ±10 %, 50 HzPower Consumption :14 W (U.S.A. & Canada models)14 W (European, U.K. and Asia/Pacific models)<strong>DN</strong>-<strong>C620</strong>482.6mm (19.0”)44mm(1.7”)✽ For improvement purposes, specifications and design are subject to change without notice.42
D&M Holdings Inc.<strong>PROFESSIONAL</strong> BUSINESS COMPANYPrinted in Japan08/2008 541110137003P ecmf-g