Administrator's Guide - Kerio Software Archive
Administrator's Guide - Kerio Software Archive Administrator's Guide - Kerio Software Archive
Chapter 10 Server’s CertificatesFigure 10.5Alert on an untrustworthy certificateFigure 10.6Certificate Details4. Use the mouse pointer to move the certificate’s icon to the desktop, as shown at figure10.7.Now, all depends on Mac OS version. For Mac OS X 10.3 Panther and Mac OS X 10.4 Tiger,follow these instructions:1. On the desktop, click on the certificate. In the Add Certificates dialog box (see figure 10.8),select the X509Anchors store type in the Keychain menu. The X509Anchors store includessaved certificates which can sign and thus make trustworthy other certificates. It alsostores all trustworthy certificates. 22 Certificates work only if they are in the X509 format, encoded by Base64. If a certificate does not meet theseconditions, it is possible to convert it by a special application, Microsoft Cert Manager. This application can befound under Applications → Microsoft Office → Office → Microsoft Cert Manager. However, in this case usage of theapplication would be irrelevant. Kerio MailServer creates certificates in the X509 format, encoded by Base64.90
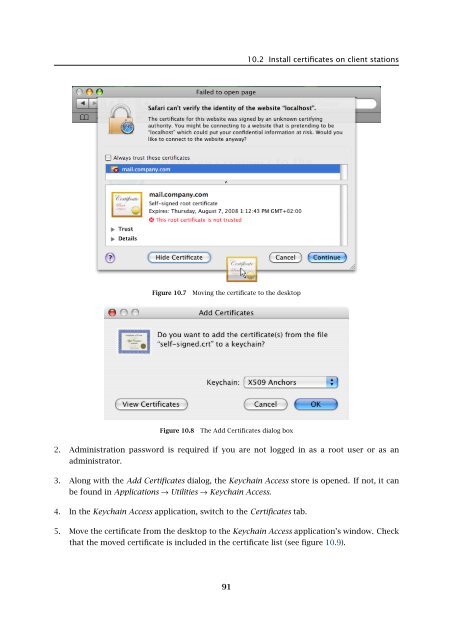
10.2 Install certificates on client stationsFigure 10.7Moving the certificate to the desktopFigure 10.8The Add Certificates dialog box2. Administration password is required if you are not logged in as a root user or as anadministrator.3. Along with the Add Certificates dialog, the Keychain Access store is opened. If not, it canbe found in Applications → Utilities → Keychain Access.4. In the Keychain Access application, switch to the Certificates tab.5. Move the certificate from the desktop to the Keychain Access application’s window. Checkthat the moved certificate is included in the certificate list (see figure 10.9).91
- Page 39 and 40: 3.2 Registration with the administr
- Page 41 and 42: 3.2 Registration with the administr
- Page 43 and 44: 3.3 License information and import
- Page 45 and 46: 3.4 Licensing policyOnce number of
- Page 47 and 48: 4.1 Kerio MailServer MonitorFigure
- Page 49 and 50: 4.2 Standalone processes of the ser
- Page 51 and 52: 5.2 Administration WindowThe same d
- Page 53 and 54: 5.2 Administration WindowStatus bar
- Page 55 and 56: Chapter 6ServicesIn Configuration
- Page 57 and 58: 6.1 Service Parameter Settings• a
- Page 59 and 60: 6.1 Service Parameter SettingsFigur
- Page 61 and 62: 6.3 TroubleshootingFigure 6.5The De
- Page 63 and 64: Chapter 7DomainsKerio MailServer ca
- Page 65 and 66: 7.2 GeneralFigure 7.2Domain setting
- Page 67 and 68: 7.4 FootersFigure 7.3Domain setting
- Page 69 and 70: 7.5 ForwardingFigure 7.5Domain sett
- Page 71 and 72: 7.6 Setting of Directory ServicesFi
- Page 73 and 74: 7.6 Setting of Directory ServicesFi
- Page 75 and 76: 7.7 Advanced7.7 AdvancedIn the Adva
- Page 77 and 78: 7.8 WebMail Logo3. In the Logging m
- Page 79 and 80: 8.2 Sending High Priority MessagesW
- Page 81 and 82: Chapter 9SchedulingKerio MailServer
- Page 83 and 84: 9.2 Optimal Scheduling9.2 Optimal S
- Page 85 and 86: 10.1 Kerio MailServer CertificateFi
- Page 87 and 88: 10.1 Kerio MailServer Certificate
- Page 89: 10.2 Install certificates on client
- Page 93 and 94: 10.2 Install certificates on client
- Page 95 and 96: 11.3 LanguageIf there is one of the
- Page 97 and 98: 11.3 LanguageFigure 11.1Dictionary
- Page 99 and 100: 12.2 Time IntervalsClick on Add to
- Page 101 and 102: 12.3 Setting Remote AdministrationF
- Page 103 and 104: 10312.3 Setting Remote Administrati
- Page 105 and 106: 13.2 Creating a user accountWarning
- Page 107 and 108: 13.2 Creating a user accountFigure
- Page 109 and 110: 13.2 Creating a user accountStore p
- Page 111 and 112: 13.2 Creating a user accountNote: T
- Page 113 and 114: 13.2 Creating a user accountFigure
- Page 115 and 116: 13.3 Editing User AccountNote: When
- Page 117 and 118: 13.5 Removing user accountsKerio Ma
- Page 119 and 120: 13.9 Administration of mobile devic
- Page 121 and 122: 13.9 Administration of mobile devic
- Page 123 and 124: 13.10 Import Users• MailAddress
- Page 125 and 126: 13.10 Import UsersFor detailed info
- Page 127 and 128: 13.10 Import UsersFigure 13.24Impor
- Page 129 and 130: 13.12 User Account TemplatesNote: C
- Page 131 and 132: Chapter 14User groupsUser accounts
- Page 133 and 134: 14.1 Creating a User GroupGroup add
- Page 135 and 136: 14.1 Creating a User GroupPublish t
- Page 137 and 138: 15.1 Mail Delivery over the Interne
- Page 139 and 140: 15.1 Mail Delivery over the Interne
10.2 Install certificates on client stationsFigure 10.7Moving the certificate to the desktopFigure 10.8The Add Certificates dialog box2. Administration password is required if you are not logged in as a root user or as anadministrator.3. Along with the Add Certificates dialog, the Keychain Access store is opened. If not, it canbe found in Applications → Utilities → Keychain Access.4. In the Keychain Access application, switch to the Certificates tab.5. Move the certificate from the desktop to the Keychain Access application’s window. Checkthat the moved certificate is included in the certificate list (see figure 10.9).91


