Administrator's Guide - Kerio Software Archive
Administrator's Guide - Kerio Software Archive Administrator's Guide - Kerio Software Archive
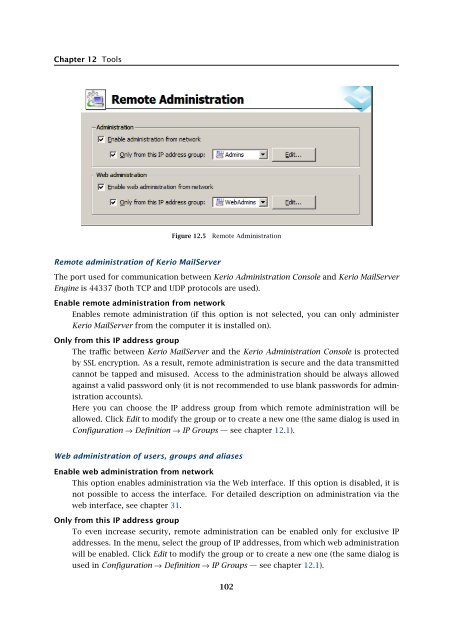
Chapter 12 ToolsFigure 12.5Remote AdministrationRemote administration of Kerio MailServerThe port used for communication between Kerio Administration Console and Kerio MailServerEngine is 44337 (both TCP and UDP protocols are used).Enable remote administration from networkEnables remote administration (if this option is not selected, you can only administerKerio MailServer from the computer it is installed on).Only from this IP address groupThe traffic between Kerio MailServer and the Kerio Administration Console is protectedby SSL encryption. As a result, remote administration is secure and the data transmittedcannot be tapped and misused. Access to the administration should be always allowedagainst a valid password only (it is not recommended to use blank passwords for administrationaccounts).Here you can choose the IP address group from which remote administration will beallowed. Click Edit to modify the group or to create a new one (the same dialog is used inConfiguration → Definition → IP Groups — see chapter 12.1).Web administration of users, groups and aliasesEnable web administration from networkThis option enables administration via the Web interface. If this option is disabled, it isnot possible to access the interface. For detailed description on administration via theweb interface, see chapter 31.Only from this IP address groupTo even increase security, remote administration can be enabled only for exclusive IPaddresses. In the menu, select the group of IP addresses, from which web administrationwill be enabled. Click Edit to modify the group or to create a new one (the same dialog isused in Configuration → Definition → IP Groups — see chapter 12.1).102
10312.3 Setting Remote Administration
- Page 51 and 52: 5.2 Administration WindowThe same d
- Page 53 and 54: 5.2 Administration WindowStatus bar
- Page 55 and 56: Chapter 6ServicesIn Configuration
- Page 57 and 58: 6.1 Service Parameter Settings• a
- Page 59 and 60: 6.1 Service Parameter SettingsFigur
- Page 61 and 62: 6.3 TroubleshootingFigure 6.5The De
- Page 63 and 64: Chapter 7DomainsKerio MailServer ca
- Page 65 and 66: 7.2 GeneralFigure 7.2Domain setting
- Page 67 and 68: 7.4 FootersFigure 7.3Domain setting
- Page 69 and 70: 7.5 ForwardingFigure 7.5Domain sett
- Page 71 and 72: 7.6 Setting of Directory ServicesFi
- Page 73 and 74: 7.6 Setting of Directory ServicesFi
- Page 75 and 76: 7.7 Advanced7.7 AdvancedIn the Adva
- Page 77 and 78: 7.8 WebMail Logo3. In the Logging m
- Page 79 and 80: 8.2 Sending High Priority MessagesW
- Page 81 and 82: Chapter 9SchedulingKerio MailServer
- Page 83 and 84: 9.2 Optimal Scheduling9.2 Optimal S
- Page 85 and 86: 10.1 Kerio MailServer CertificateFi
- Page 87 and 88: 10.1 Kerio MailServer Certificate
- Page 89 and 90: 10.2 Install certificates on client
- Page 91 and 92: 10.2 Install certificates on client
- Page 93 and 94: 10.2 Install certificates on client
- Page 95 and 96: 11.3 LanguageIf there is one of the
- Page 97 and 98: 11.3 LanguageFigure 11.1Dictionary
- Page 99 and 100: 12.2 Time IntervalsClick on Add to
- Page 101: 12.3 Setting Remote AdministrationF
- Page 105 and 106: 13.2 Creating a user accountWarning
- Page 107 and 108: 13.2 Creating a user accountFigure
- Page 109 and 110: 13.2 Creating a user accountStore p
- Page 111 and 112: 13.2 Creating a user accountNote: T
- Page 113 and 114: 13.2 Creating a user accountFigure
- Page 115 and 116: 13.3 Editing User AccountNote: When
- Page 117 and 118: 13.5 Removing user accountsKerio Ma
- Page 119 and 120: 13.9 Administration of mobile devic
- Page 121 and 122: 13.9 Administration of mobile devic
- Page 123 and 124: 13.10 Import Users• MailAddress
- Page 125 and 126: 13.10 Import UsersFor detailed info
- Page 127 and 128: 13.10 Import UsersFigure 13.24Impor
- Page 129 and 130: 13.12 User Account TemplatesNote: C
- Page 131 and 132: Chapter 14User groupsUser accounts
- Page 133 and 134: 14.1 Creating a User GroupGroup add
- Page 135 and 136: 14.1 Creating a User GroupPublish t
- Page 137 and 138: 15.1 Mail Delivery over the Interne
- Page 139 and 140: 15.1 Mail Delivery over the Interne
- Page 141 and 142: 15.2 SMTP serverinterface originall
- Page 143 and 144: 15.2 SMTP serverAuthentication by I
- Page 145 and 146: 15.2 SMTP serverLimit maximum incom
- Page 147 and 148: 15.3 AliasesMaximum number of deliv
- Page 149 and 150: 15.3 AliasesCharacter typea-zA-ZDes
- Page 151 and 152: 15.4 remote POP3 mailboxesFigure 15
Chapter 12 ToolsFigure 12.5Remote AdministrationRemote administration of <strong>Kerio</strong> MailServerThe port used for communication between <strong>Kerio</strong> Administration Console and <strong>Kerio</strong> MailServerEngine is 44337 (both TCP and UDP protocols are used).Enable remote administration from networkEnables remote administration (if this option is not selected, you can only administer<strong>Kerio</strong> MailServer from the computer it is installed on).Only from this IP address groupThe traffic between <strong>Kerio</strong> MailServer and the <strong>Kerio</strong> Administration Console is protectedby SSL encryption. As a result, remote administration is secure and the data transmittedcannot be tapped and misused. Access to the administration should be always allowedagainst a valid password only (it is not recommended to use blank passwords for administrationaccounts).Here you can choose the IP address group from which remote administration will beallowed. Click Edit to modify the group or to create a new one (the same dialog is used inConfiguration → Definition → IP Groups — see chapter 12.1).Web administration of users, groups and aliasesEnable web administration from networkThis option enables administration via the Web interface. If this option is disabled, it isnot possible to access the interface. For detailed description on administration via theweb interface, see chapter 31.Only from this IP address groupTo even increase security, remote administration can be enabled only for exclusive IPaddresses. In the menu, select the group of IP addresses, from which web administrationwill be enabled. Click Edit to modify the group or to create a new one (the same dialog isused in Configuration → Definition → IP Groups — see chapter 12.1).102


