

how to update the firmware for dvr systems - Support Home Page
how to update the firmware for dvr systems - Support Home Page
how to update the firmware for dvr systems - Support Home Page

You also want an ePaper? Increase the reach of your titles
YUMPU automatically turns print PDFs into web optimized ePapers that Google loves.
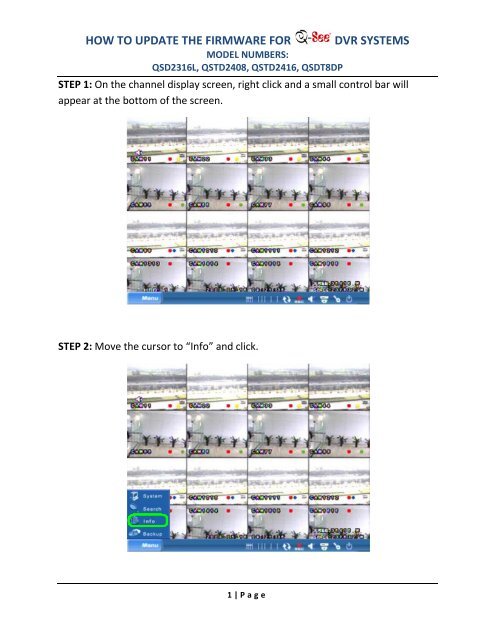
HOW TO UPDATE THE FIRMWARE FORMODEL NUMBERS:QSD2316L, QSTD2408, QSTD2416, QSDT8DPDVR SYSTEMSSTEP 1: On <strong>the</strong> channel display screen, right click and a small control bar willappear at <strong>the</strong> bot<strong>to</strong>m of <strong>the</strong> screen.STEP 2: Move <strong>the</strong> cursor <strong>to</strong> “Info” and click.1 | P a g e
HOW TO UPDATE THE FIRMWARE FORMODEL NUMBERS:QSD2316L, QSTD2408, QSTD2416, QSDT8DPSTEP 3: Move <strong>the</strong> cursor <strong>to</strong> “System” and click.DVR SYSTEMSSTEP 4: Write down <strong>the</strong> Firmware version and Launch date on a piece of paper.2 | P a g e
HOW TO UPDATE THE FIRMWARE FORMODEL NUMBERS:QSD2316L, QSTD2408, QSTD2416, QSDT8DPSTEP 5: Go <strong>to</strong> your desk<strong>to</strong>p computer and go <strong>to</strong> Internet Explorer.DVR SYSTEMS3 | P a g e
HOW TO UPDATE THE FIRMWARE FORSTEP 6: Go <strong>to</strong> http://www.q-see.com.MODEL NUMBERS:QSD2316L, QSTD2408, QSTD2416, QSDT8DPDVR SYSTEMSSTEP 7: Hover your cursor over <strong>the</strong> <strong>Support</strong> link and a drop down menu willappear. Click on “Q-See Product Download Center”.4 | P a g e
HOW TO UPDATE THE FIRMWARE FORMODEL NUMBERS:QSD2316L, QSTD2408, QSTD2416, QSDT8DPDVR SYSTEMSSTEP 10: Compare <strong>the</strong> Launch date with <strong>the</strong> one you wrote down earlier; if <strong>the</strong><strong>firmware</strong> on this page is newer, click on <strong>the</strong> link <strong>to</strong> download <strong>the</strong> newest<strong>firmware</strong>.STEP 11: Click “Save”.6 | P a g e
HOW TO UPDATE THE FIRMWARE FORMODEL NUMBERS:QSD2316L, QSTD2408, QSTD2416, QSDT8DPSTEP 12: Choose <strong>the</strong> save destination and click “Save”.DVR SYSTEMSSTEP 13: Connect a USB flashdrive in<strong>to</strong> your desk<strong>to</strong>p. Right click <strong>the</strong> folder/drivethat it is associated with <strong>the</strong> flashdrive, and click “Format”.7 | P a g e
HOW TO UPDATE THE FIRMWARE FORMODEL NUMBERS:QSD2316L, QSTD2408, QSTD2416, QSDT8DPSTEP 14: Set <strong>the</strong> file system <strong>to</strong> “FAT” and click “Start”.DVR SYSTEMSSTEP 15: Click “OK”.STEP 16: Click “OK”.8 | P a g e
HOW TO UPDATE THE FIRMWARE FORMODEL NUMBERS:QSD2316L, QSTD2408, QSTD2416, QSDT8DPDVR SYSTEMSSTEP 17: Send <strong>the</strong> archived <strong>firmware</strong> that you downloaded <strong>to</strong> <strong>the</strong> USB drive.STEP 18: Open <strong>the</strong> folder/drive associated with your flashdrive.9 | P a g e
HOW TO UPDATE THE FIRMWARE FORMODEL NUMBERS:QSD2316L, QSTD2408, QSTD2416, QSDT8DPDVR SYSTEMSSTEP 19: Right click <strong>the</strong> archived <strong>firmware</strong> and click “Extract Here”. Remove <strong>the</strong>flashdrive from your computer. (NOTE: You may need <strong>to</strong> install WinRAR be<strong>for</strong>eextracting <strong>the</strong> archive; see <strong>the</strong> “Installing WinRAR” guide if you do not have itinstalled on your computer)STEP 20: Input <strong>the</strong> flashdrive in<strong>to</strong> your DVR. On <strong>the</strong> channel display screen, rightclick <strong>for</strong> <strong>the</strong> control bar <strong>to</strong> appear; click on <strong>the</strong> “Menu” but<strong>to</strong>n and click on“System”.10 | P a g e
HOW TO UPDATE THE FIRMWARE FORMODEL NUMBERS:QSD2316L, QSTD2408, QSTD2416, QSDT8DPSTEP 23: Move <strong>the</strong> cursor <strong>to</strong> “OK” and click.DVR SYSTEMSSTEP 24: A progress bar will appear s<strong>how</strong>ing <strong>how</strong> much progress has been made.12 | P a g e
HOW TO UPDATE THE FIRMWARE FORMODEL NUMBERS:QSD2316L, QSTD2408, QSTD2416, QSDT8DPDVR SYSTEMSSTEP 25: Once <strong>the</strong> <strong>update</strong> has been made, <strong>the</strong> screen will display “UpdateSuccess!”.STEP 26: The DVR will reboot au<strong>to</strong>matically.13 | P a g e


