
You also want an ePaper? Increase the reach of your titles
YUMPU automatically turns print PDFs into web optimized ePapers that Google loves.
Woven Wood <strong>Shade</strong>sInstallation InstructionsTC02-04.2009
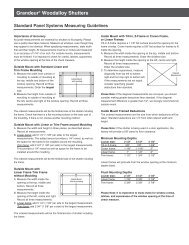
Your quality Woven Wood <strong>Shade</strong> has been custom craftedto your ordered measurements and comes withthe necessary installation hardwarefor mounting the shade inside or outside the window frame.How to Install Your Woven Wood <strong>Shade</strong>Please take a few minutes to read these instructions.When properly installed, your shade will providemany years of beauty and dependable service. Installation Brackets Mounting Screws Additional Mounting Brackets(If required for extra support)2Hardware IncludedOne of the following bracket sets is requireddepending on shade options ordered. The numberof brackets required, varies with shade width,as shown in the table. Installation brackets andmounting screws are provided. PencilTools Needed Drill Screw Driver #6 Robertson Drill Bits (7/64” & 1/16”) Level ScissorsFasteners for Other Surfaces The screws provided are for mounting the shade to a wood surface only. For othersurfaces, use the following: Wallboard or plastic - pre-drill holes for suitable hollow wall anchors or toggle bolts. Metal surfaces - pre-drill holes and use short metal screws.Width BracketsRequired18” - 36” 236 1/8” - 72” 372 1/8” - 96” 52-on-15Headrail For concrete, stone, brick or tile - use a carbide drill and appropriate plugs, or anchorwith screws.
Before Mounting The <strong>Shade</strong> Hold the shade against the window opening to determine if shade is made for insideor outside installation. (See Figs. 1 and 2.)Inside MountOutside MountFig. 1 Fig. 2 If shade is for inside window installation, and if the window frame is not even or level(Fig. 3), use shims to make sure that the headrail will be level when installed. (See Fig. 4)Uneven FrameShim as NecessaryFig. 3 Fig. 4 Even if the headrail is mounted on the frame, wall or ceiling, it must be level, so theshade will operate properly. Also make sure that shade is the proper length and that itwill clear any obstructions.(Spacers or extension brackets may be required for shade to clear any obstructions.)3
Mounting the <strong>Shade</strong>Mounting withbracketsMounting withScrews onlyWindow CasementHeadrailBracketPost withWingnut2-inchWoodScrewInside Window InstallationTwo mounting OptionsNote: If installation brackets (included) are used for inside mount, refer to “CeilingInstallation”.Otherwise, see below for mounting instructions. <strong>Shade</strong> is fabricated to fit inside the window casement. While holding the headrail firmly against the casement, drill 1/16” pilot holes intothe casement through the small round holes in the headrail. (Do not drill pilot holesthrough the slots in the headrail.) Use the 2-inch wood screws to attach the shade to the window casement. If shim isused to level headrail, make sure that it is in place before tightening screws.Window Frameor WallInstallationBracketInstallationBracketHeadrailWingnut Fig. 5InstallationBracketFig. 6Frame Or Wall Installation <strong>Shade</strong> is fabricated to overlap the window opening. The installation brackets aremounted to window frame or wall. While holding the headrail level against the window frame or wall, lightly mark on themounting surface the positions of the headrail slots. Hold each installation bracket against the mounting surface and mark for two diagonalscrew holes. (Fig. 5) Position brackets to line up with centers of slots in headrail. Drillpilot holes and use appropriate fastener screws, wall anchors or toggle bolts to mountbrackets.4
Push the headrail up onto the brackets so that the threaded posts on the brackets fitthrough the slots in the headrail. (See Fig. 6) Secure the headrail to installation brackets by tightening wing nuts.CeilingHeadrailWingnutInstallationBracketFig. 7Ceiling Installation <strong>Shade</strong> is fabricated to overlap the window opening. The installation brackets aremounted to the ceiling. While holding the headrail level against the ceiling, lightly mark on the ceiling surfacethe positions of the headrail slots. Hold each installation bracket against the ceiling and mark for two diagonal screwholes. (Fig. 7) Position brackets to line up with centers of slots in headrail. Drill pilotholes and use appropriate fastener screws, wall anchors or toggle bolts to mountbrackets. Brackets must be aligned from front to back. Each bracket must be equal distancefrom the glass. Push the headrail up onto the brackets so that the threaded posts on the brackets fitthrough the slots in the headrail. (See Fig. 6) Secure the headrail to installation brackets by tightening wing nuts.<strong>Shade</strong> AdjustmentYour shade has been carefully inspected and adjusted to operate properly. Once installedhowever, minor adjustments may be necessary. The yarn in your Woven Wood shade is flexible enoughto straighten to window opening by stretching the yarn.Pull down on the short side to eliminate unevennessand align the shade. If the shade is not flat when lowered, roll the shadetightly from the bottom and then twist the roll fromthe ends (one end clockwise and the other counterclockwise)to align yarn and slats. (Fig. 8)Fig. 85
Should a strand of yarn slip out from the edge of the woven wood fabric, it may beremoved with scissors (from top to bottom of shade) without affecting the strength ofthe shade.To Operate Your <strong>Shade</strong>Standard Cordlock Operated <strong>Shade</strong>sTo raise the shade: Hold the cord and pull until the shade is at thedesired height. Pull the cord towards the outside of the shade to lockinto position.To lower the shade: Pull the cord towards the inside of the shade tounlock. Holding the cord, let the shade lower to the desiredheight. Pull the cord towards the outside of the shade tolock.LockUnlockClutch Operated <strong>Shade</strong>s Pull one side of the cord loop to lower the shade. Pull the other side of the cord loop to raise theshade.If the cord tensioner moves up the cord, you havenot secured it to the wall or window frame. You mustdo so for the shade to operate properly. See theUniversal Cord Tensioner installation kit instructions.<strong>Shade</strong>s with Operable Liner OptionTo raise the liner: Hold the cord and pull until the liner is at the desired height. Pull the cord towards the outside of the liner to lock into position.To lower the liner: Pull the cord towards the inside of the liner to unlock. Holding the cord, let the liner lower to the desired height. Pull the cord towards the outside of the liner to lock.6
Child SafetyStandard <strong>Shade</strong>sYoung children can STRANGLE in cord loops above the cord stop. They can also wrap cordsaround their necks and STRANGLE. Always keep cords out of the reach of children. Move cribs, playpens and other furniture away from cords. Children can climb furnitureto get to cords. Do not tie cords together. Make sure cords do not twist together and create a loop.Cord cleats are provided with the shade and we recommend their use. Cord Cleats: Attach two cord cleats 6” to 12” apart at a height where they will beout of the reach of children. Take into account that a child may stand on furnitureattempting to reach the cords. Be sure the cleats are firmly secured. Once the cleats are attached, wrap excess cord around them after each use of the shade.Breakaway Cord StopTo further reduce the hazards of entanglementand strangulation, breakaway cord stops areprovided with all shades. They are designed tobreak apart when force is applied from the top.CAUTION: Should the Breakaway Cord Stopbreak apart, be sure to untangle the cords priorto reassembling.TwoCordsFourCordsClutch Operated <strong>Shade</strong>s Attach the cord tensioner on the cord loop to the wall or window casement. This canprevent children from pulling cord around their necks. A cord tensioner installation kit with instructions for attaching the cord tensioner isincluded. For the shade to operate properly, the cord tensioner must be correctlymounted and secured.! WARNINGFor more safety informationcall 1-866-662-0666Cleator go to www.healthcanada.ca/blindcords7
Trouble ShootingEach woven wood shade has a very unique style, composed of a variety of natural materialsoriginating from many points across the world: bamboo, reeds, jute, rattan, grasses, andwoods. Slight imperfections and variations in color are all part of the natural beauty of thistype of product and should not be considered flaws.Due to the woven construction of your shade, materials may have shifted slightly duringshipping. Use the guidelines below to realign your shade. If you have any questions, callyour dealer for advice.Problem:Cause:Repair:Problem:Cause:Repair:Problem:Cause:Repair:Only one side of the shade moves when pulling all draw cords.One of the draw cords may have come untied.Gently run the stray draw cord back through the shade’s pulley mechanismand through the rings on the back of the shade. Tie the draw cord to thebottom ring.<strong>Shade</strong> appears slightly shorter than ordered length.Some materials are woven very tightly, and have a tendency to “spring up”which decreases over time.If your shade is slightly shorter than ordered after you have completedinstallation, gently grasp the bottom of the shade and pull carefully to stretchthe shade back into shape.<strong>Shade</strong> appears to have uneven edges once hung.Woven materials may have shifted slightly during shipping.Lightly tap the edges of the shade with a flat tool (ruler, etc.) until even.Care and CleaningOccasional dusting or vacuuming with a brush attachment is all that is necessary to keepyour shade looking new.8550 Oakdale Road, Toronto, ON, Canada M3H 1W6Toll Free: 1-800-387-2879e-mail: support@shade-o-matic.on.cawww.shade-o-matic.com