DRIVE CHAINS - Tsubaki
DRIVE CHAINS - Tsubaki
DRIVE CHAINS - Tsubaki

You also want an ePaper? Increase the reach of your titles
YUMPU automatically turns print PDFs into web optimized ePapers that Google loves.
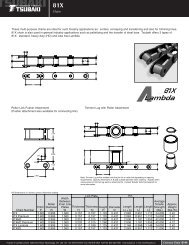
Before Use For Safe UseStandard Roller Chains Lube-Free Roller Chains Heavy Duty Roller Chains Corrosion Resistant Roller Chains Specialty Roller Chains Accessories Selection Handling3) Using a straightedge (or a scale), adjust the twosprockets so that they are parallel. Adjust to withinthe following values based on the distance betweenthe shafts.Up to 1 m 1 mmDistance between shafts(mm)1 m to 10m 10,00010m or more 10 mmCatenary sideStraightedgeFig. 17: Sprocket misalignmentCatenary sideGap4) Secure each sprocket to the shaft with a powerlock, lock sprocket, or key (if needed use a collar,set bolt, etc.).4.5 Layout ( indicates the driver side in the illustrations)1) General layoutIdeally the line connecting the sprocket centers in theroller chain transmission equipment should be closeto level. In a layout that is close to vertical, the rollerchain may stretch and fall off the sprocket. Thus, anidler or tensioner should be used. If possible keepthe angle of inclination within 60°.Fig. 18: General layoutFig. 19: Layout when the center-to-center distance is shortIntermediate idlerCatenary side2) Layouts requiring caution(1) When the slack is on the upper sideWhen the center-to-center distance between theshafts is short, move the shafts to adjust the distanceand slightly increase the tension.When the center-to-center distance is long, insertan intermediate idler under the slack part to supportthe roller chain.(2) When the chain speed is fast and the load variesRoller chain may vibrate if the natural vibration frequencyof the chain, shock frequency of the drivenmachine, or chordal action of the chain (verticalpulsation of the chain due to the polygoneffect) synchronize. In this event, use a guideshoe (made of NBR or ultra-high polymer polyethylene)or other device to stop the vibration.Fig. 21: Guide shoe to prevent vibration(3) When the centerline is verticalInstall a tensioner that can automatically eliminateexcess slack. This is particularly necessary whenthe drive shaft is on the bottom.TensionerGap of 2 to 4 mm betweenchain and contact surfaceFig. 22: Vertical transmission4.6 Lambda Curved Chain installation1) Installing the guideCompared to a standard chain, a Lambda CurvedChain has a larger gutter between the pins andbushes, providing a greater degree of freedom. Forthis type of chain, please install a guide on the chainso that it engages straight onto the sprocket.GuideGuideLambda Curved ChainSprocketGuide shoeTensioner2) Minimum lateral bending radius (r)Please manufacture the chain so that its minimumlateral bending radius is equal to or greater than thespecifications shown below.Minimum lateral bending radius (r)Fig. 20: Layout when the center-to-center distance is longRS40-LMC-CU-IRS50-LMC-CU-IRS60-LMC-CU-I400500600163