DRIVE CHAINS - Tsubaki
DRIVE CHAINS - Tsubaki
DRIVE CHAINS - Tsubaki

You also want an ePaper? Increase the reach of your titles
YUMPU automatically turns print PDFs into web optimized ePapers that Google loves.
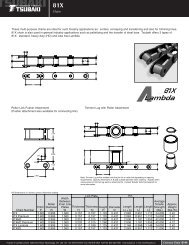
AccessoriesHandling PrecautionsWhen installing the tensioner on a base after attaching the idler sprocket to the tensioner, be sure to fasten the idler sprocket and thetensioner with a bolt. The following table indicates the tightening torque. Be sure to use bolts with a strength classification of 8.8 or more.When setting the tensioner, adjust with a shim so that the center of the idler sprocket and chain are aligned.If the idler sprocket is anchored in place, check whether or not the sprocket can turn smoothly. If it does not turn smoothly, the bolt maybe too tight. Loosen the bolt and then retighten properly. Unit: kNm{kfm}Lubricate the rod section regularly.Idler sprocket attachment bolt Tensioner attachment boltCT-TCS40,50 0.02{2.0} 0.04{4.0}RangeCT-TCS60,80 0.03{3.0} 0.05{5.0}TCS Type 10-100CT-ETS40,50 0.03{3.0} 0.03{3.0}InstallationETS TypeTA Type1) Attach the roller chain to the drive and driven sprockets.2) In order to attach the tensioner to the slack side of theroller chain as shown in Fig. 2, first push in on the rollerchain with the idler sprocket and determine theattachment position (bolt hole) for the tensioner.3) Then, within a range wherethe roller chain does notcontact the tensioner unit,ensure the force of the rollerchain moves as perpendicularas possible to the A-A line.(Tensioner is a swing typeunit.)4) Adjust with a shim, as shownin Fig. 3, so that the centerof the roller chain and idlersprocket are aligned.5) Open a hole in the basethat holds the tensioner. (Aslotted hole is convenient.)6) Push in on the chain with thetensioner and temporarilytighten the tensioner to thebase with a bolt. (Fig. 4)Then tighten the hexagonalscrew and anchor so that theswing angle is about 15.Fig. 2 Tensioner position (front)BaseShimRollerchainFig. 3 Tensioner position (side)BaseBolt10-10010-60ShimHexagonal screwFig. 4 Tightening the tensionerCT-ETS60,80 0.04{4.0} 0.04{4.0}CT-TA40 0.03{3.0}CT-TA50,60 0.04{4.0}CT-TA80 0.05{5.0}1) Push in on the roller chain with the tensioner’s idlersprocket (Fig. 5) and determine the position of the holeon the attachment base.2) Open a hole in the attachment base. In this case, two boltholes are required, but a hole that is as long as possible willmake positioning simpler, and the re-tensioning operationwill be easier when the chain elongates.3) Temporarily tighten thetensioner with two bolts. Atthis time, adjust with ashim, etc., so that thecenter of the idler sprocketand roller chain are aligned.(Fig. 6)Fig. 5 Tensioner position (front)BaseShimFig. 6 Tightening the tensioner4) Push in on the chain with the tensioner and, if the amount ofslack is appropriate (), tighten the nut and anchor the tensioner.Aim for a value less than = 0.02 x L. (Fig. 7)Fig. 7 Tensioner’s anchored positionRollerchainBefore Use For Safe Use Standard Roller Chains Lube-Free Roller Chains Heavy Duty Roller Chains Corrosion Resistant Roller Chains Specialty Roller Chains Accessories Selection Handling7) Perform a test operation and check whether the tensionerworks properly. If any of the following occurs, reset thetensioner.Contacts the side of the idler sprocket: Not centered properlyVertical or traverse vibration: Insufficient initial tensionIncreased noise: Excessive initial tension5) Perform a test operation and check whether the tensionerworks properly. If any of the following occurs, reset thetensioner.Contacts the side of the idler sprocket: Not centered properlyVertical or traverse vibration: Insufficient initial tensionIncreased noise: Excessive initial tension126