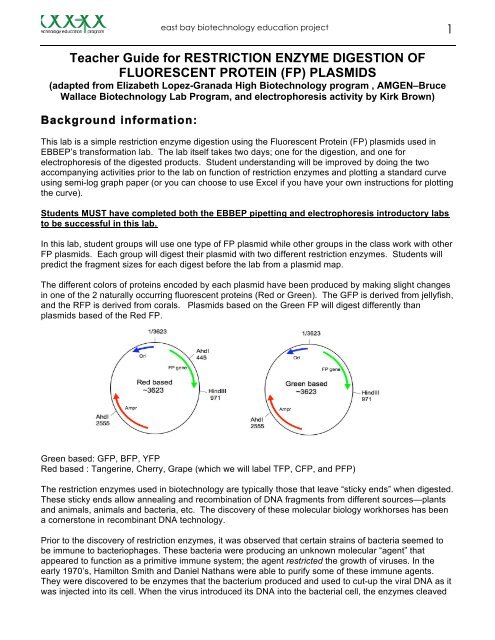
1 Teacher Guide for RESTRICTION ENZYME DIGESTION OF ...
1 Teacher Guide for RESTRICTION ENZYME DIGESTION OF ...
1 Teacher Guide for RESTRICTION ENZYME DIGESTION OF ...
Create successful ePaper yourself
Turn your PDF publications into a flip-book with our unique Google optimized e-Paper software.
east bay biotechnology education project3Laboratory Day 1 Restriction Digest <strong>Teacher</strong> prep1-3 days prior to the lab (not longer than this or the reagents can dry out)1. Aliquot the plasmids, restriction enzyme buffer (not the enzymes) and sterile water. Be<strong>for</strong>ealiquoting the buffer and plasmids you should finger flick each tube to mix or lightly vortex then doa quick spin in the microfuge to pool all the reagents.2. Store all tubes at -20C (freezer) and will be fine <strong>for</strong> a few days (max 1 week). Plasmids should belabeled with the first letter of the color followed by FP (green is GFP, Cherry is CFP). This willavoid giving students hints to the results.3. Different groups should work on different plasmids so you should not have more than 2 tubes ofany plasmid color.4. Be sure to allow enough time <strong>for</strong> this preparation.5. After digestion, the lab products can be stored in the refrigerator overnight, or in the freezer <strong>for</strong> upto two weeks.Tube aliquots per groupSize of tube Label tube Contents of tube Aliquot Actually used0.5 mL “Color” FP FP Plasmid 0.1ug/ul 17 µL 15 µL1.5 mL 10x buffer #21.5 ml 10x buffer #41.5 mL dH 2 O10x restriction buffer #2<strong>for</strong> HindIII enzyme10x restriction buffer #4<strong>for</strong> AhdI enzymeDistilled water <strong>for</strong> controland use in otherreactions3 µL 2 µL5ul4ul50 µL 35ul1 Day be<strong>for</strong>e the lab (do not do this more than one day in advance)You will dilute the restriction enzymes with the appropriate diluents (HindIII with HindIII buffer B, andAhdI with AhdI buffer A). Each enzyme is shipped from its manufacturer at a different concentrationranging from 2500u/ml to 20,000u/ml so they must be diluted to get them to the appropriate workingconcentration. Do not do this more than 24 hours be<strong>for</strong>e the lab. As you work, keep all enzymes on Iceas much as possible.1. Defrost the enzyme stock and diluents tubes on ice (do step 2 while you wait <strong>for</strong> this). Whenliquid, quick spin tubes to pool reagents and place back on ice. Transfer all of the diluent tube <strong>for</strong>each enzyme to the enzyme tube and GENTLY pipette up and down to mix, place back on ice.After each enzyme is aliquotted, transfer the tubes to the freezer <strong>for</strong> storage overnight.2. Label student tubes with enzyme names. Each group will need 1 tube of each enzyme. Afterlabeling, place student tubes on ice to prepare them <strong>for</strong> the aliquotting. See aliquotting directionsin the table below.3. Turn on the water bath and set it at 37 o C, the optimum temperature <strong>for</strong> Hind III. It isrecommended to start the water bath several hours be<strong>for</strong>e the lab so that you can get thetemperature stabilized be<strong>for</strong>e the lab. The water bath may be left on over night as long as it is fullof water. Check the temperature immediately be<strong>for</strong>e the lab to be sure it is correct. It is importantthat the temperature not be above 37 o C as this will lead to denaturation of the enzyme. It wouldbe safer to err on the low side if necessary. The digests can sit in the water bath <strong>for</strong> one hourwithout significant problems but should not be incubated longer; 40 min is generally sufficient todigest all of the plasmid
east bay biotechnology education project4Enzymes <strong>for</strong> Groups (one tube of each enzyme/group)Tube Label Contents Amount aliquoted Amount usedHindIII Diluted HindIII 3 µL 2µLAhdI Diluted AhdI 3 µL 2µLLABORATORY DAY 1:MATERIALS FOR EACH LAB STATION:ReagentsPre-aliquotted FP plasmids (0.1ug/ul)Pre-aliquotted restriction enzymes (Hind III, AhdI)Pre-aliquotted 10x restriction buffer 2 and 4Pre-aliquotted sterile waterTube with 10 µL water <strong>for</strong> controlEquipment and suppliesp20 micropipettes and tips1.5 and 0.5 mL microfuge tubes (eppendorf)Minicentrifuge37 o water bathPermanent markerTube floatsLaboratory Day 2 Confirmation of FP plasmid Restriction DigestThe purpose of this part of the lab is to visualize the digested plasmids by electrophoresis. Although onemight expect to see only one DNA band in the agarose gel, plasmids that are replicated inside a bacterialcell will generally be found in several <strong>for</strong>ms—supercoiled, nicked circle, and one or more multimers.There<strong>for</strong>e, in the undigested FP plasmid lane, you should expect to see one or more DNA bands.Remember, however, that the supercoiled and nicked circle are equal in size—their differentialmovement through the gel is simply the result of shape, with the supercoiled shape being more compact.One of the major reasons <strong>for</strong> running the undigested sample on the gel is so that you can use it as acomparison to the other digested lanes. If the undigested lane looks the same as one of the digestedlanes you can assume that the digest did not work <strong>for</strong> some reason. Also if you see some faint bands inthe digested lanes that were not expected you can compare their size to the undigested plasmid to see ifit is leftover undigested plasmid.Image shows how the different <strong>for</strong>ms of the plasmids can appear on the gel. Multimersshow up as bands above the nicked circle
east bay biotechnology education project5Preparation <strong>for</strong> Lab Day 2At least one day be<strong>for</strong>e lab (can be done many days ahead)Prepare agarose gels: This can be done several days in advance as long as you keep them in 0.5xTBE and refrigerated. (0.5g agarose in 50ml of TBE <strong>for</strong> each gel) Gently slide the gels into a weigh boatand put in a plastic bag <strong>for</strong> storage. Optimally, you will make the gels the day be<strong>for</strong>e the lab. On the dayof the lab, carefully place the gels into the gel trays and cover with TBE buffer. You should always make1 or 2 extra gels incase any break.The plasmid samples the students will be loading into their gels were prepared in the previous lab. Youwill need to aliquot 10 µL of lambda HindIII (marker/ladder) <strong>for</strong> each gel, which will be shared betweentwo groups. Aliquotting the ladder can be done several days in advance and stored in the freezer.Loading dye can also be aliquotted many days in advance, but no particular storage temperature isneeded. The amount of loading dye given in the table below is <strong>for</strong> two groups sharing one gel.TEACHER Aliquot table Lab Day 2 (<strong>for</strong> two groups sharing one gel)Tube size Label Tube Contents of tube Aliquot Actually used1.5 mL Marker Lambda Hind III 10µL 10 µL1.5 mL Loading dye 5x loading dye 20 µL 18 µLMaterials <strong>for</strong> each lab station:ReagentsEquipment and suppliesPlasmid samples from Day 1p20 and p200 micropipette and tips1.0% agarose gel 1.5 ml microfuge tubesPre-aliquotted loading dyeelectrophoresis gel box0.5x TBE power supplyDNA size marker Lambda HindIII(ladder) microfuge tube rackMarking penRunning and staining gels:Gels should run at 120v to 140v <strong>for</strong> 20 minutes. It’s important that you or your students check the gels tomake certain that the purple tracking dye is moving and that it is moving towards the positive (red)electrode. If you observe a gel where the dye is not moving, check the buffer level, then the connections.(With Bio-Rad large power supplies, make sure the start button has been pressed – it is the one with iconof the running figure).By the time your students load their gels, you may discover that you do not have sufficient time to makea complete run of at least 20 minutes. In order to resolve these fragments sufficiently to analyzefragments, the purple tracking dye (Bromophenol blue) should run to the middle of the gel. Here aresome suggestions, but it is always preferable to load and run the gels in the same day:1. Complete the electrophoresis the next day by placing the half run gel back into the casting trayand placing it into the electrophoresis chamber.2. Electrophoresis buffer can remain in the chamber and reused throughout the day. It is importantto have several plastic bottles around the lab with extra 0.5x TBE to allow students tocover their gels properly, that is, deep enough to just cover the well “dimples.”
east bay biotechnology education project6Staining the gels will be time consuming and can only be done by the teacher. STUDENTS ARE NOTALLOWED TO HANDLE ETHIDIUM BROMIDE UNDER ANY CIRCUMSTANCE. Ethidium bromide is amutagen and suspected carcinogen. It is important that you wear gloves and safety glasses whenstaining gels and handling gels that have been stained. Gels need to be stained and photographed thesame day they are run.Here are some staining suggestions:1. Designate an area of the lab that will be used <strong>for</strong> staining only.2. Have each group label their group number and class period on the outside of a plastic weighboat. Have them carefully slide their gel from the casting tray into the weight boat and have thembring their gel over to the staining area and then return to their lab area or seats.3. The teacher will then pour sufficient ethidium bromide to just cover the top of the gel. Allow thegel to stain around 10-20 minutes. Pour the ethidium bromide back into its container using afunnel. The ethidium bromide solution can be reused many times be<strong>for</strong>e it is depleted.4. Destain the gels by covering the gels with tap water. Allow the gels to remain in tap water <strong>for</strong> afew minutes. Rinse water can be poured down the sink.5. Gels are now ready to photograph your digital camera or cell phone will work fine just turn out allthe lights. If your students are not in the lab during this documentation, be certain to save one ofthe “ideal” gels so that you can show them the fluorescence of the ethidium bromide – DNAcomplex. This generally gets the students excited. Save the gel labeled and in plastic wrap or ziplock baggie. Store the gel in the refrigerator (4°C) until ready to view.Approximate timing and sequence <strong>for</strong> this lab and accessory activities:Paper Plasmid activity (DNA scissors)Introduction to Restriction Enzymes (Lab and worksheet)Lab—restriction enzyme digestLab—run gels of digestWrap up, data, graphing (Standard curve activity)1-2 days1-2 days1 day1 day1 day
east bay biotechnology education project7


