Robust Lathe Review - More Woodturning
Robust Lathe Review - More Woodturning
Robust Lathe Review - More Woodturning

You also want an ePaper? Increase the reach of your titles
YUMPU automatically turns print PDFs into web optimized ePapers that Google loves.
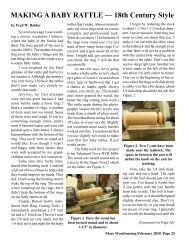
Baby Rattle Continued fromPage 25ring has just cleaned up. See Figure3. The only sharpening you need todo on the beading tool is to hone thetop face. You should never grind theother parts that were ground to shapeat the factory.Using the skew chisel, I cut avee about 1/2 inch to the left of thering recess and another one aboutone inch further to the left to definethe far left dimension of the rattle,also the end of the handle. Form abead between the handle and thering recess. Make this bead smallerthan the ring diameters, but largerthan the inside diameter of the rings,you don’t want them to slip off.Figure 3. Here the top of thering to be has been cut with theSorby beading tool.The skew chisel is used towiden the space on each side of thebead. You need a 3/8 to 1/2 inchwide vee on either side of the bead.I generally cut straight in on eitherside of the bead with the long pointof the skew. It doesn’t really matterwhich side of the bead you attackwith the ring cutting tools first. I’vedeveloped the habit of cutting onthe right side first and then cuttingthe ring loose with the left sidetool. It takes a little practice to usethese tools. A steady hand and alittle care is all that’s needed. Youdon’t have to be a great woodturnerto cut a very acceptable loose ringwith these tools. The instructionsthat came with the ring cutting toolssaid you can cut rings without usingthe beading tool first, but I’ve foundmy rings are better when the beadingtool is used to cut the top.Figure 4. Here the ring is nearlycut loose. I finally cut the ringloose with the tool on the leftside of the ring.From the Woodcraft catalog,here are the instructions for cuttinga loose ring:(1) cut a bead with a beading tool,(2) cut to depth beside the bead witha parting tool,(3) use the right ring tool to cut therear right of the ring,(4) use the left ring tool to cut therear left of the ring, which will alsoseparate the ring.Once the ring is loose, I takea 3/8 inch spindle gouge and makethe recess deeper to allow the ringto float freely.Make a second loose ring withthe right hand side of the beadingtool just cutting into the vee on theleft side of the ring recess. (SeeFigure 5.) This is done in exactly thesame manner as the first ring. Usethe 1/ 4 inch spindle gouge to cleanup and size the bottom of the ringrecess. I generally cut this down toabout 1/2 to 3/8 inch in diameter.Again its not critical, no need to sizespecifically.Figure 5. Starting the secondloose ring.Form the handle and put intwo decorative vee cuts with theskew. At this time I cut the vee atthe end of the handle down to about1/4 inch. I then shift to the far rightside and turn the piece between thefirst vee cut and the ring recess intoa pleasing knob shape. Babies liketo cut their teeth on this knob, atleast my grandson used his for thatpurpose. Again leave about 1/4 inchof material on the right end, also.(See Figure 6.)Now, you can sand the rattle. Igenerally don’t go finer than 280 or320 grit or a fine grit as some sandpapers are marked. Remember, thisis going into a baby’s mouth and, ifthey are cutting teeth, it will not besmooth for very long. I personallyPage 26 <strong>More</strong> <strong>Woodturning</strong> February 2010