Robust Lathe Review - More Woodturning
Robust Lathe Review - More Woodturning
Robust Lathe Review - More Woodturning

Create successful ePaper yourself
Turn your PDF publications into a flip-book with our unique Google optimized e-Paper software.
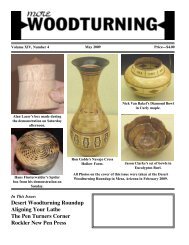
Volume XV, Number 02 February 2010 Price—$4.00Baby Rattle by Fred Holder.Fred Holder, Editor, turning a flag staff for a boat.A Tailstock Hinge for Nova DVR<strong>Lathe</strong>.Matthew Staley’s olive bowlsfrom found wood. On the right.In This Issue:<strong>Robust</strong> <strong>Lathe</strong> <strong>Review</strong>The Pen Turners CornerVacuum Chuck ImprovementMAKING A BABY RATTLE<strong>More</strong> <strong>Woodturning</strong> February 2010 Page 1
Note: We now offer subscriptioncopies as a Portable DocumentFile (*.PDF) that you can read onyour computer. You can archiveyour copies on your computer andsearch them for subjects of interest.This method provides quickdelivery of the issue. This is also acost savings, because the electronicedition costs only $25.00 per year.This is a significant cost savingsfor foreign subscribers who have topay a great deal extra for postage.It is also in full color.If interested,e-mail me at:fred@morewoodturning.netPage 2 <strong>More</strong> <strong>Woodturning</strong> February 2010
Contents<strong>Robust</strong> <strong>Lathe</strong> <strong>Review</strong>...................4Questions and Answers from the Internet............................................8Turning Hollow Forms...............8Wood Screws .............................10“The Man in the Glass”............10Mini-O-Bar and Maxi-O-Bar News....................................................11The Penturner’s Corner............12Vacuum Chuck Improvement toStop Dropped Turnings When thePower Goes Out, & <strong>More</strong>..........14Robert F. Lyon <strong>Woodturning</strong> Artist................................................18International Turning Exchange........................................19Why Wood Turners SHOULD PickUp Wood by the Side of the Road.......................................................20New BGM-100 Bench GrinderMount ........................................21Testing the Pinnacle © CryogenicTools Made by Crown Tools forWoodcraft...................................22MAKING A BABY RATTLE —18th Century Style.....................25Coming Events..........................28Testing and Certification of LeadContent in Children’s Products.............................................29Turning a Flag Staff for a Boat..........................................................30Tormek Announces T-7 Upgrades.....................................................35CUTTING SCREWS IN WOODBY THE HAND CHASER........36Tailstock Hinges.........................38The Market Place.......................39About the Cover:All of the photos on the coverthis issue are from storiesin the issue. I have providedcaptions for the photos to giveyou an idea of which story theycame from.EDITORALWe now have a good start on2010, with one issue distributed andthis one ready for the printer. I stillneed editorial material and hopethat each of you will take a lookat what you are doing and thinkabout writing a story for use in<strong>More</strong> <strong>Woodturning</strong>. For a spell,I had a lot of editorial material,but I think the holidays must haveput a damper on the people whohave been writing stories for themagazine. I hate to see all of thestories “by lined” by Fred Holder.How about putting your thinkingcap on and writing a story for themagazine, share your knowledgewith my other readers.Fred HolderEditor and PublisherTo Subscribe to <strong>More</strong> <strong>Woodturning</strong>:Check the Print Subscription Period Below:United States Canada Other Countries__One Year/$35 __One Year/$48 __One Year/$68__Two Years/$70 __Two Years/$100 __Two Years/$105__Three Years/$105 __Three Years/$145 __Three Years/$205All amounts in US Dollars! We Accept Visa/MC.Electronic Version (PDF): For People receiving Electronic issues,new priceby year only: $25.00/One year. We need an e-mail for the electronic version.Because of the significant postage increase for outside the United States,recommend the Electronic Version for all Foreign Subscribers.Thank You!!Please Enter Your Name and Address Below:Name: _________________________________________________Address: _______________________________________________City: ______________________ State: ______ ZIP: ____________E-Mail for Electronic Subscribers: ____________________________Clip and Mail with Your Check, Cash, or Charge Card Information to:<strong>More</strong> <strong>Woodturning</strong>, PO Box 2168, Snohomish, WA 98291<strong>More</strong> <strong>Woodturning</strong> February 2010 Page 3
<strong>Robust</strong> <strong>Lathe</strong> <strong>Review</strong>by Reed Gray (aka robo hippy)I went to the Portland AAWSymposium in 06 for a couple of reasons.It was just down the road, andI had never been to a symposium. Ialso was selected to do 2 rotationsof demonstrations, presenting a toolreview of the 3 different bowl coringsystems that are available. I hadsome disposable income at the time,and wanted a new lathe.I had started turning on an Atlas4 speed lathe. I worked it to death forabout 2 years, and customers keptasking for bigger bowls than my 12inch lathe could turn. I stepped upto a PM3520A. I had turned on itfor 8 years, and loved it, but wantedsome thing with more horsepower<strong>More</strong> <strong>Woodturning</strong> is published monthlyexcept April and October for $35.00 peryear by Fred and Mildred Holder at 19805Fales Road, Snohomish, WA 98296. MailingAddress is P. O. Box 2168, Snohomish WA98291-2168. Telephone: (360) 668-0976.E-Mail: fred@morewoodturning.net, WEBPage URL: http://www.morewoodturning.net. Periodicals Postage paid at Snohomish,Washington and at additional mailing office.<strong>More</strong> <strong>Woodturning</strong> is sold by subscriptionat $35.00 for one year and at a singlecopy price of $4.00 plus $1.50 postageand handling. Editorial material submittedfor publication must be accompaniedby a stamped, self-addressed envelope toensure return if it is not accepted for use.<strong>More</strong> Woodtunring uses materials frommany sources and many authors, the viewsexpressed herein are, therefore, those ofthe authors and not necessarily those of thePublishers. <strong>More</strong> <strong>Woodturning</strong> receives anumber of products each year for evaluation,but accepts no responsibility for return ofthose products unless specifically requestedto do so, in advance!POSTMASTER: Send address changesto <strong>More</strong> <strong>Woodturning</strong>, P. O. Box 2168,Snohomish WA 98291-2168.USPS No. 015387Page 4 <strong>More</strong> <strong>Woodturning</strong> February 2010<strong>Robust</strong> 25” Swing American Beauty like the author purchased.and torque. I had narrowed my mobility kit, tilt away tailstock setchoices to the <strong>Robust</strong> American up, and a steady rest. Total bill, includingshipping was over $8,000.Beauty, and the VB36. My turningroom in my shop is rather small, Brent English told me it would takeabout 8 by 12, and the lathe sits in about 3 months, and me, knowinga corner. Outboard turning isn’t an that it was custom made, expectedoption, so that ruled out the Oneway it to take about 4 months to get here,and the Serious lathe. I know this which it did. Brent did call me to tellis silly, but the Stubby just looked me that it would be about a monthalien to me, and didn’t look like it late.would work.I had sold my PM to a friend,I chose the <strong>Robust</strong> over the and he got here the day my <strong>Robust</strong>VB36 for a couple of reasons. One arrived. We dismantled my PM andwas that no matter what the set up fit it into his Volkswagon Jetta (thatwas on the VB36, it looked like a could be a story in itself), then proceededto get the <strong>Robust</strong> uncrated.dedicated bowl lathe. Probably 90%of my turnings are bowls, but I do Not too much of a problem with anothercouple of friends. I had to getsome spindles and hollow forms,and liked the set up of the <strong>Robust</strong> it onto the mobility wheels, and laybetter. Add to that the sliding headstockwhich I was used to from my the gravel and into my shop. Theout 3/4 inch plywood to get it overyears on the PM, and the fact that mobility wheels are really smooth,it was made in America, and I was and once it is on concrete, it is reallysold. I ordered the American Beauty easy to move around. I have beenwith the 3 hp motor, bed extension,
turning on it for almost 2 years now,and love it.The sliding headstock is reallynice. The one thing that I didn’t likeabout the PM sliding headstockis that it isn’t statically balanced.When you release the lever, it tiltsback towards the motor so you haveto lift it back up to slide it. The <strong>Robust</strong>seems to balance well, and ismuch easier to slide along the ways.It comes with a pressure plate thatyou loosen with 2 nuts and bolts andwrenches. This does make the headstockmore secure on the lathe thanthe PM, but both hold really well.I never realized how often I movedthe headstock until I had to hasslewith the wrenches. I frequentlymove it in between turning onebowl to the next. There is no wayto get a ratcheting wrench on them,at least not without getting specializedwrenches, so I talked to Brentabout that, and he made me a leveroperated insert to replace the bolts.Much nicer, now it takes secondsrather than minutes to move theheadstock. I think I was the first oneto ask for this option. Personally Ithink it should be standard.I got the tilt away set up for thetailstock. It operates really nicely.It is like a bed extension that is alittle over 6 inches long, and willpivot down 90 degrees to get it totallyout of the way. It did not slide‘smooth as glass’ on and off thetilt away bed, you had to jiggle ita bit, but not really a problem. Theonly problem I had with it is that itwill push the lathe out farther awayfrom the wall than I wanted, something like another 6 inches, and itmade crowding in my small latheroom a bit of a problem. I almostnever use the tailstock when turningbowls, so I took it off. The tailstockfeels lighter than the one on the PM,and it isn’t a problem for me to lift itoff and on when I need to. With thePM, you had to get the tailstock toline up perfectly before sliding it on,which was a bit of a hassle becauseyou had to support all the weight withyour body. With the <strong>Robust</strong>, you canset one corner on the ways while liningit up. Some day I should probablyput it back on, but will probably waitfor a new shop.I love the banjo as well. Tighteningthe tool post has always been aproblem. The set screw with a levertype of tightening just doesn’t get thejob done, and I had a lot of problemswith stripping the lever handle onthe PM, and the tool rest vibrating[Continued on Next Page]Intelligent sensing of turningconditions adjusts latheperformance to meet turningdemands, senses chisel digins and adjusts instantlyNOVA DVR XPNEW! 5 Favourite Speedfunction for even easierspeed selection.Download thepamphlet,view videos atwww.teknatool.comThe world’s most intelligent lathe combined with the power, capacity & capability of astationary lathe - the DVR XP is revolutionaryNEW! Higher torque motor.Delivering even morepower over the old model.Extendable Bedsadds 20” capacityper section - takeyour lathe as longas you wantDirect Drive (no belts, nopulleys) means ultrasmooth cutting conditionsAvailable in the USA fromWoodcraft Supply Corpwww.woodcraft.comCraft Supplies USAwww.woodturnerscatalog.comWoodworkers Supplywww.woodworker.comPackard Woodworkswww.packardwoodworks.comSwivel Headstocklocks at any positionmakes your turningmore comfortable,saves spaceCapacity, power & capability of amuch larger lathe in a compactfootprint - 1.75HP motor, 16” inboard,29” outboard with easy to useoutrigger accessoryNEW! Updated designsolid cast iron componentsmeans rock solidperformance<strong>More</strong> <strong>Woodturning</strong> February 2010 Page 5
<strong>Robust</strong> <strong>Lathe</strong> <strong>Review</strong> Continuedfrom Page 5loose, and lowering. The banjo onthe <strong>Robust</strong> tightens on the tool restpost with a through bolt and leverwhich is side mounted, and pulls awedge in so the post is pinched intoplace. This is much more securethan any other set up I have seen. Ido have to lubricate the wedge as itisn’t stainless, and I turn a lot of wetwood, so it will rust a bit and stickif I don’t.Initially after getting the lathe,I didn’t think it had as much torqueas I had expected. I did talk to BillGrumbine about that, and he commentedthat he could even stall aVB36. Well, I considered that fora while, but it still didn’t seemlike I was getting enough torque. Italked to Brent about it, and he hadchanged the 3 phase converter toanother bigger model. He sent methe new one with a return addressprepaid shipping label, and wiringdiagram. It was fairly simple toreplace it, even for me. I like usingmy tools, but don’t like to work onthem. This made a huge difference.The converters are programmablein many ways including speeds,torque, and braking times. One thingthat I loved about the PM3520Awas that the slowest speed wasalmost zero rpm. I turn green woodbowls to final thickness, let themdry and warp, then sand and finish.It is almost impossible to keepyour hands or a sander on warpedbowls at anything over about 20 to30 rpm. Brent walked me throughthe button pushing to reprogramthe converter to do that. The newerA models, and all the B models ofthe PM are set to turn off at 50 rpm.PM did this apparently because theyare worried about the motors overPage 6 <strong>More</strong> <strong>Woodturning</strong> February 2010heating and frying the electronics.Brent mentioned this as well. I havesanded out thousands of bowls thisway, and the motor runs cooler thanwhen I am turning.The converter is mounted onthe headstock end of the lathe onthe legs, rather than on the motorhousing like the PM. You end upwith more wires running out of it,than the single one of the PM. Noproblem, just different. There is thepower cord coming in, then 3 cordsrunning out. One cord goes to theremote on/off switch, and two tothe headstock. These two are powerto the motor, and another to thespindle lock so if you turn on thelathe while the stop is engaged, themotor won’t start. I have the remoteswitch placed on the headstock,just like on the PM. I got used toit there, and if I want to have it onthe bed/square tube of the lathe, itis far enough down that I have tobend over to reach it. I do prefer tohave it on the left side because if Ihave to reach for it quickly, I don’thave to move my gouge or scraperto the other hand first. On/off switchis easy to get to, and so is reverse. Ihave never had a lathe with a digitalspeed read out, and it isn’t necessaryfor me to have one, so I don’tmiss it on the <strong>Robust</strong>.It does have 3 speed rangeswhich I think is a plus for thelathe. Slow speed range is from0 to about 500 rpm. I seldom usethis range as it is best for really bigbowls. Mostly I am on the mediumrange which is from 1 to 1800. Onechange that was made on the PMB model was the slow speed rangewent from 1500 down to 1200. Idon’t think that was a good idea.The high speed range on the <strong>Robust</strong>goes from 1 to about 2800. I couldsee having a bit higher speed rangein the 3,000 plus range, especiallyif you turn a lot of spindles, as thecurrent speed range is a bit slow forspindles less than 3 inch diameter,but it works okay for me.Belt changing isn’t as convenientas on the PM. There are 2 doorsto open to access the belt. One on topis a lift up, and the other is on theside where you have a metal panelto rotate out of the way. It is securedwith 2 thumb screws. Access isn’tas open as on the PM, especially onthe top door, and my big paws don’tfit in there all that well. This is aminor inconvenience in that it takesmaybe 30 seconds to change thebelt as compared to 15 or so on thePM. I really wish some one wouldinvent a belt changer thing like ona bicycle for the lathes where youdon’t have to open it up at all, simplylift the motor, push a lever, and thebelt moves. I don’t change pulleysoften, so again, this is a very smallproblem.Another difference is the headstockspindle shaft housing. On thePM, it is mounted into the headstockcasing. On the <strong>Robust</strong>, the shaftis mounted into a separate housingwhich is then mounted into theheadstock housing. This means thatif you need to change to a new beltor replace the headstock bearings,you can unbolt the housing from theheadstock. Much more simple. Thereis one down side to this for me. Thespindle housing has the spindle stickingout about 2 more inches from theheadstock than it does on the PM.This extra 2 inches is a longer leverarm, add to that I mount my bowlblanks by expanding the chuck intoa Forstner bit drilled recess, I amsticking out quite a ways from theheadstock (no face plates for me). Ido get some vibrations/oscillationswhen turning big bowls that I did not
Introducing: by <strong>Robust</strong> ToolsStandard FeaturesLiberty with Optional Leg SetStarting at just $3695get on the PM. The benefit is thatyou do have extra clearance on theheadstock end if you are remountingyour bowls and returning them afterthey dry. For me, I turn to finish,and the bottom and outside are donewhen I reverse, so the clearanceisn’t needed. Also, since I neverhave the tailstock on when turning,this contributes to the vibration, andit would be greatly reduced, or eveneliminated if I had the tailstock engagedwhen turning bowls. I know,I know, use the tilt away tailstockset up that I removed.The legs on the lathe are adjustable.I really love this. Withmy PM, I had it up on a couple of2 x 4’s to get it to height. On the<strong>Robust</strong>, you just jack it up a bit andset the legs, with through bolts to theproper height. Really simple.The steel square tube on thelathe does generate a lot of different 16” swing, 28” between centers 1.5 HP Leeson Motor 110 Volt Vector Drive withAuto-Tune Stainless Steel Ways Quick Release SlidingHeadstock Chrome Moly Spindle,1-1/4 x 8 Lubricated-For-Life Bearings Spindle Lock Safety Switch Seven Year Warranty – IncludesBearings #2 Morse Taper in Spindleand Tailstock 48 Position Indexing Speed range: 100 – 2,900 RPMwith no belt change Durable Powder Coat FinishAmerican Beauty Sweet 16 Tilt-A-Matic for PM3520 Toolrests with Hardened Rodnoises than the cast iron of the PM.I think I do get some extra vibrationfrom having the longer bed extension,but that is compensated for byadding weight to the underside ofthe lathe. Just the weight of the latheisn’t enough for what I am turning,and the speeds I prefer to turn at.Another thing, if you ever haveany problems with the lathe, you callBrent. You talk to him directly aboutany problems you are having, notsome tech who has to read from amanual to solve the problem you arehaving. Customer service is prompt,and excellent. Just seeing the lathe,you can tell that a lot of worker pridegoes into the making of this lathe.If I had it all to do over again,would I still do it? Probably.Is the cost of the <strong>Robust</strong> worth2 PMs? Well, that is debatable. Itreally is a step up from the PM, andLiberty Bench <strong>Lathe</strong>Photos taken at “SWAT” October 2009 – Liberty’s first public appearance.Like all <strong>Robust</strong> lathes and accessories, Liberty is madeby <strong>Robust</strong> Tools right here in the USA using only thefinest materials, components and construction.Want more? Make Liberty your own by upgrading to2HP, adding a bed extension, adjustable leg set orpatented Tilt-Away.You can accessorize your Liberty with a vacuumadapter, caster kit, four outlet 120 volt electrical box,remote foot “OFF” switch and a bowl/steady rest.Liberty. Welcome to the family.Contact Brent or Deb English<strong>Robust</strong> Tools LLCToll Free: 866-630-1122 - www.turnrobust.commaybe not twice as good, but again,it is made in the USA.Are there any things I wouldchange?. Well, I would like to try a 5hp motor, but one won’t fit onto theheadstock housing as it is made. Icould see having more speed rangesor pulleys, especially on the highend. I would like to see a differentheadstock housing so it is closer tothe headstock, but I may be prettymuch alone as that is more my stylethan the general woodturning populationpreference.Editor’s Note: We have anotherreview on this lathe coming andexpect to have it in the March-April2010 issue. Considering the price ofthese machines, I felt it would nothurt to have two different opinionson the lathe.<strong>More</strong> <strong>Woodturning</strong> February 2010 Page 7
Questions and Answers from the InternetTurning HollowFormsQuestion: How do I turn aHollow Form?—UnknownFred’s Response: Hollowforms are generally taller than theyare wide and are therefore normallyturned from log sections with thegrain running from base to top orparallel to the axis of rotation onthe lathe while being turned. Asa result the hollowing is into theend-grain, which requires differenttools than for hollowing of bowlswhere the grain is perpendicularto the axis of rotation of the lathe.Many of the end grain hollowingtools on the market are scraper typetools with fairly small tips. Cuttingtype tools can be used if the cut ismade from the center of the openingtoward the outside. Two new toolson the market for this purpose arethe Hunter Tools and the EliminatorTools. Both of these latter toolsuse sharp carbide cutters. This isalso where a hook tool comes intoits own because it is designed to doendgrain cutting. This is true alsoof ring tools such as the OnewayTermite. There are also several toolson the market that use ring typecutters with guards over the ringto help limit the amount of cut thetool makes. One of these tools is theProforme Tool from Woodcut Toolsin New Zealand.When using any tool for hollowing,the key is that no more than20 percent of a tools length shouldextend over the tool rest into thework-piece for good cutting control.Many tools, therefore, are limited toLyle Jamieson with his boring bar at the Craft Supplies SuperWednesday event in June 2008.Fred Holder using the Big-O-Boring Bar manufactured anddistributed by Turningways. They make a smaller version for minilathes.For contact information see Wayne Shipman atwayne.shipman@comcast.netPage 8 <strong>More</strong> <strong>Woodturning</strong> February 2010
the depth to which they can be usedbecause of their overall length. Forfirst hollowing tools, it is a goodidea to select tools that have a flat onthe bottom to help reduce rotationalforces on the tool.If you have internet access, LynJ. Mangiameli wrote an excellentfive part series on hollowing toolsthat were published in <strong>More</strong> <strong>Woodturning</strong>beginning in the July 2004issue and ending in the December2004 issue. These articles can befound at my web site http://www.morewoodturning.net/articles2.php.If you are just getting into doinghollow forms and wishing somedetailed guidance on purchasingtools, this is about the most extensivetreatment of the subject thatI’ve read anywhere.Because hollowing vessels canbe hard on the anatomy, the stabilizedboring bar came into existence.I’m not sure who came up with thisidea, but I first saw it used by LyleJamieson and then later by FrankSudol using the stabilized boring barto hollow vases, etc. In 1999, I wrotea report on a further developmentthat made hollowing vessels eveneasier, the laser pointer was used tomeasure wall thickness during thehollowing. See this report at my website: http://www.morewoodturning.net/articles/laser_pointer.php. Thislatter system with some form ofstabilized boring bar has enabledmany people to make hollow formsthat would never have attempted itwith standard hollowing tools.—Fred HolderLyle’s Response: First, mydefinition of a hollow form is anyturning that I can not reach withbevel supported cuts with a bowlgouge or spindle gouge. If I canreach the surface with a bevel supportedslicing cut I can create a morecontinuous line and sweeter shapesthat slice through the fibers cleanerthan we can with boring bars or hollowingtools. The grain orientationcan be end grain or side grain. It’sthe shape of the vessel that dictateswhat tools we use and weather it isa hollow form or bowl shape.Fred addressed the “what”tools are available. Let me addressthe “how” a bit. I could write a bookabout the subject. And probably Ihave over the years written enoughvolume to compile a book. There isa lot more to hollowing than usingthe right tools. There are multitudesof topics needed to know about howto hollow. There is tool control,chucking methods, working in stages,grain orientation, sharpening,reversing options, design elements,laser measuring techniques, and onand on and on.Let me break it down to onemajor problem...vibration. Vibrationis a no-no, we cant go there.When we get vibration we needto stop and fix it. When we getvibration, nothing good can happen,it will always get worse, andsomething very bad can be the endresult. Vibration can be caused inthree different ways.First, the method of holdingthe wood can fail. Here is where Iwould never use a chuck. The chuckis not what fails, but it is the fact weare grabbing a sponge. The woodcompresses and fails to transfer thepower and stability of the lathe tothe wood. Use a strong faceplatewith many screws for a better gripof the wood, reducing the vibrationtendencies.Second, the wood can flex andvibrate under the stresses of the cuts.Here we learn to work in stages sowe have lots of waste wood at thebottom of the vessel to support thecut way out at the mouth opening.Visualize, we are turning a goblet12 inches tall and three inches indiameter. Can I grip a 3x3x12 pieceof wood in any fashion and hollowout the goblet without vibration??Impossible!! So I need to start witha larger piece of wood and have supportfor the hollowing cuts and workmy way back to the foot gradually.All the time having waste woodsupporting the wood and preventingvibration. Is it OK to waste a littlewood here??. We have to fight ourfrugal gene here, its only firewood.The last resort for me would be touse a steady rest. They are a nightmareto use and get in the way andoften dictate the shape...not a goodplan.The third way vibration happensis extending too far into thevessel with too large of an overhangover the tool rest. In this case theboring bar just plain starts to bendand flex and vibrate. There aremany variables that exacerbate thevibration, tool control, green woodvs. dry wood, porous wood vs.tight grain wood, and how sharpthe tools are. The way to stop theboring bar from vibrating would beto take light, more efficient cuts oruse a larger diameter boring bar.Just because the boring bar is 20inches long does not mean you canturn a 20 inch deep vessel. Whiteknuckling and gritting your teeth toforce your way deeper can get youin big trouble.Its not safe to hollow with vibration.The sound of the cut shouldbe a hissing sound, nothing more.[Continued on Next Page]<strong>More</strong> <strong>Woodturning</strong> February 2010 Page 9
Q&A Continued from Page9We surely welcome more detailed,specific questions about thehollowing process.—Lyle JamiesonWood ScrewsQuestion: I am new to thissite so I am sorry if this is dumbor been discussed before. I have ametal lathe and would like to makea large wood screw (say 2”)likethose used in a vise. I have triedcutting acme threads in oak but thewood was too chippy. Can this bedone on a lathe? What is the bestwood. Are there wood lathe attachments(I have a basic wood lathe)for cutting threads?—BobFred Responds: My book,“Making Screw Threads in Wood”describes how to layout and cutcoarse wood threads by hand. Thisis one option to achieve what youwant. If it is a long screw, it willbe difficult to maintain nice eventhreads when cutting them byhand.Since you have a metal lathe,I think it would work better if youcould replace your cutting tool onthe metal lathe with somethinglike a Dremel or similar tool with asquare ended cutter the width of thegroove in the thread you are tryingto cut. Then with the gearing set tocut the thread you want, you shouldbe able to (you might say) route thethreads as you slowly rotate thelathe by hand. As others have noted,the best wood for a 2” wood screwwould be English or EuropeanBoxwood. However, Eastern HardMaple would also work, but is notas strong as boxwood.—Fred HolderPage 10 <strong>More</strong> <strong>Woodturning</strong> February 2010Lyle Responds: Hand chasingthreads takes a bit of practice butits fun and worth the effort to getthe skill under your belt. HoweverI agree with Fred that the accuracyneeded for long screws would bemost difficult. Most large woodscrews I’ve seen have a significantflat at the top of each thread and widespacing between threads. This makesthe thread stronger. I would think,since you have the metal lathe, itwould be the best way to make themaccurately. I would think any dense,non porous hardwood would work.The porous grain of oak would notbe good for threading.Whatever method you end upwith make sure you keep the toolssharp...very sharp at all times.—Lyle JamiesonEditor’s Note: I thought the followinghad meaning worth sharing. Ihope you like it too!“The Man in the Glass”“When you get what you want inyour struggle for self“And the world makes you king fora day“Just go to a mirror and look atyourself“And see what that man has to say“For it isn’t your father or motheror wife“Whose judgment upon you mustpass,“The fellow whose verdict countsmost in your life“Is the one staring back from theglass.“Some people might think you’re astraight-shootin’ chum“And call you a wonderful guy.“But the man in the glass saysyou’re only a bum“If you can’t look him straight inthe eye.“He’s the fellow to please, nevermind all the rest“For he’s with you clear to the end“And you’ve passed your most dangeroustest“If the guy in the glass is yourfriend.“You may fool the whole worlddown the pathway of years“And get pats on the back as youpass“But your final reward will be heartacheand tears“If you’ve cheated the man in theglass.”Author Unknown
Mini-O-Bar and Maxi-O-BarNewsE-mail To Wayne Shipman: People kept tellingme you were out of business. Glad to see that you arestill hanging in the last couple of years has been toughfor many businesses. I’ll announce that you are stillin business and list your e-mail for contact.Fred Holder, <strong>More</strong> <strong>Woodturning</strong>Wayne Shipman’s Reply: We are still in businessbut closed the website temporarily to reduce ouroverhead. We have a sufficient inventory to fill anyorders. Robert is working full-time in contractingand I have returned to teaching high school woodshopfulltime. Let us know if you need any of ourproducts. We’re still here with the best stabilizedhollowing system on the market.—Wayne Shipman, Co-Owner TurningwaysE-mail Contact: wayne.shipman@comcast.net“Turner’s Choice”Professional Grade Wood StabilizerReduces shrinkage, drying cracks, dust, chipping, and torn grainIncreases cellular adhesion, aids smooth cutting of end-grainHelps produce long, curling chipsWater proofs and prevents decayPer 1 gallon can $49.95 or $49.95 per gallonPer 5 gallon pail $199.95 or $39.95 per gallonPer 55 gallon drum $1500.00 or $27.27 per gallonPer 275 gallon tote $7500.00 or $27.27 per gallon1 and 5 gallon lots are shipped UPS. Drums and Totes via motorfreight.Terms: Credit Card, Prepayment via check, money order or BankWire.All shipments are F. O. B Houston, Texas 77386.To learn more about this dynamic product visit www.cedarcide.comTo order call 1-800-842-1464 or email dbateman@cedarcide.comFor product or Dealership Information email Scotty at:dryes@mindspring.com<strong>More</strong> <strong>Woodturning</strong> February 2010 Page 11
The Penturner’s Cornerby Don WardPersonal comments: My wife,daughter and I spent the ChristmasHolidays in New York City visitingour son. He is a surgery resident atNew York University Medical Center.I tell you that to tell you this:New York City is a fun place to visitbut I would not want to live there.But, since this is the Penturner’sCorner and not the Traveler’s cornerI’ll stick to pens. I really like pensand not just the ones we make. I likeall pens, especially the commercialones that I’ll never be able to afford.I subscribe to Stylus and PenWorldmagazines so I keep up with thenewest designs from the world’sbest penmakers. I saw several examplesof those pens at a pen storein New York City. The store is Joonsand they have 4 locations in Manhattanand I made two of them. Wow!What gorgeous pens. Along with theinexpensive pens that sell for under$50 I saw pens that ranged in priceall the way to $14,000 and one intheir catalog that sells for $250,000.Of course the pens themselves aren’tworth that kind of money I supposethe gold, platinum, diamonds, rubies,and sapphires that adorn themmay be. I remembered a sign in thelocal Ben Franklin 5 & dime storethat read: Nice to look at and prettyto hold; drop and break it and markit sold! So I didn’t actually handleany of them...actually they didn’toffer to let me. So, if you like pensthen I would encourage you to visita pen store...a stationary store...onyour next visit to a larger city. Mostlarger metropolitan areas have them.Do some research and find a store toPage 12 <strong>More</strong> <strong>Woodturning</strong> February 2010visit. WOW! What beautiful pens. Ihad a great time.Pen news: Penn State Industrieshas introduced some new kits.They are once again designed byDavid Broadwell (http://www.david.broadwell.com) who makesart and collectible knives and pens.These new Broadwell designs areart deco motifs. Although Davidlives less than 2 miles from me Ihave only seen them in the catalog.I don’t thinkDavid has seen the final productas of this writing. I will have afew of the new kits to try out andreview as soon as David has them.One of these new Art Deco kitsis based on the PSI Gatsby (sierra)style pen kit. The Gatsby pen hasbecome a popular kit. Other pensclose to the Gatsby in design are thesierra sold by Berea Hardwoods, thesienna sold by Craft supplies, theWall Street II sold by Woodcraft.The PSI number is for this new artdeco Gatsby style pen is #PKART5Band has a two tone plating of titaniumgold and chrome and sells for$12.95. Another is #PKART6Band is also a two tone plated kit withgold titanium and black titanium. Itis also based on the Gatsby styleand sells for $12.95.The art deco fountain penmade by David Broadwell is the$PKART3F and is available in Rhodiumand 22kt gold and is priced at$31.95. The #PKART4F is a fountainpen with black titanium and22kt gold and sells for $31.95.The art deco rollerball #PKAR-T1R is available in Rhodium and22kt gold and sells for $27.95. Theother plating combination is blacktitanium and 22kt gold and sportsthe product number #PKART2R andalso sells for $27.95.These new art deco pens fromPenn State Industries and DavidBroadwell were not available whenthis article was written but hopefullythey will be available soon.I checked the websites of thethree major suppliers of pen kitsto see what is new that I’ve notreported on previously. These threesuppliers are Berea Hardwoods,Penn State Industries and CraftSupplies. All who sell pen kits sellthe kits provided by either BereaHardwoods or Penn State Industries.Craft Supplies has no resellers oftheir kits. There are a few retailers,who import some of the same kitsas these three suppliers, but thereare not many since the minimumorder is several thousand dollars ofthe same kit. Anyway, here is whatI found at the websites of thesethree.Berea Hardwoods: Bereaseems to have several new offerings.I’m not sure how new but I’ve notlooked in a few months. One is TheCartridge Bullet Twist Pen kit whichreplicates a 30.06 rifle cartridge.This is an extremely easy kit tomake using a single tube. This kituses a Parker style ball point refillor gel refill and uses the high gradedouble twist mechanism. This kitalso comes with the premium rifleclip. Available in 24k Upgrade goldplating and in Chrome plating.The ever popular Sierra ComputerCircuit Board Ballpoint penkit is now available in an orangecircuit board along with the original[Continued on Next Page]
Pen Turner’s Corner Continuedfrom Page 11green. The circuit board is a real nonfunctionalcircuit board. The circuitboard is incased in clear acrylic andturns and polishes nicely.Although not a pen, BereaHardwoods has a unique project.This unique kit is made using a real,non-functional circuit board. Thecircuit board is covered with a clearplastic that is easily turned. This itemhas a plug–n-play 2GB flash drivewith a USB 2.0 compatible connection.This kit also matches the SierraComputer Circuit Board Ballpointpen kit which uses the green circuitboard.Berea also has a letter openerusing the sierra kit. The blade isnicely shaped wave design. It is easyto make and a nice compliment to thesierra kit.The Cambridge rollerball andfountain pens now sport new hybridadditions to the family. These pensare a new variation to the Cambridge’s.The sculptured fittings arerepresentations of grapes and grapeleaves. These pens all have platednib sections and plated metal nibcouplers. All external parts are solidmetal using two of Berea’s finest andmost durable plating - Titanium Goldand Sterling Silver.Several new acrylic acetate(AA) blanks have been added alongwith new colors ofBerea’s gemstone blanks. Thefavorites of mine are the two cameopatterns and the dragon skin gemstone.These new Berea offeringscan be seen online at http://www.bereahardwoods.com/ and click on“what’s new”.Craft Supplies USA (akaThe Woodturner’s Catalog): Thehighly popular sierra has stuckonce again. This time the sierrahas shown up in the CSUSA penstables and sports a new name, thesienna. The sienna joins its othercousins: the sierra, the wallstreetII and the Gatsby in its popularity.Although not recently new, thesepens also sport clicker versions forthe sierra and Gatsby. The Gatsbyfrom PSI also has a pencil version.To see the CSUSA sienna go tohttp://www.woodturnerscatalog.com/ and click on the image of thesienna on the home page. Or, clickon “new products” and find thesienna page 1.Timely Tip: While checkingthese websites I looked at thespecials and closeouts. Most ofwebsites mentioned have severalpenturning items listed. But, besure to check out the closeoutsavailable on the Woodcraft website:http://www.woodcraft.comWoodcraft has several pen kits oncloseout. But, even more interestingis they have quite a few acrylicpen blanks on closeout....for $.99 to$1.49. I do hope they have some leftby the time this article is published.Go to http://www.woodcraft.com/and click on clearance on the leftside. Then click on pen kits. Checkthe sale items also. You will findseveral nice bargins...if there areany left.I wonder if anyone made thebaseball bat pen from last month?If so, I wonder if anyone changedthe two bat parts. Let me hear fromyou. Send me some pictures andcomments. I am working on anothertake on the baseball bat idea andhope to have it for the next issue.Stay tuned.As always, I appreciate anycomments from those who read thiscolumn. Your thoughts are alwayswelcome. Send your comments andquestions about what you read here.Or, send any pen making questionsyou may have to me. My email isdon@RedRiverPens.comDo a good turn daily!D-Way Tools (www.d-waytools.com)Simply the finest <strong>Lathe</strong> tools availableBowl & Spindle Gouges, Beading tools,Hollowing tools, handles and tool rests.Made from M42 cobalt high-speed steelPhone: (360) 432-9509 Fax: (360) 432-3051Page 13 <strong>More</strong> <strong>Woodturning</strong> February 2010
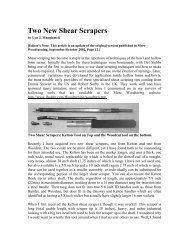
Vacuum Chuck Improvement to Stop Dropped Turnings When thePower Goes Out, & <strong>More</strong>by Bob Heltman, CMW, AAW ©10-2009One of these days you might befinish turning the bottom of a bowlyou have vacuum chucked, and thepower goes out. Thunderstorm.Truck hit a telephone/power pole.Backhoe snagged a power line.Fuse or circuit break blows. Sooneror later it WILL happen. Murphy’srevised law for woodturners says,“The likelihood of the power goingout unexpectedly increasesin proportion to the turning time,effort, and cost of the wood beingturned.”When it happens you haveVERY LITTLE time to react bygrabbing the object you are turningbefore it flies off the lathe and breaksor gets scarred. Or it bonks you inthe face.What to do...here’s my unfoldingstory...One technique is to put anempty tank in the vacuum linebetween the pump and your vaccumchuck. At our CMW ( www.carolinamountainwoodturners. org )club some members have found thatempty Freon tanks, about the shapeof BBQ grill tanks, but 3/5ths thePage 14 <strong>More</strong> <strong>Woodturning</strong> February 2010size, can be modified to do the job.The tank provides some extra reactiontime before your bowl comesoff the lathe. CMW Foundingmember John Hill says he therebygets about 7 seconds before thewoodturning drops. Figure 1 showsJohn’s setup, which he has mountedon a wheeled dolly.Also there are larger air tanksthat might be used, modified to storea vacuum instead of compressedair. DON’T use a tank that everhad an explodable gas in it, such aspropane!However, in my shop I havevery little spare room for anothertank anywhere near the headstockend of my lathe; my ShopVac sitsthere. So I wondered if there mightbe another approach.Somewhere in my mottledbackground I remember hearing ofcheck valves; they only allow liquidor air to flow in one direction, andpop shut automatically if the flowstops or tries to reverse. Thus IGoogled “vacuum check valve” andgot a number of hits. These valvesexist in many sizes! A few telephonecalls and emails to the salesand application engineers in two ofthose companies led to my obtaininga couple of suitable valves. The oneI needed retails at around $10.00 andsource details are in the end notes ofthis article.Figure 1. This photo showsJohn’s setup.As I slept on this project itcame to mind that if the vacuum wasTHAT tight I might need a manualbleeder valve so I could relieve thevacuum. Next came consultationwith Danny Williams of our localWilliams Hardware store. This ledto the purchase of a 1/4” Ball valve($11.00), a brass “T,” and couplings.Total $15.84. I had some Teflonplumber’s tape so the total cost ofmy experiment and modification
was about $25.00. Figure 2 showsthe components obtained. Left toRight: piece of vacuum hose with1/2” I.D., ( Note: my 5’ long hoseis NAPA 1/2” multi duty 1 braid250 PSI rubber hose CS091903Y500.), male air hose quick disconnect,aluminum check valve(engraved arrow shows which endshould point to the vacuum pump),threaded coupling, T joint, threadedcoupling, with aluminum bleedervalve below. The whole unit, wheninstalled, adds just 3 1/4” to thelength of the vacuum hose!Let’s pause and look at mytotal vacuum chuck system. Figure3 shows the vacuum pump. Itis a medical aspirator; PrecisionMedical Co. EZ Vac 1/5HP pump,delivering 26inHg, given to me asa gift from a fellow woodturner. Ithas worked fine for 3 years. Theheavy bent wire on the handle allowsthe pump to hang off the outeredge of a nearby table saw, savingfloor space and keeping the pumpaway from floor debris.Figure 3. This photo shows theauthor’s vacuum pump.Going through the hollowshaft of my Nova 3000 DVR lathe’sheadstock is the One-Way vacuumchuck with an EZ Adapter, availableat Packard Woodworks ( www.packardwoodworks.com ). SeeFigure 4. This has also workedfine for about 3 years! The hollowthreaded rod goes through theFigure 2. This photo shows the components the author obtained.Figure 4. This photo shows the One-Way vacuum chuck with an EZAdapterChinese BallToolsI have recently become a dealerfor the Crown Chinese Ball Tools andhave an inventory of sets and extrahandles on hand for immediate shipment.A set includes one handle, fourcutters, a tool to make a taperedhole, and a pamplet written by DavidSpringett. These are priced at $125.00for each set.The handles include a woodenhandle and a metal piece to attach thecutters and ride on the ball. These arepriced at $36.20 each. I recommendthree additional handles.Fred HolderPO Box 2168Snohomish, WA 98291360-668-0976hollow shaft of the headstock. Thealuminum piece at the right endhas a #2 morse taper that fits in thetaper of the headstock’s shaft. Atthe left end is a sharper taper that isturned tight against the left end ofthe headstock’s shaft, sealing all inplace. The aluminum chuck threadsonto the headstock shaft. There is aclosed cell rubber donut around thechuck’s far right, against which thebowl or other turned object rests,being sucked into place by thevacuum.I next assembled all the piecesshown in Fig 2, using Teflon tapeto give an air tight seal at every[Continued on Page 16]<strong>More</strong> <strong>Woodturning</strong> February 2010 Page 15
Vacuum Chuck Continuedfrom Previous Pagethreaded joint. A side comment:wrap the Teflon as shown in Figure5 so the tape will not tear loose whenthe male threaded part is insertedinto the female part.Figure 5. This photo shows theTeflon wrapped around thethreads of the air hose fitting.Figure 6. This photo shows thenew components installed in thevacuum hose.Figure 6 shows the new componentsinstalled in the vacuumhose, which is press fit over the malequick disconnect that was wrappedin 2 layers of electrician’s tape toassure an airtight fit.Next came the testing. Figure7 shows the test setup. The vacuumhose comes in at the left. Insteadof risking a precious bowl I wasturning I used a flat board. Withthe lathe off, when the vacuum islost the board drops straight downonto the lathe bed with a resounding“thunk” to signal a click of thestop watch.I used a digital timer, Figure8. When I turned off the vacuum Ipunched the start/stop button, andwhen the flat board “thunked” Iclicked the button again. This gavefar more accurate results than usingmy watch, and at least 3 repeats gavesame results.Figure 7. This photo shows thetest set up.Figure 8. Digital timer used toholding time of the system.As a benchmark, I first ran atest with just the old vacuum hose,as seen in Figure 7. The drop timewas 10 seconds. My hose is about5 feet long, so I guessed (wronglyas you’ll learn) it held that muchvacuum.Next I installed the new checkvalve sub-system, with the malequick disconnect wrapped in electrician’stape. Drop time was a worse 9seconds. WHAT?!..an air leak??I was also worried that at somepoint in time the tape wrapped connectionmight come loose. So, Iswitched out that quick disconnectand inserted a double threaded connector.I figured the thread’s teethwould bite into the hose’s rubberand eliminate any unwanted disconnects.Drop time decreased to7 seconds, to my dismay! Puzzlingover this I listened and heard airseeping into the rubber-to-threadsjoint. Peeved, I superglued the joint,and did the same at the other end ofthe sub-system where it again connectsto the rubber hose. I might addhose clamps.Checking to assure the bleedervalve was tightly closed I againtested the new system...and the droptime was 10 seconds. 10 seconds?Why not MORE?? I concluded thatmaybe my type of medical aspiratorvacuum pump already had its owninternal check valve! Heck, I didn’teven need all this new sub-systemclap-trap. But, I thought about thatand remembered that many times Iwanted to get a bowl off the vacuumMike MahoneyNew VideoTo Orderwww.bowlmakerinc.com<strong>More</strong> <strong>Woodturning</strong> February 2010 Page 16
chuck and had to wait what seemedlike a long time before it came loose,or I had to pull the vacuum hose offat the headstock. Now I could justreach around and open the bleedervalve. (It is important to be able torationalize one’s purchases!)However, the question ofwhether these vacuum pumps didor did not come with check valvesbothered me, so I called all the majorwoodturning catalogs. They didn’tknow, but some thought their Gast®,HoldFast®, or other pumps did notcome with check valves...and theythought the bowl would come offthe chuck “pretty quickly.” No harddata was provided.Next, I called OneWay; theysell a Gast pump, and for $38.00more will supply a check valve.To my surprise none of thewoodturning catalogs I calledseemed up-to-date on the notion ofa check valve to stop bowl fly-off.But, they appreciated my suggestionthat they look into offering one.NES and Air-Vac are two othermajor manufacturers of vacuumpumps; they believed that 99%of such pumps do NOT automaticallycome with check valves,which have to be ordered separately.They recommended a minimum of20inHg for woodturning, and I sawother numbers from 19 to 26.5inHg(inches of mercury); mine is ratedat 26inHg. Atmospheric pressureat sea level is 29.92 inches Hg, bythe way.It would be good to pause andmention that the type of wood beingturned, whether green or cured, itsthickness, and whether finished ornot makes a great impact on vacuumholding. A thin vessel of porouswood may need more CFM (CubicFeet per Minute of air movement)to stay on the chuck. My Precisionpump has a low CFM, I’m told oneCFM, yet it works fine for me; Iusually have the bowl’s interiorand most of the exterior finished(lacquer plus wax and polishing)before vacuum chucking to finishthe bottom. Club member John Hilltried a Gast with 4CFM and nowprefers one with 10CFM, along witha bleeder valve and vacuum gauge.He and club member Gary Billscommented that with “leaky” wood,like Ash, you need a higher CFM tooffset the steady loss of vacuum.John referenced David Lancaster( http://www. heirloombowls.com ) as a long time expert, I calledDavid. A pleasant chat led to hisobservation that if you are turninga large and unfinished bowl youwill get a lot of leakage through thewood and need more CFM; he has3 different Gast pumps and doeslarger bowls. But, he agreed that ifthe wood is finished and there is atight seal, small CFM is all that isneeded. I guess one has to decide onall the variables...type wood, shopspace, funds available, whether tofirst finish the turning, etc....beforemaking up one’s vacuum system.Going back to Precision Medical,and getting to the right experttherein, I learned that my Precisionpump is of a “rocking piston” design,with flapper valves at the pumphead which function as a checkvalve (thus making my new checkvalve a bit redundant). It makessense, in a medical setting, to NOThave bodily fluids that are beingsucked out, to be allowed to flowback in during a power failure.Precision’s expert also advisedthat rebuilding the pump is inexpensive,at around $50.00.Another approach, not exploredherein, is to build your ownvacuum pump; Google somethinglike “make a vacuum pump” andyou will be amazed at the options,a do-it-yourselfer’s field day.<strong>Review</strong>ing what I had learnedI added a micro-filter (20 Micron),vacuum gauge, and some neat hoseclamps, from my local automotivesupply store, that have thumbscrews so no screwdriver is neededto tighten or loosen the clamps.The last picture shows the fullinstallation...jury rigged to just seethat it all works. It is suspended ona long 1” x 3” board screwed to mystudio’s ceiling joists. I’ll make anicer mounted setup one of thesedays. Soon. Perhaps.Such is the reality of experimentation.CONCLUSIONS:1 - Vacuum chucking is a verygood idea.2 - If you turn solid wood, lowCFM is fine.3 - If you finish (seal the pores)the inside of your vessel before reversechucking, low CFM is fine.4- A manual relief bleedervalve allows quicker release of theturning when done, AND allows useof lower vacuum on thin, flexingvessels to avoid bottom bursting.5 - Having a check valve is avery good idea to prevent vessel flyoffdue to power failure. 6 - Havingan extra vacuum storing tank is anotherway to give you “catch” timedue to power failure, AND to allowturning “leaky” wood. If you havethe shop space, a setup like JohnHill’s, Fig. 1, is probably best.A final observation is that Istarted this investigation just thinkingthe issue was preventing vessel[Continued on Page 18]<strong>More</strong> <strong>Woodturning</strong> February 2010 Page 17
Vacuum Chuck Continuedfrom Previous Pageloss due to a power failure. What Ialso learned is that having the abilityof relieve some of the vacuum pressureon thin walled vessels is alsoimportant, and so is higher CFM ifyou are turning porous wood thathas not been sealed.END NOTE - Sources:1) Gast Manufacturing (VacuumPumps) for check valve itemAE238 for approx. $38.00. Phone:269 926 6171. Their pumps areavailable through most leadingwoodturning catalogs. ALSO,check for surplus or rebuilt Gastpumps which cost less if available.2) Anver Corp., check valveitem #CV14F14F for approx.$10.00. Phone: 800 654 3500 andask for your nearest distributor.Also see: http://www. anver.com/document/vacuum%20components/vacuum%20valves/valve-check.htm Note they have higher ratedCFM check valves too.3) Precision Medical for EZVac 1/5 HP aspirator, model PM60giving 26inHg, 1 CFM, cost approx.$330. Contact Jim Parker: 1 800331 2685 x 228. Email: jparker@precisionmedical.com. He alsomight have some rebuilt units atless cost.PLEASE NOTE: This informationis inherently based on justthe experiences revealed herein.You are “on your own” to experiment,etc. and assume all the risks(financial, personal, health, moral,intellectual, spiritual, etc.) attendingsuch undertakings.And, who knows, maybe YOUhave, or can invent, an even bettermethod. If so, drop a note...?:)??Robert F. Lyon<strong>Woodturning</strong> Artist[Editor’s Note: Robert F. Lyonis a subscriber of <strong>More</strong> <strong>Woodturning</strong>and a demonstrated woodturning artistand sculpturer. He sent me someinformation and photos of his work.Unfortunately, the photos were toosmall to use in the magazine and thephotos on his web site could not bedownloaded. I suggest you go tohis web site to see his work: http://robertflyon.com.]Robert F. Lyon was born andraised in Queens, New York. He receiveda BA degree in Studio Art andArt Education from the College ofNew Jersey, (formerly Trenton State“THE ELIMINATOR”Where Turners Turn FirstCollege), Trenton, New Jersey. In1977 he was awarded the MFA degreewith a concentration in ceramicsand glass from the Tyler Schoolof Art, Philadelphia, Pennsylvaniawhere he studied with Robert Winokur,Rudy Staffel, Italo Scanga,and Jon Clark. He joined the facultyof the School of Art at LouisianaState University in 1978 where hetaught ceramics, glass and sculpturefor seventeen years. In 1997 he wasnamed Professor and Chair of theDepartment of Art at the Universityof South Carolina. In 2002 ProfessorLyon relinquished his position asChair, and now teaches sculpture.Robert Lyon has been the recipientof several awards and grants, whichinclude a National Endowment forthe Arts Visual Artists Fellowship inHollowing ToolELIMINATES:CATCHES,TEAR OUT,SHARPENINGAvailable in three sizes: 1/4, 3/8, 1/2 inch cutters. Tool shafts aremilled with flats for both right and left hand cutting.Available from: Packard Woodworks and Craft Supplies USAwww.jewelwood.comINFORMATION AND RESOURCES FORWOODTURNERS WORLDWIDEFind articles, projects, new products, vendors, club listings,turner websites, courses and schools, discussion forum,books and videos and much more!WWW.WOODTURNINGONLINE.COMPage 18 <strong>More</strong> <strong>Woodturning</strong> February 2010
sculpture and a Southeastern ArtistsFellowship from the SoutheasternCenter for Contemporary Art. ProfessorLyon has been an artist inresidence at the International TurningExchange, Philadelphia, PA,Artpark in Lewiston, New York,Sculpture Space, Inc. in Utica, NewYork, The Banff Center in Banff,Canada, and the Kohler Companyin Kohler, Wisconsin. He residesand works in South Carolina, alongwith his wife, painter, Ann Hubbard.www.annhubbard.netRobert Lyon’s work has beenexhibited in numerous museums andgalleries. These include:• Wood Turning Center, Philadelphia,Pennsylvania• New Jersey State Museum,Trenton, New Jersey• Alternative Museum, New York,New York• New Orleans Museum of Art,New Orleans, Louisiana• Greenwich House Pottery, NewYork, New York• Southeastern Center for ContemporaryArt,• Winston-Salem, North Carolina• The Columbus Museum, Columbus,Georgia• Chattahoochee Valley Art Museum,LaGrange, GA• McIntosh Gallery, Atlanta,Georgia• Gillman Stein Gallery, Tampa,Florida• Lamar Dodd Art Center,LaGrange, Georgia• Galerie Simonne Stern , NewOrleans, Louisiana• Tampa Museum of Art, Tampa,Florida• Evansville Museum of Art,Evansville, Indiana• Arthur Roger Gallery, New Or-leans, Louisiana• Tweed Museum of Art, Duluth,Minnesota• Blue Spiral 1, Asheville, NorthCarolina• McKissick Museum, Columbia,South Carolina• South Carolina State Museum,Columbia, SC• Columbia Museum of Art, Columbia,South CarolinaRobert Lyon is included inWho’s Who in America, Who’s Whoin the South and Southeast, Who’sWho in American Art and Who’sWho Worldwide. See Robert F.Lyon’s work at his web site: http://robertflyon.comInternational TurningExchangeThe International Turning Exchange(ITE) is sponsored by theWood Turning Center (WTC) andcomprises the following:An 8-week residency programfor four lathe artists, one scholar,one furniture maker/educator, andone photojournalist selected fromthe international community.Residents will receive $400 perweek, roundtrip transportation to theresidency location, housing, plus anallowance for materials.A hands-on workshop designedfor artists to focus on advanced technicalinnovations, aesthetics, andtechniques and for scholars to betterunderstand the turning field and itspractitioners.Applications must be completewith $25.00 fee and postmarked nolater than October 1 of each year forresidency consideration.Mail applications to:Wood Turning Center501 Vine St.Philadelphia, PA 19106 USAWOODWORKERS’SEMPORIUMVICMARC5461 Arville StreetLas Vegas, NV, 89118Toll Free 800-779-7458Fax 702-871-0991Stuart Batty-Trent Bosch-Cindy DrozdaKeith Gotshall-Mike Mahoney-David Nittman-Richard RaffanAll reputed woodturners using Vicmarc lathes.....shouldn't you?www.woodworkersemporium.com<strong>More</strong> <strong>Woodturning</strong> February 2010 Page 19
Why Wood Turners SHOULD Pick Up Wood by the Side of the Roadby Matthew StaleyA Question Is AskedI would pose the followingquestion to anyone reading this(yes, all two of you), regardlessof whether you are a wood turneror wood worker of any sort, skilllevel, or age: How many times doyou drive/bike/run/walk past logsor branches lying by the side ofthe road waiting to be land-filled,burned, or chipped? If your experienceis anything like mine, my betis that the answer is “frequently.”What I propose is that you stopmoving for a few seconds, just longenough to pick up some “trash”wood, throw it in your vehicle, andtake it home to see what it becomes.You might well be surprised.Buying Wood To TurnI know from experience thatit is very, VERY easy to spendlarge amounts of cash on exotichardwoods. In fact today I was ina local Woodcraft store to pick upa Tormek T-7 and I was congratulatingmyself on NOT picking upany wood there. They were sellingwood by the pound even andalso had an INCREDIBLE bin ofdomestic wood in sizes up to 8”round. But, tempted though I was,as I always am by beautiful hunksof wood crying for a good home, Ileft the store without any.The reason I didn’t purchaseany doesn’t have anything to dowith having “found,” or “trash”wood at home, even though I do, butit still illustrates the point that thereare many specialty retailers all toohappy to sell you a chunk of pinkivory or ebony, among countlessThe Author’s two bowls made from the found wood.other species. And make no mistake,I am a big fan of all of those woodsand more. But my latest work hadeverything to do with the luck ofthe found discarded wood intendedto be burned until rescued from thecold wet ground and shipped on along journey.Origins of the Writer/TurnerI grew up in the central partof California, a land of olive andorange trees along with just aboutany other agricultural product youcan think of. Understand that thisis NOT the California of oceans,movie stars, or amusement parks.There is little, to nothing, amusingabout this part of California whichis why you have never heard of it orvisited it if you are not from there.But because some friends and familystill live there, and because thereare some tastes, like MellowGoldGrapefruit, that I can’t get anywhereelse, I find myself returning at leastonce per year. Another flavor I can’tfind anywhere else is a specific brandof olives that are packed literally afew blocks up the road from whereI grew up.Origins of the WoodI was driving out to the olivefarm in fact when I drove past oneof the many, although diminishing,olive orchards that I grew upamongst. It was in the early part ofthe year and it was time for pruning,which in the case of olives, can includesome branches that are severalinches thick. The wood was piled upto be burned so I figured that no onewould mind if I purloined a piece ortwo. My Dad, and also my turninginstructor, wasn’t sure if anythingcould be made of these branches,but I shipped them home to myselfto someday find out. Yesterday wasthe day.Turning the “Trash” WoodSome time ago, the day I firstassembled and fired up my newbandsaw, I cut out rough dish blanksfrom the two branches. Yesterday,I loaded one on to my screw chuckand started working on it. The woodis fragrant, although I don’t knowPage 20 <strong>More</strong> <strong>Woodturning</strong> February 2010
that I would say that it would bea universally appealing odor. Butmore importantly, the wood turnsabsolutely beautifully, almost likebutter, and it is a richly figured andcolored wood to boot. From theoutside looking in I don’t think onecould easily imagine how stunningscrap olive wood intended for theburn pile can be once turned andsanded smooth. But I think onceyou see a piece you will be wishingyou had the same inside source forthis “trash” wood as I do!What the “Trash” Turned IntoI was able to leave a naturaledge on both dishes; howevermore of the bark was preserved onthe first attempt. The second dishshows the rather severe crackingand checking that happened as thegreen wood dried in my shop priorto my turning it down. I fully realizethat for some turners the existenceof such severe cracking would bean automatic disqualifier and thatpiece might have been discarded andnever turned at all. But honestly, ofthe two, it is my favorite because itreminds me, and all of us really, thatwood is a natural material and likeall natural materials it has uniquecharacteristics from piece to pieceeven among that same species oreven the same tree. This piece ofwood cracked, that is what the wooddid, it isn’t anything I did rightto achieve an effect or somethingwrong that caused the appearance,and if you could feel the wood, youwould immediately know that greatcare and patience was exercised toachieve that smooth feel where thewood isn’t naturally cracked.The Unique Piece Waiting to BeFoundThis little dish reminds me thatif I want a certainty of appearanceand smooth finish 100% of the timethen I should stick with thermoformedplastic crap from China. Itwill always be predictable, and mostimportant, or horrifying, to someof us, exactly like the one before itand after it, multiplied by the literalmillions. WallMart is happy to sellyou as many as you can carry andmore. But with a piece of randomwood that is free for the taking younever know. It might be a rottenmess that you throw out, and if youdo, so what? It was free! But everynow and then you find yourselfwith a truly unique one of a kindpiece that no one else can ever havebecause you found the materialand your work, patience, practice,and skills turned that “trash” intosomething you can treasure for alifetime. So, the next time you seewood lying by the side of the road,pick it up because you never knowwhat it might turn out to be.New BGM-100 BenchGrinder MountWhile nothing on the planetbeats the Tormek at maintaining aperfect edge on turning tools, establishingthe shape on a tool can pusha turner’s patience and take the funout of the process. Shaping on adry grinder comes with its own setof trials and tribulations, too. Thesteel is coming off the tool veryquickly, which as all of us who havebeen there know, can be as much ofa curse as a blessing. If you’re tryingto control that process freehand-- good luck. Those who can do itwell are few and far between.Jig systems are nothing new todry grinders, but what we have now,with the BGM-100, is the controlthat has made Tormek jigs worldfamous combined with the shapingspeed of a dry grinder. Even better,if you use the TTS-100 Turning ToolSetter, the match of the profile to thegrindstone when moving from shapingon the dry grinder to sharpeningon the Tormek is nothing short ofamazing.Tormek is now accepting thatdry grinding is a reasonable alternativefor initial shaping, if donecarefully and under the same controlused on the Tormek.Setting up a BGM-100 is veryeasy. You just laminate a block fromscrap plywood that is 2 inches lessin height than the measurement fromthe base to the centerline of yourgrinder (2-½ inches if using a 6 inchgrinder). Screw the horizontal baseto that, position it in front of yourgrinder according to the detailed instructions,and you’re good to go.It is as easy or easier to constructthan any of the competitivesystems. It’s priced competitivelywith anything out there. And, itdoesn’t have the huge footprint inyour shop that some other systemstake up. If you later decide that youwant to take the next step and put theperfect edge on your turning tools,everything you buy for a BGM-100set up will be fully functional withyour new Tormek.<strong>More</strong> <strong>Woodturning</strong> February 2010 Page 21
Testing the Pinnacle © Cryogenic ToolsMade by Crown Tools for Woodcraftby Fred HolderI recently had the opportunityto try out the Pinnacle© CryogenicPen Turner’s Set and the Pinnacle©Cryogenic 5 Piece Miniature Setmade by Crown Tools exclusivelyfor Woodcraft. (See the Woodcraftadvertisement in the January 2010issue, Page 25.)This was the first of the CryogenicTreated tools that I’ve had aopportunity to use. For those notfamiliar with this form of heat treatment,I am including informationfrom the information sheet sent withthe tools.Cryogenic TreatmentIt has long been understood thatby subjecting metal tools to elevatedtemperatures and then rapidly coolingthem, the properties of the metalcan be altered. This happens becausethe crystal structure of the metal isaltered to change the way the metalreacts when in use.The two main crystals in toolingsteel are the larger and softer austeniteand the smaller, more stablemartensite. Through heat treatment,the austenite is transformed to martensiteto produce steel with goodwear characteristics and an amountof ductile properties.When combined with a goodquality heat treatment, the cryogenicprocess greatly enhancesthe austenic transformation. Also,at these extreme temperatures of-301degrees Farenheit (-185 degreesCentegrade), fine ‘eta’ carbodes areformed within the carbon structure.Growing very slowly and only atPage 22 <strong>More</strong> <strong>Woodturning</strong> February 2010Figures 1 and 2 show the two sets of tools. The pen turners set ison the left. The set on the right is designed for turning very smallpieces on mini-lathes, etc.these very low temperatures, ‘eta’carbides are extremely small andact as a ‘filler’ between the othercrystals in the metal.The combined effect of thecryogenic processing is to producea refined crystal structure in yourhand tools that will give a lifetimeof service by producing a blade thatwill retain its edge longer and givea superior ‘feel’ in use.The Tools in UseAll of this sounds bit strange,but Crown Tools claims the tooledge on these tools will last threetimes longer than normal HSS tools.I found that they held an edge verywell on my trials, but I wasn’t comparingthem to regular HSS tools.I began my testing with the penturners set of three tools: a gouge, aparting tool, and an oval skew. Myfirst project was a pen made usinga Bic Pen Insert. The blank hadalready been drilled for an IWCSmeeting we hosted last summer andwe encouraged people to try theirhand at turning a pen. Since therehad been three of us drilling theseblanks, I sort of held my breathconcerning whether the hole wasdead center or not. Apparently, itwas since I didn’t have a hole in theside of the pen.I turned this pen completelywith the oval skew from the set,including the parting off. This littletool performed supburbly, but itdid have to be sharpened before
Figure 3. The pen has been completely turned and is ready to beparted off at the headstock end.Figure 4. Parting off the finish turned pen with the oval skew chisel.Figure 5. The finished pen with the Bic Insert fitted into the wood.The hole had been drilled 9/64” and had to be enlarged to 5/32” toallow the shoulder of the insert to fit into the wood.use. In fact all of the tools had to besharpened before they were useable.After hand sanding the little bumpleft after parting off, I applied agenerous coating of Kerf’s WoodCreme, a wax that I use on most ofmy small pieces. The finished penis shown in Figure 5.Figure 6 shows the little bowlthat was turned with the gouge. Theshape of this gouge makes a fairlydecent small bowl gouge. Since Ihad to sharpen it, I shaped the cuttingend as close to the Ellsworthgrind as I could do freehand. It cutbeautifully on both the outside andthe inside. The tool was still cuttingas well when I finished the bowl asit was when I started. I consider thisan indication of unusual edge holdingcapability.I did try the parting tool and itperformed very well, something thatmost parting tools do when they aresharp and this one did need sharpening.In fact, almost all new tools onthe market require sharpening beforeuse. This is one of the problemthat beginners often encounter. Theyexpect that new tool the just boughtto be sharp and ready to use. Unfortunately,that is seldom the case.Most manufacturers grind the tool toshape, but do not put an extremelysharp edge on the tools.My next test was of the Pinnacle©Cryogenic 5 Piece MiniatureSet. This is a little beauty ofminiature turning tools. These toolsare designed for turning miniaturepieces like I used to turn when I wasdoing craft shows. It makes a nicedemonstration to turn a miniaturegoblet while potential customersstand and watch the turning progress.[Continued on Page 24.]<strong>More</strong> <strong>Woodturning</strong> February 2010 Page 23
Pinnacle© Cryogenic Tools Testing Continued from Page23Figure 6. The little bowl was turned with the gouge included in thethree piece pen turning set. I suppose it could be used effectively asa spindle gouge, but it looked very much like a small bowl gouge tome.Even with Catarac Surgery andTri-Focal glasses, I don’t see wellenough to turn really small itemsanymore, but these tools providethe size relationship for doing thesmall work.The only actual project thatI turned was the item in Figure 7.When I was doing craft shows, Ioften turned these little pieces witha captive ring in the center and gavethem to ladies who were watchingme turn with great interest. In fact,when I demonstrated at the Utah<strong>Woodturning</strong> Symposium in 2006,this was a project that I turned in theDemonstrators Challenge. I turnedtwo of these in the 15 minutes ofPage 24 <strong>More</strong> <strong>Woodturning</strong> February 2010Figure 7. This was the only piecethat I actually turned with thefive piece set of tools.alloted time. They make a nice setof earrings when findings are attached.Figure 8 show the various cutthat I made with each of the tools. Ifyou turn small items on a mini-lathe(or any size lathe for that matter) youwill find these tools from Woodcrafta worthwhile investiment.I highly recommend both setof tools. You can get them at yourlocal Woodcraft store or from thewoodcraft catalog. Visit their webFigure 8. This photo shows the cuts made with the various tools.From left: Parting Tool cut, cove with the round nose scraper, covewith the 1/8” gouge, cove with the 1/4” gouge, and bead turned withthe little skew.
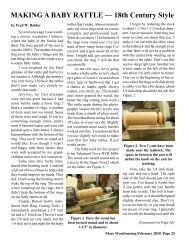
MAKING A BABY RATTLE — 18th Century Styleby Fred W. HolderSeveral years ago I was watchinga movie, Australian I believe,where the baby in the family haddied. The time period of the moviewas the 1800’s. The mother was puttingaway the baby’s things and thelast thing she laid in the trunk was awooden baby rattle.I was inspired by the briefglimpse of that rattle and had to trymy hand at it. Although my memorywas a bit fuzzy, I believe the rattlesthat I now make very closely resemblethat rattle.Anyway, my first attemptswere not too great because I hadnever before made a loose ring. Ibroke a number of rings. A numberof them were not too round. Someof them were real rough. If you trysomething enough times, prettysoon it become easier and your endproduct gets a little better. I alwayshad problems with the bottom of thering. They never were as round as Iwould like. Even though I wasn’treal happy with these rattles, theywere well accepted by my grandchildrenand even a few customers.Some time later Sorby introducedtheir beading tools. I ordereda full set of five of these in hopes thatthey would improve my beads. Theydid. I tried using the beading tool tomake the top of the ring. This madea nice round top on my rings, but itdidn’t help the bottom of the ringson my baby rattles at all.Finally, Robert Sorby introducedtheir Ring Cutting Tools. Iimmediately purchased a 1/4 inchset and a 3/ 8 inch set. I haven’t usedthe 3/8 inch set very much, but the1/4 inch set is just right for the babyrattles that I make. Almost immediatelymy loose rings took on a morecomplete and professional look.What do you know! The bottoms ofthe rings were round too! I’ve losttrack of how many loose rings I’vecut now and it gets easier all of thetime. I might add, get careless andyou break the ring. I still do thatoccasionally.As the title says, we’re goingto make a baby rattle so let’s chuckup a piece of wood. I’ve used aboutevery type of hardwood that I geta chance at: maple, apple, cherry,walnut, yew, birch, etc. (The harderand closer grained the wood, thebetter the ring cutting tools work.)The rattle made during the photographicsession for this article wasmade from a chunk of plum wood.The wood had been curing for about10 years, so it was very dry. Slightlywet wood turn more easily, but thisworked just fine. I recommend thatyou use slightly wet wood to makeyour first few baby rattles. It justworks easier.The lathe used for this projectis my Teknatool Nova DVR 3000.The wood was turned round and toa size to fit the Super Nova2 chuckon my lathe, see Figure 1.Figure 1. Here the wood hasbeen turned round and to about1-1/2” in diameter.I begin by reducing the stockto about 1-1/4 to 1-1/2 inch in diameter.I never measure it but they justseem to come out about that size. Imake a vee cut with the skew closeto the tailstock, but far enough awayso that there will not be a problemwith the center hole winding up inthe end of the rattle. Don’t cut thisvee too deep right now. Another veeis now made to the left of the firstone about 5/8 inch center to center.This vee is the beginning of the recesswhere the rings will slide freelyto rattle. Cut this a bit deeper, about3/8 inch deep should do the job. SeeFigure 2.Figure 2. Two V-cuts have beenmade near the tailstock. Thespace in between the cuts willdefine the knob on the end forteething.Now, take the 1/4 inch beadingtool and cut a bead. The rightside of the tool should just cut intoyour vee. I’ve found it works bestif you gently rock the tool handlefrom side to side. This tool is basicallya scraper so it should be tippedslightly downward also. Don’t tryto cut too heavily or you may breakout pieces of your ring. I generallycut in with the beading tool until the[Continued on Page 26]<strong>More</strong> <strong>Woodturning</strong> February 2010 Page 25
Baby Rattle Continued fromPage 25ring has just cleaned up. See Figure3. The only sharpening you need todo on the beading tool is to hone thetop face. You should never grind theother parts that were ground to shapeat the factory.Using the skew chisel, I cut avee about 1/2 inch to the left of thering recess and another one aboutone inch further to the left to definethe far left dimension of the rattle,also the end of the handle. Form abead between the handle and thering recess. Make this bead smallerthan the ring diameters, but largerthan the inside diameter of the rings,you don’t want them to slip off.Figure 3. Here the top of thering to be has been cut with theSorby beading tool.The skew chisel is used towiden the space on each side of thebead. You need a 3/8 to 1/2 inchwide vee on either side of the bead.I generally cut straight in on eitherside of the bead with the long pointof the skew. It doesn’t really matterwhich side of the bead you attackwith the ring cutting tools first. I’vedeveloped the habit of cutting onthe right side first and then cuttingthe ring loose with the left sidetool. It takes a little practice to usethese tools. A steady hand and alittle care is all that’s needed. Youdon’t have to be a great woodturnerto cut a very acceptable loose ringwith these tools. The instructionsthat came with the ring cutting toolssaid you can cut rings without usingthe beading tool first, but I’ve foundmy rings are better when the beadingtool is used to cut the top.Figure 4. Here the ring is nearlycut loose. I finally cut the ringloose with the tool on the leftside of the ring.From the Woodcraft catalog,here are the instructions for cuttinga loose ring:(1) cut a bead with a beading tool,(2) cut to depth beside the bead witha parting tool,(3) use the right ring tool to cut therear right of the ring,(4) use the left ring tool to cut therear left of the ring, which will alsoseparate the ring.Once the ring is loose, I takea 3/8 inch spindle gouge and makethe recess deeper to allow the ringto float freely.Make a second loose ring withthe right hand side of the beadingtool just cutting into the vee on theleft side of the ring recess. (SeeFigure 5.) This is done in exactly thesame manner as the first ring. Usethe 1/ 4 inch spindle gouge to cleanup and size the bottom of the ringrecess. I generally cut this down toabout 1/2 to 3/8 inch in diameter.Again its not critical, no need to sizespecifically.Figure 5. Starting the secondloose ring.Form the handle and put intwo decorative vee cuts with theskew. At this time I cut the vee atthe end of the handle down to about1/4 inch. I then shift to the far rightside and turn the piece between thefirst vee cut and the ring recess intoa pleasing knob shape. Babies liketo cut their teeth on this knob, atleast my grandson used his for thatpurpose. Again leave about 1/4 inchof material on the right end, also.(See Figure 6.)Now, you can sand the rattle. Igenerally don’t go finer than 280 or320 grit or a fine grit as some sandpapers are marked. Remember, thisis going into a baby’s mouth and, ifthey are cutting teeth, it will not besmooth for very long. I personallyPage 26 <strong>More</strong> <strong>Woodturning</strong> February 2010
find them more attractive if theyaren’t too highly polished.Figure 6. Here the piece is prettymuch ready for sanding.Figure 8. The finished baby rattle. Now ready to ship to mycustomer.Figure 7. The Robert Sorbytools used in this project: (topto bottom) Right hand side tool,beading tool, and left hand sidetool.After I’m satisfied with thesanding job, I cut the vee’s at eachend down to about 1/8 inch, justenough to still hold everything together.I prefer to separate the rattlefrom the rest of the spindle with aknife or saw. I use a knife to pareoff the excess and then hand sandto smooth each end.Add a coat of non-toxic oiland you have a completed rattle. Iused the Mahoney Walnut Oil finish,which works very well. The finishedbaby rattle is not too large, but itmeets the minimum size requirementfor baby toys.This completes the making ofthe rattle, but perhaps you would likea few specifications on the Sorbytools used to make this little item. Ipurchased my tools from Woodcraft,but I believe several other suppliersalso carry these tools. The beadingtools are available in five sizes fromWoodcraft: 1/8, 3/16, 1/4, 5/ 16, and3/8 inch diameter beads. The bladelength is 4-1/2 inches and the ashhandles measure 6-1/2 inches inlength, giving an overall tool lengthof about 11 inches. These tools allowthe making of excellent beadswith much less skill and experiencerequired. I like them because they’refaster and repeatable. A bead madewith the Sorby beading tool will alwaysbe near perfect if care is usedin the cutting process. The pricesvary on these tools depending onsize, but the set of five tools sold for$97.50 in Woodcraft’s 1996 catalog.If you have problems cutting consistentquality beads, these tools shouldhelp solve your problem.The ring cutting tools comein sets of right and left tool. Formaking baby rattles, I recommendthe 1/4” tools. The blades are fiveinches long and the ash handle is8-3/4 inches in length, making a respectablylong tool. The tools comewith full instructions for use. Evenif you’re an expert turner, I believethese ring cutting tools are a worthwhileaddition to your turning tools,if for no other reason than speed. Ican complete a loose ring with thesetools while I’m thinking about it usingonly a skew chisel.Note: In its original form, this articlewas published in the October1996 issue of <strong>More</strong> <strong>Woodturning</strong>. Ithas been updated here.<strong>More</strong> <strong>Woodturning</strong> February 2010 Page 27
Coming Events2010 Florida <strong>Woodturning</strong>Symposium will be held on January15-January 17, 2010. It will be heldat the Lake Yale Baptist ConventionCenter in Eustis, Florida, about ½hour drive North of Orlando, Florida.The featured turners for this yearare: Nick Cook, Larry Hasiak, AlHockenbery, Alan Leland, RudolphLopez, Michael Mocho, Paul Pouliotand Dale Nish. Online reservation isavailable. Credit Cards and checksare accepted. For more informationgo tohttp://www.floridawoodturningsymposium.com.* * *The Tennessee Associationof Woodturners (TAW) will bepresenting their 22nd annual Symposiumon Friday January 29 andSaturday, January 30, 2010. TheSymposium will again be held atthe Radisson Opryland Hotel inNashville, Music City USA. Againthe Symposium features some ofthe world’s leading woodturnersincluding Tania Radda, Frank Penta,Mark St. Leger, and Trent Bosch.The Symposium will also includean Instant Gallery, People’s ChoiceAward, Banquet and Auction, Vendors,and Slide Show and RoundtableDiscussion with the demonstrators.For more information contact:TAW 2010 Symposium, P.O. Box158296, Nashville, TN 37215* * *The Adirondack WoodturnersAssociation (AWA) is bringingthe seventh Totally Turning Symposium.Totally Turning 2010 willbe held on Saturday and Sunday,March 27 and 28, 2010 in SaratogaSprings, New York.The AWA (Adirondack WoodturnersAssociation) is a SpecialPage 28 <strong>More</strong> <strong>Woodturning</strong> February 2010Interest Group (woodturning) ofthe Northeastern Woodworkers Association(NWA). The NWA has presenteda woodworking show titledSHOWCASE in Saratoga Springs,New York for the past 18 years.SHOWCASE draws about 4000woodworking attendees. It providesan Instant Gallery of roughly500 pieces of fine woodworkingincluding woodturning, presentscontinuous classes on woodworking,offers about 70 woodworkingvendors (including many related towoodturning), and displays continuousdemonstrations of woodturning,woodcarving, scrollsawing, andlumbering. Door prizes, raffles, andmany give-aways make it an excitingtwo days of woodworking.* * *The 2010 Utah <strong>Woodturning</strong>Symposium will be held on May6-8, 2010 at the McKay Center atUtah Valley University (formerlyUtah Valley State College). Parkingwill be available in Lot U. Featuringover 20 premier woodturners anddemonstrations, an instant gallery,manufacturer’s show case, penturner’s rendezvous, educator’s lectureseries, swap meet and so muchmore! Visit http://www.utahwoodturning.com/for more informationand registration.* * *The AAW 2010 Symposiumwill be held in Hartford, Connecticuton June 18 - 20, 2010. It is time tostart planning your schedule to attendthis symposium. We will havemore detailed information as it is released.For more information, AAWmembers should contact the office inSt. Paul, MN - phone 651-484-9094,email: inquiries@woodturner.orgor check out the website at www.woodturner.org* * *Turn-On! Chicago 2010, the2nd Midwest woodturning symposiumpresented by the ChicagoWoodturners. will be held August20-22, 2010 in Mundelein, IL, justnorth of Chicago. Demonstratorsinclude: Jimmy Clewes, Don Derry,Cindy Drozda, David Nittman, BinhPho, Dick Sing, and Malcolm Tibbetts,with more to be announced.Events include hands-on pen turningfor the troops and special eveningdemonstrations plus trade show andbanquet. For more information goto their web site at: www.chicagowoodturners.com* * *The AAW 2011 Symposiumwill be held in St. Paul, Minnesotaon June 24 through 26, 2011. Theevent will be held in the St. PaulRiverCentre the city’s state-of-theartconvention, special event, andentertainment facility. With 15meeting rooms, the 27,000 squarefoot Star Tribune Grand Ballroom,and nearly 100,000 square feet ofexhibition space it should be a winningsymposium. An event to attendas it is the 25th Anniversary of theAAW.Editor’s Note: If your club isplanning a symposium during 2010,please let us know about it so thatwe can give you a bit of publicity inthis column.
Testing andCertification of LeadContent in Children’sProductsSource: AAW Web Site Comment:The Consumer Product Safety ImprovementAct of 2008 is scheduledto go into effect in February, andmay impact some woodturnersability to make/sell children’s toys.Here’s the Government’s “Statementof Policy” - providing much neededclarification on administration ofthis new law.This statement of policy is issuedby the Commission to provideguidance on the testing and certificationof children’s products forcompliance with the lead contentlimits established in the ConsumerProduct Safety Improvement Act of2008 (“CPSIA”). The Commissionhas received a number of questionson compliance with the new leadlimits.This document, which has beenapproved by the Commission, providesguidance. It does not imposelegal requirements beyond thosealready contained in the CPSIA orother agency regulations.We have received several questionsasking us to explain a recentCommission determination thatcertain materials will not exceedthe lead limits. (The determinationappeared in a final rule that waspublished in the Federal Registeron August 26, 2009 (74 Fed. Reg.43031)). We also have receivednumerous questions on componenttesting.We address those issues usingplain language to make it easierfor readers to understand our approach.A. What does the lead contentlaw require?The CPSIA provides that productsdesigned or intended primarilyfor children 12 years old andyounger (“children’s products”)cannot contain more than 300 partsper million (ppm) of lead in anyaccessible part. We call this a 300ppm “lead content limit.”This new lead content limitshould not be confused with theCommission’s 90 ppm limit on leadin paint used on certain productssuch as furniture and children’stoys.B. How and when must children’sproducts be tested andcertified to the 300 ppm leadcontent limit?Children’s products will needto be tested for compliance withthe 300 ppm lead content limit. Thetests must be done by a third partyconformity assessment body (morecommonly known as a third partylaboratory) and, based on thosetests, certified as compliant. Thethird party laboratory must be accreditedand the accreditation mustbe recognized by CPSC. A listingof CPSC-recognized laboratoriescan be found at http://www.cpsc.gov/cgi-bin/labapplist.aspx. Formore information on who needsto certify children’s products forcompliance, please see http://www.cpsc.gov/businfo/frnotices/fr09/certification.pdf.The Commission has postponedthe requirement to begintesting and certification to the 300ppm lead content limit; therefore,we do not require such testing andcertification until February 2010,at which time the Commission willvote on the stay.Companies, however, may notdistribute or sell children’s productsthat exceed the 300 ppm lead contentrequirement in the law. Thereare, however, two exceptions withrespect to lead testing and certification:(a) lead in paint; and (b) leadin children’s metal jewelry. Testingand certification of products subjectto the 90 ppm limit on lead in painthas not been postponed. <strong>More</strong>over,the Commission has not postponedthe requirement for testing and certificationof children’s metal jewelryto the 300 ppm lead content limit.C. What is a children’s productthat must be tested for leadcontent?The Commission is often askedwhat products must comply withthe lead content limit, i.e., what isa “children’s product” under thelaw. The answer is anything that isdesigned or intended primarily fora child 12 years of age or younger.“Primarily” is the key word used inthe law. Not everything a child usesor touches must meet the lead contentlimit, only those things designedor intended primarily for a child 12years old or younger. The Commissionlooks at each product on a caseby-casebasis. We consider how theproduct is marketed as well as whatthe manufacturer has said about theproduct (if reasonable) and whetherconsumers commonly recognizethe product as being intended for achild 12 or younger. For example,the Commission has previously saidthat an ordinary ball point pen is notprimarily intended for children, andmost consumers would not consideran ordinary ball point pen as beingintended primarily for use by a child12 years of age or younger. We real-[Continued on Page 34.]<strong>More</strong> <strong>Woodturning</strong> February 2010 Page 29
Turning a Flag Staff for a BoatThe project for this article is shown above. The piece on top is the part needing replacement. The pieceon the bottom is the finished project. The boat owner, my friend’s son, didn’t want us to put on anyfinish. He preferred to use the finish that he uses on his boat to properly protect it from the water.by Fred HolderShortly before Christmas, afriend of mine was diagnosed withcancer in his hip bone and was toldnot to walk or stand. His son hadjust sent the flag staff from his boat,which needed repairing or replacing.Now, he couldn’t do the job. Heasked if I could give him a hand.I said, sure I would be glad to doit for him. So I drove over to pickup the piece that needed replacing.It turned out to be 25 inches longand about two inches at the largestpoint.I had a 3 inch thick mapleplank that has been kicking aroundin my shop for a dozen years. Thislooked like good stock to makethis piece, so I sawed out a squarepiece about 2.5 inches square and25 inches long. Mounted it onto thelathe between centers and turned atenon on each end to fit my chuck.Actually on the larger end, whichhad a cap fit over it, I sized it to fitthe cap and then it would also fit inthe chuck. At this point, I realizedit might make a decent story for themagazine and brought my camerato the shop and enlisted Mildred’shelp to take the photos.Since this piece had to have ahole drilled the complete length forwire to the light on the top of thePage 30 <strong>More</strong> <strong>Woodturning</strong> February 2010Figure 1. The wood is mounted between the chuck and the livecenter with my steady rest mounted and set to the rearmost recessturned to fit the rollers on the steady.staff, I was going to have to use asteady rest to support the tailstockend while drilling. I also don’t trustdrills to drill perfectly true for 25inches. Therefore, it was best todrill half way from each end. So,while the piece was mounted in thechuck at the headstock end and on alive center at the tailstock, I turnedround recesses in the square stockan equal distance from each end.I did it this way so that the steadyrest could be mounted onto the latheand locked down into place andnot require moving when the stockwas switched end for end to drillthe second half section of the hole.Figure 1 shows the set up ready tostart drilling.Each end had a larger holedrilled for an inch or so in depth.One end was ¾” and the other endwas 5/8”. These holes were drilled
with a Forstner drill to begin thedrilling process. When the tailstockwas backed away from the wood,the center point was still runningtrue to the center in the tailstock.This was good since I was goingto start drilling. I first drilled thehole to depth with the appropriatesize Forstner bit mounted in a drillchuck, which was mounted into theMorse Taper of the tailstock. Figure2 shows this operation.My long hole drill was one thatI had made many years ago whenI was doing a set of Newel Postsfor a stairway in a new house underconstruction. I needed a 5/16 inchdiameter hole that was drilled deepenough that I needed a 36” shaft.I had a welder set up the drill andmy 36” length of 5/16 inch rod ina lathe and weld the rod to the drillend. This worked very well for thoseseven foot Newel Posts that I hadto drill. I had drilled each of themfrom each end and the holes hadmet nicely in the center. This timethe piece was smaller in diameterthan those 5 inch Newel Posts, so Iwanted to make sure the drill enteredthe piece as straight as possible. Apart of my Christmas present fromMildred was the Colt Five Star HSS-M2 Pen Drill Set. Since these drillsdrill a very straight hole, I used the“O” size drill, the closest to the 5/16inch size to drill a hole the full depthof the drill; i.e., about 5 inches. Thisoperation is show in Figure 3.Once I had a pilot hole, Ineeded something in the tailstockto help center the drill. A quickmeasurement showed that once thecenter point was removed from theNova Live Center the drill was asnug fit through the hole. I was notset to drill the hole half way throughthe work piece. I put a mark on thedrill shaft at slightly over half theFigure 2. Drilling the larger hole one inch deep with an appropriatesize Forstner bit. The Forstner bit leaves a nice center point for thenext drill to center into.Figure 3. Drilling a pilot hole with an “O” size Colt Five StarHSS-M2 Pen Drill. The drill was able to drill a 5 inch deep holemaking a good starting point for my 5/16” three foot long drill.length of the wood to be drilled.That would mark the depth of drillingfrom the first end. On the secondend it would give me an idea as towhether I had intercepted the holefrom the other end or was aboutto drill through the side. Figure 4shows the drilling process.[Continued on Page 32]Page 31 <strong>More</strong> <strong>Woodturning</strong> February 2010
Turning a Flag Staff for aBoat Continued from Page31Once the drilling from oneend was completed, the wood wasreversed on the lathe and the processjust described was repeated on theother end. I was very pleased whenthe drill broke through into the holefrom the other end and proceededdown the length of the wood to theother end. This meant that I hada hole that was virtually centereddown the piece of wood and thereshould be no problem of getting thewire through.Then using a pair of calipersand a parting tool, I was able to markthe diameter at a number of pointsalong the wood. It was then a simpleprocess to use a skew chisel to turnthe wood to final shape as shown inFigure 5.Figure 4. This photo shows the drilling of the hole with the long5/16 inch drill. The end of the drill has an old drill chuck attachedto serve as a handle.Figure 6. The recess to acceptthe chrome cup is shown here.This piece had two pieces ofchrome plated metal that needed tobe fitted one on each end. On thelarge end, which I think was the topof the piece, a chrome cup shapedpiece fitted over it at about 2 inchesin diameter. On the other end wasa chrome cap that must fit over theFigure 5. The piece has been turned to diameter and is ready forsanding.wood. This latter portion is shownin Figure 6. The larger diametersection is shown still in the chuckin Figure 5.I haven’t heard back as towhether the piece actually workedfor my friend’s son. But hopefullythe wire to the light is not too largeto pass through the 5/16 inch hole.This was a bit different project thanthe stuff that I normally turn, but Ifound it a fun project and enjoyedevery minute of it.Page 32 <strong>More</strong> <strong>Woodturning</strong> February 2010
Editor’s Books for SaleBooks Written by the Editor of <strong>More</strong> <strong>Woodturning</strong>Making the ChineseBallRevised 2008, by FredHolder.This revised booklet outlines Fred’strials and tribulations in conqueringthis project. Tells how to makethe tools needed to use the CrownChinese Ball Tools. Booklet nowcontains 64 pages of information.Price is $10.00 including shipping.Order from: Fred Holder, PO Box2168, Snohomish, WA 98291.Telephone 360-668-0976.Price: $28.00, plus $5.00s/hPrice: $27.00, plus $5.00 s/hI have purchased 25 copies ofThe Woodturner’s FAQ Book andhave them available as signedcopies for $19.95 plus $5.00for shipping by Priority Mail(Washington State residentsplease add 8% for sales tax.)We accept cash, check, orMasterCard and Visa creditbook, which is “required readingfor all new turners” directlyfrom the author:Fred Holder<strong>More</strong> <strong>Woodturning</strong>PO Box 2168Snohomish, WA 98296 USA“Two Books in One”a CD-ROMThis CD-ROM contains Fred’snewest book, “The Turning Process”and the above book “Makingthe Chinese Ball” on one CD-ROM.Both books are in PDF format andrequire Adobe Acrobat Reader toread them on your computer. TheTurning Process is a 105 pagebooklet designed for beginner tointermediate woodturners. It mighteven have something worthwhile forexperienced woodturners.Available by 9/10/2008Price for this CD-ROMis just $14.95 including postagewithin the United States.Order from: Fred Holder, PO Box2168, Snohomish, WA 98291.Telephone: 360-668-0976These books seemedto be missing from most USSources. So I have purchased25 of each book for resale. Ifyou haven’t had an opportunityto purchase one, this isan opportunity to get a signedcopy. Books will be shippedby Priority Mail.Fred Holder<strong>More</strong> <strong>Woodturning</strong>PO Box 2168Snohomish, WA 98291 USATEL: 360-668-0976Back Issues of <strong>More</strong> <strong>Woodturning</strong>Available on CD-ROMAnyone who owns a computer and likes to read <strong>More</strong> <strong>Woodturning</strong>on their computer or to archive it onto their computer, willbe pleased to learn that we now have all issues of <strong>More</strong> <strong>Woodturning</strong>ever published in PDF format. While we offer individual yearson a CD-ROM for $25.00, we have come up with a special pricewhich includes all issues published from October 1996 to the datethat the order is placed on a single CD-ROM for just $95.00. This<strong>More</strong> <strong>Woodturning</strong>, PO Box 2168, Snohomish, WA 98291 USA.Page 33 <strong>More</strong> <strong>Woodturning</strong> February 2010
Testing Children’s Toys Continuedfrom Page 29ize that children, once they reach acertain age, might use a ball pointpen, but an ordinary ball point penis generally sold to consumers ofall ages. In other words, an ordinaryball point pen is not designed or intendedprimarily for children. In thisexample, the ball point pen is not achildren’s product. (Although thereare some instances when such a pencan become a children’s product.See http://www.cpsc.gov/library/foia/foia09/petition/wima_resp.pdf). The Commission may providefurther guidance on this issue in thefuture by rule.D. Must all children’s productsbe tested and certified forlead content?Another common questionis whether all children’s productsneed to be tested and certified forcompliance with the new 300 ppmlead content limits. The law limitsour ability to exempt products fromthe lead content limit. However, wehave found that certain products, bytheir nature, will never exceed thelead content limit so those productsdo not need to be tested and do notneed certifications to show that theycomply with the law. These productsinclude:1. Precious gemstones: diamond,ruby, sapphire, emerald;2. Semiprecious gemstonesand other minerals, provided thatthe mineral or material is not basedon lead or lead compounds: e.g.,aragonite, bayldonite, boleite, cerussite,crocoite, galena, linarite,mimetite, phosgenite, vanadinite,and wulfenite;3. Natural or cultured pearls;4. Wood (any paint on woodneeds to be tested and certified);Page 34 <strong>More</strong> <strong>Woodturning</strong> February 20105. Paper and similar materialsmade from wood or other cellulosicfiber, including, but not limited to,paperboard, linerboard and medium,and coatings on such paper that soakinto the paper and cannot be scrapedoff the surface;6. CMYK process printing inks(inks that must meet the testing andcertification requirements includespot colors, other inks that are notused in the CMYK process, and inksthat can be scraped off the surfaceon which they are used or that areused in after-treatment applications,including screen prints, transfers,decals, or other prints);7. Textiles (excluding aftertreatmentapplications, such asscreen prints, transfers, decals, orother prints) consisting of:a. Natural fibers (dyed or undyed)including, but not limitedto, cotton, kapok, flax, linen, jute,ramie, hemp, kenaf, bamboo, coir,sisal, silk, wool (sheep), alpaca,llama, goat (mohair, cashmere),rabbit (angora), camel, horse, yak,vicuna, qiviut, guanaco;b. Manufactured fibers (dyedor undyed) including, but not limitedto, rayon, azlon, lyocell, acetate,triacetate, rubber, polyester, olefin,nylon, acrylic, modacrylic, aramid,spandex;8. Other plant-derived andanimal-derived materials including,but not limited to, animal glue, bee’swax, seeds, nut shells, flowers, bone,sea shell, coral, amber, feathers, fur,and leather;9. Surgical steel and otherstainless steel within the designationsof Unified Numbering System,UNS S13800– S66286, not includingthe stainless steel designated as303Pb (UNS S30360), provided thatno lead or lead-containing metal isintentionally added. The non-steelor non-precious metal componentsof a product, such as solder or basemetals in electroplate, clad, or fillapplications must be tested andcertified;10. Precious metals: Gold (atleast 10 karat); sterling silver (atleast 925/1000); platinum; palladium;rhodium; osmium; iridium;ruthenium, titanium.The products on this list areall things the Commission has determineddo not contain lead over100 ppm, which is within the allowable300 ppm limit. Thus, theywill comply with the law (and mustalways comply) and, therefore, donot need testing and certification.They do not need to be tested by athird party laboratory to prove theyare, in fact, made of something onthe list, and they do not need to betested to prove that they meet thelead content limits. For example, wehave determined that natural fibers,such as cotton, by their nature donot contain lead in excess of thelead content limit; this means thatcotton blankets or t-shirts (withoutbuttons or appliqués), do not needto be tested by a third party laboratoryfor lead content. It also meansthat a third party laboratory wouldnot need to test the cotton shirt toshow that it is, indeed, made outof cotton. Some retailers may wantmanufacturers and importers to testand certify their products, but thosetests and certificates are not requiredby the Commission for the materialsor products on the list.Editor’s Note: It appears that unpaintedwood products do not needto be tested, so I have deleted theremainder of this announcement.You can read the entire statementat the AAW Website.
Tormek AnnouncesT-7 UpgradesThe three most recently addedimprovements to the Tormek T-7directly address concerns expressedby customers. New features improvestone changing, water managementand corrosion protection.“The new EzyLock system forthe grindstone uses a self-tighteningstainless steel knob to secure thegrindstone. No tools are requiredand you don’t need to exert anypressure on the nut to secure thegrindstone” says Tormek CEOHåkan Persson. This constructionalso makes it very easy to changegrindstones, from the standard aluminiumoxide to the new specialtystones (Blackstone Silicon and the4000 Grit Japanese Waterstone).Another improvement to theTormek T-7 is the new AdvancedWater Trough AWT-250. It addressescustomer concerns aboutwater splash while sharpeningcertain tools. The standard lip hasbeen enlarged considerably, and forthose long tools that drip water wellover the edge of the lip (like chef’sknives and planer blades) just addthe water chute, which attaches easilyand directs the water back intothe trough.The new water trough alsohas an incorporated magnet, whichattracts the steel cut from yourtools and keeps your stone cleanerand more free-cutting. For thosedrippy jobs where the water chute isneeded, Tormek has added a pair ofTilt Shoes for the T-7. When put onthe feet of the machine, they put theframe on a slight angle so that thewater that lands on the frame runsback into the water trough.The frame of the T-7 is nowtreated with an Electrodeposition(ED) coating that provides superiorcorrosion protection and forms thefoundation for the tough powdercoat paint finish. This combinationfinish is designed to withstand evenoutdoor environments (but don’ttake your Tormek outside – themotor and electrical system are notweatherproof).For those who already own aTormek T-7 or 2000 the AdvancedWater Trough with tilt shoes and theEzyLock shaft system MSK-250will soon be available as upgradesthat will fit any 250 mm/10” machine.For details of your neareststockist log onto www.affinitytool.com or call 1-866-588-0395.VERMECCHUCK DRIVE DOG• For Vermec, Vicmarc, or small Nova Bonhamchucks• Held by chuck jaws for quick mounting andremoval• Domed surface allows alignment in variouspositions• Pins are Adjustable and Replaceable• Centre Pin is hardened•For Further Information:Web: www.vermec.comEmail: vermec@netspace.net.au39 Dalton Street, Kippa-Ring QLD 4021 AUSTRALIAPh: +61 7 3284 3733 Fax: +61 7 32842733PROUDLY MADE IN AUSTRALIAPage 35 <strong>More</strong> <strong>Woodturning</strong> February 2010
CUTTING SCREWS IN WOOD BY THE HAND CHASERby James Lukin[Reprinted from Turning <strong>Lathe</strong>s, Aguide to Turning, Screw-Cutting,Metal-Spinning, Ornamental Turning,Etc., Fourth Edition, 1894. Thisbook has been reprinted and is currentlyavailable from The AstragalPress, Mendham, New Jersey.]This somewhat difficult artis well worth all the trouble that itneeds to acquire it. As soon as it isgained, it renders the work moreindependent of all costly apparatusused to render the process easy tosuch as cannot succeed with handtools alone, and the screw can bemade in a shorter time than it takesto set up even the simplest of suchapparatus; but it would be a mistaketo suppose the art in question easy ofacquirement, and it needs constantpractice to keep up the knack of usingthe chaser.The directions given by mostof our leading authorities are asfollows: “Having turned smoothand true the cylinder upon whichthe screw is to be traced, round offthe edge or arris so that it shall notcatch into the teeth at starting, andcheck the traverse of the tool. Therest is placed very near the work,and must have its edge filed smoothand level if it is at all notched fromother work.The tool is to be held by itshandle in the right hand, and itsblade between the first finger andthumb, so as to cushion it somewhat,and allow it barely to lie on the rest.Then the <strong>Lathe</strong> is to be set in easymotion, and after a trial or two,without actually touching the work,just to get the swing of it, a steady,Figure 1. Shows the Methods of striking threads recommended byHoltzapffel in his book, Hand or Simple Turning. Holtzapffel directsthat the first stroke of the chaser be across the center of the curvewhere the sharp angle has been turned off. The arc a-b is the firststroke and arc c-d is the second.decisive cut is to be attempted, traversingthe tool without nervousnessor hesitation.”Exactly so; but, unless theworkman is already an adept, thechances are sadly against his hittingoff the thread; and, knowing this, hewill be as nervous as a skater makinghis first essay on the ice.Yet there is no royal road toscrew-cutting, and the above directionsare as good as any. The bestway is to cut threads outside chucks,and any odd bits of boxwood, on alloccasions: go at it and keep at it, andthe skill will not long be wanting.The inside thread has also tobe struck haphazard, only the movementof the tool is now straightforward into the hole. Many use forthis purpose an arm rest, which is along-handled, flat bar of iron, about1/2-inch. wide, tapering down toabout 1/4-inch. at the extremity. Theend is turned up 1/4-inch., and thechaser rests on the end just behindthis hook.The “T” of the rest is now retainedin its usual position parallelto the <strong>Lathe</strong> bed, and the arm restis held under the left armpit, withthe blade of it across the rest. Thisplaces the shank and hook at rightangles, or nearly so, across the faceof the hollowed work, and the toolis laid on it, instead of having toturn round the “T” of the rest itself.The hands grasp the end of the armrest as well as the tool, so that thetwo move as one. A great deal ofinside work, besides screw-cutting,is done with this contrivance, as itprevents having to shift round the“T” of the rest.Inside screws are easier to cutwith its aid, as it moves on the “T”Page 36 <strong>More</strong> <strong>Woodturning</strong> February 2010
as on a fulcrum, and gives to the toolan easy swing, as if it moved on aball-and-socket joint.Each cut of the chaser, especiallyat the commencement, mustbe very light, and it must carry itselfalong by the thread first traced, andnot be driven in the least until thethread is well and deeply cut.The great difficulty will befound with the coarse pitches: thefiner, from 16 to 24, are easier thanfrom 8 to 16 the traverse of the latteris necessarily so much faster andmore difficult to hit off, as regardsspeed. Except for chucks and largeboxwood cases, it is not often thatthe course pitches will be needed,and 12 to 24 will amply suffice forgeneral purposes.Holtzapffel, in his valuablework, directs that the first stroke ofthe chaser is to be across the centerof the curve where the sharp anglehas been turned off, like Figure 1,a-b showing the first stroke, and c-dthe second. Thus, the screw is graduallyworked round to the cylindricalpart. The traverse is, of course,from right to left, and from theedge to the interior of hollow work.Personally, I have found it quite aseasy to begin at once upon the endof the cylindrical part; but it is, Isuppose, a question of habit. I havealso generally found it better at thecommencement to keep the pointsclear, and to let the tool touch justbelow them. This will carry it alongsufficiently to let the required speedof traverse be seen, after which thetool may be lowered, so as to bringinto action its full cutting powers.But there is no sort of doubt aboutthe difficulty of screw-chasing byhand a difficulty that is only to be[Contued on Page 39]<strong>Woodturning</strong> Books For SaleWe are pleased to offer the following books from Linden Publishing forsale through <strong>More</strong> <strong>Woodturning</strong>.Here are the titles we are offering:• All Screwed up!: Turned Puzzles and Boxes Featuring Chased threadsby John Berkeley $24.95• 500 Wood Bowls $24.95• Beyond Basic Turning: Off-Center, Coopered, and Laminated Work,by Jack Cox $28.95• Chris Child’s Projects for Woodturners, by Chris Child $16.95• Decorating Turned Wood: The Maker’s Eye, by Liz and MichaelO’Donnell $19.95• Fabulous Turned Wood Projects, by Hazeu Hiebert, et al $17.95• Richard Raffan Turning Guides, Slipcase Set, by Richard Raffan $59.95• Segmented Turning: A Complete Guide, by Ron Hampton $19.95• The Art of Segmented Wood Turning: A Step-by-Step Guide,by Malcolm Tibbetts $25.95• The Complete Illustrated Guide to Turning by Richard Raffan $39.95• The <strong>Lathe</strong> Book, by Ernie Conover $24.95• The Woodturner’s Workbook, by Ray Key $19.95• The Woodturner’s FAQ Book, by Fred Holder $19.95• Turn a Bowl: Getting Good Results the First Time Around,by Ernie Conover $19.95• Turned Boxes: 50 Designs, by Chris Stott $19.95• Turning Boxes with Richard Raffan: (revised and updated) $24.95• Turning Bowls with Richard Raffan, by Richard Raffan $24.95• Turning Boxes with Richard Raffan $24.95• Turning Green Wood, by Michael O’Donnell $17.95• Turning Pens and Pencils, by Kip Christensen & Rex Burningham $17.95• Turning Projects, by Richard Raffan $21.95• Turning Wood with Richard Raffan, by Richard Raffan $24.95• Wood for Woodturners by Mark Baker $19.95• <strong>Woodturning</strong>: A Foundation Course, by Keith Rowley $19.95• <strong>Woodturning</strong>: A Fresh Approach, by Robert Chapman $17.95• <strong>Woodturning</strong> Forms and Materials, by John Hunnex $19.95• <strong>Woodturning</strong> Projects, by Mark Baker $19.95• Woodturner’s Wooden Clock Cases by Tim Ashby $5.95Pay shipping of $4.25 for the first book plus $1.00 for each additional book.Priority Mail is $6.50 for the first book and $1.00 for each additonal book.Foreign Customers please request a quote for shipping costs.Order three books and take a 10 percent discount on the order.Note: Discount does not apply to postage.Master Card and Visa Charge Cards AcceptedSend Orders to:<strong>More</strong> <strong>Woodturning</strong>P. O. Box 2168Snohomish, WA 98291-2168Telephone: 360-668-0976Fax: 360-668-1798Page 37 <strong>More</strong> <strong>Woodturning</strong> February 2010
Tailstock Hingesby Fred HolderI’m not sure what companycame out with the hinging tailstock,but it is a very handy item with theheavy tailstock on today’s largerlathes. I did some research on theinternet and turned up four retrofitsavailable.having to remove and refit the heavytailstock. An added bonus is that itlengthens the lathe by 300mm (12”).Order number is ACC-400 and priceis $395.00.Vermec39 Dalton StreetKippa-Rinc, QLD 4021 AustraliaE-mail: vermec@netspace.net.auWeb Site: www.vermec.comTelephone: +61 7 3284 3733Oneway Manufacturing241 Monteith AveStratford, ONN5A 2P6, CanadaTel: 1.519.271.7611Email: postbox@oneway.caWeb Site: www.oneway.caFigure 1. Tailstock hingefrom Woodcut Tools in New Zealand.The Tailstock Hinge fromWoodcut Tools allows one to quickly& easily swing the lathe tailstockaway. Moving your tailstock outof the way saves lifting, increaseslathe bed length by 120mm is availablefor Nova DVR XP and DVR3000. Price on Woodcut’s web siteis $210.Woodcut Tools LimitedP.O.Box 57, Clive,Hawkes Bay, New ZealandEmail: sales@woodcut-tools.comWeb: www.woodcut-tools.comTelephone: +64 6 875 1066The Vermec Tailstock SwivelAttachment can be used on a VicmarcVL300 shortbed lathe andallows the tailstock to be swiveledout of the way when turning longobjects or using long chisels withoutFigure 2. Vermec TailstockSwinger for the Vicmard VL:-300 Short Bed <strong>Lathe</strong>.The Oneway TailstockSwinger for the Oneway lathes.No longer do you have to try andmuscle the heavy tailstock on andoff your lathe. Simply slide thetailstock onto the Swinger andlock it out of the way. It couldn’t beany easier. Solidly constructed using3/8” steel plate and powder paintedfor protection, the Swinger willlast a lifetime. The Bedways on theswinger are 9” long and precisionground which allows the tailstockto glide smoothly when moving itbetween the lathe and the Swingerand vice versa.Figure 3. The Oneway TailstockSwinger.Figure 4. <strong>Robust</strong> <strong>Lathe</strong> Tilt-Away Tailstock.<strong>Robust</strong> Tilt-Away for thePowermatic 3520. The <strong>Robust</strong> lathecome with a Tilt Away tailstockand now <strong>Robust</strong> has now made thiscapability available for the Powermatic3520. Their website lists aSpecial Introductory Price of $344which Includes FREE shipping andhandling to the lower 48 states. ThePage 38 <strong>More</strong> <strong>Woodturning</strong> February 2010
Tilt-A-Matic installs in minutes–just three bolts using existing holes.Fits the original 3520 as well as thelater 3520A and 3520B. With thisunit, you can tilt the tailstock to theback or front.<strong>Robust</strong> Tools LLCBarneveld, WisconsinToll Free: 866-630-1122E-mail: Info@Turn<strong>Robust</strong>.comWeb Site: www.turnrobust.comFigure 5. The <strong>Robust</strong> Tilt-Away tailstock mount for thePowermatic 3520.Or you can make your own tiltaway mechanism for your lathe asI did for my Nova DVR 3000. Thecost was less, but it not as solid.However, it keeps me from havingto lift the tailstock.Figure 6. Fred’s Version.Page 39 <strong>More</strong> <strong>Woodturning</strong> February 2010The Market PlaceThe first 10 words of classified advertisementsare free to subscribers, additionalwords are 20-cents per word, no minimum.On non-subscriber advertisements, price is20-cents per word with a minimum billingof $4.00.Beginning and advanced woodturningclasses. Call Ted Bartholomew 253-927-6855,Tacoma, WA.Teaching beginning to advancedclasses in all aspects of woodturning. Call: EdSzakonyi, Roselle, IL (800) 894-8123.Make pens using your drill press with aVertilathe. http://vertilathe.freeyellow.com<strong>Woodturning</strong> on a VB36 <strong>Lathe</strong>, atHigher Manaton Farm. SW England. Web Site:www.turning-wood.comFaceplates: Straight from manufacture,heavy duty aluminum, brightly colored anodize,most common sizes. Visit our website:www.minkcrafts.com or call toll free (866)956-2200.The Burl Source. Large supply of AustralianBurl Caps, turning blanks, pen blanks,and large jarrah burl slabs. Check us out at www.theburlsource.com or call 801-942-2616.Emory’s <strong>Woodturning</strong> E-Books www.asthewoodturns.com/books.html.Free Wet Grind/Hone Instant ChangeSharpening System Plans: http://www.DavidReedSmith.com.Maple Turning Blanks--PRICE $6-8PBF+S&H cut to size, call 360-942-3468 ore-mail: john@hamptonwoodcraft.com.Pen Finishing Kit: A must for all penturners! Obtain a scratch free remarkale shine onall surfaces including stabilized woods, acrylicsand solid surface materials using the new 2”x2”double sided foam backed sanding pads. Kit containsinstructions for use and seven color codedpads ranging from 300 to 12,000 grit. $13.95.BG Artforms. TEL: 888-717-4202.Chasing Threads Continuedfrom Page 37overcome by such constant workas falls to the lot of brass-turnersand others who are at work with thechaser every day, and, for the mostpart, confine the chasing to one ortwo pitches only, of which they thussoon get the exact pace. By wayof encouragement, I may add thata fortnight’s apprenticeship oftenmakes a lad at an optician’s workshopa fair proficient, provided heis kept to one pitch of thread only,Easier, Faster Segmented Vessel Design,Web Site: www.segmentedturning.com.TEL: (805) 489-5309.<strong>Woodturning</strong> classes – Satisfactionguaranteed. Call Larry Miller 360-412-1583,Olympia, Washington”Cabochons for woodturners at www.yoyospin.com/cab<strong>Woodturning</strong> Instruction: Now that Ihave insurance through the AAW Craft WorkersInsurance Program, I can again offer trainingin my shop. If interested in basic woodturninginstruction or specialized training such as theChinese Ball, contact me at: 360-668-0976.Fred Holder.New Video--”Relief carved Embellishmentsfor Wood Projects”. DVD--$30.00plus $3.00 S/H. VHS $20.00 plus $3.00 S/H.Contact: Tony Cortese, 20850 NW 13th Street,Dunnellon, FL 34431. Ph 352-489-5652. E-mail:romeowoodturner@msn.com.NEW REDUCED PRICE: SimplifiedFluting with Al Caton. Video-$20.00 plus S&H$3.00. DVD-$30.00 plus S&H $3.00. Insturctionand inexpensive jigs for fluted works of art.Order from: Al Caton, PO Box 2360, Dunnellon,FL 34430. TEL: 352-465-0562. E-Mail: alcat@bellsouth.net.Making the Chinese Ball, Revised 2008,by Fred Holder. The revised booklet outlinesFred’s trials and tribulations in attempting toconquer this project. Tells how to make the toolsneeded to use the Crown Chinese Ball Tools.Booklet now contains 64 pages of information.Order from Fred Holder, PO Box 2168, Snohomish,WA 98291. Price is $10.00 includingshipping. Telephone 360-668-0976.Turn Nested Bowls from 6” or 8” bowlblanks with a $39.95 hand-held coring tool I callthe BowlSaw. Check bowlsaw.com for detailsor e-mail me at Steuss@aol.com. For questionscall 415-897-1457. Steussy Creations.Micheal’s Magic Mojo - Conditioningand Finishing Wax $5.99.http://quartersmith.us (11-09)as he soon gets used to traverse thetool at one rate of speed.Considering, however, thatscrewchasing is an acknowledgeddifficulty, we are not surprised tomeet with various suggested contrivancesfor effecting the work inan automatic manner, especially asthis can be done without difficultyin more than one way.Editor’s Note: I recommend mybook, “Making Screw Threads inWood”, as a good reference for makingscrew threads in wood.
MANUFACTURER OF QUALITY WOODTURNING LATHES, CHUCKS AND ACCESSORIESMade in AustraliaThe VL200 Sit Down Stand has beendesigned to suit people who havetrouble standing for a long period oftime or people in wheelchairs.The lathe comes with electronicvariable speed unit, a 1.5kW motor,remote switch box and has all thestandard features of a VL200 Short Bed<strong>Lathe</strong>.<strong>Lathe</strong> Complete, Part No. V00757The stand can also be purchasedseparately to suit a VL200 Short.Stand Only, Part No. V01083The angle of the bed can be adjusted every 7.5 degreesfrom 0 to 45 degrees.The stand’s center height (C.H.)from the floor to the spindle isadjustable every 25mmC.H. from 750mm to900mm at 45˚C.H. from 950mm to1100mm at 0˚Check our website for the full range of<strong>Lathe</strong>s, Chucks and AccessoriesFor your nearest Vicmarc ® dealer please contact us:Phone: + 61 7 3284 3103 Fax: + 61 7 3283 4656Web: www.vicmarc.comEmail: vicmarc@vicmarc.comPage 40 <strong>More</strong> <strong>Woodturning</strong> February 2010