WatchGuard Firebox System 7.0 User Guide
WatchGuard Firebox System 7.0 User Guide WatchGuard Firebox System 7.0 User Guide
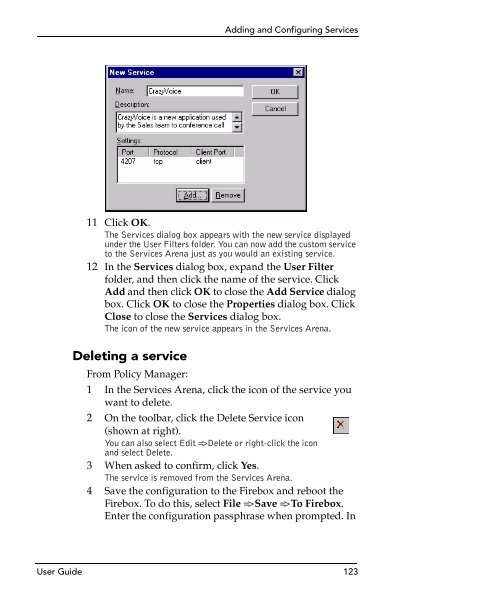
Chapter 8: Configuring Filtered Services7 In the Client Port text box, select an option from thedrop-down list. Note that you can select a range ofport numbers. The following options are available:IgnoreSource port can be any number (0—65565). (If youare not sure which port setting to use, choose thisoption.)SecureSource port can range from 0—1024.PortSource port must be identical to the destinationport, as listed in the Port number field of thedestination service’s Properties dialog box,Properties tab (shown below).ClientSource port can range from 1025—65565.8 In the Port field, enter the port number. If you areentering a range, enter the lowest number of the range.9 In the To field, enter the highest number of the range.(If you are not entering a range, leave this field blank.)10 Click OK.Policy Manager adds the port configuration to the New Servicedialog box. An example of how this dialog box might lookappears in the following figure. Verify that the name, description,and configuration of this service are correct. If necessary, clickAdd to configure an additional port for this service. Repeat theprocess until all ports for the service are configured.122 WatchGuard Firebox System
Adding and Configuring Services11 Click OK.The Services dialog box appears with the new service displayedunder the User Filters folder. You can now add the custom serviceto the Services Arena just as you would an existing service.12 In the Services dialog box, expand the User Filterfolder, and then click the name of the service. ClickAdd and then click OK to close the Add Service dialogbox. Click OK to close the Properties dialog box. ClickClose to close the Services dialog box.The icon of the new service appears in the Services Arena.Deleting a serviceFrom Policy Manager:1 In the Services Arena, click the icon of the service youwant to delete.2 On the toolbar, click the Delete Service icon(shown at right).You can also select Edit => Delete or right-click the iconand select Delete.3 When asked to confirm, click Yes.The service is removed from the Services Arena.4 Save the configuration to the Firebox and reboot theFirebox. To do this, select File => Save => To Firebox.Enter the configuration passphrase when prompted. InUser Guide 123
- Page 93 and 94: Configuring Routes3 Click the Net o
- Page 95 and 96: CHAPTER 6Managing andMonitoring the
- Page 97 and 98: Viewing Basic Firebox StatusThe top
- Page 99 and 100: Viewing Basic Firebox Statusbut the
- Page 101 and 102: Viewing Basic Firebox Status• The
- Page 103 and 104: Monitoring Firebox TrafficSetting t
- Page 105 and 106: Performing Basic Tasks with System
- Page 107 and 108: Performing Basic Tasks with System
- Page 109 and 110: Viewing Bandwidth Usage(shown above
- Page 111 and 112: Viewing Details on Firebox Activity
- Page 113 and 114: Viewing Details on Firebox Activity
- Page 115 and 116: Viewing Details on Firebox Activity
- Page 117 and 118: Viewing Details on Firebox Activity
- Page 119 and 120: HostWatchHostWatchHostWatch is a re
- Page 121 and 122: HostWatch3 Enter the Firebox status
- Page 123 and 124: CHAPTER 7Configuring NetworkAddress
- Page 125 and 126: Using Simple Dynamic NATService-bas
- Page 127 and 128: Using Simple Dynamic NAT3 Use the T
- Page 129 and 130: Using Service-Based Dynamic NATEnab
- Page 131 and 132: Configuring a Service for Incoming
- Page 133 and 134: Using 1-to-1 NATA one-to-one mappin
- Page 135 and 136: CHAPTER 8Configuring FilteredServic
- Page 137 and 138: Selecting Services for your Securit
- Page 139 and 140: Adding and Configuring Servicesrigh
- Page 141 and 142: Adding and Configuring Services5 (O
- Page 143: Adding and Configuring Services3 In
- Page 147 and 148: Defining Service PropertiesEnabled
- Page 149 and 150: Defining Service Properties6 Click
- Page 151 and 152: Defining Service Propertiesthe serv
- Page 153 and 154: Service Precedencegroup always have
- Page 155 and 156: Service Precedencether down the pre
- Page 157 and 158: CHAPTER 9Configuring ProxiedService
- Page 159 and 160: Customizing Logging and Notificatio
- Page 161 and 162: Configuring an SMTP Proxy Service3
- Page 163 and 164: Configuring an SMTP Proxy Service2
- Page 165 and 166: Configuring an SMTP Proxy ServiceAd
- Page 167 and 168: Configuring an SMTP Proxy ServiceEn
- Page 169 and 170: Configuring an SMTP Proxy ServiceCo
- Page 171 and 172: Configuring an FTP Proxy Service6 S
- Page 173 and 174: Selecting an HTTP Service4 Select t
- Page 175 and 176: Selecting an HTTP Servicefrom Any t
- Page 177 and 178: Configuring the DNS Proxy ServiceGE
- Page 179 and 180: Configuring the DNS Proxy Service3
- Page 181 and 182: Configuring the DNS Proxy ServiceYo
- Page 183 and 184: CHAPTER 10Creating Aliases andImple
- Page 185 and 186: Using AliasesGroupfireboxtrustedopt
- Page 187 and 188: How User Authentication WorksHow Us
- Page 189 and 190: Defining Firebox Users and Groups f
- Page 191 and 192: Defining Firebox Users and Groups f
- Page 193 and 194: Configuring RADIUS Server Authentic
Adding and Configuring Services11 Click OK.The Services dialog box appears with the new service displayedunder the <strong>User</strong> Filters folder. You can now add the custom serviceto the Services Arena just as you would an existing service.12 In the Services dialog box, expand the <strong>User</strong> Filterfolder, and then click the name of the service. ClickAdd and then click OK to close the Add Service dialogbox. Click OK to close the Properties dialog box. ClickClose to close the Services dialog box.The icon of the new service appears in the Services Arena.Deleting a serviceFrom Policy Manager:1 In the Services Arena, click the icon of the service youwant to delete.2 On the toolbar, click the Delete Service icon(shown at right).You can also select Edit => Delete or right-click the iconand select Delete.3 When asked to confirm, click Yes.The service is removed from the Services Arena.4 Save the configuration to the <strong>Firebox</strong> and reboot the<strong>Firebox</strong>. To do this, select File => Save => To <strong>Firebox</strong>.Enter the configuration passphrase when prompted. In<strong>User</strong> <strong>Guide</strong> 123


