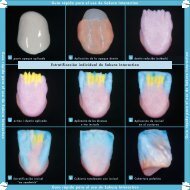
iPencil and Pencil (Brush) Cleaner:Important: After removing it from its package, thepaste opaque is ready for immediate use. Use theenclosed pencil (brush) cleaner only to moisten orclean the brush. During processing, do not usewater to clean the brush. If paste opaque comesinto contact with water, cracks or air bubbles mayform in the opaque layer during firing.2Applied paste opaqueAvailable colours: A1, A2, A3, A3,5, A4,B1,B2, B3, B4, C1, C2, C3, C4, D2, D3, D42a Processing:First opaque layer:• Take the required quantity of paste opaque from thesyringe.• Use the enclosed paste opaque brush.• Mix the material thoroughly.• Apply the first opaque layer evenly from the incisaledge to the cervical. Make sure that it covers theentire surface.• For a smoother surface, file the applied layer toincrease its density.Firing chart:Drying Starting Vacuum starting Rate oftemp. temp. temp. heat increase7 min. 400°C 400°C 60°C/min.Final temp. Hold time Surface appearance915°C 2 min. eggshell glossANTAGONinteractionConsult the layer organiser to optimise the layering structure.2bProcessing:Second opaque layer:• Apply the second opaque layer evenly.• For a smoother surface, file the applied layer toincrease its density.Processing:Drying Starting Vacuum starting Rate oftemp. temp. temp. heat increase7 min. 400°C 400°C 60°C/min.Final temp. Hold time Surface appearance910°C 2 min. * eggshell gloss* 1 min. with vacuum, 1 min. without vacuumANTAGONinteractionopaque dentin3Processing:Together, the opaque dentin and dentin constitute thebasic layer of colour of the entire layering structure.With <strong>Antagon</strong> <strong>Interaction</strong>, the fluorescent layers areconcentrated in more deeply lying part of thebuildup. As a result, the reflected white lightenhances the opalescent characteristics of the transparentupper layers. The opaque dentin can also beapplied where little space is available and lesstranslucency is required, for instance at the gingivalor palatinal/lingual area of intermediate elementsand at places where there is little space for a standardceramic structure.Available colours: A1, A2, A3, A3,5, A4,B1, B2, B3, B4, C1, C2, C3, C4, D2, D3, D483Applying the opaque dentin
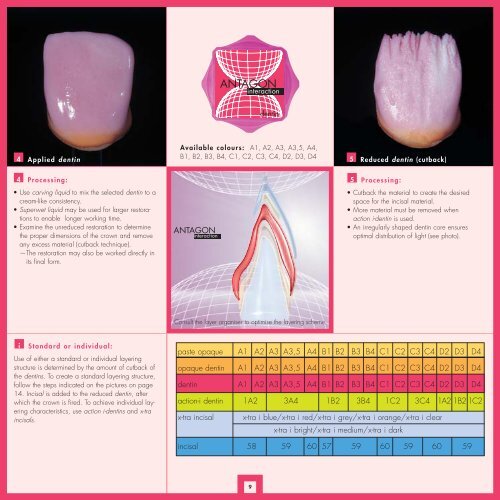
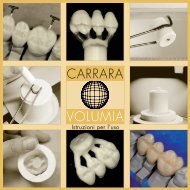
ANTAGONinteractiondentin4Applied dentinAvailable colours: A1, A2, A3, A3,5, A4,B1, B2, B3, B4, C1, C2, C3, C4, D2, D3, D45Reduced dentin (cutback)4 Processing:5 Processing:• Use carving liquid to mix the selected dentin to acream-like consistency.• Superwet liquid may be used for larger restorationsto enable longer working time.• Examine the unreduced restoration to determinethe proper dimensions of the crown and removeany excess material (cutback technique).—The restoration may also be worked directly inits final form.ANTAGONinteraction• Cutback the material to create the desiredspace for the incisal material.• More material must be removed whenaction i-dentin is used.• An irregularly shaped dentin core ensuresoptimal distribution of light (see photo).Consult the layer organiser to optimise the layering scheme.iStandard or individual:Use of either a standard or individual layeringstructure is determined by the amount of cutback ofthe dentins. To create a standard layering structure,follow the steps indicated on the pictures on page14. Incisal is added to the reduced dentin, afterwhich the crown is fired. To achieve individual layeringcharacteristics, use action i-dentins and x-traincisals.paste opaque A1 A2 A3 A3,5 A4 B1 B2 B3 B4 C1 C2 C3 C4 D2 D3 D4opaque dentin A1 A2 A3 A3,5 A4 B1 B2 B3 B4 C1 C2 C3 C4 D2 D3 D4dentin A1 A2 A3 A3,5 A4 B1 B2 B3 B4 C1 C2 C3 C4 D2 D3 D4action-i dentin 1A2 3A4 1B2 3B4 1C2 3C4 1A2 1B2 1C2x-tra incisal x-tra i blue/x-tra i red/x-tra i grey/x-tra i orange/x-tra i clearx-tra i bright/x-tra i medium/x-tra i darkincisal 58 59 60 57 59 60 59 60 599