HerpeSelect® 2 ELISA IgG test is intended for - Focus Diagnostics
HerpeSelect® 2 ELISA IgG test is intended for - Focus Diagnostics
HerpeSelect® 2 ELISA IgG test is intended for - Focus Diagnostics
- No tags were found...

Create successful ePaper yourself
Turn your PDF publications into a flip-book with our unique Google optimized e-Paper software.
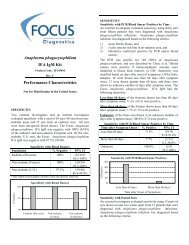
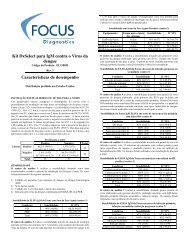
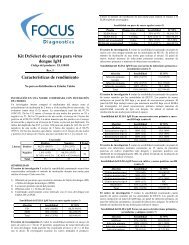
HerpeSelect ® 2 <strong>ELISA</strong> <strong>IgG</strong>Page 38. Bacterial contamination of serum specimens or reagents can produce erroneous results. Use aseptic techniques to avoid microbial contamination.9. Per<strong>for</strong>m the assay at room temperature (approximate range 20 to 25°C).10. Use proper pipetting techniques, maintaining the pipetting pattern throughout the procedure to ensure optimal and reproducible values.11. The stop reagent contains sulfuric acid. Do not allow to contact skin or eyes. If exposed, flush with copious amounts of water.SPECIMEN COLLECTION AND PREPARATIONSerum <strong>is</strong> the specimen source. No attempt has been made to assess the assay’s compatibility with other specimens. Hyperlipemic, heat-inactivated, hemolyzed, orcontaminated sera may cause erroneous results; there<strong>for</strong>e, their use should be avoided.Specimen Collection and HandlingCollect blood samples aseptically using approved venipuncture techniques by qualified personnel. 12 Allow blood samples to clot at room temperature prior tocentrifugation. Aseptically transfer serum to a tightly closing sterile container <strong>for</strong> storage. Separated serum should remain at 22°C <strong>for</strong> no longer than 8 hours. Ifthe assay will not be completed within 8 hours, refrigerate the sample at 2 to 8°C. If the assay will not be completed within 48 hours, or <strong>for</strong> shipment of samples,freeze at –20°C or colder. Thaw and mix samples well prior to use.Specimen, Controls and Calibrator PreparationDilute each specimen, control and calibrator 1:101. For example, label tubes and d<strong>is</strong>pense 1000 µL of Sample Diluent into each labeled tube. Add 10 µL ofspecimen, control or calibrator to each appropriate tube containing the 1000 µL Sample Diluent and mix well by vortex mixing.TEST PROCEDURE1. Bring all reagents to room temperature be<strong>for</strong>e use. Remove the Antigen Well packet from cold storage. To avoid condensation, allow micro-well strips toreach room temperature be<strong>for</strong>e opening the foil packet. If less than a full plate <strong>is</strong> to be used, return unused strips to the foil packet with desiccant and resealcompletely. Store unused antigen wells at 2 to 8°C. (Note: At the end of the assay, retain the frame <strong>for</strong> use with the remaining strips.)2. OPTIONAL 5 minute Pre-Soak. If omitting pre-soak, proceed to Step 3.Fill wells with 1X Wash Buffer and soak <strong>for</strong> 5 minutes. Decant (or aspirate) the Antigen Wells and tap vigorously to remove 1X Wash Buffer. Blot theemptied Antigen Wells face down on clean paper towels or absorbent paper to remove residual 1X Wash Buffer.3. D<strong>is</strong>pense 100 µL of the Sample Diluent into the “blank” well and 100 µL of each diluted specimen, control or calibrator (see Specimen, Controls, andCalibrator Preparation, above) into the appropriate wells. (Note: For runs with more than 48 wells it <strong>is</strong> recommended that 250 µL of each diluted samplefirst be added to a blank microtiter plate in the location corresponding to that in the <strong>ELISA</strong> wells. The samples can then be efficiently transferred into theAntigen Wells with a 100 µL 8 or 12-channel pipettor.)4. Cover plates with sealing tape (or place in a humid chamber), and incubate <strong>for</strong> 60 ± 1 minute at room temperature (20 to 25°C).5. Remove sealing tape (or remove wells from the humid chamber), and empty the contents of the wells into a sink or a d<strong>is</strong>card basin.6. Fill each well with a gentle stream of 1X Wash Buffer solution from a wash bottle then empty contents into a sink or a d<strong>is</strong>card basin.7. Repeat wash (step 6) an additional 2 times.8. Tap the antigen wells vigorously to remove 1X Wash Buffer. Blot the emptied Antigen Wells face down on clean paper towels or absorbent paper toremove residual 1X Wash Buffer.9. D<strong>is</strong>pense 100 µL Conjugate to all wells, using a 100 µL 8 or 12-channel pipettor.10. Cover plates with sealing tape (or place in a humid chamber) and incubate <strong>for</strong> 30 ± 1 minutes at room temperature (20 to 25°C).11. Repeat wash steps 5 through 8.12. Pipet 100 µL of Substrate Reagent to all wells, using a 100 µL 8 or 12-channel pipettor. Begin incubation timing with the addition of Substrate Reagent tothe first well. (Note: Never pour the substrate reagent into the same trough as was used <strong>for</strong> the conjugate.)13. Incubate <strong>for</strong> 10 ± 1 minutes at room temperature (20 to 25°C).14. Stop the reaction by adding 100 µL of Stop Reagent to all wells using a 100 µL 8 or 12-channel pipettor. Add the Stop Reagent in the same sequence and atthe same pace as the Substrate was added. In antibody-positive wells, color should change from blue to yellow.15. Gently blot the outside bottom of wells with a paper towel to remove droplets that may interfere with reading by the spectrophotometer. Do not rub with thepaper towel as it may scratch the optical surface of the well. (Note: Large bubbles on the surface of the liquid may affect the OD readings.)16. Measure the absorbance of each well within 1 hour of stopping the assay. Set the microwell spectrophotometer at a wavelength of 450 nm. Zero theinstrument on the blank wells, or correct all ODs by manually subtracting the blank ODs.QUALITY CONTROLEach plate run (or strips or wells from a single plate) must include the Cut-off Calibrator and all 3 controls. If multiple plates are run, include the Cut-offCalibrator and all 3 controls on each plate. It <strong>is</strong> recommended that until the user becomes familiar with the kit per<strong>for</strong>mance, all specimens, controls and the CutoffCalibrator should be run in duplicate with the Cut-off Calibrator run twice <strong>for</strong> a total of 4 wells. If single wells are used, the Cut-off Calibrator should be runin triplicate. Include a minimum of 1 blank well (containing sample diluent only) <strong>for</strong> instrument calibration purposes.The Cut-off Calibrator has been <strong>for</strong>mulated to give the optimum differentiation between negative and positive sera. Although the absorbance value may varybetween runs and between laboratories, the mean value <strong>for</strong> the Cut-off Calibrator wells must be within 0.100 to 0.700 OD units. All replicate Cut-off CalibratorODs should be within 0.10 absorbance units from the mean value.Report results as index values relative to the Cut-off Calibrator. To calculate index values, divide specimen optical density (OD) values by the mean of the CutoffCalibrator absorbance values.1. The High Positive Control index value should be greater than 3.5.2. The Low Positive Control index value should be between 1.5 and 3.5.3. The Negative Control index value should be less than 0.8.If the Calibrator or controls are not within these parameters, patient <strong>test</strong> results should be considered invalid and the assay repeated.The Positive and Negative Controls are <strong>intended</strong> to monitor <strong>for</strong> substantial reagent failure. The Positive Control should not be used as an indicator <strong>for</strong> cutoffprec<strong>is</strong>ion and only ensures reagent functionality. The Cut-off Calibrator and controls may be <strong>for</strong>mulated using the same lots of raw materials. Additional controlsmay be <strong>test</strong>ed according to guidelines or requirements of local, state, and/or federal regulations or accrediting organizations.