You also want an ePaper? Increase the reach of your titles
YUMPU automatically turns print PDFs into web optimized ePapers that Google loves.
IG-3002D Imager Barcode ScannerUser’s <strong>Manual</strong>
Contents1. Introduction .......................................................................... 11.1 Safety & Caution ................................................................ 11.2 FCC Warning ...................................................................... 22. General Description ............................................................... 32.1 Product Description ........................................................... 32.2 Illustration ......................................................................... 33. Installation ........................................................................... 43.1 Unpacking .......................................................................... 43.2 Mounting ........................................................................... 43.3 USB Driver .......................................................................... 53.4 Switching Cable .................................................................. 54. Configuring ........................................................................... 64.1 Preface ............................................................................... 64.2 Scanner Settings with Programming Codes ....................... 64.3 Scanner Settings with Utility Tool ...................................... 74.4 Factory Default Settings ..................................................... 75. Operating Settings ................................................................. 85.1 Scanning Triggering............................................................ 85.2 Time Out .......................................................................... 105.3 Good Read Mode ............................................................. 105.4 Buzzer Beep Tone ............................................................ 105.5 Good Read Duration ........................................................ 125.6 Bad Read Message Settings ............................................. 136. Imager Settings .................................................................... 146.1 Imager Mode ................................................................... 146.2 Firmware Version ............................................................ 157. Programming Codes ............................................................ 167.1 Factory Default ................................................................ 167.2 RS232 Parameters Baud Rate .......................................... 177.3 Decoding Selection .......................................................... 23Appendixes ............................................................................. 32A.Decimal Value Table ............................................................ 32B.ASCII Table ........................................................................... 33C.Readable Symbologies ......................................................... 34D.Technical Specifications ...................................................... 35E.Scan Map ............................................................................. 37F.Test Symbologies ................................................................. 38
1. IntroductionThank you for purchasing this brand-new designed 2Dimager hand held barcode scanner.This is a cutting-edge gun-type Area Imaging barcodescanner which is designed specifically for retailer,entertainment coupons, medical environment, shippingindustry and etc. That adds on more user friendlyfunctions and has replaceable cable that makes itmore easily to be operated by the customers.This high performance gun-type scanner provides thecustomer with the most cost effective solution in themarket. It is perfectly suitable and definitely the bestchoice for you.1.1 Safety & Caution1) Please read the following safety statementcarefully.2) Please preserve this user manual for referencesometime.3) Before cleaning the device, the users must cut offall AC power. Do not use liquid or spray type ofdetersive to clean the device. Please usedampish cotton cloth to clean the device.4) The outlet must set nearby the device forconnecting power easily.5) Keep the device dry to avoid short circuit.6) During installation you must fix the equipment atsolid table to avoid damage caused by falling.7) Before inserting power please ensure the voltageis healthy to the equipment.8) For safety please tie wire well and don’t putanything on the wire.9) If you don’t use this equipment for long time,please cut off the power to avoid damage fromsurge power.10) Don’t spray any liquid on this scanner because itmay cause a fire or short circuit.11) Please do not open the equipment. For safetyonly the qualified serviceman can open theequipment.1
12) If there are the following situations please contactwith the qualified serviceman to check thisequipment.13) The damage of wire or pin of power supply.14) Some Liquid infiltrate into the equipment.15) The equipment has been exposed to wetenvironment.16) The equipment can’t work well.17) The equipment has any obvious damage, makingthe device working abnormally.18) Don’t storage the device at the temperature lowerthan -20°C (-4°F) or higher than +70°C (158°F) toavoid any damage.1.2 FCC WarningThis equipment complies with the requirements inPart 15 of FCC.Any operation must comply with the conditionsbelow:1) The equipment will not cause any severeinterference.2) The equipment can avoid any interference fromenvironment.Statement:This product is classified as B class product.In environment this product may cause someinterference. In this situation the user may dosomething to avoid interference.2
2. General Description2.1 Product DescriptionIG-300 is a high performance wire 2D imager barcodescanner supporting liner, area imager barcodescanning and picture capture.This device is very easy to configure by this manual,you can set up by scanning all necessary programmingcodes one time that meet applications, the settings aredirectly saved permanently, and all settings can bedisabled after scan reset factory default.2.2 IllustrationIG-300 Series3
3. Installation3.1 Unpacking1) Take device and its accessories out of the box.2) Remove the packing material.3) Check the standard shipment packing list to makesure you have received all of the items ordered.IG-300 series- 2D Imager Scanner- Power Adaptor (if applied)- Communication Cable- User <strong>Manual</strong>4) Visually inspect the device and accessories for anyevidence of physical damage.5) If anything is missing or appears to be damaged,immediately contact your dealer.ATTENTION:Store the packing material and boxes: it shouldbe used whenever the device is transported forservicing.3.2 MountingOnce you have unpacked all components, you canstart installing the device as below steps:IG-300 2D Imager Barcode Scanner1) Connect the supplied communication cable at thebottom side of the scanner and you will hear a“click” when the connection is made.2) Turn off the host system.3) Connect the communication cable to Host system.4) Connect the Power supply (if needed) to Powercable inlet. And plug the power supply into theAC outlet.5) Turn on the host system.4
3.3 USB DriverIn case you will use the device with USB VirtualCOM port emulation, please contact with yourdealer and download the correct USB driver forVirtual COM port. Since it is necessary to install theUSB driver on your Host system and operatecorrectly between the device and your system.3.4 Switching CableBefore removing the cable from the scanner, it’srecommended to turn off the power of the hostsystem and the power supply has beendisconnected from unit.1) Find the small “Pin-hole” on the bottom of theunit.2) Use a bended regular paperclip and insert thetip into the hole.3) You will hear a “click”, then gentle on the strainreliefof the cable and it will slide out of thescanner.5
4. Configuring4.1 PrefaceHow to configure this device: The BarcodeProgramming Feature gives the possibility to changethe scanner settings with use programming codes.4.2 Scanner Settings with ProgrammingCodesYou can setup your device by scanning all necessaryprogramming codes for parameters that meetapplications. After these scans, the device will savedirectly and permanently. To go back to the factorydefault settings, just scans the programming codefactory default.In order to change the scanner settings please followthe sequence below:1) Power-up the scanner.2) Change scanner settings by scanning any of theprogramming code that meet applications.An Example:For changing the Baud rate to 38400 only scan theprogramming code that represents this.After reading a valid programming code the scannerwill give a High beep and the green led indicator willlights on.At any moment, you can stop your programming andread programming code factory default to go back todefault.6
4.3 Scanner Settings with Utility ToolManufacturer has setup this scanner with the mostcommon used programming codes, it could bepossible that you need more advanced settings to usethe scanner without any problems into your application.In this case you can setup your scanner by using theadvanced Utility Tool. This tool can be used with thefollowing operation systems: Windows98,Windows2000, Windows XP en Windows Vista.This Utility Tool can be delivered on request. Pleasecontact your dealer4.4 Factory Default SettingsThe factory default settings are shown with * and boldin the followings sectionsThe readable and default enable symbologies list,please see Appendixes C.7
5. Operating Settings5.1 Scanning TriggeringA reading session begins (lighting and decodeprocessing on) when beam is activated and stopswhen beam is deactivated.Continuous ScanningWhen the scanner is turned on a continuous readingsession begins (lighting and decode processing on).PulseA reading session begins when beam is activated andstays on until a period of inactivity lasting the timespecified by the timeout.After the timeout, the scan engine turns off.FlashingFlashing mode allows power up the lighting anddecoding are on (no need to activate the trigger line)and after a period of inactivity lasting the time specifiedby the trigger timeout, the scanner starts flashing,checking for a bar code to be read.When a bar code is detected, the lighting and decodingautomatically turn on and stay on until another periodof inactivity (timeout), after the timeout the scannerstarts flashing again.8
AutostandThis mode allows you to switch from Flashing triggermode to Level trigger mode.Autostand begins in flashing mode: At power up thelighting and decoding are on (no need to activate thetrigger line) and after a period of inactivity lasting thetime specified by the trigger timeout, the scanner startsflashing.To switch to Level trigger mode activate the trigger line(press the trigger).When in Level trigger mode, after a period of inactivitylasting the time specified by the trigger timeout, thescanner switches back to flashing mode.ToggleThis mode allows lighting and decoding toggle whenthe trigger line is activated.First trigger activation = lighting and decoding on,second trigger activation = lighting and decoding off.PresentationThis mode allows power up lighting and decoding areon. After a period of inactivity lasting the time specifiedby the trigger timeout, the lighting turns off or isdimmed. When a new bar code is presented thelighting and decoding restart and stay on until anotherperiod inactivity.9
5.2 Time Out4 sec6 sec5.3 Good Read ModeWhen active, the scan engine stops the readingsession after a successful decoding.Note: This parameter is NOT used with continuous andcontinuous + flashing modes.Not Active5.4 Buzzer Beep Tone5.4.1 Beep Tone SetupMediumLow10
5.4.2 Good Read BeepsTwo BeepsNone5.4.3 Beep Duration60 msec200 msecOff5.4.4 TimingBefore TransmissionAfter Transmission11
5.5 Good Read Duration5.5.1 Good Read Led Duration0.5 sec1 secOff5.5.2 Error BeepOff5.5.3 Setup BeepOff12
5.6 Bad Read Message SettingsActive13
6. Imager Settings6.1 Imager ModeYou can set the best reading performance depends onthe environment, your used application and type ofbarcodes.• Linear mode for decode 1D Barcodes.• Area mode for decode 1D and 2D barcodes.Area mode allows you to set the position of the VEGAin any direction regardless of the orientation of thebarcode, and perform a good read on 1D and 2Dbarcodes.Linear mode allows you to increase your decodingspeed while scanning 1D barcodes. But, you need toposition the beam across all bars in the 1D barcode.Linear imagerArea imagerBright EnvironmentArea imager withReflective Surface14
6.2 Firmware VersionDisplay the firmware version of the scanner, pleasescan below barcode.Engine Firmware VersionScanner Decoder Firmware Version15
7. Programming Codes7.1 Factory DefaultThe factory default settings are shown with bold< > in the following pages.To set the scanner parameters to factorydefaultSet factory defaultReset all configuration parameters to their factorydefault setting. After this reset you must select allrequired parameters that meet applications.7.1.1 Interface SelectionRS232 Serial ModeUSB Com Port Mode16
7.2 RS232 Parameters Baud Rate1200240048009600384007.2.1 Data BitsData Bits 77.2.2 Stop BitsStop Bits 217
7.2.3 ParityEvenOddMarkSpace7.2.4 HandshakingRTS/CTS EnableACK/NAK EnableXON/XOFF Enable18
7.2.5 Keyboard Wedge Mode Parameter1) Terminal TypeIBM PC/XTIBM PS/2 25, 302) Capslock DetectionEnable3) Upper/Lower CaseUpper CaseLower Case19
4) Send Character by ALT MethodEnable5) Select Numerical PadON6) Time out Between Characters5 ms10 ms25 ms50ms100ms20
7) Language SelectionUK EnglishItalianSpanishFrenchGermanSwedishSwitzerlandHungarianJapanese21
BelgiumPortugueseDenmarkNetherlandsTurkeyReserved 122
7.3 Decoding Selection7.3.1 Symbologies SelectionAustralian Post ONAZTEC ONBPO ONCanada Post ONCODABAR ONCodablock A ON23
Codablock F ONCODE 11 ONCODE 39 OFFCODE 93 ONCODE 128 OFF24
GS1-128 OFFDATAMATRIX OFFDATAMATRIX ‐ MIRROR ONDutch Post ONEAN-8 OFFEAN-13 OFF25
EAN 128 OFFGS1 CC-A/B ONGS1 CC-C ONGS1 DataBar-Omni ONGS1 DataBar Limited ONGS1 DataBar Expanded ON26
Infomail ONInterleaved 2 of 5 ONJapan Post ONMatrix 2 of 5 ONMaxiCode ONMicroPDF417 ON27
MSI ONPDF417 OFFPlanet ONPLESSEY ONPostnet ONQR Code ON28
Standard 2 of 5 ONSweden Post ONTelepen ONTLC 39 ONUPC-A OFFUPC-E OFF29
7.3.2 Multi CodeThe multicode function is used configure the scannerto read a series of bar codes and then transmit themall at once.ActiveActive exclusiveNumber of bar codes –compose: 2Number of bar codes –compose: 3Number of bar codes ‐compose: 4Number of bar codes –compose: 5Number of bar codes ‐compose: 630
7.3.3 PostamblesThe scanner can be programmed to output Barcodedata according to the following format: [BAR CODEDATA] [POSTAMBLE STRING]Example:To send a after the Barcode, scan onlyprogramming code .As a result, the scanner will give the following barcodedata output:[BAR CODE DATA] []Postamble NoneCRLFTABSP31
AppendixesA. Decimal Value Table012345678932
B. ASCII TableA B CD E FG H IJ K LM N OP Q RS T UV W XYZ33
C. Readable Symbologies1D SymbologiesSymbologies ReadableDefaultEnableEAN/UPC ○ ○UCC/EAN128 ○ ○ISBN ○ISBT ○Code 11 ○Code 39 ○ ○Code 93/93i ○Code 128 ○ ○Interleaved 2 of 5 ○Matrix 2 of 5 ○Instustrial 2 of 5 ○Standard 2 of 5 ○Codabar ○MSI ○Plessey ○Telepen ○BPO ○Codablock ○Informail ○Planet ○TLC 39 ○Postnet ○Postal codes ○GS1‐128○GS1 CC‐A/B/C ○GS1 DataBarOmnidirectional○GS1 DataBarLimited○GS1 DataBarExpanded○34
2D SymbologiesSymbologies ReadableDefaultEnableData Matrix ○PDF417 ○ ○MicroPDF417 ○MaxiCode ○QR code ○Aztec ○EAN.UCCcomposite○D. Technical SpecificationsD-1 Physical CharacteristicsWeightScanner Approx. 135gAccessoryKBW cable Approx. 75gRS232 Cable Approx. 123gUSB Cable Approx. 67gAC adaptor Approx. 125gMaterialABS PlasticConnector RJ 45C 10PinsCable Length 5Ft. (150mm)DimensionScanner 193x90x72mmD-2 Performance Scanner CharacteristicsLight source Visible Red light 650nm ± 10nmScan rate 200scans/sec auto adaptive inlinear mode56 images/sec auto adaptive inarea modeOptical 752 Horizontal x 480 Verticalresolution pixels, 256 gray levelsScan angle Horizontal 70°±10% (Forward: 20°/Backward: 50°)Vertical 80°±10% (Left 40°/ Right40°)InterfaceIG‐300 RS232, USB (HID KBW and VirtualCOM Port)35
D-3 Indicator LED StatusScannerLight Signal Statusgood readGreen 1 blink and 1 beepand transmittedD-4 Electrical CharacteristicsOperation Voltage 5 VDC ±5%Current Operating 450 mA (max) @ 5 VDCCurrent Standby 37 mA typical @ 5 VDCAC transformers5.2 VDC @ 650 mAInput AC 100‐240VD-5 EnvironmentalOperating Temp 0°C to 50°CStorage Temp. ‐20°C to 70°CRelative Humidity 0 to 95% non‐condensingAmbient light 100,000 Lux (direct sunlight)D-6 Regulatory of ComplianceFCC, CE, RoHs36
E. Scan MapSymbologyDensityMinimumDistance(+/‐ 10%)MaximumDistance(+/‐ 10%)0.125 mm 5.2 cm 12.1 cm0.20mm 2.0 cm 21.5 cmCode 39 0.25mm 2.4 cm 26 cm0.5mm 4 cm 44 cm1mm 7 cm 82 cmUPC / EAN 0.33 mm 4 cm 31 cm0.191 mm 5.3 cm 16.2 cmData matrix 0.254 mm 3.8 cm 21 cm0.381 mm * 28 cm0.16 mm 5.2 cm 14.4 cmPDF417 0.254 mm 3.5 cm 22 cm0.381 mm 3 cm 36 cm37
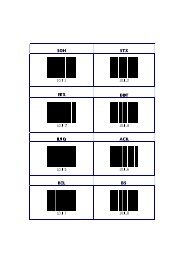
F. Test SymbologiesScan one or more of these barcodes to test barcodesymbologies you enabled.CodabarCode 39Code 93Code 128DataMatrixEAN 8EAN131234 56701 234567 890128EAN 128Interleaved 2 of 5MSI code38
PDF417GS1 DataBarOmnidirectionalGS1 DataBar Omni StackedGS1 DataBar ExpandedGS1DataBar Expanded StackedGS1 DataBar LimitedUPC A0 12345 67890 5UPC E0 123456 539
Set factory defaultEngine Firmware VersionScanner Decoder Firmware VersionDue to <strong>Champtek</strong>’s / Scantech ID’s continuing productimprovement programs, specifications and features aresubject to change without notice.0145-88E0091V001