Eagle - Premier RC
Eagle - Premier RC
Eagle - Premier RC
You also want an ePaper? Increase the reach of your titles
YUMPU automatically turns print PDFs into web optimized ePapers that Google loves.
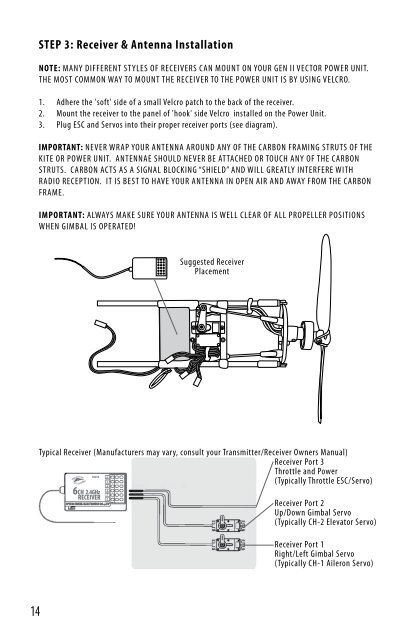
STEP 3: Receiver & Antenna InstallationNOTE: Many different styles of receivers can mount on your GEN II Vector Power Unit.The most common way to mount the receiver to the Power Unit is by using Velcro.STEP 4: Transmitter Power-Up & Battery InstallationIMPORTANT: ALWAYS TURN TRANSMITTER “ON” FIRST BEFORE POWERING UP VECTOR KITE. ALWAYSDE-POWER VECTOR KITE BEFORE TUNRNING TRANSMITTER OFF.1.2.3.Adhere the 'soft' side of a small Velcro patch to the back of the receiver.Mount the receiver to the panel of 'hook' side Velcro installed on the Power Unit.Plug ESC and Servos into their proper receiver ports (see diagram).1.2.Make sure throttle control is all the way back (down). Make sure all trim controls are in themiddle position.Turn the transmitter on.IMPORTANT: Never wrap your antenna around any of the carbon framing struts of thekite or power unit. Antennae should never be attached or touch any of the carbonstruts. Carbon acts as a signal blocking “shield” and will greatly interfere withradio reception. It is best to have your antenna in open air and away from the carbonframe.IMPORTANT: Always make sure your antenna is well clear of all propeller positionswhen gimbal is operated!Suggested ReceiverPlacementThrottleControlTrimControlsTurn PowerSwitch to'ON' Position3.Plug the Battery into the Battery Extension Cable inside the body and then plug the upper partor the Battery Extension Cable to the Power Unit on top of the kite sail. The Battery ExtensionCable is located on a small opening on the <strong>Eagle</strong>s back and goes through the sail of the kiteand ends inside the kite at the battery compartment area. To access the internal batterycompartment you must open the zipper in the lower body of the kite. The Battery ExtensionCable is to allow for ease of battery changing and also for ease of Power Unit removal. Closethe zipper on body before launch.Typical Receiver (Manufacturers may vary, consult your Transmitter/Receiver Owners Manual)Receiver Port 3Throttle and Power(Typically Throttle ESC/Servo)Receiver Port 2Up/Down Gimbal Servo(Typically CH-2 Elevator Servo)Receiver Port 1Right/Left Gimbal Servo(Typically CH-1 Aileron Servo)Connect Batteryto BatteryExtension CableConnect BatteryExtension Cableto Power Unit14 15


