

Eagle - Premier RC
Eagle - Premier RC
Eagle - Premier RC

You also want an ePaper? Increase the reach of your titles
YUMPU automatically turns print PDFs into web optimized ePapers that Google loves.
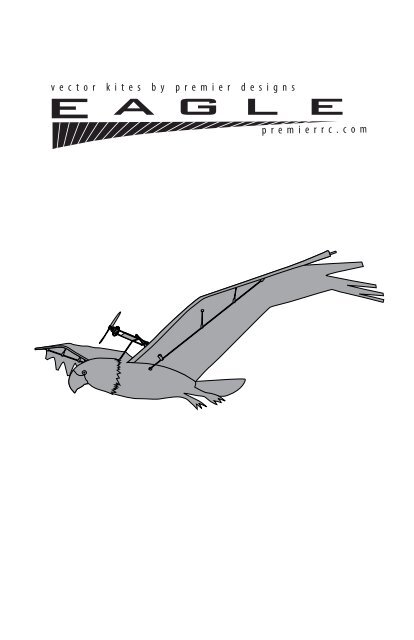
Congratulations!Names of PartsWelcome to the world of Vector Kite Flying. Keep in mind that you are nowone of the first pioneers of this exciting new <strong>RC</strong> sport. Vector Kite Flyingoffers you new challenges and excitement not found in any other form ofmodel aviation. With the <strong>Premier</strong> Gimbal System (patent pending) installedin a Vector-Ready Kite, you will discover an exhilarating dimensionbetween the beauty and gracefulness of traditional kite flying with the artof piloting remote aircraft.If you have any questions or want to learn more about Vector Kites, pleasesee us on the web at www.premier<strong>RC</strong>.comStand-offMotor MountFrameInner LeadingEdge StrutOuter LeadingEdge ConnectorStand-offWing Tip NockSincerely,The Staff at <strong>Premier</strong> KitesUnderwingSpreaderTail SpreaderTipsYour Vector Powered <strong>Eagle</strong> Kite is one of the most majestic flying productsto date. As it flies overhead many onlookers will believe they are seeingthe real animal in the wild! Because of its high aspect ratio and camberedwings, the <strong>Eagle</strong> also boasts one the best glide ratios and sink rates of theVector Kite line. It is interesting to note that such performance comesfrom a close replication of the real bird in the natural world.Motor MountFrame ExtensionMotor MountFrame ExtensionConnectorSpineIMPORTANT: TAILMUST BE FACINGUPWARD FORPROPER FLIGHTWith that said, be careful of thermals and wind because this bird caneasily fly away from you. First flights should be on large fields with nowind – preferably in the early morning or very late afternoon. If you arein trouble in rough conditions, maneuver the gimbal thrust downwardand to one side. Downward thrust to one side will help put the <strong>Eagle</strong> in aquick circular descent.2 3
Kite Assembly Instructions12Inner Leading Edge StrutOuter LeadingEdge ConnectorStart of SleeveStraighten the beak after unpackingInsert Inner Leading Edge Strut into the sleeve inside the zippered body.Leading Edge Strut should extend all the way into the Outer Leading EdgeConnector. Repeat with second Inner Leading Edge Strut on other side.Motor Mount Frame3Connect InnerLeading EdgeStruts to DihedralCorrect Dihedral PositionIncorrect Dihedral PositionSide Motor Mount Frame ExtensionsRear Motor Mount Frame ExtensionTail SpreaderInner Leading Edge StrutsUnderwing SpreadersUnroll the kite.Lay the kite out on a flat surface with the zippered pocket facing up.Straighten the <strong>Eagle</strong>'s beak. Set aside and identify the struts.Insert remaining ends of both Inner Leading Edge Struts into the UpperDihedral. Make sure the tip of the Dihedral is pointed towards the zipper,not towards the back of the <strong>Eagle</strong>.4 5
4Insert UnderwingSpreader through thehole in zippered bodyand into the dihedral.6BungeeNockInsert the Underwing Spreader into the hole in the zipperd body.Make sure the dihedral is positioned correctly and insert theUnderwing Spreader into the dihedral. Zip up the body.Stretch the Wing Tension Bungee Loops over the Wing Tip Nocks.5Outer LeadingEdge Connector7IMPORTANT!Correct Tail PositionSlide Tail Spreaderthrough loops andinto pockets Loops PocketStand-offsIncorrect Tail PositionInsert remaining end of the Underwing Spreader into theOuter Leading Edge Connector. Connect both Stand-offs intothe Stand-off Connectors on the Underwing Spreader.Repeat 4 & 5 with second Underwing Spreader on other side.Flip the kite over. Slide the Tail Spreader under the loops at the middle ofthe tail. Insert the ends of the Tail Spreader into the pockets on each sideof the tail. Make sure the tail points upward. If necessary, rotatethe ferrule inside the spine sleeve until the tail points upward.6 7
8Motor Mount FrameExtension Connector10Position the Motor Mount Frame Extension Connectors with their openingsthrough the holes on the wings and body back.Slide the Motor Mount Frame onto the Rear Motor Mount Frame Extension.9Stops11Insert Side Motor MountFrame Extensions intoMotor Mount FrameInsert Side MotorMount Extensionsinto ConnectorInsert the Rear Motor Mount Frame Extension into the Motor MountFrame Extension Connector attached to the Spine of the <strong>Eagle</strong>. Stopsshould be away from the Connector.Insert the Side Motor Mount Frame Extensions into the Motor Mount Framethen into the Connectors on the Wing.8 9
12PowerUnitGetting Started:<strong>RC</strong> Flight InstructionsYour Vector Powered Kite is composed of three main components:1.2.3.The Vector Ready KiteThe Vector Power UnitThe Transmitter/ReceiverBattery ExtensionCableSlide Power Unit all the way into the front of the Motor Mount Frame.The Vector Ready Kite (VR) is a high quality aircraft that is built with rip-stop nylon sails, carbonand/or fiberglass framing material. A Vector Ready (VR) kite also includes specially built frameworkto receive the Vector Power Unit. This framework also includes provisions to mount the LiPo batterypack. The Vector Ready Kite includes a high quality case to store your kite and motor mountingframework. It is best to store your Vector Kite in this case and keep it in a cool dry place. The casewill protect your kite from unnecessary harmful UV and dust.The Vector Power Unit is what powers and controls your Vector Kite. This unit is purchased witha foam protection jacket, battery, battery charger, battery power supply, propeller, prop-saver andspare propeller and instruction manual. Although you may be tempted to store your Vector PowerUnit in your kite case, we recommend you store it wrapped in the protective foam jacket and inyour field bag. The servos, linkages, ESC and motor are delicate components that should not becompressed or treated roughly. The Vector Power Unit can also be purchased separately withoutaccessories such as the battery, charger and field bag.13BungeeBungeeThe Transmitter/Receiver is what links the pilot to the Vector Kite. <strong>Premier</strong> <strong>RC</strong> offers a very simpleTransmitter/Receiver package for beginners to get started. This transmitter is limited to about fiveto ten pilots with the same unit flying at the same time. Many hobbyists are flying Vector Kitesusing transmitters and receivers of their choice. There are many fine brands of transmitter/receiverproducts available and <strong>Premier</strong> <strong>RC</strong> encourages pilots to use the brand they are most comfortablewith. Many of these transmitters have much greater capacity to handle interference when flown withother transmitters. Some transmitters also offer helpful programming options that may enhance theflying experience. Fortunately, a basic Vector Kite set-up only requires three channels: THROTTLE(proportional), LEFT-RIGHT servo (typically elevator) and an UP-DOWN servo (typically aileron). Ofcourse, other channels on more sophisticated transmitters may be incorporated to operate cameras,lights, parachutes or “candy” drops or other ideas left up to the imagination of the modeler.BungeeSide viewStretch Bungee on Power Unit around hook on Motor Mount Frame.There is also a bungee on the motor mount frame which connects to a hookon the motor mount frame extension.10 11
STEP 3: Receiver & Antenna InstallationNOTE: Many different styles of receivers can mount on your GEN II Vector Power Unit.The most common way to mount the receiver to the Power Unit is by using Velcro.STEP 4: Transmitter Power-Up & Battery InstallationIMPORTANT: ALWAYS TURN TRANSMITTER “ON” FIRST BEFORE POWERING UP VECTOR KITE. ALWAYSDE-POWER VECTOR KITE BEFORE TUNRNING TRANSMITTER OFF.1.2.3.Adhere the 'soft' side of a small Velcro patch to the back of the receiver.Mount the receiver to the panel of 'hook' side Velcro installed on the Power Unit.Plug ESC and Servos into their proper receiver ports (see diagram).1.2.Make sure throttle control is all the way back (down). Make sure all trim controls are in themiddle position.Turn the transmitter on.IMPORTANT: Never wrap your antenna around any of the carbon framing struts of thekite or power unit. Antennae should never be attached or touch any of the carbonstruts. Carbon acts as a signal blocking “shield” and will greatly interfere withradio reception. It is best to have your antenna in open air and away from the carbonframe.IMPORTANT: Always make sure your antenna is well clear of all propeller positionswhen gimbal is operated!Suggested ReceiverPlacementThrottleControlTrimControlsTurn PowerSwitch to'ON' Position3.Plug the Battery into the Battery Extension Cable inside the body and then plug the upper partor the Battery Extension Cable to the Power Unit on top of the kite sail. The Battery ExtensionCable is located on a small opening on the <strong>Eagle</strong>s back and goes through the sail of the kiteand ends inside the kite at the battery compartment area. To access the internal batterycompartment you must open the zipper in the lower body of the kite. The Battery ExtensionCable is to allow for ease of battery changing and also for ease of Power Unit removal. Closethe zipper on body before launch.Typical Receiver (Manufacturers may vary, consult your Transmitter/Receiver Owners Manual)Receiver Port 3Throttle and Power(Typically Throttle ESC/Servo)Receiver Port 2Up/Down Gimbal Servo(Typically CH-2 Elevator Servo)Receiver Port 1Right/Left Gimbal Servo(Typically CH-1 Aileron Servo)Connect Batteryto BatteryExtension CableConnect BatteryExtension Cableto Power Unit14 15
Right ControlStick in NeutralRight ControlStick PointingBackRight ControlStick PointingForwardPropeller AlignedStraightPropellerTurns UpPropellerTurns DownSTEP 5: Control Test1.Follow the diagrams on the opposite page to make sure the controls function per theillustrations.STEP 6: Servo Reversing & Changing Servo Arm PositionsNOTE: Most transmitters include servo reversing switches. These are usually locatedon the front of the transmitter or in the battery compartment of your transmitter(please consult your manufacturer’s manual). If your controls work opposite thanthe illustrations or if you prefer opposite stick control than what is illustrated, youmay change the switch positions.NOTE: On the Vector Power Unit your servos come factory adjusted to the correct trimposition. If you need to adjust the trim position of either the UP-DOWN servo or LEFT-RIGHT servo there are two methods available.1. ELECTRONIC METHOD – The electronic method is the easiest way to adjust the trim on theservo. Most transmitters include trim adjustment controls located on either side of thecontrol sticks. You may read more about these adjustments in “STEP 11: TRIM ADJUSTMENTS”.Some transmitters include programmable trim and servo adjustments. Please consult yourtransmitter manual.2. MECHANICAL METHOD – The mechanical method is done by unscrewing the servo arm releasescrew, pulling off the servo arm and repositioning the servo arm to the desired spot. Ingeneral, when the gimbal is in neutral position, the servo arm should be at about a 90° angleto the servo (see diagram). Neutral position is defined when the gimbal is adjusted so themotor axle runs parallel to the GEN II frame when looked at from both a top view and a sideview. Mechanical adjustments should only be made if large changes are needed in the servocontrol arms.Neutral Position is at about 90°Servo ArmRight ControlStick PointingRightPropellerTurns RightRight ControlStick PointingLeftPropellerTurns LeftServo Arm Release Screw16 17
STEP 7: Field ConditionsIMPORTANT: ON YOUR FIRST FLIGHTS, CHOOSE A DAY WITH NO WIND. THE CALMER THE WIND THEBETTER FOR LEARNING TO CONTROL YOUR VECTOR KITE. REMEMBER, FLYING IN WIND IS BY FAR THENUMBER ONE CAUSE FOR CRASHES FOR BEGINNER VECTOR KITE PILOTS.IMPORTANT: CHOOSE A LARGE FIELD FOR YOUR FIRST FLIGHTS. THE FIELD SHOULD HAVE A MINIMUMOF 300 FEET IN ALL DIRECTIONS FROM THE PILOT.IMPORTANT: NEVER FLY OVER OR NEAR PEOPLE, BUILDINGS, POWER LINES, HIGHWAYS, TRAINTRACKS, MOTOR VEHICLES, TREES, HARD SURFACES, WATER AND/OR ANYTHING THAT YOU COULD CRASHINTO AND CAUSE HARM, INJURY OR DAMAGE TO YOU, YOUR VECTOR KITE AND/OR OTHERS. PLEASETAKE THIS WARNING SERIOUSLY.IMPORTANT: DO NOT ATTEMPT TO FLY INDOORS, SUCH AS IN A GYM, UNTIL YOU HAVE FULLY MASTEREDCONTROL OF YOUR VECTOR KITE. DO NOT FLY INDOORS WITH PEOPLE IN THE INDOOR AREA.1.2.Although you are anxious to fly your Vector Kite, it is important to wait for a calm day.Remember, Vector Kites are the “grandchildren” of traditional kites. They are still very muchaffected by the wind. Wind is a variable you can do without while learning. For beginners,it is the number one cause for crashes. Once you become familiar flying your Vector Kite, alittle wind can be fun to play with but for initial training, pick a calm day. Grab some grass andthrow it in the air. The grass should almost drop straight to the ground. You should not feelwind on any part ofyour body. If you seeleaves moving in trees,it is best to wait foranother day.Pick a large field. Youwill want somethingthe size of a footballfield or two soccerfields. Make sure itis free from obstaclessuch as buildings ortrees. Do not fly nearpeople or vehicles.300 ft. clearancein all directionsSTEP 8: Range TestA range test requires two people. One person is needed to operate the transmitter and the other is tocheck and hold the Vector Kite.1. Hold the transmitter and have the other person walk about 100 steps away from the transmitterwhile holding the Vector Kite. Make sure the person holding the kite has a firm grip on thekite and does not come in contact with the propeller.2. Turn the transmitter on.3. Have the person plug in the battery to the Vector Kite.4. Pull the throttle (left stick) all the way to the backward position. This will arm the throttle.5. Move the steering controls (right stick) and have the other person observe the Vector Kite.Make sure the controls operate smoothly. Use the directions in the “CONTROL TEST” sectionabove to test the Vector Power Unit. Make sure the gimbal moves up and down and from sideto side per the diagrams.6. Signal to the other person you want to test the throttle. SLIGHTLY move the throttle stickforward and determine if the throttle is working properly.7. If all works well, have the person bring the Vector Kite back to you to prepare for launch.8. If controls do not work after the range test, check all connections and batteries. Make sure youare using a fully charged battery for the Vector Kite and that you have fresh batteries in thetransmitter. Make sure the polarities of all the batteries in the transmitter are correct per theinstructions inside the battery hatch.IF MODEL STILL DOES NOT RANGE TEST CORRECTLY, DO NOT FLY YOUR VECTOR KITE. PLEASE CALLTHE PREMIER TOLL FREE CUSTOMER SERVICE NUMBER FOR HELP 1-888-416-0174.CAUTION: THE PERSON HOLDING THE VECTOR KITE SHOULD HAVE A FIRM GRIP ON THE KITE.MAKE SURE PROPELLER IS COMPLETELY CLEAR OF BODY AND HAIR.100 StepsLarge Field18 19
STEP9: Launch1.2.3.4.5.For first flights, your Vector Kite works best with a hand launch.Hold the Vector Kite wings level in one hand while holding the transmitter in the other hand.Move the throttle stick forward about ½ to ¾ speed and throw the Vector Kite forward andslightly up.Immediately get both hands on the transmitter. The throttle stick should be positioned so theVector Kite climbs steadily in the air.Do not attempt to control the Vector Kite up or down or left or right (right stick on controls)until the Vector Kite is at least 60 feet high in the air.IMPORTANT TIPS FOR LAUNCH:1.2.As discussed earlier, you should have your first flights with no wind. However if there is a slightwind, ALWAYS LAUNCH INTO THE WIND.WHEN LAUNCHING, MAKE SURE THE SPINNING PROPELLER IS COMPLETELY AWAY FROM YOUR HAIR,HEAD, HANDS OR ANY PART OF YOUR BODY. INJURY IS VERY POSSIBLE WITH EVEN THE SLIGHTESTPROPELLER CONTACT.STEP 10: Flying1.2.3.4.After launching, allow the Vector Kite to climb up to at least 60 feet. As the Vector Kiteclimbs you may need to make slight right or left control adjustments to fly straight into thewind.Once you have reached sufficient altitude you may turn the Vector Kite. Turning isaccomplished by a slight push of the control stick either left or right.It is important to note that the Vector Thrust Power Unit has a very wide range of control. Themost common mistake for beginners is over controlling the Power Unit. Only make slight stickmovements at first.Your Vector Kite is capable of very radical maneuvers; however it should be the goal of thebeginner to simply launch the kite, fly in gentle circles and land the kite near the pilot. Thisshould be practiced many times before aerobatics are attempted.GENERAL CONTROL TIPS:1.2.3.Keep in mind that vector thrust maneuvers kites in a different manner than traditional movingcontrol surfaces such as ailerons, rudders and elevators. Vector thrust works by directing thedriving force of the propeller to the direction you want the kite to go. In light of this it isimportant to realize that without some throttle input, the Vector Kite can not be controlled.Many beginner flyers have the problem concerning which way to turn as the kite is goingaway from you (simple right and left turns) and coming toward you (left and right is oppositeof stick). Although correct “coming and going” turns become second nature with a littleexperience, here is a good tip: while flying, pretend you are seated right at the tail of the kiteand it should be easier making a good judgment about which way to turn. Made a mistake? Noproblem, just make the correction in the air – kites are slow and usually easy to correct.At the beginning, keep the Vector Kite flying in front of you in the field. Try to avoid flying thekite overhead and having to frequently turn your whole body around in circles.Wind DirectionWind Direction20 21
STEP 10: FlyingSTEP 11: Trim AdjustmentsGENERAL CONTROL TIPS CONTINUED:4.5.6.7.You may shut off the engine in mid flight however you must remember that to turn the VectorKite in any direction you must power up the motor to direct some amount of thrust in thedirection you want to make a turn. Control can only be asserted on the kite if the motor poweris on. Keep in mind the more power and the more stick “throw” to the transmitter, the fasterand more forceful the reaction of the kite.Start with only small control inputs and work your way up to greater control input as you gainexperience.It is also possible to turn the motor off, position the desired thrust direction and then give a“burst” of power to re-direction the kite.Faster turns are also possible by giving the gimbal a slight “up” vector thrust on the control stickwhile moving the stick to the direction of the turn.8. Strategy for Encountering Unforeseen Wind: Steer the Vector Kite into the wind.Keep the nose into the wind by using “left-right” thrust controls. Once headed into the wind,use “downward” vector thrust by pushing the control stick forward to help maintain control andpitch of the kite. With practice, Vector Kites can advance forward in moderate headwinds.1.2.In a zero wind condition and with the control stick in neutral, look carefully as the Vector Kiteis flying and see whether it has a tendency to go right or left.If you wish, most transmitters are equipped with right/left trim controls to compensate forminor variations or personal preferences in flight control. If you find your kite is favoring theright more than desired, simply adjust trim to the left until straight flight is achieved with thecontrol stick in neutral position. If the kite is favoring toward a left flight path simply trim tothe right. Only try trimming in small increments.If kite is favoring the right,adjust trim to the leftIf kite is favoring the left,adjust trim to the rightWind DirectionUse DownwardVector ThrustSteer Into the Wind3.Most transmitters are also equipped with up/down trim controls. These should only be usedafter experience flying the Vector Kite. They are included to make minor pitch adjustmentsdepending on personal flight preferences. If you are an advanced flyer and would like moreclimb you may try adjusting the trim to make the gimbal direct more upward thrust. A littlemore upward thrust can also be used by advanced flyers for slower indoor flying. If you arean advanced pilot and are flying in slight breezes, you may find a little downward thrusttrim helpful. The best is to become thoroughly familiar with Vector Flying before pitch trimadjustments are made.9. FOR THE FASTEST DESCENT IN AN EMERGENCY: Use full downward thrust in combination with ahard turn. Level off when the kite is close to the ground.10. Keep in mind that the wind can be stronger at higher altitudes. Be careful when ascending.11. Remember, up/down (pitch) and left/right (yaw) control can all be used in any combination forthe desired maneuver. Focus first on left/right control until you experiment with pitch control.12. Remember, the beauty of vector thrust is that it does not rely on airspeed. It is a completelynew concept for kites and most aircraft. Even if the kite stalls or stops in the air, you canstill power it right and left or up and down or in any pitch or yaw combination. As you gainexperience, you will undoubtedly discover new maneuvers never seen before. You are a pioneerpilot in the new world of Vector Kiting!For more upward thrust,adjust trim upFor more downward thrust,adjust trim down22 23
STEP 12: Throttle and ESCSTEP 13: Landing1.2.3.4.The throttle stick (left stick on transmitter) is one of the most important controls to achieveclimbing, descending and level flight.Once your Vector Kite has achieved a good altitude, practice slightly pulling back on thethrottle stick to the point that the kite descends. As the kite descends, try slightly increasingthrottle and try and keep the kite flying level.Make it a goal to achieve level flight with your Vector Kite before attempting aerobatics orradical maneuvers.Please note your Vector Power Unit is equipped with a powerful custom designed 16 polebrushless motor. Although it weighs only 26 grams, it has about 800 grams of thrust withthe matching propeller, battery and ESC. The ESC is a sophisticated device that controls thebrushless motor’s speed and power usage. For the advanced hobbyist, <strong>Premier</strong> <strong>RC</strong> has availablefor download a full set of instructions for the ESC that includes specifications and programmingfeatures. These instructions can be found at www.premier<strong>RC</strong>.com. <strong>Premier</strong> <strong>RC</strong> does notrecommend any sort of re-programming of the ESC for beginner flyers however, advancedhobbyists may find the full ESC instructions useful.1.2.3.On your first flights, practice cutting the throttle down to about ½ or less and making acontrolled descent.As the Vector Kite descends under less power, steer the kite back to you. As the kite gets closeto the ground, simply cut power and it will gently glide down.For more advanced landings, you may “flair” the kite just before it lands. A flair is accomplishedby giving the kite a burst of “up” vector thrust just before the kite comes down to the ground.This maneuver makes for a gentler nose up landing.Cut Power as KiteNears the Ground10 ft.ThrottlePower 'Off'MaximumThrottle PowerLANDING TIP:It is important to note that if you lose all battery power on the Vector Power Unit you also lose theability to steer. A de-powered Vector Kite is no problem as long as it is free from obstacles to land.Thus on first flights, choose a large field and keep close to the landing zone. A de-powered kitesimply floats gently down to the ground.WHEN YOU ARE AT FULL THROTTLE AND CAN NOT CLIMB ANYMORE, IT IS TIME TO STEER BACK TO ASUITABLE LANDING ZONE. This means you are running out of power. The ESC is also programmed toreduce power when the battery is low. Pilots will often sense this as a “surge” or sudden power dropwhile flying. Even though you are running low on power, you still have enough power to steer. Useyour last bit of power wisely to steer back to the landing zone. Depending on conditions, you mayonly have a half minute or less of effective steering power left. For power conservation, use shortbursts of directed vector thrust to coax the nose of the kite to the direction you want it to go.EMERGANCY LANDING TIP FOR WIND ENCOUNTERS:Although beginners should not attempt to fly their Vector Kite in any sort of wind, you may findyourself at some point encountering an unforeseen breeze. As soon as you realize you are in a heador tail wind, immediately turn the kite’s nose into the wind and head directly into the wind. Give thePower Unit downward thrust and while steering the nose into the wind see if you can move forwardand descend. If you are headed into the wind with full downward thrust and your kite begins toclimb because you are being overrun by the breeze, POINT THE VECTOR THRUST DOWN AND GIVE THEPOWER UNIT A HARD TURN INPUT EITHER RIGHT OR LEFT. This maneuver will put the kite in a spiralingdive downward toward the ground. You will still loose some position if the wind is strong but at leastyour kite will be coming down. Level the kite off as it gets close to the ground and land.24 25
STEP 14: Center of Gravity AdjustmentsWARNINGS AND SAFETY:1.2.3.4.Your Vector Power Unit is equipped with Velcro panels that allow adjustments to the center ofgravity of your kite.For your first flights, simply place the battery in the front of the rear panel as shown.If you would like to make your Vector Kite more nose heavy, move the battery toward the frontof the nose. Usually a heavier nose is best if the pilot is encountering a slight breeze.If you would like to make your Vector Kite more “stalled” or tail heavy, move the batterytoward the back of the power unit. Sometimes very advanced pilots will fly a little stalled whileattempting very slow flight indoors or in zero wind conditions.In all your flight endeavors, safety must come first! Please read your instructions and allwarnings carefully. Your Vector Kite is capable of creating serious injury to you and others if you donot read and follow the warnings and directions carefully.Your Vector Kite is not a toy. It should only be flown by adults or under strict adult supervision forages 15 and under.Keep the propeller away from all parts of your body. Keep the propeller away from all parts of yourbody even if it is not spinning! Do not let hair or loose clothing get close to the propeller especiallyduring launch because entanglement could cause injury.Do not fly your Vector Kite in windy conditions. In windy conditions it is very possible to loosecontrol of your Vector Kite and cause serious injury.Never fly your Vector Kite near or over people, highways, roads, houses, buildings, vehicles, traintracks, power lines, hard surfaces, water or trees.Never attempt to catch a Vector Kite while flying or landing because both the spinning propeller andmoving kite could cause injury.Use only a battery charger intended for the Lithium Polymer batteries that come with the VectorPower Unit. NEVER, NEVER, NEVER leave the charger unattended while charging the battery.ALWAYS place the battery and charger on a fireproof surface such as in a ceramic or metal pot and ona concrete surface. The potential for a damaged, defective or improperly charged battery to catch fireis very real.Never cut into a battery. Never use a battery that looks damaged from a crash. Never use a batterythat looks swollen. Do not use a battery that has damage to the wire insulation. Never intentionallyshort circuit a battery. READ ALL BATTERY WARNINGS STATED EARLIER IN THESE INSTRUCTIONS.Always hold a Vector Kite firmly when the battery is plugged into the Vector Power Unit to keepbody parts away from the propeller.Battery Placementfor Standard FlyingBattery Placementfor Nose Heavy FlyingBattery Placementfor Tail Heavy FlyingAlways turn the transmitter on first before plugging in the Vector Power Unit.Always unplug the Vector Power Unit first before turning off the transmitter.STEP 13: Crash RepairPlease use common sense. Fly Safe.Your Vector Kite is much more resilient to crash damage than traditional <strong>RC</strong> aircraft. The carbonrods, fittings and rip-stop fabric are very durable and have a lot of “give” on most impacts.Nevertheless, as with all things piloted by man, crashes do occur and some damage can result.<strong>Premier</strong> <strong>RC</strong> stocks a complete line of spare parts including carbon rods, fittings, kite sails and powerunit parts. If you need a spare part, please visit our website at www.premier<strong>RC</strong>.com and all partsare available for your Vector Kite. If you need further help, call our toll free customer service lineat 1-888-416-0174.26 27
THE ACADEMY OF MODEL AERONAUTICS:To learn more about the exciting world of remote control flight we highly recommend you join theAcademy of Model Aeronautics. Please visit their website at www.modelaircraft.orgTHE AMERICAN KITEFLIERS ASSOCIATION:To learn about the exciting world of kites and kite flying we highly recommend you join the AmericanKite Flyers Association. Please visit their website at www.aka.kite.orgGen II MotorMount Frame10314Parts ListLeading EdgeStruts10309WARRANTY AND CUSTOMER SERVICE:Due to the unforeseen events that encompass the nature of remote control flying devices, <strong>Premier</strong> <strong>RC</strong>can not extend the warranty beyond the initial preflight testing. It is up to the user to carefully checkthe product’s operation and parts through the control tests and range tests listed above before yourfirst flight. Any damage incurred during launching, flying, landing or crashing is not covered underthe warranty.UnderwingSpreader10311Tail Spreader10313WARRANTY:<strong>Premier</strong> <strong>RC</strong> guarantees this product to be free of defects in material and workmanship for the dateof one year after the purchase of the product. If you discover any defects during initial pre-flighttesting please call our Customer Service number at 1-888-416-0174 to report the problem. Ifdirected to do so, you will be given an RA (return authorization number) to return the product.<strong>Premier</strong> <strong>RC</strong> will determine the problem and at our discretion repair or replace the product. Warrantycoverage does not extend to products that have been flown.REPLACEMENT & OPTIONAL PARTS:Propulsion Unit Parts:10291 Gen II RTF Vector Power Package10292 Gen II ARF Vector Power Package10293 Gen II Vector Power Unit10328 Gen II Frame & Gimbal Only10201 V780 High Performance Brushless Motor10203 20 Amp ESC10205 3 cell, 11.1 volt 1050mAp LiPo Battery10207 Battery Charger10286 Battery Charger Power Supply10209 GWS 8040 Propeller10211 Prop-saver (includes o-ring)10264 O-ring10212 High Torque 7520 MG Metal Gear Servo10213 Servo Arm Set10327 Gen II Servo Push Rods10214 2.4mHz Four Channel Transmitter and Receiver10215 2.4mHz Four Channel Receiver10218 <strong>Premier</strong> Transmitter Flying Strap10332 Battery Extension CableKite Parts:10314 Gen II <strong>Eagle</strong> Motor Mount Frame10309 Leading Edge Struts10311 Underwing Spreaders10312 Spine Strut with Dihedrals and Battery Mount10313 Tail SpreaderMiscellaneous Parts:10267 End Caps for P300 rod10269 J-4 Fitting10271 APAC Fitting10261 P – Series Wrapped Carbon Rod10284 Vector <strong>RC</strong> Field BagFor parts ordering please visit our website at www.<strong>Premier</strong><strong>RC</strong>.comGen II VectorPower Unit10293Vector Power UnitFrameBattery Type: LiPolymerCapacity: 1050 mAVolts: 11.1Cell #: 3 - All cells in series (3S1P)Gen II Vector Power UnitParts can be purchased at www.premier<strong>RC</strong>.com28 29BatteryReceiverSpine10312Battery ExtensionCableESC7520 MG Servo 1Servo Push Rods& Ball Joint Set7520 MG Servo 2Propeller withProp-SaverGimbalV780 High PerformanceBrushless Motor
Pilot's LogDate Place Duration NotesDate Place Duration Notes30 31
<strong>Premier</strong><strong>RC</strong>5200 Lawrence PlaceHyattsville, Maryland 20781, USAToll Free: 1-888-416-0174Phone: 301-277-3888Fax: 301-277-3323


