

Technical Service Manual - mbm-Service GmbH
Technical Service Manual - mbm-Service GmbH
Technical Service Manual - mbm-Service GmbH

Create successful ePaper yourself
Turn your PDF publications into a flip-book with our unique Google optimized e-Paper software.
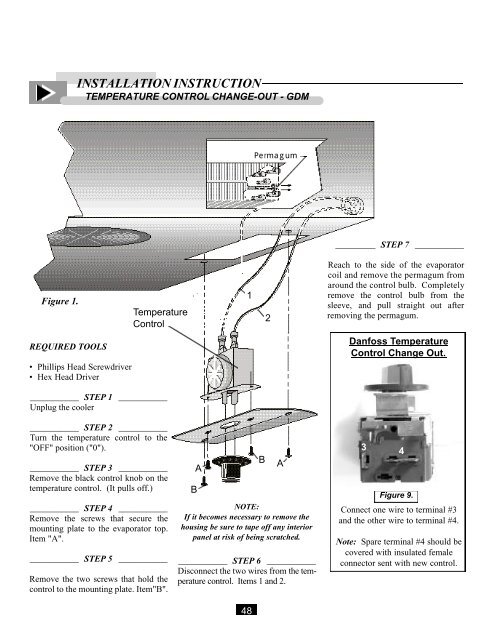
Figure 1.<br />
REQUIRED TOOLS<br />
INSTALLATION INSTRUCTION<br />
TEMPERATURE CONTROL CHANGE-OUT - GDM<br />
• Phillips Head Screwdriver<br />
• Hex Head Driver<br />
Temperature<br />
Control<br />
___________ STEP 1 ___________<br />
Unplug the cooler<br />
___________ STEP 2 ___________<br />
Turn the temperature control to the<br />
"OFF" position ("0").<br />
___________ STEP 3 ___________<br />
Remove the black control knob on the<br />
temperature control. (It pulls off.)<br />
___________ STEP 4 ___________<br />
Remove the screws that secure the<br />
mounting plate to the evaporator top.<br />
Item "A".<br />
___________ STEP 5 ___________<br />
Remove the two screws that hold the<br />
control to the mounting plate. Item"B".<br />
B<br />
A<br />
NOTE:<br />
If it becomes necessary to remove the<br />
housing be sure to tape off any interior<br />
panel at risk of being scratched.<br />
1<br />
___________ STEP 6 ___________<br />
Disconnect the two wires from the temperature<br />
control. Items 1 and 2.<br />
48<br />
Permagum<br />
2<br />
B A<br />
_________ STEP 7 ___________<br />
Reach to the side of the evaporator<br />
coil and remove the permagum from<br />
around the control bulb. Completely<br />
remove the control bulb from the<br />
sleeve, and pull straight out after<br />
removing the permagum.<br />
Danfoss Temperature<br />
Control Change Out.<br />
3<br />
4<br />
Figure 9.<br />
Connect one wire to terminal #3<br />
and the other wire to terminal #4.<br />
Note: Spare terminal #4 should be<br />
covered with insulated female<br />
connector sent with new control.


