

Instructions for SLx Aerial Amplifiers - Labgear
Instructions for SLx Aerial Amplifiers - Labgear
Instructions for SLx Aerial Amplifiers - Labgear

Create successful ePaper yourself
Turn your PDF publications into a flip-book with our unique Google optimized e-Paper software.
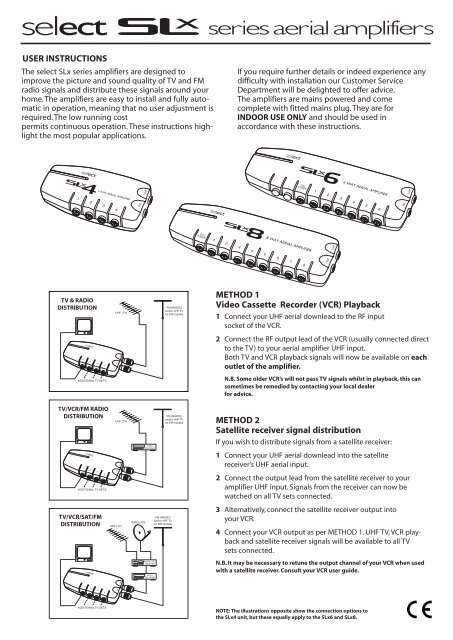
FMFMselectseriesaerialamplifiersUSER INSTRUCTIONSThe select <strong>SLx</strong> series amplifiers are designed toimprove the picture and sound quality of TV and FMradio signals and distribute these signals around yourhome. The amplifiers are easy to install and fully automaticin operation, meaning that no user adjustment isrequired. The low running costpermits continuous operation. These instructions highlightthe most popular applications.If you require further details or indeed experience anydifficulty with installation our Customer ServiceDepartment will be delighted to offer advice.The amplifiers are mains powered and comecomplete with fitted mains plug. They are <strong>for</strong>INDOOR USE ONLY and should be used inaccordance with these instructions.TV & RADIOTV & RADIODISTRIBUTIONDISTRIBUTIONUHF (TV)FM (RADIO)and/or VHF TVon EIR modelsMETHOD 1Video Cassette Recorder (VCR) Playback1 Connect your UHF aerial downlead to the RF inputsocket of the VCR.2 Connect the RF output lead of the VCR (usually connected directto the TV) to your aerial amplifier UHF input.Both TV and VCR playback signals will now be available on eachoutlet of the amplifier.ADDITIONAL TV SETSN.B. Some older VCR’s will not pass TV signals whilst in playback, this cansometimes be remedied by contacting your local dealer<strong>for</strong> advice.TV/VCR/FM RADIOTV/VCR/FM RADIODISTRIBUTIONADDITIONAL TV SETSTV/VCR/SAT/FMTV/VCR/SAT/FMDISTRIBUTIONUHF (TV)FMUHF (TV)FM (RADIO)and/or VHF TVon EIR modelsVIDEORECORDERFM (RADIO)and/or VHF TVSATELLITEon EIR modelsSATELLITERECEIVERVIDEORECORDERMETHOD 2Satellite receiver signal distributionIf you wish to distribute signals from a satellite receiver:1 Connect your UHF aerial downlead into the satellitereceiver’s UHF aerial input.2 Connect the output lead from the satellite receiver to youramplifier UHF input. Signals from the receiver can now bewatched on all TV sets connected.3 Alternatively, connect the satellite receiver output intoyour VCR.4 Connect your VCR output as per METHOD 1. UHF TV, VCR playbackand satellite receiver signals will be available to all TVsets connected.N.B. It may be necessary to retune the output channel of your VCR when usedwith a satellite receiver. Consult your VCR user guide.ADDITIONAL TV SETSNOTE: The illustrations opposite show the connection options tothe <strong>SLx</strong>4 unit, but these equally apply to the <strong>SLx</strong>6 and <strong>SLx</strong>8.
selectseriesaerialamplifiersTECHNICAL INFORMATION & PERFORMANCE DATAMODEL NO. SLX 4 SLX 6 SLX 8NO. OF INPUTS 2 2 2NO. OF OUTPUTS 4 6+1 8+1FREQ. RANGE (MHz) 47-230 470-863 47-230 470-863 47-230 470-863FULL OUTPUT (Gain) - 18dB 18dBLINE POWERING YES 25mA YES 25mA YES 25mAGAIN PER SPLIT 10.5 dB 8dB 8dBNOISE FIGURE 3.5dB 25dB >25dBIMPENDANCE 75 Ohms 75 Ohms 75 OhmsMAIN SUPPLY 240 Volts 240 Volts 240 VoltsLED YES YES YESWEIGHT 518g 726g 726gMEASUREMENT 178 x 85 x 46 mm 260 x 85 x 46 mm 260 x 85 x 46mmSAFETY EMC / CE EMC / CE EMC / CEFITTED MAINS PLUGThis appliance is supplied with a standard fusedplug which has been already fitted.If this is not suitable, refer to the instructionsbelow. In the unlikely situation that you need tochange the fuse, follow instructions below.Always re-fit the plastic fuse carrier when replacingthe fuse.CHANGING THE PLUGIf the fitted mains plug is not suitable <strong>for</strong> thesocket outlets in your house, It should be cut offand fitted with an appropriate new plug.Wiring the New Plug:Any instructions supplied with the new plugshould be followed (these may state how muchinsulation to be removed from the wires in theSafety Advicemains cord). The brown wire must be connectedto the live (L) terminal of the plug and the bluewire to the neutral (N) terminal Neither wireshould be connected to the earth (E) terminal ofa 3-pin plug (this appliance does not require anearth connection). Ensure that the cord grip inthe plug is correctly used and has clamped thesheath of the cord firmly.Fuse Rating: If the new plug is a fused type, thefuse fitted should be rated at not more than 3Amp.CAUTION: The old plug should be destroyedpromptly since it would be dangerous ifplugged into a live socket.


![Freesat Installation kit [35.pdf] - Philex](https://img.yumpu.com/43505801/1/184x260/freesat-installation-kit-35pdf-philex.jpg?quality=85)

![(HD) Satellite kit [28260R_28261R_IM_1_3nonpaySlx.pdf] - Philex](https://img.yumpu.com/35201073/1/184x260/hd-satellite-kit-28260r-28261r-im-1-3nonpayslxpdf-philex.jpg?quality=85)

![48 element aerial Gold [27884LAB_IM_v1_5.pdf] - Philex](https://img.yumpu.com/29233381/1/188x260/48-element-aerial-gold-27884lab-im-v1-5pdf-philex.jpg?quality=85)
![7 Day Electronic Timer Switch [76933R_IM_V1_3.pdf] - Philex](https://img.yumpu.com/23209791/1/190x136/7-day-electronic-timer-switch-76933r-im-v1-3pdf-philex.jpg?quality=85)


