Vitotrol 100 UTDB RF2 Service/installation780 KB - Viessmann
Vitotrol 100 UTDB RF2 Service/installation780 KB - Viessmann
Vitotrol 100 UTDB RF2 Service/installation780 KB - Viessmann
- No tags were found...

You also want an ePaper? Increase the reach of your titles
YUMPU automatically turns print PDFs into web optimized ePapers that Google loves.
Installation and serviceinstructionsfor contractorsVIESMANN<strong>Vitotrol</strong> <strong>100</strong>Type <strong>UTDB</strong>-<strong>RF2</strong>Room temperature controller with digital time switch and wirelessreceiverFor applicability, see the last pageVITOTROL <strong>100</strong>5457 286 GB 2/2010 Please keep safe.
Safety instructionsSafety instructions (cont.)If you smell flue gasDangerFlue gas can lead to life-threateningpoisoning.■ Shut down the heating system.■ Ventilate the boiler room.■ Close all doors leading to theliving space.Working on the system■ When using gas as fuel, also close themain gas shut-off valve and safeguardagainst unauthorised reopening.■ Isolate the system from the power supplyand check that it is no longer 'live',e.g. by removing a separate fuse or bymeans of a main isolator.■ Safeguard the system against unauthorisedreconnection.Ancillary components, spare andwearing partsPlease note! Spare and wearing parts whichhave not been tested togetherwith the heating system can compromiseits function. Installingnon-authorised components andnon-approved modifications/conversioncan compromise safetyand may invalidate our warranty.For replacements, use only originalspare parts from <strong>Viessmann</strong>or those which are approved by<strong>Viessmann</strong>.!Please noteElectronic modules can be damagedby electro-static discharges.Touch earthed objects, such asheating or water pipes, to dischargestatic loads.Repair work!Please noteRepairing components which fulfila safety function can compromisethe safe operation of yourheating system.Replace faulty components onlywith original <strong>Viessmann</strong> spareparts.5457 286 GB3
IndexIndexInstallation instructionsPreparing for installationFunction................................................................................................................ 5Installation location............................................................................................... 5Installation sequenceInstalling and connecting the wireless receiver.................................................... 6Installing the <strong>Vitotrol</strong> <strong>100</strong>...................................................................................... 8<strong>Service</strong> instructionsCommissioningCommissioning the <strong>Vitotrol</strong> <strong>100</strong>............................................................................ 11Commissioning the wireless receiver................................................................... 11<strong>Service</strong> settingsChanging the address code................................................................................. 13Specification....................................................................................................... 14Declaration of Conformity................................................................................. 155457 286 GB4
Preparing for installationFunctionThrough its integral room temperaturesensor and in conjunction with the wirelessreceiver, the <strong>Vitotrol</strong> <strong>100</strong>,type <strong>UTDB</strong>-<strong>RF2</strong>, achieves a constantroom temperature. During the selectedperiods, there is a changeover betweenoperation with standard room temperature"Comfort" and operation withreduced room temperature "Eco" or"Reduced". DHW is provided during theselected periods.Installation locationInstallation<strong>Vitotrol</strong> <strong>100</strong>■ In the main living room on an internalwall opposite radiators.■ Approx. 1.5 m from the floor.■ Not near windows or doors.■ Not on shelves or in recesses.■ Not near heat sources (radiators,direct sunlight, fireplace, TV set, etc.).■ Wireless reception (good communicationwith the wireless receiver) must bepossible (see page 12).Wireless receiver■ Installation in the boiler.■ Wireless reception must be possible(see page 12).(Subject to the material used and thethickness of walls and ceilings, therange may be 10 to 30 m).NoteConducting metallic materials have astrong negative effect on reception.Do not install further controllers in thismain living room. Open any thermostaticradiator valves fully.5457 286 GB5
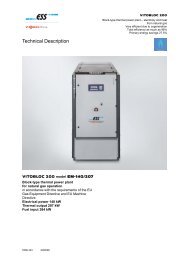
Installation sequenceInstalling and connecting the wireless receiverOpening the control unit casing!Please noteElectronic modules can be damagedby electrostatic discharges.Before beginning work, touchearthed objects, such as heatingor water pipes, to discharge staticloads.2.3.2x1.4xInstalling the wireless receiver1.2.3.8 Q ë r w5457 286 GB6
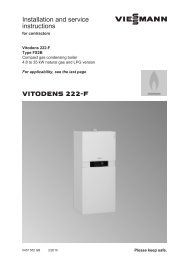
Installing and connecting the wireless receiver (cont.)Connecting the wireless receiverInstallation sequenceX21X7GASPUMPFANX9X20? L N 1 L N1. Insert the wireless receiver cable intothe control unit casing and push theplug into "X7". The plug must clickhome.NoteRoute the cable in such a way that itdoes not become trapped as the controlunit casing is closed.2. Close the control unit casing and flipup the control unit.5457 286 GBInstallation7
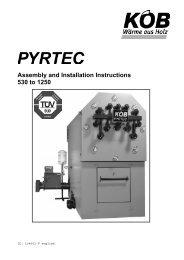
Installation sequenceInstalling the <strong>Vitotrol</strong> <strong>100</strong>Opening the <strong>Vitotrol</strong> <strong>100</strong>5.4.3.1.2.Fitting the wall mounting baseAlways check reception prior to fittingto the wall (see page 12).Power is supplied by batteries (seechapter "Specification").5457 286 GB8
Installation sequenceInstalling the <strong>Vitotrol</strong> <strong>100</strong> (cont.)2.3.1.5457 286 GBInstallation9
Installation sequenceInstalling the <strong>Vitotrol</strong> <strong>100</strong> (cont.)Assembling the <strong>Vitotrol</strong> <strong>100</strong>1.2.3.5.4.5457 286 GB10
CommissioningCommissioning the <strong>Vitotrol</strong> <strong>100</strong>1. Open the hinged flap.2. Use a pointed object to press"Reset".3. Select language with / .4. Confirm with OK.5. Set current date and time with / .6. Confirm with OK.Commissioning the wireless receiverA8 Q ë r wBA LEDOperating displayAddress recognition<strong>Service</strong> functionr Heat demand for central heatingHeat demand for DHW heatingSeveral <strong>Vitotrol</strong> <strong>100</strong> appliances withwireless receiver can be installed in onebuilding. Each pair is matched in the factory.Each <strong>Vitotrol</strong> <strong>100</strong> can only communicatewith its allocated wirelessreceiver.NoteIf LED r flashes, the wireless receiverhas not recognised the signal from the<strong>Vitotrol</strong> <strong>100</strong>. If this is the case, changethe address code (see page 13).5457 286 GB<strong>Service</strong>11
CommissioningCommissioning the wireless receiver (cont.)Testing the strength of reception1. Press and hold B on the wirelessreceiver for approx. 5 s until LEDflashes.2. Carry out the following settings onthe <strong>Vitotrol</strong> <strong>100</strong>:Operating instructionsOpen the flap of the <strong>Vitotrol</strong> <strong>100</strong>.3. Press twice.4. Select "Settings" with / .5. Confirm with OK.6. Select "<strong>Service</strong>" with / .7. Press OK four times to confirm."Transmitting" appears on the display.The transfer takes approx. 30 s.If the signal strength is sufficient, LEDshows green; otherwise it shows red.Then check the installation location ofthe <strong>Vitotrol</strong> <strong>100</strong>.Testing switching outputs1. Press B on the wireless receiver(see diagram on page 11) repeatedlyuntil the required condition is reached(see following table).2. Terminate the function:Press B.orautomatic if the switching output isclosed via the setting on the<strong>Vitotrol</strong> <strong>100</strong>.Function LED r LEDCentral heating and DHW heating off OFF OFFCentral heating off, DHW heating enabled OFF ONCentral heating enabled, DHW heating off ON OFFCentral heating and DHW heating enabled ON ON5457 286 GB12
<strong>Service</strong> settingsChanging the address codeIf the wireless connection between the<strong>Vitotrol</strong> <strong>100</strong> and the wireless receiver isfaulty, change the address code.1. Press and hold B on the wirelessreceiver (see diagram on page 11) forapprox. 10 s until LED r flashes.2. Carry out the following settings onthe <strong>Vitotrol</strong> <strong>100</strong>:Operating instructionsOpen the flap of the <strong>Vitotrol</strong> <strong>100</strong>.3. Press twice.4. Select "Settings" with / .5. Confirm with OK.6. Select "<strong>Service</strong>" with / .7. Press OK three times to confirm.8. Select "Address code" with / .9. Confirm with OK.After approx. 30 s the display shows"Transmitting".The transfer takes approx. 30 s.During the transfer, LED flashesbriefly.<strong>Service</strong>Once the address code is recognised,the LEDs go out; otherwise repeat theprocedure.5457 286 GB13
SpecificationSpecification<strong>Vitotrol</strong> <strong>100</strong>Rated voltage 3 V–2 batteries LR 6/AAAmbient temperature■ during operation 0 to 40 °C■ during storage and transport -25 to +60 °CIP rating IP 20 to EN 60529;Protection class II to EN 60730-1Radio frequency868.1 MHzWireless receiverPower supplyFrom the control unitAmbient temperature 0 to 40°CIP ratingAs for the boilerTransfer from the <strong>Vitotrol</strong> <strong>100</strong>:■ With every heat demand and consumption.■ With every demand for DHW heating.■ Cyclically every 20 min.5457 286 GB14
Declaration of ConformityDeclaration of ConformityWe, <strong>Viessmann</strong> Werke GmbH&Co KG, D-35107 Allendorf, confirm as sole responsiblebody that the product <strong>Vitotrol</strong> <strong>100</strong>, type <strong>UTDB</strong>-<strong>RF2</strong>, complies with the followingstandards:EN 60730-2-9EN 60335 (receiver only)EN 50371EN 55014ETSI EN 300 220-2ETSI EN 301 489-1ETSI EN 301 489-3In accordance with the following Directives, this product is designated with _:2004/108/EC1999/5/EC2006/95/ECAllendorf, 1 February 2009<strong>Viessmann</strong> Werke GmbH&Co KGpp. Manfred Sommer5457 286 GB<strong>Service</strong>15
Printed on environmentally friendly,chlorine-free bleached paperApplicabilityApplies to the <strong>Vitotrol</strong> <strong>100</strong>, type <strong>UTDB</strong>-<strong>RF2</strong>Part no. 7426 46716<strong>Viessmann</strong> Werke GmbH&Co KGD-35107 AllendorfTelephone: +49 6452 70-0Fax: +49 6452 70-2780www.viessmann.com<strong>Viessmann</strong> LimitedHortonwood 30, TelfordShropshire, TF1 7YP, GBTelephone: +44 1952 675000Fax: +44 1952 675040E-mail: info-uk@viessmann.com5457 286 GB Subject to technical modifications.