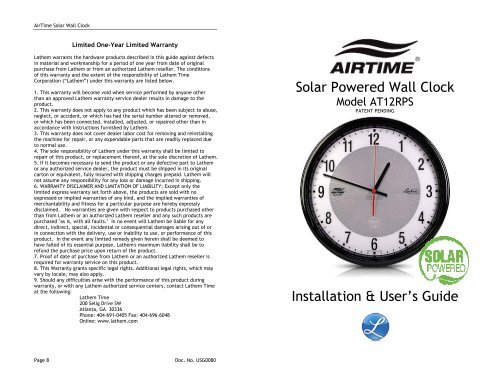
Solar Powered Wall Clock - Lathem Time Corporation
Solar Powered Wall Clock - Lathem Time Corporation
Solar Powered Wall Clock - Lathem Time Corporation

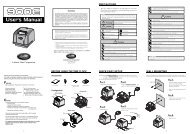
Create successful ePaper yourself
Turn your PDF publications into a flip-book with our unique Google optimized e-Paper software.
Air<strong>Time</strong> <strong>Solar</strong> <strong>Wall</strong> <strong>Clock</strong>THIS EQUIPMENT COMPLIES WITH FCC CLASS-B REQUIREMENTSPURSUANT SUBPART J OF PART-15This device complies with Part 15 of the FCC Rules. Operation is subject to the followingtwo conditions: (1) this device may not cause harmful interference, and (2) this devicemust accept any interference received, including interference that may cause undesiredoperation.WARNING: Changes or modifications to this product not expressly approved by the partyresponsible for compliance could void the user’s authority to operate this equipment.NOTE: This equipment has been tested and found to comply with the limits for a Class Bdigital device, pursuant to Part 15 of the FCC Rules. These limits are designed to providereasonable protection against harmful interference in a residential installation. Thisequipment generates, uses, and can radiate radio frequency energy and, if not installedand used in accordance with the instructions, may cause harmful interference to radiocommunications. However, there is no guarantee that interference will not occur in aparticular installation. If this equipment does cause harmful interference to radio ortelevision reception, which can be determined by turning the equipment off and on, theuser is encouraged to try to correct the interference by one or more of the followingmeasures:- Reorient or relocate the receiving antenna.- Increase the separation between the equipment and receiver.- Connect the equipment into an outlet on a circuit different from that to which thereceiver is connected.- Consult the dealer or an experienced radio TV technician for help.This equipment complies with FCC radiation exposure limits set forth for an uncontrolledenvironment. This equipment should be installed and operated with minimum distance20cm between the radiator and your body. This Transceiver must not be co-located oroperating in conjunction with any other antenna or Transceiver.DisclaimerThe information within this document has been carefully checked and isbelieved to be entirely reliable. However, no responsibility is assumed forinaccuracies. <strong>Lathem</strong> <strong>Time</strong> Corp. reserves the right to make changes to anyproducts herein to improve reliability, function, or design.Air<strong>Time</strong>, <strong>Lathem</strong> and the <strong>Lathem</strong> logo are registered trademarks of <strong>Lathem</strong><strong>Time</strong> <strong>Corporation</strong>. Other product names mentioned in this manual may betrademarks of their respective companies and are hereby acknowledged.WARNING: Changes or modifications to this product not expressly approved bythe party responsible for compliance could void the user’s authority to operatethis equipment.Copyright © 2009 <strong>Lathem</strong> <strong>Time</strong> <strong>Corporation</strong>. All rights reserved.<strong>Lathem</strong> <strong>Time</strong> <strong>Corporation</strong>200 Selig Drive SWAtlanta, GA 30336www.lathem.comInstallation & User’s Guideduring normal operation. To verify that the clock has properlyreceived an Air<strong>Time</strong> signal:1. Press the A button the back of the clock2. Look at the LED on the front of the clocka. Green: Signal was received successfullyb. Red: Signal was not received.The LED on the front of the clock will flash Red automaticallyif the signal is not received within the previous 72 hours.Setting the <strong>Time</strong> ManuallyIf the Air<strong>Time</strong> transceiver is not installed and transmitting, youcan manually set the time on the clock and it will operate as ahighly precise standalone clock until an Air<strong>Time</strong> signal isreceived.1. Press and hold the B button on the back of the clock for 5seconds, until the red second hand stops.2. Press the A button on the back of the clock to advance thetime one minute. You can press and hold the A button torapidly advance the minute and hour hands.3. When the time on the clock is one minute before thecurrent time, wait until the exact time reaches zero “0”seconds and then press the B button on the back of theclock.4. The clock will begin normally operation.Document No. USG0080 / Revised April 14, 2009Page 2Doc. No. USG0080Patent Pending Page 7
Air<strong>Time</strong> <strong>Solar</strong> <strong>Wall</strong> <strong>Clock</strong>Installation & User’s GuideHanging the <strong>Clock</strong>Air<strong>Time</strong> wall clocks feature an innovative maze style mountingbracket that prevents simple upward motion from removingthem from the wall.1. Secure a mounting screw into the wall leaving the headexposed.2. Slide the clock onto the screw head at the bottom of themaze track.3. Move the clock down, left, down and then right until itrests securely at the top of the bracket.4. To remove the clock, reverse the process above.Verifying Signal ReceptionDuring normal operation, the clock will listen for the Air<strong>Time</strong>signal twelve times per day on even hours, at the 58 th minute,between the 50 th and 59 th second. For example, the clocklistens between 10:58:50 – 10:58:59 and then between 12:58:50– 12:58-59, continuing every even hour. The LED will not flashQuick Install StepsImportant: Before installing the wall clock, verify that anAir<strong>Time</strong> Transceiver is installed and properly transmitting. Youshould manually initiate the transmission of the Air<strong>Time</strong> signalby pressing the TRANS button on the front of your transceiver.If an Air<strong>Time</strong> transceiver is unavailable, you can still install theclock and set to the current time (see “Setting the <strong>Time</strong>Manually” on page 7).1. Insert the supplied lithium battery (CR123A) into thebattery compartment on the back of the clock.2. Turn the clock on, by sliding the Power Switch to the Startposition.3. Press the Reset button on the back of the clock to beginlistening for the Air<strong>Time</strong> correction signal.4. The LED on the front of the clock will flash green everytwo (2) seconds.5. When the signal is received, the LED will flash green everysecond and correction will occur. When correction iscomplete, the LED will stop flashing.Page 6Doc. No. USG0080Patent Pending Page 3
Air<strong>Time</strong> <strong>Solar</strong> <strong>Wall</strong> <strong>Clock</strong>Room Lighting and Battery UsageThe Air<strong>Time</strong> <strong>Solar</strong> <strong>Wall</strong> <strong>Clock</strong> uses a room’s interior lighting forpower. Upon initial installation, or for extended periods of lowlight, the clock will operate accurately using the supplementalCR123A lithium battery (included). Each clock has aninnovative light meter feature is to check the light level at theprecise installation location.1. Press and hold the Light Meter Button on the back of theclock.2. While holding the button down, position the clock where itwill be installed on the wall.3. Look at the LED indicator on the front of the clock todetermine the light level (lux).Average office lighting is between 350 and 500 lux.Installation & User’s GuideThe Air<strong>Time</strong> <strong>Solar</strong> <strong>Wall</strong> <strong>Clock</strong> is equipped with an internalpower cell that stores energy from the light source. It can take8 days or more to full charge the internal cell. With a fullycharged cell the clock can run in complete darkness without asupplemental battery for approximately 7 days.Smart Second Energy SaverThe Air<strong>Time</strong> <strong>Solar</strong> <strong>Wall</strong> <strong>Clock</strong> has an innovative energy savingfeature that conserves power at night or when the lights in theroom are turned off. When the room lighting is less than 10 lux,the second hand will stop at 0 seconds and the hour and minutehands continue displaying the correct time. When the roomlighting rises above 10 lux, the second hand returns to normalsmooth sweeping operation indicating the correct second.Average office lighting is between 350 to 500 lux.LED Indicator Light Level* Battery Usage Battery LifeGreen > 350 lux N/A N/ARed 200 – 350 lux Yes ~ 4 yearsNone < 200 lux Yes ~ 2 years* Battery usage and life is based on the lighting levelremaining consistent for an average of 8 hours per day.If the light level is not adequate, you can try moving the clockto a different location in the room or higher position on thesame wall closer to the light source.Page 4Doc. No. USG0080Patent Pending Page 5