

On-3 lateral transfer device skills checklist
On-3 lateral transfer device skills checklist
On-3 lateral transfer device skills checklist

Create successful ePaper yourself
Turn your PDF publications into a flip-book with our unique Google optimized e-Paper software.
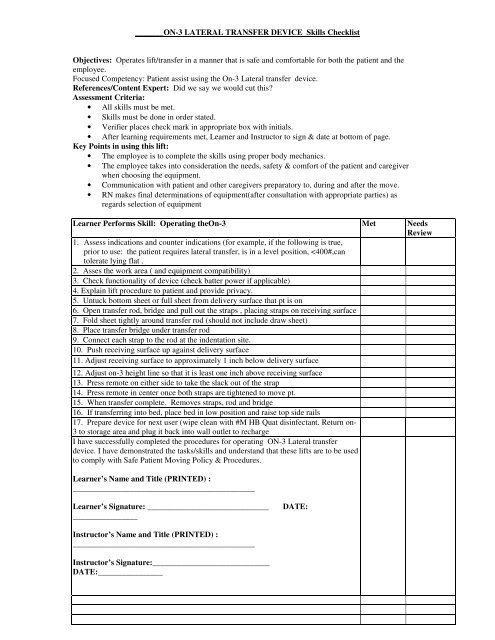
_______ON-3 LATERAL TRANSFER DEVICE Skills ChecklistObjectives: Operates lift/<strong>transfer</strong> in a manner that is safe and comfortable for both the patient and theemployee.Focused Competency: Patient assist using the <strong>On</strong>-3 Lateral <strong>transfer</strong> <strong>device</strong>.References/Content Expert: Did we say we would cut this?Assessment Criteria:• All <strong>skills</strong> must be met.• Skills must be done in order stated.• Verifier places check mark in appropriate box with initials.• After learning requirements met, Learner and Instructor to sign & date at bottom of page.Key Points in using this lift:• The employee is to complete the <strong>skills</strong> using proper body mechanics.• The employee takes into consideration the needs, safety & comfort of the patient and caregiverwhen choosing the equipment.• Communication with patient and other caregivers preparatory to, during and after the move.• RN makes final determinations of equipment(after consultation with appropriate parties) asregards selection of equipmentLearner Performs Skill: Operating the<strong>On</strong>-3 Met NeedsReview1. Assess indications and counter indications (for example, if the following is true,prior to use: the patient requires <strong>lateral</strong> <strong>transfer</strong>, is in a level position,
I have successfully completed the procedures for operating ON-3 Lateral <strong>transfer</strong> <strong>device</strong>. I havedemonstrated the tasks/<strong>skills</strong> and understand that these lifts are to be used to comply with Safe PatientMoving Policy & Procedures.Learner’s Name and Title (PRINTED) : _____________________________________________Learner’s Signature: ______________________________DATE: ________________Instructor’s Name and Title (PRINTED) : _____________________________________________Instructor’s Signature:_____________________________DATE:________________
Beasy Board <strong>skills</strong> competencyObjectives: Operate <strong>transfer</strong> <strong>device</strong> in a manner that is safe and comfortable, for both patient andemployee.Focused Competency: Patient assists using the Beasy Board Device.References/Content Expert: _____________________________Assessment Criteria:• All <strong>skills</strong> must be met and demonstrated in the order presented• Preceptor places check mark in appropriate box with initials• After learning requirements met, employee & Preceptor sign & date at bottom of pageKey Points in using this <strong>device</strong>:• Caregivers should never use gait belts to lift, support weight, or manually <strong>transfer</strong> a patient.Alternative <strong>transfer</strong>s should be considered in these circumstances.• The employee will complete the <strong>skills</strong> using proper body mechanics• The employee will consider the needs, safety & comfort of the patient and caregiver(s) when choosingequipment• Communicates with patient and other caregivers prior to, during and after the move.Employee Performs Skill: Operating Beasy Board to <strong>transfer</strong> a patient. Met Needsreview1. Patients must be cooperative and have sufficient strength to assist in the <strong>transfer</strong>.Patients may not weigh in excess of 375 pounds.2. Check work area and equipment compatibility. Remove obstacles. Plane of<strong>transfer</strong> should be as level as possible. A difference in height of up to six (6)inches between delivery and receiving surfaces is permissible.3. Explain process to the patient prior to <strong>transfer</strong> and provide privacy.4. If supine, assist patient to seated position properly. Place gait belt aroundpatient’s lower trunk.5. Remove obstructions to <strong>transfer</strong> such as removable or swing away armrests andfootrests6. If applicable, <strong>transfer</strong> to patient’s stronger side. Position receiving surface asclose to a 45 degree angle as possible from the delivery surface. Ensure thatdelivery and receiving surfaces are locked in place.7. Ensure safety before instructing patient to lean. Instruct patient to lean as far aspossible to the opposite side of the <strong>transfer</strong> to clear the way for Beasy discplacement. If patient is able, instruct patient to lift lead leg and cross itover the trailing leg.8. Place Beasy disc under the patient. Hold the disc in place to keep it from movingin the track.9. Instruct patient to sit straight upright. If applicable, instruct patient to uncrosslegs. Be sure the edge of the disc is visible with all patients (Disc should NOT betotally under the patient). Ensure that the board makes sound contact with bothreceiving and delivery surfaces before attempting <strong>transfer</strong>.10. Instruct patient to place their hands on either side of the board and pushthemselves toward the receiving surface using their legs (if possible). If thepatient is not able to use their legs, they can slide themselves on the disc usingtheir arms. Caregivers may grasp the gait belt to stabilize the patient during<strong>transfer</strong>. Ensure the disc and track are clear of any obstruction and the patient’sfingers are not pinched during movement.11. Remove Beasy Board and secure patient (armrests replaced and locked, etc.)12. Prepare <strong>device</strong> for next user: Disinfect between each use. Replace in dedicated,exclusive storage space.I have successfully completed the procedures for operating the Beasy Board. I have demonstrated thetasks/<strong>skills</strong> and understand that these <strong>device</strong>s are to be used to comply with Safe Patient Moving Policy &Procedures.Employee Name (print):Employee Number:Employee Signature: ___________________________ Employee Job Title: __________________________Verifier Name (print):Verifier Signature:Date: ________________________________________Verifier Job Title:Department:
Competency Checklist for the Vander LiftObjectives: Operates lift/<strong>transfer</strong> <strong>device</strong> in a manner that is safe and comfortable for both the patient andthe employee.Focused Competency: Patient assist using the Vander Lift <strong>device</strong>.References/Content Expert: http://vancare.com/index.htmlAssessment Criteria:• All <strong>skills</strong> must be met, and demonstrated in the order presented.• Verifier places check mark in appropriate box with initials.• After learning requirements met, Learner and Instructor to sign & date at bottom of page.Key Points in using this <strong>device</strong>:• The employee is to complete the <strong>skills</strong> using proper body mechanics.• The employee takes into consideration the needs, safety & comfort of the patient and caregiver(s) whenchoosing the equipment.• Communication with patient and other caregivers preparatory to, during, and after the move.Learner Performs Skill: Operating the Vander Lift <strong>device</strong> to <strong>transfer</strong> a patient. Met NeedsReview1. Knowledge of potential candidates and exclusions for use with this <strong>device</strong>. (Apatient must have enough leg length for the sling to wrap around and lift them and beable to bend their hips to 90 degrees. A patient’s weight may not exceed the capacityof the model being used. With any sling, pressure exerted on the skin should beconsidered.)2. Check work area (and equipment compatibility), Remove obstacles.3. Check <strong>device</strong> (power level, condition of sling).4. Locate emergency power cut off and emergency lowering.5. Explain procedure to patient and provide privacy.6. Identify proper sling size for patient.7. Demonstrate ability to position a sling behind patient in both bed and wheelchair(normally, any sling, pressure exerted on the skin should be considered.)8. Secure patient to <strong>device</strong> properly (leg straps should be flat under the patient’s legsand should criss-cross). Demonstrate ability to adjust patient positioning through useof fabric loops on sling.9. Watch patient throughout ascent for clearance, stability, and comfort.10. Move patient from delivery surface.11. Demonstrate use of <strong>device</strong> leg spread.12. Align patient with receiving surface. Ensure that wheel locks of receiving surface(not <strong>device</strong>) are engaged. Patient is moved as little as possible in this step.13. Check patient positioning throughout descent. Use positioning handles whenpatient is approximately 1 inch above receiving surface.14. Ensure patient ends up in a safe position with access to call light and detach sling.Remove sling if patient’s skin is compromised or if patient will be up for more than 30minutes. Note: sling removal guidelines do not apply to repositioning slings.15. Prepare <strong>device</strong> for next user: Disinfect between each patient use. Plug into anelectrical outlet when not in use to recharge, and store in appropriate location nearoutlet. Vander Lift is not plugged into an electrical outlet during patient <strong>transfer</strong>s.16. Demonstrate knowledge of sling disinfection, storage, and disposable slingprotocols.17. Demonstrate how to use <strong>device</strong> to address a patient fall emergency.18. Demonstrate use of inclusive scale (if applicable to model).19. Demonstrate use of available specialty slings.I have successfully completed the procedures for operation of the Vander Lift <strong>transfer</strong> <strong>device</strong>.I have demonstrated the tasks/<strong>skills</strong> and understand that these <strong>device</strong>s are to be used to comply with SafePatient Moving Policy & Procedures.Employee Name (print):Employee Number: ___________________Employee Signature: _________________________ Employee Job Title: __________________Verifier Name (print):__________________________ Verifier Job Title:_____________________Verifier Signature:____________________________ Department:________________________Date: ______________________________________
EZ Stand Skills ChecklistObjectives: Operates lift/<strong>transfer</strong> <strong>device</strong> in a manner that is safe and comfortable for both the patientand the employee.Focused Competency: Patient assist using the EZ Stand Pivot Machine.References/Content Expert: http://www.ezlifts.com/Assessment Criteria:• All <strong>skills</strong> must be met, and demonstrated in the order presented.• Verifier places check mark in appropriate box with initials.• After learning requirements met, Learner and Instructor to sign & date at bottom of page.Key Points in using this <strong>device</strong>:• The employee is to complete the <strong>skills</strong> using proper body mechanics.• The employee takes into consideration the needs, safety & comfort of the patient andcaregiver(s) when choosing the equipment.• Communication with patient and other caregivers preparatory to, during and after the move.Learner Performs Skill: Operating the EZ Stand Pivot Machine Met Needs Review1. Knowledge of potential candidates and exclusions for use with this machine. (Apatient must be approximately 20% weight bearing, have some upper body muscletone, no knee flexion restrictions, and their weight cannot exceed the capacity ofthe model being used)2. Check work area (and equipment compatibility). Remove obstacles.3. Check <strong>device</strong> (battery power level, condition of harness, etc).4. Locate emergency shut off (red button).5. Explain lift procedure to patient and provide privacy.6. If supine, patient assisted to seated position properly. (bed auto firmed, etc)7. Align and position foot plate and knee stabilizer. Ensure patients’ feet makesound contact with footplate.8. Wheel locks engaged.9. Patient properly secured to machine (body correctly aligned with harness)10. Patient instructed to hold onto handles. Wheel locks disengaged.11. Lifting communicated, patient lifted to standing position12. If needed-seat strap attached/patient lifted and lowered/seat strap tightenedPlace draw sheet or towel between patient and the fabric seat strap or sling toavoid contamination.13. Chair/commode moved to patient14. Patient positioning checked through descent15. Patient properly detached from machine16. Prepare <strong>device</strong> for next user. Disinfect all surfaces directly touched by patient(e.g., handles, solid seats) between each patient use using hospital approveddisinfectant product. Replace seat strap or sling before next use if draw sheet ortowel was not used during <strong>transfer</strong>.Hang harness on <strong>device</strong> or place in pocket on back. If battery level reads at orbelow 50%, exchange for battery in charger.17. Knowledge of emergency lowering technique.18. Knowledge of use of pivot machine as a walker (if applicable to model)19. Knowledge of use of inclusive scale (if applicable to model)I have successfully completed the procedures for operating the EZ Stand Pivot Machine. I havedemonstrated the tasks/<strong>skills</strong> and understand that these <strong>device</strong>s are to be used to comply withSafe Patient Moving Policy & Procedures.Employee Name (print):Employee Signature: ___________________________Verifier Name (print):Verifier Signature:Date: ________________________________________Employee Number:Employee Job Title: __________________________Verifier Job Title:Department:
Overhead patient lift Skills ChecklistObjectives: Operates lift/<strong>transfer</strong> <strong>device</strong> in a manner that is safe and comfortable for both the patient and theemployee.Focused Competency: Patient assist using the Maxi Sky overhead lift or the MedCare overhead lift.References/Content Expert: http://www.arjohuntleigh.com or: http://www.medcarelifts.com/Assessment Criteria:• All <strong>skills</strong> must be met, and demonstrated in the order presented.• Verifier places check mark in appropriate box with initials.• After learning requirements met, Learner and Instructor to sign & date at bottom of page.Key Points in using this <strong>device</strong>:• The employee is to complete the <strong>skills</strong> using proper body mechanics.• The employee takes into consideration the needs, safety & comfort of the patient and caregiver(s) whenchoosing the equipment.• Communication with patient and other caregivers preparatory to, during and after the move.Learner Performs Skill: Operating an overhead lift1. Knowledge of potential candidates and exclusions for use with this <strong>device</strong>. (For seating slings, apatient must have enough leg length for the sling to lift their weight and be able to bend their hips to 90degrees. With any sling, pressure exerted on the skin should be considered. A patient’s weight maynot exceed the capacity of the cassette being used).2. Check work area (and equipment compatibility). Remove obstacles.3. Check <strong>device</strong> (battery power level, service indicator, condition of sling). Ensure compatibility ofselected sling with the overhead lift being used.4. Demonstrate activation and deactivation of emergency stop.5. Explain lift procedure to patient and provide privacy.6. Adjust bed height to shortest caregiver’s waist. If applicable, auto firm (max inflate) sleep surface.7. Position sling properly behind patient. NOTE: For a chair loop sling, arch should be at base of spineand positioning handles should be on the outside of the sling.8. Move cassette from charger properly (process will differ depending on controller and overheadtracking). Bracket/ spreader bar lowered to patient’s chest.9. Secure sling to spreader bar properly (Leg straps should be flat under the patient’s legs and shouldcross one inside the other). Demonstrate patient positioning adjustment through hook selection (ifapplicable)10. Watch patient through ascent for clearance, stability, and comfort.11. Perform <strong>lateral</strong> movement of patient (<strong>device</strong> specific). Keep patient’s body stable to stop swingingmotion.12. Watch patient positioning throughout descent. Use positioning handles when patient isapproximately 1 inch above the receiving surface.13. Hold spreader bar away from patient’s face at end of descent.14. Ensure patient ends up in a safe position with access to call light and detach sling. Returncassette to charger properly (<strong>device</strong> specific). Remove sling if patient’s skin is compromised or ifpatient will be up for more than 30 minutes. NOTE: sling removal guidelines do not apply torepositioning slings.15. Knowledge of different ways to properly attach repositioning sling to spreader bar(s) demonstrated.16. Knowledge of positioning of patient’s body on a repositioning sling.17. Knowledge of using a repositioning sling to boost.18. Knowledge of using a repositioning sling to roll.19. Knowledge of using a repositioning sling to do a <strong>lateral</strong> <strong>transfer</strong>.20. Knowledge of how to use <strong>device</strong> to address a patient fall emergency.21. Knowledge of how to use the <strong>device</strong> with a walking harness.22. Knowledge of emergency lowering technique (<strong>device</strong> specific).I have successfully completed the procedures for operating an overhead lift. I have demonstrated thetasks/<strong>skills</strong> and understand that these <strong>device</strong>s are to be used to comply with Safe Patient Moving Policy &Procedures.Employee Name (print):Employee Number:Met NeedsReviewEmployee Signature: ___________________________ Employee Job Title: __________________________Verifier Name (print):Verifier Signature:Verifier Job Title:Department:Date: ________________________________________ Circle Type(s) of lifts trained: Arjo / Medcare /2 function / 4 function / straight track / “H” track
AIR PAL LATERAL TRANSFER DEVICE COMPETENCY CHECKLISTObjectives: Operates <strong>transfer</strong> <strong>device</strong> in a manner that is safe and comfortable for both thepatient and the employee.Focused Competency: Patient assist using the Air Pal Lateral Transfer Device.References/Content Expert: http://www.airpal.com/Assessment Criteria:• All <strong>skills</strong> must be met, and demonstrated in the order presented.• Verifier places check mark in appropriate box with initials.• After learning requirements met, Learner and Instructor to sign & date at bottom of page.Key Points in using this <strong>device</strong>:• The employee is to complete the <strong>skills</strong> using proper body mechanics.• The employee takes into consideration the needs, safety & comfort of the patient andcaregiver(s) when choosing the equipment.• Communication with patient and other caregivers preparatory to, during and after themove.Learner Performs Skill: Operating the Air Pal Lateral Transfer <strong>device</strong> Met NeedsReview1. Knowledge of potential candidates and exclusions for use with this <strong>device</strong>. (Patientmust be able to tolerate <strong>lateral</strong> <strong>transfer</strong> in a level position or up to 20 degrees inclinedand weigh 1000 pounds or less. Not for use with unstable spinal fractures unless postop). Select mattress size based on the size of the patient to be <strong>transfer</strong>red.2. Check work area. Remove obstacles.3. Plug in and turn on to check that the <strong>device</strong> is working (green light indicates <strong>device</strong>readiness).4. Explain <strong>transfer</strong> procedure to patient and provide privacy.5. Auto firm bed. Adjust bed height to waist level of shortest caregiver assisting in<strong>transfer</strong>. Assure that degree of incline of sending and receiving surfaces is the same(that is both flat or both 20 degrees etc)6. Position air mattress under patient so that the proper side is up (should be able tosee foot tag), and the patient is centered on the mattress. Use heavy soil covering ifnecessary.7. If mattress has safety straps, adjust and snap into place over patient.8. Align receiving surface with patient’s body and engage all brakes.9. Snap hose(s) into air mattress at end marked: “foot end”. Two hoses / blowers maybe indicated for heavy patients (especially if a large mattress size is used).10. Plug in blower(s) and communicate to the patient that the machine will be loudonce turned on.11. Turn on blower(s) and ensure that mattress inflates totally.12. Use grab straps to <strong>transfer</strong> patient to receiving surface. A minimum of 2 caregiversare required (3 may be needed for difficult <strong>transfer</strong>s, with 2 on the receiving end). Themotion of the patient on the mattress should be slow and steady.13. Ensure patient is centered on receiving surface before turning blower(s) off todeflate.14. Disconnect hose(s).15. Roll patient to remove mattress pad (unless air pal will be needed for subsequent<strong>transfer</strong>s).15. Prepare <strong>device</strong> for next user. Disinfect between each patient use. Return <strong>device</strong>to storage location.I have successfully completed the procedures for operating the Air Pal Lateral Transfer <strong>device</strong>. I havedemonstrated the tasks/<strong>skills</strong> and understand that these <strong>device</strong>s are to be used to comply with Safe PatientMoving Policy & Procedures.Employee Name (print):Employee Signature: ___________________________Verifier Name (print):Verifier Signature:Date: ________________________________________Employee Number:Employee Job Title: __________________________Verifier Job Title:Department:
EZ Re-positioner DeviceObjectives: Operates repositioning <strong>device</strong> in a manner that is safe and comfortable for both thepatient and the employee.Focused Competency: Patient assist using the EZ Re-positioner Device.References/Content Expert: http://www.EZLIFTS.com/Assessment Criteria:• All <strong>skills</strong> must be met, and demonstrated in the order presented.• Verifier places check mark in appropriate box with initials.• After learning requirements met, Learner and Instructor to sign & date at bottom of page.Key Points in using this <strong>device</strong>:• The employee is to complete the <strong>skills</strong> using proper body mechanics.• The employee takes into consideration the needs, safety & comfort of the patient andcaregiver(s) when choosing the equipment.• Communication with patient and other caregivers preparatory to, during and after themove.Learner Performs Skill: Operating the EZ Re-positioner <strong>device</strong> Met NeedsReview1. Knowledge of potential candidates and exclusions for use with this <strong>device</strong>.(patient must weigh 300 pounds or less.) The EZ Re-positioner sheet maycause an increase in the patient’s perspiration.2. Ensure EZ Re-positioner is installed correctly on the bed (EZ Re-positionersheet should be over the top of the head of bed bar and “this side up” labelshould be visible).3. Explain procedure to patient and provide privacy.4. Auto firm bed and place as flat as patient can tolerate. Adjust bed height sothat the caregiver can easily access the roller bar.5. Un-tuck bed linens to allow free movement.6. Insert handle into roller bar at head or foot of bed (depending upon whichway the patient is to be moved)7. Ensure excess length of linens is free of roller mechanism and handle.8. Re position patient by turning handle in desired direction (may need to pressdown on mattress surface to free roller bar of pressure).9. Place handle back in holder.10. Knowledge of procedure for heavy patients. (a second handle may beinstalled. This would be operated by a second caregiver on the opposite sideof the bed).11. Excess length of bedding linen allowed to rest loosely at head or foot ofbed.12. Re-tuck sheets along both sides of bed to prevent bunching or wrinklingunder patient.13. When patient is out of bed, return repositioning sheets to bottom of bed.14. Knowledge of laundering procedure for EZ Re-positioner sheets (soiled EZRe-positioner sheets should be replaced with clean. EZ Re-postioner sheetsand should be laundered between patients, and hardware should bedisinfected).I have successfully completed the procedures for operating the EZ Re-positioner <strong>device</strong>. I havedemonstrated the tasks/<strong>skills</strong> and understand that these <strong>device</strong>s are to be used to comply withSafe Patient Moving Policy & Procedures.Employee Name (print):Employee Signature: ___________________________Verifier Name (print):Verifier Signature:Date: ________________________________________Employee Number:Employee Job Title: __________________________Verifier Job Title:Department:
EZ Stand Skills ChecklistObjectives: Operates lift/<strong>transfer</strong> <strong>device</strong> in a manner that is safe and comfortable for both thepatient and the employee.Focused Competency: Patient assist using the EZ Stand Pivot Machine.References/Content Expert: http://www.ezlifts.com/Assessment Criteria:• All <strong>skills</strong> must be met, and demonstrated in the order presented.• Verifier places check mark in appropriate box with initials.• After learning requirements met, Learner and Instructor to sign & date at bottom of page.Key Points in using this <strong>device</strong>:• The employee is to complete the <strong>skills</strong> using proper body mechanics.• The employee takes into consideration the needs, safety & comfort of the patient andcaregiver(s) when choosing the equipment.• Communication with patient and other caregivers preparatory to, during and after themove.Learner Performs Skill: Operating the EZ Stand Pivot Machine Met NeedsReview1. Knowledge of potential candidates and exclusions for use with this <strong>device</strong>. (Apatient must be approximately 20% weight bearing, have some upper bodymuscle tone, no knee flexion restrictions, and their weight cannot exceed thecapacity of the model being used)2. Check work area (and equipment compatibility). Remove obstacles.3. Check <strong>device</strong> (battery power level, condition of harness, etc).4. Locate emergency shut off (red button).5. Explain lift procedure to patient and provide privacy.6. If supine, patient assisted to seated position properly. (bed auto firmed, etc)7. Align and position foot plate and knee stabilizer. Ensure patients’ feet makesound contact with footplate.8. Wheel locks engaged.9. Patient properly secured to machine (body correctly aligned with harness)10. Patient instructed to hold onto handles. Wheel locks disengaged.11. Lifting communicated, patient lifted to standing position12. If needed-seat strap attached/patient lifted and lowered/seat strap tightened13. Chair/commode moved to patient14. Patient positioning checked through descent15. Patient properly detached from machine16. Prepare <strong>device</strong> for next user. Dis-infect between each patient use. Hangharness on <strong>device</strong> or place in pocket on back. If battery level reads at or below50%, exchange for battery in charger.17. Knowledge of emergency lowering technique.18. Knowledge of use of pivot machine as a walker (if applicable to model)19. Knowledge of use of inclusive scale (if applicable to model)I have successfully completed the procedures for operating the EZ Stand Pivot Machine. I havedemonstrated the tasks/<strong>skills</strong> and understand that these <strong>device</strong>s are to be used to comply withSafe Patient Moving Policy & Procedures.Employee Name (print):Employee Signature: ___________________________Verifier Name (print):Verifier Signature:Date: ________________________________________Employee Number:Employee Job Title: __________________________Verifier Job Title:Department:
Maxi Sky Skills ChecklistObjectives: Operates lift/<strong>transfer</strong> <strong>device</strong> in a manner that is safe and comfortable for both the patient and theemployee.Focused Competency: Patient assist using the Maxi Sky overhead lift.References/Content Expert: http://www.arjo.com/usAssessment Criteria:• All <strong>skills</strong> must be met, and demonstrated in the order presented.• Verifier places check mark in appropriate box with initials.• After learning requirements met, Learner and Instructor to sign & date at bottom of page.Key Points in using this <strong>device</strong>:• The employee is to complete the <strong>skills</strong> using proper body mechanics.• The employee takes into consideration the needs, safety & comfort of the patient and caregiver(s) whenchoosing the equipment.• Communication with patient and other caregivers preparatory to, during and after the move.Learner Performs Skill: Operating the Maxi Sky overhead lift1. Knowledge of potential candidates and exclusions for use with this <strong>device</strong>. (For seating slings, apatient must have enough leg length for the sling to lift their weight and be able to bend their hips to 90degrees. With any sling, pressure exerted on the skin should be considered. A patient’s weight maynot exceed the capacity of the cassette being used).2. Check work area (and equipment compatibility). Remove obstacles.3. Check <strong>device</strong> (battery power level, service indicator, condition of sling). Ensure compatibility ofselected sling with Maxi Sky overhead lift.4. Locate emergency shut off (red cord).5. Explain lift procedure to patient and provide privacy.6. Bed Auto Firmed and height adjusted to shortest caregiver’s waist.7. Sling positioned properly (normally, arch should be at base of spine). Positioning handles should beon the outside of the sling.8. Cassette moved from charger using the hand control. Bracket/ spreader bar lowered to patient’schest.9. Patient secured to machine properly. Leg straps should be flat under the patient’s legs and shouldcross one inside the other.10. Patient watched through ascent for clearance, stability, and comfort.11. Proper <strong>lateral</strong> movement of patient demonstrated (<strong>device</strong> specific). Patient's body kept stable tostop swinging motion (if applicable).12. Patient positioning checked throughout descent. Use positioning handles when patient isapproximately 1 inch above receiving surface.13. Bracket/ spreader bar held away from patient’s face at end of descent.14. Ensure patient ends up in a safe position with access to call light and detach sling. Return tocharger button used properly. Remove sling if patient’s skin is compromised or if patient will be up formore than 30 minutes. Note: sling removal guidelines do not apply to repositioning slings.15. Knowledge of positioning of patient’s body on a repositioning sling. Sling should attach to bracket/spreader bar with four hooks on the top and six on the bottom.16. Knowledge of using a repositioning sling to boost.17. Knowledge of using a repositioning sling to roll.18. Knowledge of using a repositioning sling to do a <strong>lateral</strong> <strong>transfer</strong>.19. Knowledge of how to use <strong>device</strong> to address a patient fall emergency.20. Knowledge of emergency lowering technique.I have successfully completed the procedures for operating the Maxi Sky overhead lift. I have demonstratedthe tasks/<strong>skills</strong> and understand that these <strong>device</strong>s are to be used to comply with Safe Patient Moving Policy& Procedures.Employee Name (print):Employee Signature: ___________________________Verifier Name (print):Verifier Signature:Date: ________________________________________Employee Number:Met NeedsReviewEmployee Job Title: __________________________Verifier Job Title:Department:
Multi Lift Skills ChecklistObjectives: Operates lift/<strong>transfer</strong> <strong>device</strong> in a manner that is safe and comfortable for both thepatient and the employee.Focused Competency: Patient assist using the Multi Lift <strong>device</strong>.References/Content Expert: www.accessunlimited.comAssessment Criteria:• All <strong>skills</strong> must be met, and demonstrated in the order presented.• Verifier places check mark in appropriate box with initials.• After learning requirements met, Learner and Instructor to sign & date at bottom of page.Key Points in using this <strong>device</strong>:• The employee is to complete the <strong>skills</strong> using proper body mechanics.• The employee takes into consideration the needs, safety & comfort of the patient andcaregiver(s) when choosing the equipment.• Communication with patient and other caregivers preparatory to, during and after themove.Learner Performs Skill: Operating the Multi Lift <strong>device</strong> to <strong>transfer</strong> apatient out of (or into) an automobile.1. Knowledge of potential candidates and exclusions for use with this <strong>device</strong>.(A patient must have enough leg length for the sling to wrap around and liftthem, be able to bend their hips to 90 degrees, and weigh 400 pounds or less.With any sling, pressure exerted on the skin should be considered.)2. Check work area (and equipment compatibility). Remove obstacles.Knowledge of how to adjust lifting arm between the high and low positions.3. Check <strong>device</strong> (battery power level, condition of sling).4. Explain procedure to patient and provide privacy.5. Sling positioned properly (normally, arch should be at base of spine).Positioning handles should be on the outside of the sling. Machine operatorwill be at automobile door opening / spotter will be in an adjacent seat.6. Legs of base positioned and locked in wide position. Spreader bar unlockedand rotated to face patient.7. Machine moved into position, wheel locks engaged.8. Patient secured to machine properly. Leg straps properly adjusted andpositioned flat under the patient’s thighs.9. Patient watched through ascent for clearance, stability, and comfort.MetNeedsReview10. Wheel locks disengaged, and patient’s feet rotated out of car. A frictionreduction sheet may be used. Spreader bar locked into place.11. Patient removed from automobile safely. The patient may need to belowered to clear the door frame. A friction reduction sheet may be used.12. Wheelchair moved into position under patient, wheel locks engaged.13. Patient positioning checked throughout descent. Positioning handle used.14. Sling detached and removed from behind patient.15. Prepare <strong>device</strong> for next user: Disinfect between each patient use. Hangsling on <strong>device</strong>. Ensure <strong>device</strong> is turned off and plugged into wall outlet instorage area. Legs of base should be locked in narrow position for storage.16. Knowledge of emergency lowering technique.I have successfully completed the procedures for operation the Multi Lift automobile <strong>transfer</strong><strong>device</strong>. I have demonstrated the tasks/<strong>skills</strong> and understand that these <strong>device</strong>s are to be used tocomply with Safe Patient Moving Policy & Procedures.Employee Name (print):Employee Number:Employee Signature: ___________________________Verifier Name (print):Verifier Signature:Date: ________________________________________Employee Job Title: __________________________Verifier Job Title:Department:
<strong>On</strong>-3 Lateral Transfer DeviceObjectives: Operates <strong>transfer</strong> <strong>device</strong> in a manner that is safe and comfortable for both thepatient and the employee.Focused Competency: Patient assist using the <strong>On</strong>-3 Lateral Transfer Device.References/Content Expert: http://www.hill-rom.com/Assessment Criteria:• All <strong>skills</strong> must be met, and demonstrated in the order presented.• Verifier places check mark in appropriate box with initials.• After learning requirements met, Learner and Instructor to sign & date at bottom of page.Key Points in using this <strong>device</strong>:• The employee is to complete the <strong>skills</strong> using proper body mechanics.• The employee takes into consideration the needs, safety & comfort of the patient andcaregiver(s) when choosing the equipment.• Communication with patient and other caregivers preparatory to, during and after themove.Learner Performs Skill: Operating the <strong>On</strong>-3 Lateral Transfer <strong>device</strong> Met NeedsReview1. Knowledge of potential candidates and exclusions for use with this <strong>device</strong>.(patient must be able to tolerate <strong>lateral</strong> <strong>transfer</strong> in a level position and weigh400 pounds or less.)2. Check work area and equipment compatibility. Remove obstacles.3. Unplug and check battery power level (green light indicates <strong>device</strong>readiness).4. Explain procedure to patient and provide privacy.5. Auto firm bed. Adjust bed height to waist level of shortest caregiver assistingin <strong>transfer</strong>.6. Open <strong>transfer</strong> rod and fold up tightly in bed sheet right up to patient’s body.7. Open <strong>transfer</strong> bridge and position edge with “patient” indicator under rod8. Align receiving surface with patient’s body. Ensure that both surfaces are onthe same level and in the brake position.9. Align <strong>On</strong>-3 <strong>device</strong> with plane of <strong>transfer</strong>. Line on <strong>device</strong> (under straps)should be 1” above plane of <strong>transfer</strong> (knowledge of height adjustabilitydemonstrated)10. Straps pulled out straight and attached to <strong>transfer</strong> bar at indentations.11. Machine operator and spotter positioned at patient’s head and feet.Machine operator removes slack from straps by pushing on one side of thebutton on the controller or the other. Pressure in the middle of the button willpull on both straps equally.12. Transfer patient. Straighten out straps as needed with controller.(Dragging can be corrected by machine operator or spotter manually guidingpatients head or feet over the course of the <strong>transfer</strong>).13. Place rod and bridge back on <strong>device</strong>.14. If patient was <strong>transfer</strong>red to bed, ensure bed is in lowest position and raisetop siderails15. Prepare <strong>device</strong> for next user: Dis-infect between each patient use. Return<strong>device</strong> to storage location and plug into wall outlet.I have successfully completed the procedures for operating the <strong>On</strong>-3 Lateral Transfer <strong>device</strong>. Ihave demonstrated the tasks/<strong>skills</strong> and understand that these <strong>device</strong>s are to be used to complywith Safe Patient Moving Policy & Procedures.Employee Name (print):Employee Signature: ___________________________Verifier Name (print):Verifier Signature:Date: ________________________________________Employee Number:Employee Job Title: __________________________Verifier Job Title:Department:
Sara Plus Skills ChecklistObjectives: Operates lift/<strong>transfer</strong> <strong>device</strong> in a manner that is safe and comfortable for both thepatient and the employee.Focused Competency: Patient assist using the Sara Plus sit-to-stand <strong>device</strong>.References/Content Expert: http://www.arjohuntleigh.comAssessment Criteria:• All <strong>skills</strong> must be met, and demonstrated in the order presented.• Verifier places check mark in appropriate box with initials.• After learning requirements met, Learner and Instructor to sign & date at bottom of page.Key Points in using this <strong>device</strong>:• The employee is to complete the <strong>skills</strong> using proper body mechanics.• The employee takes into consideration the needs, safety & comfort of the patient andcaregiver(s) when choosing the equipment.• Communication with patient and other caregivers preparatory to, during and after themove.Learner Performs Skill: Operating the Sara Plus Sit to Stand Device Met NeedsReview1. Knowledge of potential candidates and exclusions for use with this <strong>device</strong>. (Apatient must be cooperative, able to bear weight on at least one leg, weight cannotexceed 420 pounds, or in a halo. Relative contraindication: Spinal fusion/TLSO, )2. Check work area (and equipment compatibility). Remove obstacles.3. Check <strong>device</strong> (battery power level, condition of harness, etc).4. Locate emergency shut off and controls on handset / mast.5. Explain lift procedure to patient and provide privacy.6. If supine, patient assisted to seated position properly. (bed auto firmed, etc)7. Harness fastened around patient’s torso. (if “Standing/walking” harness,additional straps moved into position under patients’ buttocks)8. Align and position knee stabilizer (standard position is just below patella) andengage wheel locks of <strong>device</strong>. Ensure patients’ feet make sound contact withfootplate. Calf strap applied if necessary.9. Patient instructed to hold onto handles (arms on the OUTSIDE of the harness).10. Ropes properly secured to harness and uniformly tightened as needed.11. Lifting communicated, patient lifted to standing position. Caregiver to ensure thatpatients’ feet remain on footplate.12. Wheel locks disengaged. Patient moved to receiving surface (Chair/commodemoved to patient if possible). The backs of the patients’ knees should be touchingthe receiving surface.13. Wheel locks of receiving surface engaged (if applicable). Wheel locks of SaraPlus <strong>device</strong> remain disengaged for descent.14. Patient positioning checked throughout descent15. Patient properly detached from <strong>device</strong>.16. Prepare <strong>device</strong> for next user. Disinfect between each patient use. Hang harnesson <strong>device</strong>. If battery level is in the “amber” color, exchange for battery in charger.Best practice: exchange for battery in charger daily.17. Knowledge of emergency lowering technique.18. Knowledge of use of Walking Sling (removal of footplate, etc).19. Knowledge of use of inclusive scale (if applicable to model)I have successfully completed the procedures for operating the Sara Plus sit to stand Machine. I have demonstrated thetasks/<strong>skills</strong> and understand that these <strong>device</strong>s are to be used to comply with Safe Patient Moving Policy & Procedures.Employee Name (print):Employee Signature: ___________________________Verifier Name (print):Verifier Signature:Date: ________________________________________Employee Number:Employee Job Title: __________________Verifier Job Title:Department:
Stedy Skills ChecklistObjectives: Operates lift/<strong>transfer</strong> <strong>device</strong> in a manner that is safe and comfortable for both thepatient and the employee.Focused Competency: Patient assist using the Stedy manual pivot assist <strong>device</strong>.References/Content Expert: http://www.arjo.com/usAssessment Criteria:• All <strong>skills</strong> must be met, and demonstrated in the order presented.• Verifier places check mark in appropriate box with initials.• After learning requirements met, Learner and Instructor to sign & date at bottom of page.Key Points in using this <strong>device</strong>:• The employee is to complete the <strong>skills</strong> using proper body mechanics.• The employee takes into consideration the needs, safety & comfort of the patient andcaregiver(s) when choosing the equipment.• Communication with patient and other caregivers preparatory to, during and after themove.Learner Performs Skill: Operating the Stedy manual pivot assist <strong>device</strong> Met NeedsReview2. Knowledge of potential candidates and exclusions for use with this <strong>device</strong> (Apatient must weigh 265 pounds or less, be able to stand with minimalassistance, keep his or her upper body stable, and have no knee flexionrestrictions)2. Check work area (and equipment compatibility). Remove obstacles.3. Check <strong>device</strong>: wheel locks, seat flaps, back support strap (if included).4. Explain procedure to patient and provide privacy.5. If supine, patient assisted to seated position properly. (bed auto firmed, etc)6. Align and position <strong>device</strong> (with seat flaps up). Wheel locks engaged.7. Patient assisted to standing position (if needed).8. Seat positioned behind patient (flaps down).9. Patient instructed to sit on seat flaps and hold onto bar in front of the seat.Wheel locks disengaged.10. Knowledge of when to use back support strap (if included with <strong>device</strong>).11. Pivot or transport patient to destination.12. Patient aligned to destination seat or bed. Wheel locks engaged.13. Patient assisted to standing position (if needed)14. Seat removed from behind patient (flaps up).15. Patient assisted to sitting position (if needed)16. Prepare <strong>device</strong> for next user: Disinfect between each patient use. Hangback support strap on <strong>device</strong> (if included).I have successfully completed the procedures for operating the Stedy manual pivot assist <strong>device</strong>.I have demonstrated the tasks/<strong>skills</strong> and understand that these <strong>device</strong>s are to be used to complywith Safe Patient Moving Policy & Procedures.Employee Name (print):Employee Signature: ___________________________Verifier Name (print):Verifier Signature:Date: ________________________________________Employee Number:Employee Job Title: __________________________Verifier Job Title:Department:
Stedy / SARA Stedy Skills ChecklistObjectives: Operates lift/<strong>transfer</strong> <strong>device</strong> in a manner that is safe and comfortable for both thepatient and the employee.Focused Competency: Patient assist using the Stedy manual pivot assist <strong>device</strong>.References/Content Expert: http://www.arjohuntleigh.comAssessment Criteria:• All <strong>skills</strong> must be met, and demonstrated in the order presented.• Verifier places check mark in appropriate box with initials.• After learning requirements met, Learner and Instructor to sign & date atbottom of page.Key Points in using this <strong>device</strong>:• The employee is to complete the <strong>skills</strong> using proper body mechanics.• The employee takes into consideration the needs, safety & comfort of thepatient and caregiver(s) when choosing the equipment.• Communication with patient and other caregivers preparatory to, during and after themove.Learner Performs Skill: Operating the Stedy manual pivot assist <strong>device</strong> Met NeedsReview3. Knowledge of potential candidates and exclusions for use with this <strong>device</strong> (Apatient must be able to stand with minimal assistance, keep his or her upper bodystable, have no knee flexion restrictions, and the patient’s weight cannot exceedthe capacity of the <strong>device</strong> being used.)2. Check work area (and equipment compatibility). Remove obstacles.3. Check <strong>device</strong>: wheel locks, seat flaps, back support strap (if included).4. Explain procedure to patient and provide privacy.5. If supine, patient assisted to seated position properly. (bed auto firmed, etc)6. Use of leg spreader (if applicable to model) demonstrated.7. Align and position <strong>device</strong> (with seat flaps up). Wheel locks engaged.8. Patient assisted to standing position (if needed).9. Seat positioned behind patient (flaps down).10. Patient instructed to sit on seat flaps and hold onto bar in front of the seat.Wheel locks disengaged.11. Knowledge of when to use back support strap (if included with <strong>device</strong>).12. Pivot or transport patient to destination.13. Patient aligned to destination seat or bed. Wheel locks engaged.14. Patient assisted to standing position (if needed)15. Seat removed from behind patient (flaps up).16. Patient assisted to sitting position (if needed)17. Prepare <strong>device</strong> for next user: Disinfect between each patient use.I have successfully completed the procedures for operating the Stedy manual pivot assist <strong>device</strong>.I have demonstrated the tasks/<strong>skills</strong> and understand that these <strong>device</strong>s are to be used to complywith Safe Patient Moving Policy & Procedures.Employee Name (print):Employee Signature: ___________________________Verifier Name (print):Title:____________________Verifier Signature:Date: _____________Department:________________________Employee Number:_________________Employee Job Title:_________________Verifier Job
Stretcher Chair Skills ChecklistObjectives: Operates <strong>device</strong> in a manner that is safe and comfortable for both the patient andthe employee.Focused Competency: Patient assist using the Stretcher Chair <strong>lateral</strong> <strong>transfer</strong> / transport <strong>device</strong>.References/Content Expert: http://www.wyeastmed.com/index.shtmlAssessment Criteria:• All <strong>skills</strong> must be met, and demonstrated in the order presented.• Verifier places check mark in appropriate box with initials.• After learning requirements met, Learner and Instructor to sign & date at bottom of page.Key Points in using this <strong>device</strong>:• The employee is to complete the <strong>skills</strong> using proper body mechanics.• The employee takes into consideration the needs, safety & comfort of the patient andcaregiver(s) when choosing the equipment.• Communication with patient and other caregivers preparatory to, during and after themove.• RN makes final determinations of equipment (after consultation with appropriate parties)as regards to selection of equipment.Learner Performs Skill: Operating the Stretcher Chair <strong>lateral</strong> <strong>transfer</strong> /transport <strong>device</strong>1. Knowledge of potential candidates and exclusions for use with this <strong>device</strong>(The patient’s weight may not exceed 400 pounds and his or her body must fitbetween the side rails of the <strong>device</strong>)2. Check work area (and equipment compatibility). Remove obstacles.3. Check <strong>device</strong> (brake, sliding board, lap belt).4. Explain procedure to patient and provide privacy.5. Device placed into a “stretcher” (or flat) position properly6. Height adjusted for <strong>lateral</strong> <strong>transfer</strong> (shortest caregiver’s waist level)7. Device aligned with patient’s body/ height adjustable foot plate adjusteddown (out of the way of the <strong>transfer</strong>) / brake engaged.8. Lateral <strong>transfer</strong> from bed to <strong>device</strong> with slipp sheet, overhead lift, air pal, orsome models of ON-39. Brake disengaged /side rails raised/ lap belt attached10. Height adjustable footplate moved up to meet patient’s feet11. Patient slowly raised to sitting position (if applicable, hip flexion restrictionsconsidered)12. Device lowered to its lowest height / Patient left with access to call light13. Knowledge of angle adjustable legrest (must be all the way down beforeattempting to place the <strong>device</strong> back into a stretcher position)14. Knowledge of how to use the <strong>device</strong> for transport(Steer/Neutral/Brake/Height adjustment/IV pole and O2 Holder.)15. Knowledge of two handed technique for lowering side rail.16. Knowledge of how to use the built in sliding board with hand cranks to<strong>transfer</strong> a patient back to bed (pad must be slightly above bed surface to allowit to slide over / never crank further than red line on the opposite side of <strong>device</strong>/ patient can be slid half way off / pad cranked back and centered onto <strong>device</strong>frame)I have successfully completed the procedures for operating the Stretcher Chair <strong>lateral</strong> <strong>transfer</strong> /transport <strong>device</strong>. I have demonstrated the tasks/<strong>skills</strong> and understand that these <strong>device</strong>s are tobe used to comply with Safe Patient Moving Policy & Procedures.MetNeedsReviewEmployee Name (print):Employee Signature: ___________________________Verifier Name (print):Verifier Signature:Date: ________________________________________Employee Number:Employee Job Title: __________________________Verifier Job Title:Department:
Stryker Zoom Powered GurneyObjectives: Operates transport <strong>device</strong> in a manner that is safe and comfortable for both thepatient and the employee.Focused Competency: Patient transport using the Stryker Zoom powered gurney.References/Content Expert: http://www.stryker.com/Assessment Criteria:• All <strong>skills</strong> must be met, and demonstrated in the order presented.• Verifier places check mark in appropriate box with initials.• After learning requirements met, Learner and Instructor to sign & date at bottom of page.Key Points in using this <strong>device</strong>:• The employee is to complete the <strong>skills</strong> using proper body mechanics.• The employee takes into consideration the needs, safety & comfort of the patient andcaregiver(s) when choosing the equipment.• Communication with patient and other caregivers preparatory to, during and after themove.Learner Performs Skill: Operating the Stryker Zoom powered gurney Met NeedsReview1. Knowledge of potential candidates and exclusions for use with this <strong>device</strong>.(weight to be moved must not exceed the model’s capacity).2. Check work area and remove obstacles.3. Unplug and check battery power level.4. Explain procedure to patient and provide privacy.MANUAL MODE5. Engage the manual mode by stepping on pedal, bringing it to neutral6. Check that the dial at the foot of the gurney is in the “off” position. An amberlight on the gurneys’ push handles will confirm the gurney is in manual mode.(light will show when the buttons on push handles are engaged.)7. Ability to engage wheel locks demonstrated8. Ability to raise/lower glideaway siderails demonstrated9. Ability to raise/lower pneumatic headrest demonstratedZOOM MODE10. Engage “Zoom” (powered) mode by stepping on the pedal, bringing it to thedrive position.11. Check that the dial at the foot of the gurney is in the “on” position. A greenlight on the gurneys’ push handles will confirm the gurney is in zoom mode.(light will show when the buttons on push handles are engaged.)12. Engage the buttons on the push handles and push forward. The motorpropels the gurney from the middle and back wheels and will increase speedwith the amount of pressure applied. The gurney will maintain speed until thebuttons are released or pressure is exerted in the opposite direction. Note: Ifhandles are pulled, the motor will propel the gurney backwards.13. Demonstrate a turn (the gurney will pivot on the central wheel)14. Prepare the gurney for the next user: Disinfect between each patient use.Return to proper storage place, and ensure that gurney is plugged into walloutlet.I have successfully completed the procedures for operating the Stryker Zoom Powered Gurney. Ihave demonstrated the tasks/<strong>skills</strong> and understand that these <strong>device</strong>s are to be used to complywith Safe Patient Moving Policy & Procedures.Employee Name (print):Employee Signature: ___________________________Verifier Name (print):Verifier Signature:Date: ________________________________________Employee Number:Employee Job Title: __________________________Verifier Job Title:Department:
Dane Wheelchair MoverObjectives: Operate <strong>transfer</strong> <strong>device</strong> in a manner that is safe for the patient and employeeFocused Competency: wheelchair moverReference/ Content expert: http://www.danetechnologies.comAssessment criteria:• All <strong>skills</strong> must be met and demonstrated in the order presented.• Verifier places check marks in appropriate box with initials• After learning requirements met, Learner and instructor to sign and date atbottom of pageKey points in using this <strong>device</strong>:• The employee is to complete the <strong>skills</strong> using proper body mechanics• The employee takes into consideration the needs, safety & comfort of the patientand caregiver(s) when choosing the equipment.• Communication with patient and other caregivers preparatory to, during and afterthe move.Learner performs Skill: Operating the Dane Wheelchair mover Met NeedsReview1. Knowledge of potential candidates and exclusions with this <strong>device</strong>. Patientmust be able to be safely transported in an upright (sitting) position. Patientand wheelchair must weigh less then 550 pounds. Ramps traversed cannotexceed a 12% grade.2. Check work area. Remove any obstacles3. Explain procedure to patient and provide privacy.4. Unplug <strong>device</strong>, stow cord safely, and check battery power level.5. Knowledge of “<strong>On</strong>-Off” switch and emergency power cut off demonstrated.6. Knowledge of “turtle” (slow) or “rabbit” (fast) speed demonstrated.7. The push lever throttle has a slight delay-depress slowly until thewheelchair mover begins to move. Pressure on the right side propels thewheelchair mover forward, left is reverse.8. Docking: Using “turtle” speed button, drive the wheelchair mover underthe back of the wheelchair. To extend the arms and secure the wheelchair,push down on the black handle (Do not squeeze the small silver rod on thehandle)9. Foot pedals at the bottom of the wheelchair mover are used only if armsneed centering to reach wheelchair frames evenly.10. Safely <strong>transfer</strong> the patient to wheelchair. Replace the footrests; assist thepatient with foot position if needed (proper body mechanics demonstrated).11. Ensure wheelchair is connected securely, depress lever throttle slowly.NOTE: The amount of pressure applied to the throttle handles is directlyproportionate to the speed of the <strong>device</strong>. To stop, disengage pressure on thethrottle.12. To use IV holder, grasp the bar, pull it up, unfold it horizontally until it“clicks” into place.13 To disconnect the wheelchair mover from the wheelchair, grasp the blackhandle, squeeze the small silver rod, and pull up.14. Return the wheelchair mover to its charging area, turn off and plug in.I have successfully completed the procedures for operating the wheelchair mover . I have demonstrated the task/<strong>skills</strong>and understand that these <strong>device</strong>s are to be used to comply with Safe Patient Moving policy and procedures.Employee Name (print):_______________________ Employee Number:________________________Employee Signature:___________________________ Employee Job title:________________________Verifier Name (print)__________________________ Verifier Job title:_________________________Verifier Signature:____________________________ Department:_____________________________Date_______________________________________
Stryker Zoom Cart Skills ChecklistObjectives: Operates lift/<strong>transfer</strong> in a manner that is safe and comfortable for both the patient and theemployee.Focused Competency: Patient assist using the Stryker Zoom Cart <strong>device</strong>.References/Content Expert: Did we say we would cut this?Assessment Criteria:• All <strong>skills</strong> must be met.• Skills must be done in order stated.• Verifier places check mark in appropriate box with initials.• After learning requirements met, Learner and Instructor to sign & date at bottom of page.Key Points in using this lift:• The employee is to complete the <strong>skills</strong> using proper body mechanics.• The employee takes into consideration the needs, safety & comfort of the patient and caregiverwhen choosing the equipment.• Communication with patient and other caregivers preparatory to, during and after the move.• RN makes final determinations of equipment(after consultation with appropriate parties) asregards selection of equipmentLearner Performs Skill: Operating the Stryker Zoom Cart Met NeedsReview4. Assess indications and counter indications (for example, if the following is true,prior to use: pt plus equipment weighs < 660#2. Assess the work area (and equipment compatibility).3. Check functionality of <strong>device</strong> (chaeck battery power if applicable)4. Explain lift procedure to patient and provide privacy.MANUAL MODE-5. Engage the manual mode by stepping on pedal, bringing it to neutral6. Squeeze handle and see amber light – this is manual mode7. Apply brakes by moving pedal to “red”8. Elevate pneumatic head lift9. Raise and lower the glideaway side rails10.Demonstrate turn – the cart will pivot as a non-motorized cart doesZOOM MODE-11.Engage zoom mode by stepping on pedal to green12Assess battery charge13. Check that the dial at foot of cart is also in drive (should never not be in drive)14.Squeeze buttons on handles and apply 5-10# pressure (lights should be green). Thecart is power driven and carried by middle and back wheels15. The cart will move and increase speed with amount of pressure applied and activityof user. It maintains speed until buttons are released or pressure is exerted in oppositedirection.16.Demonstrate turn – need to turn wide –turning point is middle wheel17.Prepare <strong>device</strong> for next user (wipe clean with 3M HB Quat disinfectant spray andplug into outlet when stored and not in use.I have successfully completed the procedures for operating _Stryker Zoom Cart. I have demonstrated thetasks/<strong>skills</strong> and understand that these lifts are to be used to comply with Safe Patient Moving Policy &Procedures.Learner’s Name and Title (PRINTED) : _____________________________________________Learner’s Signature: ______________________________DATE: ________________Instructor’s Name and Title (PRINTED) : _____________________________________________Instructor’s Signature:_____________________________DATE:________________


