PT32 GST - Elektrobock
PT32 GST - Elektrobock
PT32 GST - Elektrobock
- No tags were found...

Create successful ePaper yourself
Turn your PDF publications into a flip-book with our unique Google optimized e-Paper software.
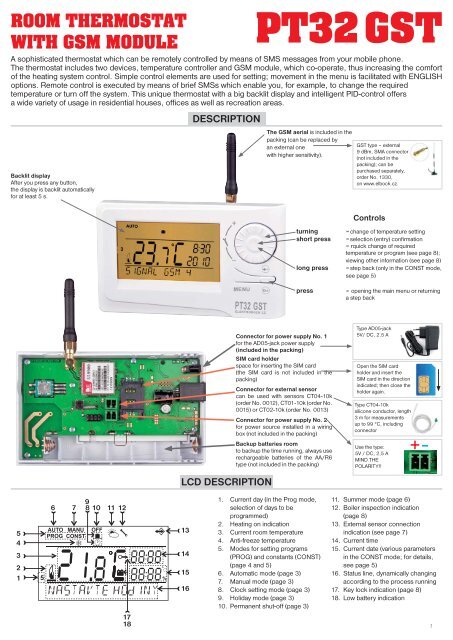
ROOM THERMOSTATWITH GSM MODULEBacklit displayAfter you press any button,the display is backlit automaticallyfor at least 5 s.<strong>PT32</strong> <strong>GST</strong>A sophisticated thermostat which can be remotely controlled by means of SMS messages from your mobile phone.The thermostat includes two devices, temperature controller and GSM module, which co-operate, thus increasing the comfortof the heating system control. Simple control elements are used for setting; movement in the menu is facilitated with ENGLISHoptions. Remote control is executed by means of brief SMSs which enable you, for example, to change the requiredtemperature or turn off the system. This unique thermostat with a big backlit display and intelligent PID-control offersa wide variety of usage in residential houses, offi ces as well as recreation areas.DESCRIPTIONThe GSM aerial is included in thepacking (can be replaced byan external onewith higher sensitivity).<strong>GST</strong> type – external9 dBm, SMA connector(not included in thepacking); can bepurchased separately,order No. 1330,on www.elbock.cz.turningshort presslong presspressControls= change of temperature setting= selection (entry) confi rmation= rquick change of requiredtemperature or program (see page 8);viewing other information (see page 8)= step back (only in the CONST mode,see page 5)= opening the main menu or returninga step backLCD DESCRIPTIONConnector for power supply No. 1for the AD05-jack power supply(included in the packing)SIM card holderspace for inserting the SIM card(the SIM card is not included in thepacking)Connector for external sensorcan be used with sensors CT04-10k(order No. 0012), CT01-10k (order No.0015) or CT02-10k (order No. 0013)Connector for power supply No. 2for power source installed in a wiringbox (not included in the packing)Backup batteries roomto backup the time running, always userechargeable batteries of the AA/R6type (not included in the packing)Type AD05-jack5V/ DC, 2.5 AOpen the SIM cardholder and insert theSIM card in the directionindicated; then close theholder again.Type CT04-10ksilicone conductor, length3 m for measurementsup to 99 °C, includingconnectorUse the type:5V / DC, 2,5 AMIND THEPOLARITY!!543216 7 9 8 10 11 12131415161. Current day (in the Prog mode,selection of days to beprogrammed)2. Heating on indication3. Current room temperature4. Anti-freeze temperature5. Modes for setting programs(PROG) and constants (CONST)(page 4 and 5)6. Automatic mode (page 3)7. Manual mode (page 3)8. Clock setting mode (page 3)9. Holiday mode (page 3)10. Permanent shut-off (page 3)11. Summer mode (page 6)12. Boiler inspection indication(page 8)13. External sensor connectionindication (see page 7)14. Current time15. Current date (various parametersin the CONST mode; for details,see page 5)16. Status line, dynamically changingaccording to the process running17. Key lock indication (page 8)18. Low battery indication17181
INSTALLATIONInstall the thermostat at a suitable place where its operation will not be affected by direct fl ow of hot air from a heating source, by sunshine orother disturbing effects. Do not install it on an external wall either. The installation height should be at least 1.5 m above the ground. Locate thethermostat in the so-called reference room, such as the living room (the heat source will be switched according to the temperature in this room).The installation can only be done by a person with adequate qualification!Before installation, disconnect the power supply!1) Switch off the main circuit breaker.2) Remove the control part from the bottom cover of the device (Fig. 1).3) Chip off the plastic piece in the middle of the bottom cover to lead in the conductors.4) Run the conductors through the hole and connect them to the terminal board, see the wiring diagram.5) Fasten the bottom cover to the wiring box by means of screws (Fig. 2).6) Insert the activated SIM card into the SIM card holder at the back of the control part.7) If you want to back up the time, install the rechargeable batteries (see Fig. 3).8) Mount the control part onto the bottom cover (Fig. 2).9) Connect the power supply to the connector No. 1 or No. 2 (see page 1).10) Switch on the main circuit breaker and test the thermostat for correct connection, see page 3 (TEST).11) Upon the fi rst start (or reset), the thermostat shows the “SET CLOCK”, “ENTER PIN” messages; set the current time and dateacc. to the instructions on page 3, enter the PIN acc. to page 7 and select language acc page 5.Fig.1Fig.3AA rechargeablebatteryAA rechargeablebatteryThe thermostat enables backup of time incase of power failure. You must use rechargeablebatteries 2x1,2 V, type AA/R6. Afterpower failure, the time remains current (approximateservice life: 2 years, according tothe type of batteries used).The advantage is recharging of the batteriesafter the power supply is restored.CAUTION: THE BATTERIES ARE NOT USEDFOR SUPPLYING THE THERMOSTAT, FORWHICH THE AD05-jack POWER SOURCEMUST BE USED (see page 1).Fig.2Wiring diagram:<strong>PT32</strong><strong>GST</strong>BOILERconnector for theAD05 power sourceconnectionMENUpotential-free(voltage-free) contact**The thermostat terminals aremarked differently with everyboiler type; therefore, observe thewiring recommended by the boilermanufacturer!FIRST SWITCH-ONAfter you switch on <strong>PT32</strong><strong>GST</strong> fi rst, the following message appears on the LCD; follow the instructions to make the corresponding settings:TEST GSMGSM module is beingchecked.SET TIMEPress the “ MENU “, button twice;choose the CLOCK mode byturning the “ „ button and makethe settings acc. to page 3.SET TIMESET HOURENTER PINPress the “ MENU “, button twice;choose the CONST mode byturning the “ „ button; move onto set CONST13 acc. to page 7.CONSTANTS13 ENTER PIN2
OPERATING MODESPressing any button fi rst, you activate the display backlit. By another short press of the “ MENU “ button, you open the main menu in whichyou can choose operating modes.AUTO (the Pr3 weekly program set by default, see page 4)The thermostat works according to the weekly program settings (this program can be changed; for detaileddescription, see PROG, page 4).Press twice the “ MENU “, choose the AUTO mode by turning the “ “ and press the “ “ button to confi rm.SMS form: AutoChange of the mode to AUTO. Thermostat will be work acc. last setting weekly program.AUTO MOdEMANU (default temperature setting of 21°C)The thermostat works according to the temperature setting until the next manual change.Press twice the “ MENU “, choose the MANU mode by turning the “ “ and press the “ “ button to confi rm.“.SMS form: ManuChange of the mode to MANU. Thermostat will be keep last setting temperature.OFF (the anti-freeze temperature of 3 °C is kept – cannot be changed)The thermostat is permanently switched off until the next manual change of the mode.Press twice the “ MENU “, choose the OFF mode by turning the “ “ and press the “ “ button to confi rm.SMS form: OffChange of the mode to OFF. You can cancel the mode by the SMS: Temp xx or Auto or ManuHOLIDAYThe thermostat maintains the preset temperature until the preset date and selected time. After expiry of thepreset period, it automatically returns to the AUTO/ MANU mode last selected before the holiday.Press twice the “ MENU “ button, choose the mode by turning the “ “ and press the “ “ button toconfi rm.Step by step, set the temperature which the thermostat should keep during the holiday, date and time of yourreturn from the holiday. Change the values by turning the “ “ button and confi rm each change by pressingthe “ “ button.After making the settings, press the“ “ button to return to the basic screen.Note: The holiday mode can be cancelled any time by selecting another AUTO or MANU mode.CLOCK SETTINGSetting the current time and date.Press twice the “ MENU “ button, choose the CLOCK mode by turning the “ “ button, and press the“ “ button to confi rm.Change the values by turning the “ “ button and confi rm each change by pressing the “ “ button (theparameter modifi ed is always fl ashing); pressing the “ “ button, you return to the menu).MANU MOdEOFF MOdEHOLIdAYSET TEMPSET TIMEPROG (PROGRAMMING)You can set 9 weekly programs with 6 temperature changes per day. The Pr1 and Pr2 programs are empty;Pr3 to Pr7 programs are set by default. The PrU and PrL are also set by default, intended for the EVEN/ODDweek option (for details, see pages 4 and 6).CONST (CONSTANTS)Setting the control parameters. For a detailed description, see page 5.Press twice the “ MENU “ button, choose the CONST mode by turning the ““ “ button to confi rm.“ button, and press theTESTTesting the correct connection and function of GSM.Press twice the “ MENU “, choose the TEST mode by turning the “ “ button, and press the “ “ button toconfi rm. Turn the “ “ button to start testing the module and thermostat. The output relay will be switchedon/off several times (the ON/OFF messages appear on the LCD).SET HOURPROGRAMMINGCONSTANTSTEST MOdETEST GSM PIN OK ON OFF3
PROG (PROGRAMMING)You can set 9 weekly programs with 6 temperature changes per day. The Pr1 and Pr2 programs are empty;Pr3 to Pr7 programs are set by default. The PrU and PrL are also set by default, intended for the EVEN/ODDweek option (for details, see page 6).Change in the program settings:Press twice the “ MENU “ button, choose the PROG mode by turning the “ “ button, and press the “ “button to confi rm.The selected program number is fl ashing on the display. Turning the “ “ button, choose the program whichyou want to change and press the “ “ button to confi rm. Turning the “ “ button, choose the number ofdays to be programmed (you can program day-by-day or 1-5 = Mon-Fri, 6-7 = Sat-Sun, or 1-7 = Mon-Sun)and press the “ “ button to confi rm.The 1st change time starts fl ashing; set the time by turning the “ “ button and press the “ “ button toconfi rm. Set the temperature for this time by turning the “ “ button and press again the “ “button to confirm. The 2nd change time appears on the display. Proceed in the same way as with the fi rst change setting.In this way, you can set up to 6 temperature changes per day. To return one step back, shortly press the“ “ button; to return to the main menu, press the “ “ button long.After changing the preset program, check whether all the changes made conform to your requirements!It is not necessary to apply all six changes to one day!PROGRAMMINGSELECT PROGRAMSELECT dAYTIME CHANGESTables of temperature programs:program No.1MondayTuesdayWednesdayThursdayFridaySaturdaySundayprogram No.2MondayTuesdayWednesdayThursdayFridaySaturdaySundayprogram No.3MondayTuesdayWednesdayThursdayFridaySaturdaySundayprogram No.4MondayTuesdayWednesdayThursdayFridaySaturdaySundayprogram No.5MondayTuesdayWednesdayThursdayFridaySaturdaySundayNote:5/21 meansthat the requiredtemperature at 5o’clock is 21 °Cprogram No.6MondayTuesdayWednesdayThursdayFridaySaturdaySundayprogram No.7MondayTuesdayWednesdayThursdayFridaySaturdaySundayAll theindicatedprogramscan bechanged!Even or odd week selection:This setting is suitable, for example, for shift operation (the requirements on thermal comfort in the objectchange every week). The PrU and PrL programs will alternate automatically. The programs can also be modified according to your requirements.Press twice the “ MENU “ button, choose the CONST mode by turning the “ “ button, and press the “ “button to confi rm. Repeat pressing the“ “ button until the constant No. 9 appears on the LCD. Set YES byturning the “ “ button, and press the “ “ button to confi rm.Odd-EVEN MOdEUMondayTuesdayWednesdayThursdayFridaySaturdaySundayLMondayTuesdayWednesdayThursdayFridaySaturdaySunday4
CONST (CONSTANTS)Setting the control parameters.Press twice the “ MENU “ button, choose the CONST mode by turning the“ “ button, and press the “ “button to confi rm.1 CESKY (Czech language set by default)Language selection (CZ/PL/EN/DE/RU/SVK).Choose the language by turning the “ “ button and press the “ “ button to confi rm.2 MINIMUM CONTROL TEMPERATURE (5 °C set by default)Setting the limit of the minimum temperature which can be set. If using the GSM module, you will beinformed by an SMS that the room temperature has dropped below this value.Choose within the range from 3 °C to 10 °C (by 0.5 °C).Set the value by turning the “ “ button and press the “ “ button to confi rm.3 MAXIMUM CONTROL TEMPERATURE (39 °C set by default)Setting the limit of the maximum temperature which can be set. If using the GSM module, you will beinformed by an SMS that the room temperature has risen above this valueChoose within the range from 15 °C to 39 °C (by 0.5 °C).Set the value by turning the “ “ button and press the “ “ button to confi rm.CONSTANTSTEMP.TEMP.4 CONTROL TYPE (PID control set by default)Selection of the control type:Choose the type of control by turning the “ “ button and press the “ “ button to confi rm.HS = HysteresisDifference between the desired and current temperature.TYPE OF REGUL.If the hysteresis is 1 °C and the desired temperature is 20 °C, the thermostat switches off at 20 °C, and on at 19 °C (see the graph).For correct hysteresis function, set the parameters according to the heating system type; see CONST 5.Note: If hysteresis is selected, CONST 6 is skipped automatically.PI = proportional-integral controlThe PI-control principle consists in comparison of the current room temperature with the desired temperature.The PI-control aims at achieving and maintaining the desired temperature without overshooting (see the graph). For correct function of thePI-control, set the control parameters according to the type of the heating system with respect to the room thermal inertia;see CONST 6.Note: If the PI-control is selected, CONST 5 is skipped automatically.PID = proportional-integral-derivative controlThe PID-control principle consists in continuous comparison of the current room temperature with the desired temperature,and automatic adaptation of the controller to the given conditions.This is the most perfect continuous control; you can achieve not only short control time, but also high accuracy without permanent controldeviation. The minimum switch-on time is internally set to 2 minutes, the proportional band is 2 °C, the time interval is automaticallyrecalculated according to current temperature conditions.Note: If the PID-control is selected, CONST 5 and CONST 6 are skipped automatically.HYSTERESISPI-CONTROLPID-CONTROLTpožad.teplotaTpožad.teplotaTpožad.teplotahysterezepásmoproporcionalitytttTopeníONTopeníONTopeníONtttNote: The graphs are just tentative; the real control course differs according to current conditions in the measured object!CAUTION! ONLY IN CASE OF LOCKING BY PASSWORD (see CONST18)If the “ “ key symbol appears on the LCD, the constant selected cannot be modifi ed and you must know thePASSWORD (see CONST 18, page 8). You can change the constant after entering the password. After you exit theCONST mode, the security lock of the constants related to the control will be activated automatically.TYPE OF REGUL.5
5 SETTING HYSTERESIS PARAMETERSHYSTERESIS (factory setting of 0.5 °C)Set from 0.1 to 6 °C. According to the value preset, the thermostat switches on at the temperature:T switching = T required - HYSTERESISSet the hysteresis by turning the “ “ button, and confi rm with the “ “ button.HYSTERESISMINIMUM SWITCH-ON TIME (factory setting of 2 min)Here you can set the minimum switch-on time of the boiler in minutes at hysteresis. Select within therange from 1 to 5 minutes according to the type of the heating system used (see the table).Set the value by turning the “ “ button, and confi rm with the “ “ button.6 SETTING PI-CONTROL PARAMETERSPI-CONTROL INTERVAL (factory setting of 10 min.)Select according to the object’s thermal inertia. The optimum setting usually falls within the range of10 to 15 min. The adjustable range is 5 min to 20 min (by 1 min).MIN TIME ONSet the interval by turning the “ “ button, and confi rm with the “ “ button.MINIMUM SWITCH-ON TIME (factory setting of 2 min.)Select within the range of 1 to 5 minutes. The setting is given by the heating system type, anddepends on the PI-control time period selection. Setting according to the table is recommended.Set the value by turning the “ “ button, and confi rm with the “ “ button.PI-CONTROL BAND (factory setting of 2 °C)TThis value determines the temperature at which the PI-control starts functioning. For example, thedesired temperature is 22 °C, the proportional band is 1.5 °C. Up to 20.5 °C, the source heats fully.When this value is reached, the PI-control starts. The PROPORTIONAL band can be set within therange of 0.5 to 3.0 °C (by 0.1 °C).Set the PI band by turning the “ “ button, and confi rm with the “ “ button.MIN TIME ONPI ZONEDifference between setting of the thermostatwith hysteresis and PI-controlTable for setting the minimumswitch-on timeHeating typeMinimumsource switch-on timeElectric heating 1Plate radiators 2 (3)Cast iron radiators 4Floor heating 57 PRELIMINARY SWITCH-ON OF HEATING (NO set by default)This function guarantees you the required temperature at the required time. You need not consider whento switch the heating on in order to be warm when getting up in the morning without heating unnecessarilylong in advance. You just program the time at which you want the desired temperature. Within two operatingdays, the program ascertains the thermal constants of the room and then it switches the heating onin advance suffi ciently. The preliminary switch-on time is limited to 2 hours.Set YES/NO by turning the “ “ button and press the “ “ button to confi rm.8 SUMMER MODE (NO set by default)In this mode, you are not allowed to switch the heating on. It can particularly be used in the summerperiod, when you need not heat. After you enable this mode, the “ “ symbol appears on the display.Note: The anti-freeze protection (3 °C) is still enabled. In this mode, you cannot change the temperatureor set the holiday mode!Set YES/NO by turning the “ “ button and press the “ “ button to confi rm.PRE SWITCH MOdESUMMER MOdE9 EVEN-ODD WEEK SELECTION (NO set by default)If you choose “YES”, the PrU and PrL programs will alternate automatically according to the current week(even/odd). This setting is suitable, for example, for shift operation (the requirements on thermal comfortin the object change every week).Set YES/NO by turning the “ “ button and press the “ “ button to confi rm.Odd-EVEN MOdE6
10 HEATING / COOLING SELECTION (HEAT set by default)Setting the thermostat function.HEATING = the output relay (for heating systems) switches if the current temperature drops below the desired valueCOOLING = the output relay (for cooling systems) switches if the current temperature rises above the desired valueSet HEAT/COOL by turning the “ “ button and press the “ “ button to confi rm.11 TEMPERATURE CORRECTION (0 °C set by default)This is used for correcting the temperature measured by the thermostat. The setting can only be doneafter 12 hours of operation, when the internal sensor temperature has settled. Measure the roomtemperature with a thermometer; if it is different from the temperature on the thermostat,set the correction within the range of -5 °C do +5 °C.Set the correction by turning the “ “ button and press the “ “ button to confi rm.12 EXTERNAL SENSOR SELECTION ( - - - set by default)If an external sensor is connected, the symbol appears on the LCD.The external sensor can be used for:1, control according to the room temperature - the sensor is located in the room ( - - - option)2, control according to the floor temperature - the sensor is located in the fl oor (- - - option)- - - If connected, the external sensor measures the temperature at the place of its installation(suitable, for example, for places at which the thermostat cannot be located, yet you want tocontrol according to this room);3, maximum floor temperature monitoring - čthe sensor is located in the fl oor (selection of 15 to 99,5°C)15…99,5°C If connected, the external sensor monitors the fl oor temperature; the maximumtemperature allowed for fl oor heating must be set (control according to the roomtemperature, with simultaneous floor temperature monitoring).If the preset limit temperature is exceeded, the thermostat is switched off irrespective of the roomtemperature, and the “EXT SENS STOP” message appears on the LCD. The heating device is switchedon again if the external sensor temperature drops by 0.5 °C.If the external sensor is unconnected or faulty, the “EXT SENS ERROR” message appears on the LCD.Set the external sensor option by turning the “ “ button and press the “ “ button to confi rm.HEATINGTEMP CORRECT12 EXT SENSOR12 EXT SENSOREXT SENS STOPTPHONE NUMBER SETTINGEnter a phone number in the international format (420123456789), to which return SMS messageson the thermostat condition should be sent. You can enter up to 13-digit phone number.Turning the “ “ button, enter the phone number stepwise; confi rm each setting with the “ “ button.T 420000000000-13 PIN CODE SETTINGEnter the PIN code of the SIM card inserted in the thermostat.Turning the “ “ button, enter 4 digits stepwise; confi rm each setting with the “ “ button.14 TESTWe recommend the test at first use of the thermostat to verify its correct connection! This function isidentical with the TEST mode in the basic menu.Start the test by turning the “ “ button. The output relay is switched on/off several times (the ON/OFFmessages appear on the LCD). The “ “ sbutton displays the next constant; pushing “ “ you returnto the main menu.13 ENTER PIN14INSERT SIMERROR PINChecking theGSM module.PIN enteredcorrectly.SIM card notinserted. Insert theSIM card and reset<strong>PT32</strong><strong>GST</strong>. Thenrepeat the settingand test.Wrong PIN.Reset <strong>PT32</strong><strong>GST</strong>and enter PINagain.7
15 KEY LOCK (NO set by default)This is used for locking the controls as a protection against undesirable interference of a foreign person.Set YES/NO by turning the “ “ button and press the “ “ button to confi rm.16 KEY CODEThis constant can be set if CONST 15 = YES. It is used for setting the code by which you will be able toactivate the controls. Set a four-digit combination (range from 0 to 9).The keys will be locked within 1 minute (after opening the basic display). The “ ” symbol appears onthe LCD. If you press the “ “ or “ “ button, the LCD asks you to enter the key code; after enteringthe correct code, you are able to make any changes (the controls are functional again). The controls willautomatically be locked again after you fi nish the setting (within approx. 1 min).Gradually set 4 digits by turning the “ “ button; confi rm each setting with the “ “ button.RECOMMENDATION: - Record the key code in the table- You can cancel the code by setting CONST 15 to NO, or by restoring thedefault settings of the thermostat (see CONST 19).17 BOILER INSPECTION REMINDER (1.1.2030 set by default)Set the date on which you want to be informed about the necessity of the prescribed boiler service. At therequired time, the “MAINTENANCE NECESSARY” message and the “ ” symbol will appear on the bottomline of the LCD (you can cancel the message by setting a new date for the next boiler maintenance!).Gradually set the day, month and year by turning the“ “ button, confi rm each setting with the “ “.18 PASSWORD (not set by default)It is used for locking the constants related to the given control settings. Suitable for service technicians.After a numerical code has been entered, the user cannot change constants No. 4, 5, 6 and 10.If you open the CONST mode and browse the constants, the “ ” symbol appears next to the constantslocked; if you turn the “ “ button, the password is required! Unless you enter the password, the constantsremain locked. To try to unlock them again, you must exit the CONST mode and browse up theconstant locked again.Turning the “ “ button, gradually enter four digits and confi rm each setting with the “ “.19 VERSION (restoring the default settings)Firmware version, informative parameter only.If you press the “ “ button long (for about 3 s), the RESET message appears shortly on the LCD andthe thermostat returns to the default settings!USER TIPSQUICK CHANGE OF REQUIRED TEMPERATURE / PROGRAM IN THE AUTO MODEPress twice the “ “ ; the required temperature starts fl ashing on the display. Change the required temperatureby turning the “ “ button and press the “ “. The change will last until the next program change.SMS form: Temp xx (where xx are only integers within the range of CONST1 and CONST2)Change of the desired temperature; the change will last until the next temperature change givenby the program.Stiskněte 3x tl.“ “, na displeji se rozbliká údaj o nastaveném programu. Otočením tl.“ “ proveďtezměnu programu a stiskněte tl.“ “.QUICK CHANGE OF REQUIRED TEMPERATURE IN THE MANU MODEPress twice the “ “; the required temperature starts fl ashing on the display. Change the required temperatureby turning the “ “ button and press the “ “. The change will last until the next manual temperaturechange.SMS form: Temp xx (where xx are only integers within the range of CONST1 and CONST2)Change of the desired temperature; the change will be permanent.15 LOCK16 KEYCOdEYOUR CODE17 SERVICE dAY18 PASSWORd19 VERSIONTEMP. IN AUTOTEMP IN MANUOPERATIONAL HOURSPush the “ “ button four times. The boiler operating hours appear on the LCD. The fi gure on the picturemeans 906 hours 43 minutes.Resetting the counter:When operational hours are displayed, turn the “ “ button anti-clockwise.OPER HOURS H.C.EXTERNAL SENSOR TEMPERATUREPush the “ “ button fi ve times. The current temperature of the external sensor appears on the LCD; thevalue is only informative, and appears only if the external sensor is monitoring the maximum fl oor temperature(see CONST 12, page 7).TEMP 2Nd SENS8
INFORMATION IN THE LCD DYNAMIC LINESIGNAL GSM xREQUIR TEMPPROGR 3 PERIOd 2HOLIdAY IN 22.7T EXT SENS 25.0EXT SENS STOPDetermines the signal strength at the place where the thermostat is located;where x is a value within the range from 0 to 5:0..undeterminable or no signal detected1..worst level5..best level of signalInformation on the desired temperature presetInformation on the program preset (e.g., 3) and the time interval running(interval 2)Only displayed in the holiday mode; informs on the end of holiday when thethermostat restores the last selected AUTO/MANU mode.Current temperature of the external sensor, displayed only if the sensor isconnectedIf the preset limit temperature of the external sensor in the maximum fl oortemperature monitoring function is exceeded (see page 7), the thermostat isswitched offFORMS OF MESSAGES SENTInfoAutoManuOffTemp xxCallInformation on the heating system statusSetting AUTO mode, thermostat will be work acc. last setting weekly programSetting MANU mode, thermostat will be keep last setting temperatureHeating system switched off permanently. ; to cancel the function, use theTemp xx message, thermostat will automatically enter into the MANU mode with thegiven temperature or SMS message Auto (for AUTO mode) or Manu (for MANU)Required temperature change (only integer numbers can be entered, they must fallwithin the permitted range of maximum and minimum temperatures –CONST1 andCONST2).Back callxx = temperature value in °C (always a two-digit number, e.g. 05)!Any type of mobile phone can be used for sending and receiving back messages!If you can set the font size (format) in your phone, always use the MEDIUM size when writing messages(if there are three options), or the BIG size (if there are two options).FORMS OF BACK MESSAGES FROM THE THERMOSTATRequir: xx.xAct: xx.xOnOffAUTOMANUOFFSig: xSens 2: xx.xBattery!Noakcept!Temperature required (user set)Current room temperatureHeating system OnHeating system OffThermostat in automatic AUTO modeThermostat in manual MANU modeThermostat in the OFF mode (permanently off)Signal strength at the place where the module is located; where x is thevalue within the range of 0 to 5:0..undeterminable or no signal detected1..the worst strength5..the best signal strengthCurrent temperature of the external sensorLow batteries in the thermostatError indicated (wrong SMS format, etc.)xx.x = temperature value in °CBACK MESSAGES ARE SENT WITHIN 3 MINUTES!Note: If the minimum / maximum room temperature (preset CONST 1 and 2) is exceeded, the “WARNING” SMS isautomatically sent in a form similar to that in the „Info“ form.Info: If using a credit card, you must make a paid call once in 3 months. This call is executed automatically (in 80 days, between 4 and 9PM) to the phone number entered in the thermostat (CONST T); after 20 s, the call is terminated automatically. You can execute this functionearlier by means of the “Call” SMS message.9
Example of using <strong>PT32</strong><strong>GST</strong>:The thermostat is located in a room where anti-freeze temperature must be maintained (e.g., 7 °C).1. Connect the <strong>PT32</strong><strong>GST</strong> strictly according to the instructions.2. Choose the MANU mode.3. Press the “ “ button and set the temperature of 7 °C by turning the “ “ button.4. Before arriving at the object, write an SMS in your mobile with the wording: Temp 23; then send the SMS to thenumber of the SIM card inserted in your thermostat.After receiving the message, the thermostat automatically switches on the heating system until the desired temperature isreached. Then <strong>PT32</strong><strong>GST</strong> automatically sends the “BACK SMS message” informing you about the temperature change made.After arriving at the object, you can change the temperature according to your needs on the thermostat directly.Properties: control by means of a mobile phone 9 weekly programs 6 temperature changes per day programming by 10 minutes and 0.5 °C programming “day-by-day” or Mon-Fri, Sat-Sunor Mon-Sun big backlit graphic display selection from three types of control: PID, PI orHYSTERESIS preliminary heating start function short-term change in the required temp. manual mode (MANU) permanent switch-off (OFF) HOLIDAY mode summer mode even-odd week selection heating / cooling mode selectionDimensions: possibility of connecting an external sensor current temperature correction key lock boiler operating hours total boiler maintenance indication service safeguard by a password anti-freeze protection (3 °C) TEST function automatic SUMMER / WINTER time change clock backup in case of power failure, approx.7 days if rechargeable batteries are used(not included in the packing)Power source:included in thepackingtype AD05-Jack,5V/ DC, 2.5 AExternal sensor:not included in thepacking type CT04-10k,CYXY 2 x 0.5 mm,10 k, lenght 3 m,plastic case PVC(CT01-10k and CT02-10ksensors can also be used)CERTIFICATE OF GUARANTEE(guarantee period for the product amounts to 2 years)product No.:136.5 28.5date of sale:83Technical parametersPower supply5 V/ DC, 2.5 A, type AD05 - JackGSM module SIM 900Aerialdirect 1dBNumber of adjustable temp. 6 different temp. per every dayHysteresis 0.1 to 6°CMinimum program. time 10 minutesAdjustable temperature range +3°C to 39°CTemperature setting by 0.5°CMinimum indication step 0.1°CMeasurement accuracy ± 0,5°CProtection classIP20Outputmax.5 A (potential-free contacts)Working temperature 0°C to +40°Cexamined by:stamp of shop:In case of guarantee or post-guarantee service, send thethermostat including proof of purchase to the manufacturer’saddress. The guarantee does not cover faults resulting fromincompetent installation or interference in the device design.PbLEAD FREEin compliance with RoHSMADE IN CZECH REPUBLICELEKTROBOCK CZ s.r.o.Blanenská 1763Kuřim 664 34Tel./fax: +420 541 230 216www.elbock.cz10