Field Supply Kit for Regenerative MinPak Plus ... - Reliance Electric
Field Supply Kit for Regenerative MinPak Plus ... - Reliance Electric
Field Supply Kit for Regenerative MinPak Plus ... - Reliance Electric

Create successful ePaper yourself
Turn your PDF publications into a flip-book with our unique Google optimized e-Paper software.
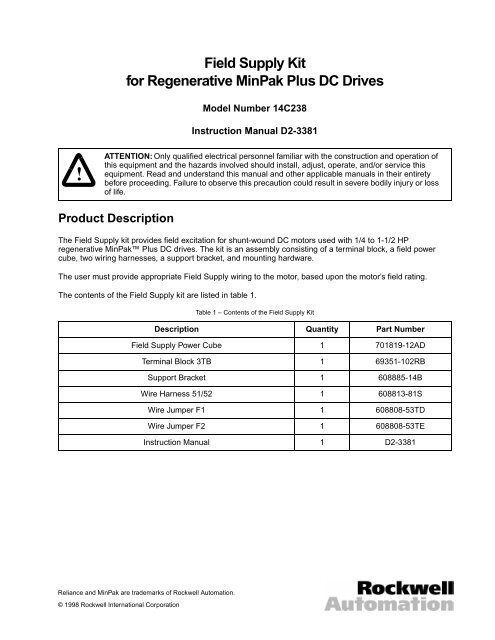
<strong>Field</strong> <strong>Supply</strong> <strong>Kit</strong><strong>for</strong> <strong>Regenerative</strong> <strong>MinPak</strong> <strong>Plus</strong> DC DrivesModel Number 14C238Instruction Manual D2-3381!ATTENTION: Only qualified electrical personnel familiar with the construction and operation ofthis equipment and the hazards involved should install, adjust, operate, and/or service thisequipment. Read and understand this manual and other applicable manuals in their entiretybe<strong>for</strong>e proceeding. Failure to observe this precaution could result in severe bodily injury or lossof life.Product DescriptionThe <strong>Field</strong> <strong>Supply</strong> kit provides field excitation <strong>for</strong> shunt-wound DC motors used with 1/4 to 1-1/2 HPregenerative <strong>MinPak</strong> <strong>Plus</strong> DC drives. The kit is an assembly consisting of a terminal block, a field powercube, two wiring harnesses, a support bracket, and mounting hardware.The user must provide appropriate <strong>Field</strong> <strong>Supply</strong> wiring to the motor, based upon the motor’s field rating.The contents of the <strong>Field</strong> <strong>Supply</strong> kit are listed in table 1.Table 1 – Contents of the <strong>Field</strong> <strong>Supply</strong> <strong>Kit</strong>Description Quantity Part Number<strong>Field</strong> <strong>Supply</strong> Power Cube 1 701819-12ADTerminal Block 3TB 1 69351-102RBSupport Bracket 1 608885-14BWire Harness 51/52 1 608813-81SWire Jumper F1 1 608808-53TDWire Jumper F2 1 608808-53TEInstruction Manual 1 D2-3381<strong>Reliance</strong> and <strong>MinPak</strong> are trademarks of Rockwell Automation.© 1998 Rockwell International Corporation
Installing the <strong>Field</strong> <strong>Supply</strong>!ATTENTION: Do not install modification kits with power applied to the drive. Disconnect, lockout, and tag all sources of incoming AC power to the drive be<strong>for</strong>e attempting such installation.Verify that no voltage is present at the drive’s AC input terminals, L1/181 and L2/182. Failure toobserve this precaution could result in severe bodily injury or loss of life.ATTENTION: The user is responsible <strong>for</strong> con<strong>for</strong>ming with all applicable local, national, andinternational codes. Failure to observe this precaution could result in damage to, or destructionof, the equipment.ATTENTION: This kit contains ESD (Electrostatic Discharge) sensitive parts and assemblies.Static control precautions are required when installing, testing, servicing, or repairing thisassembly. Failure to observe these precautions could result in damage to, or destruction of, theequipment.Refer to your <strong>MinPak</strong> <strong>Plus</strong> DC drive instruction manual <strong>for</strong> help locating and identifying drive components.To install the <strong>Field</strong> <strong>Supply</strong> in your regenerative <strong>MinPak</strong> <strong>Plus</strong> DC drive:Step 1.Step 2.Step 3.Step 4.Step 5.Step 6.Step 7.Disconnect, lock out, and tag input power to the drive.Remove the drive cover.Verify that no voltage is present at the drive’s AC input terminals, L1/181 and L2/182.Fasten the field supply support bracket to the top of the drive’s circuit breaker bracket using the fourscrews that secure the circuit breaker.Connect wire harness 51/52 to terminal block 2TB in the upper left corner of the drive. Connect wiresF1 and F2 from the field supply to terminal block 3TB on the <strong>Field</strong> <strong>Supply</strong> mounting bracket.Route the user-supplied motor field wires (F1 and F2) into the drive chassis. You can use the sameconduit as the armature and motor thermostat conductors. Refer to the section on DC wiring in your<strong>MinPak</strong> <strong>Plus</strong> DC drive instruction manual.For a full-wave supply, connect the motor field wires to terminals F1 and F2 on <strong>Field</strong> <strong>Supply</strong> terminalblock 3TB. See figure 1.For a half-wave supply, connect motor lead F1 to terminal 51 on 2TB and motor lead F2 to terminalF2 on 3TB. See figure 2.Refer to the motor’s nameplate label and the technical specifications at the end of this instructionmanual to determine the appropriate field type required.2 <strong>Field</strong> <strong>Supply</strong> <strong>Kit</strong> <strong>for</strong> <strong>Regenerative</strong> <strong>MinPak</strong> <strong>Plus</strong> DC Drives
To F1, F2 on motor51 52AC+ –F1F22TBAC3TBFigure 1 – Connecting the <strong>Field</strong> <strong>Supply</strong> (Full-wave)To F1 on motorTo F2 on motor51 52AC+ –F22TBAC3TBFigure 2 – Connecting the <strong>Field</strong> <strong>Supply</strong> (Half-wave)Step 8.Step 9.Verify that the wiring of the <strong>Field</strong> <strong>Supply</strong> is correct and all connectors are securely fastened.Reattach the cover to the drive.Step 10. Apply power and test the operation of the drive.This completes installation of the <strong>Field</strong> <strong>Supply</strong> kit.<strong>Field</strong> <strong>Supply</strong> <strong>Kit</strong> <strong>for</strong> <strong>Regenerative</strong> <strong>MinPak</strong> <strong>Plus</strong> DC Drives 3