TruVision DVR 60 User Manual - Interlogix
TruVision DVR 60 User Manual - Interlogix TruVision DVR 60 User Manual - Interlogix
10BChapter 11: Configuring recording settingsTo set up a recording schedule:1. Enter the Record Settings screen by selecting Record in the main menu.2. Select the Schedule tab to open the Schedule menu (see Figure 35 on page81).3. Select a camera for which to edit the schedule.4. Click Edit. The following screen is displayed.5. Check Enable Schedule.6. Select the day of the week for which you want to set up the schedule or selectAll Week to set up the schedule for the entire week.You can define a schedule for each day of the week.7. Set the start and end time for recording.Define a time period by entering a start (left column) and end (right column)time. You can schedule up to eight time periods. Click All Day to record allday.Note: Time periods defined cannot overlap.8. Select a recording type.This setting instructs the DVR to begin recording when an alarm is triggered.The recording type can be based on time and triggered by motion detectionand/or an alarm.9. Select a recording parameter.Recording parameters include Scheduled or TimeLapse. If set to Scheduled,the DVR records based on the schedule defined. If set to TimeLapse, theDVR records continuously.10. Click OK to finish configuration.11. Repeat steps 3 to 9 for other cameras or copy the schedule settings from onecamera to another.To copy the current schedule settings to another camera, select a camerafrom the Copy To dropdown list, and then click Copy.12. Click OK to finish and save the schedule settings.82 TruVision DVR 60 User Manual
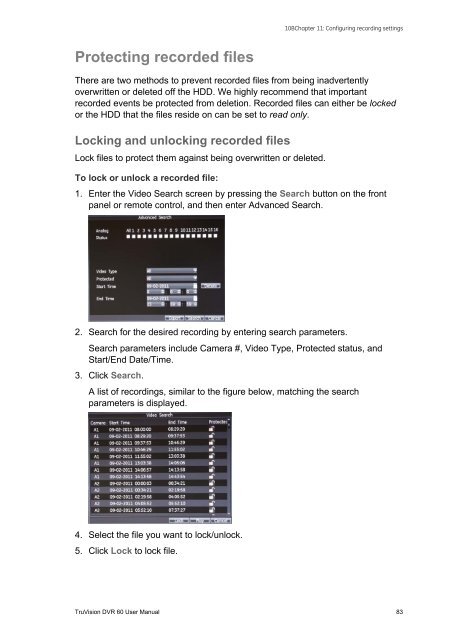
10BChapter 11: Configuring recording settingsProtecting recorded filesThere are two methods to prevent recorded files from being inadvertentlyoverwritten or deleted off the HDD. We highly recommend that importantrecorded events be protected from deletion. Recorded files can either be lockedor the HDD that the files reside on can be set to read only.Locking and unlocking recorded filesLock files to protect them against being overwritten or deleted.To lock or unlock a recorded file:1. Enter the Video Search screen by pressing the Search button on the frontpanel or remote control, and then enter Advanced Search.2. Search for the desired recording by entering search parameters.Search parameters include Camera #, Video Type, Protected status, andStart/End Date/Time.3. Click Search.A list of recordings, similar to the figure below, matching the searchparameters is displayed.4. Select the file you want to lock/unlock.5. Click Lock to lock file.TruVision DVR 60 User Manual 83
- Page 38 and 39: 3BChapter 4: Operating instructions
- Page 40 and 41: 4BChapter 5: Live modeFigure 13: Di
- Page 42 and 43: 4BChapter 5: Live modeTable 10: Pop
- Page 44 and 45: 4BChapter 5: Live modeItem Name Des
- Page 46 and 47: 5BChapter 6: Configuring the live m
- Page 48 and 49: 5BChapter 6: Configuring the live m
- Page 50 and 51: 5BChapter 6: Configuring the live m
- Page 52 and 53: 5BChapter 6: Configuring the live m
- Page 54 and 55: 6BChapter 7: Controlling a PTZ came
- Page 56 and 57: 6BChapter 7: Controlling a PTZ came
- Page 58 and 59: 6BChapter 7: Controlling a PTZ came
- Page 60 and 61: 6BChapter 7: Controlling a PTZ came
- Page 62 and 63: 7BChapter 8: Playing back a recordi
- Page 64 and 65: 7BChapter 8: Playing back a recordi
- Page 66 and 67: 7BChapter 8: Playing back a recordi
- Page 68 and 69: 7BChapter 8: Playing back a recordi
- Page 70 and 71: 7BChapter 8: Playing back a recordi
- Page 72 and 73: 8BChapter 9: Archiving recorded fil
- Page 74 and 75: 8BChapter 9: Archiving recorded fil
- Page 76 and 77: 8BChapter 9: Archiving recorded fil
- Page 78 and 79: 9BChapter 10: Using the Web browser
- Page 80 and 81: 9BChapter 10: Using the Web browser
- Page 82 and 83: 9BChapter 10: Using the Web browser
- Page 84 and 85: 9BChapter 10: Using the Web browser
- Page 86 and 87: 10BChapter 11: Configuring recordin
- Page 90 and 91: 10BChapter 11: Configuring recordin
- Page 92 and 93: 10BChapter 11: Configuring recordin
- Page 94 and 95: 11BChapter 12: Configuring alarm se
- Page 96 and 97: 11BChapter 12: Configuring alarm se
- Page 98 and 99: 11BChapter 12: Configuring alarm se
- Page 100 and 101: 11BChapter 12: Configuring alarm se
- Page 102 and 103: 11BChapter 12: Configuring alarm se
- Page 104 and 105: 11BChapter 12: Configuring alarm se
- Page 106 and 107: 12BChapter 13: Configuring network
- Page 108 and 109: 12BChapter 13: Configuring network
- Page 110 and 111: 12BChapter 13: Configuring network
- Page 112 and 113: 13BChapter 14: Camera managementFig
- Page 114 and 115: 13BChapter 14: Camera managementEnt
- Page 116 and 117: 13BChapter 14: Camera management5.
- Page 118 and 119: 13BChapter 14: Camera management112
- Page 120 and 121: 14BChapter 15: HDD managementTo set
- Page 122 and 123: 14BChapter 15: HDD managementChecki
- Page 124 and 125: 14BChapter 15: HDD management118 Tr
- Page 126 and 127: 15BChapter 16: Configuring the DVR
- Page 128 and 129: 15BChapter 16: Configuring the DVR
- Page 130 and 131: 15BChapter 16: Configuring the DVR
- Page 132 and 133: 15BChapter 16: Configuring the DVR
- Page 134 and 135: 15BChapter 16: Configuring the DVR
- Page 136 and 137: 16BAppendix A: TroubleshootingFailu
10BChapter 11: Configuring recording settingsProtecting recorded filesThere are two methods to prevent recorded files from being inadvertentlyoverwritten or deleted off the HDD. We highly recommend that importantrecorded events be protected from deletion. Recorded files can either be lockedor the HDD that the files reside on can be set to read only.Locking and unlocking recorded filesLock files to protect them against being overwritten or deleted.To lock or unlock a recorded file:1. Enter the Video Search screen by pressing the Search button on the frontpanel or remote control, and then enter Advanced Search.2. Search for the desired recording by entering search parameters.Search parameters include Camera #, Video Type, Protected status, andStart/End Date/Time.3. Click Search.A list of recordings, similar to the figure below, matching the searchparameters is displayed.4. Select the file you want to lock/unlock.5. Click Lock to lock file.<strong>TruVision</strong> <strong>DVR</strong> <strong>60</strong> <strong>User</strong> <strong>Manual</strong> 83


