TruVision DVR 60 User Manual - Interlogix
TruVision DVR 60 User Manual - Interlogix TruVision DVR 60 User Manual - Interlogix
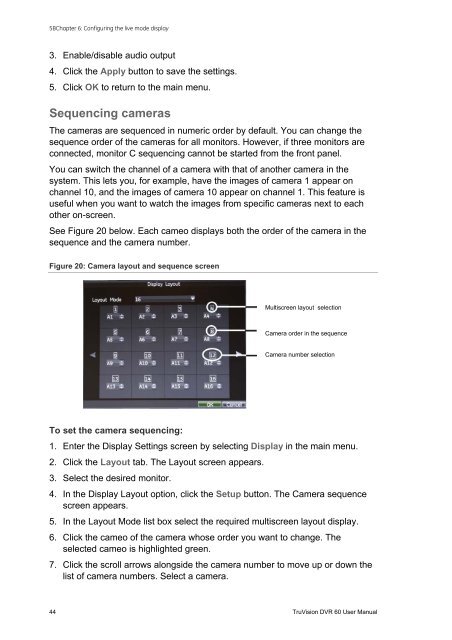
5BChapter 6: Configuring the live mode display3. Enable/disable audio output4. Click the Apply button to save the settings.5. Click OK to return to the main menu.Sequencing camerasThe cameras are sequenced in numeric order by default. You can change thesequence order of the cameras for all monitors. However, if three monitors areconnected, monitor C sequencing cannot be started from the front panel.You can switch the channel of a camera with that of another camera in thesystem. This lets you, for example, have the images of camera 1 appear onchannel 10, and the images of camera 10 appear on channel 1. This feature isuseful when you want to watch the images from specific cameras next to eachother on-screen.See Figure 20 below. Each cameo displays both the order of the camera in thesequence and the camera number.Figure 20: Camera layout and sequence screenMultiscreen layout selectionCamera order in the sequenceCamera number selectionTo set the camera sequencing:1. Enter the Display Settings screen by selecting Display in the main menu.2. Click the Layout tab. The Layout screen appears.3. Select the desired monitor.4. In the Display Layout option, click the Setup button. The Camera sequencescreen appears.5. In the Layout Mode list box select the required multiscreen layout display.6. Click the cameo of the camera whose order you want to change. Theselected cameo is highlighted green.7. Click the scroll arrows alongside the camera number to move up or down thelist of camera numbers. Select a camera.44 TruVision DVR 60 User Manual
5BChapter 6: Configuring the live mode displayNote: “X” means that the camera is not displayed.8. Click the OK button to accept the changes and return to the Layout screen.9. Click the Apply button to see the results immediately implemented. Click theSetup button again if further changes are required.10. Click the OK button in the Layout screen to save changes and return to livemode.TruVision DVR 60 User Manual 45
- Page 6 and 7: ivTruVision DVR 60 User Manual
- Page 8 and 9: 0BChapter 1: Product introductionFe
- Page 10: 0BChapter 1: Product introduction4
- Page 13 and 14: 1BChapter 2: InstallationFigure 1:
- Page 15 and 16: 1BChapter 2: InstallationFigure 2:
- Page 18 and 19: 1BChapter 2: InstallationCameraSwit
- Page 20 and 21: 1BChapter 2: InstallationUse an RS-
- Page 22 and 23: 1BChapter 2: InstallationBracketsTh
- Page 24 and 25: 1BChapter 2: Installation18 TruVisi
- Page 26 and 27: 2BChapter 3: Getting startedAny cha
- Page 28 and 29: 2BChapter 3: Getting startedCheck b
- Page 30 and 31: 3BChapter 4: Operating instructions
- Page 32 and 33: 3BChapter 4: Operating instructions
- Page 34 and 35: 3BChapter 4: Operating instructions
- Page 36 and 37: 3BChapter 4: Operating instructions
- Page 38 and 39: 3BChapter 4: Operating instructions
- Page 40 and 41: 4BChapter 5: Live modeFigure 13: Di
- Page 42 and 43: 4BChapter 5: Live modeTable 10: Pop
- Page 44 and 45: 4BChapter 5: Live modeItem Name Des
- Page 46 and 47: 5BChapter 6: Configuring the live m
- Page 48 and 49: 5BChapter 6: Configuring the live m
- Page 52 and 53: 5BChapter 6: Configuring the live m
- Page 54 and 55: 6BChapter 7: Controlling a PTZ came
- Page 56 and 57: 6BChapter 7: Controlling a PTZ came
- Page 58 and 59: 6BChapter 7: Controlling a PTZ came
- Page 60 and 61: 6BChapter 7: Controlling a PTZ came
- Page 62 and 63: 7BChapter 8: Playing back a recordi
- Page 64 and 65: 7BChapter 8: Playing back a recordi
- Page 66 and 67: 7BChapter 8: Playing back a recordi
- Page 68 and 69: 7BChapter 8: Playing back a recordi
- Page 70 and 71: 7BChapter 8: Playing back a recordi
- Page 72 and 73: 8BChapter 9: Archiving recorded fil
- Page 74 and 75: 8BChapter 9: Archiving recorded fil
- Page 76 and 77: 8BChapter 9: Archiving recorded fil
- Page 78 and 79: 9BChapter 10: Using the Web browser
- Page 80 and 81: 9BChapter 10: Using the Web browser
- Page 82 and 83: 9BChapter 10: Using the Web browser
- Page 84 and 85: 9BChapter 10: Using the Web browser
- Page 86 and 87: 10BChapter 11: Configuring recordin
- Page 88 and 89: 10BChapter 11: Configuring recordin
- Page 90 and 91: 10BChapter 11: Configuring recordin
- Page 92 and 93: 10BChapter 11: Configuring recordin
- Page 94 and 95: 11BChapter 12: Configuring alarm se
- Page 96 and 97: 11BChapter 12: Configuring alarm se
- Page 98 and 99: 11BChapter 12: Configuring alarm se
5BChapter 6: Configuring the live mode display3. Enable/disable audio output4. Click the Apply button to save the settings.5. Click OK to return to the main menu.Sequencing camerasThe cameras are sequenced in numeric order by default. You can change thesequence order of the cameras for all monitors. However, if three monitors areconnected, monitor C sequencing cannot be started from the front panel.You can switch the channel of a camera with that of another camera in thesystem. This lets you, for example, have the images of camera 1 appear onchannel 10, and the images of camera 10 appear on channel 1. This feature isuseful when you want to watch the images from specific cameras next to eachother on-screen.See Figure 20 below. Each cameo displays both the order of the camera in thesequence and the camera number.Figure 20: Camera layout and sequence screenMultiscreen layout selectionCamera order in the sequenceCamera number selectionTo set the camera sequencing:1. Enter the Display Settings screen by selecting Display in the main menu.2. Click the Layout tab. The Layout screen appears.3. Select the desired monitor.4. In the Display Layout option, click the Setup button. The Camera sequencescreen appears.5. In the Layout Mode list box select the required multiscreen layout display.6. Click the cameo of the camera whose order you want to change. Theselected cameo is highlighted green.7. Click the scroll arrows alongside the camera number to move up or down thelist of camera numbers. Select a camera.44 <strong>TruVision</strong> <strong>DVR</strong> <strong>60</strong> <strong>User</strong> <strong>Manual</strong>


