Download - Eppendorf NA
Download - Eppendorf NA
Download - Eppendorf NA

You also want an ePaper? Increase the reach of your titles
YUMPU automatically turns print PDFs into web optimized ePapers that Google loves.
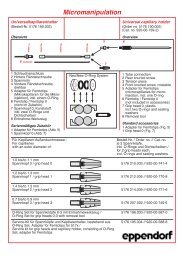
Equipment• Inverted microscope (Axiovert ® 135, Carl Zeiss AG, Germany)• Micromanipulator TransferMan NK2 (<strong>Eppendorf</strong> AG, Germany)• Microinjector FemtoJet express, (<strong>Eppendorf</strong> AG, Germany)• Pipette puller (Sutter Instruments, Model P-87, USA)• Vacuum drying chambers (Binder, Germany)• Research Pipette (0,5 – 10 µl, <strong>Eppendorf</strong> AG, Germany)Materials• Agarose (VWR International)• Voltalef oil (VWR International)• Micropipette glass tubes; 100 mm long, 1.2 mm diameter (World Precision Instruments, Inc., USA)• Cover slips; 48 mm x 60 mm, 1 mm thick (Menzel Glaeser, Germany)• Microloader 20 µl (<strong>Eppendorf</strong> AG, Germany)MethodsPreparation of agarose padPlace a 2% agarose drop (60°C) on the center of a cover slip and gently sandwich by dropping another cover slip ontop. This flattens the agarose into a thin pad. Air bubbles should be avoided. It is more useful to have a large agarosepad because more worms can be mounted per pad. Remove one of the cover slips and air dry the pad overnight. On thenext day, bake the pad in the vacuum drying chambers for 2 - 4 hours before use. It is important to use dry agar padsotherwise the worms will not stick to the pad. Store the agarose pads in an air-tight container, preferably in a desiccator.Preparation of injection pipettes and loading the injection mixtureInjection pipettes are produced using a mechanical pipette puller. The needle-pulling parameters (heat, pull, velocity andtime) are adjusted in a “trial-and-error” manner. Good needles taper quickly to a sharp-open point, although each usermay develop unique preferences. The shape of the tip may change depending on the position of the heating filament. Ifthe needle is produced with a closed tip, the tip has to be broken prior to microinjection.The injection mixture is loaded into the injection pipette by a very long and thin Microloader pipette tip inserted throughthe wide back-end.Mounting and breaking the tipAssemble the injection capillary to the handle of the micromanipulator. The capillary holder is connected to a FemtoJetexpress microinjector, which is attached to a pressurized nitrogen supply. Place a glass tube on a cover slip and coverthe glass tube completely with Voltalef oil. Transfer this cover slip to the Zeiss Axiovert 135 inverted microscope. Alignthe glass tube perpendicular to the angle of the capillary. Center the glass tube and the needle tip in the field at lowmagnification (e.g., 40x). Be careful to let the tip of the capillary neither touch the glass tube nor the surface of the coverslip. Change to a higher magnification (e.g., 100x). Break the tip by gently pressing the tip against the glass tube. Pleasekeep in mind that if the breakage is clearly visible, the capillary will not be sharp enough for successful injections.Mounting the worms on an agarose padPlace a drop of Voltalef oil on the agarose pad. Pick a worm and let it swim in the oil to get rid of residual OP50 culture(OP50 is an E. coli strain fed to C. elegans). Transfer the worm with plenty of oil to the pad. Attach the worm carefully tothe surface of the pad with a pick or tweezers. Straighten the worm and align it perpendicular to the injection needle.Getting the animal to stick to the pad can be a challenge: If the pad is not freshly vacuum dried, it is difficult to attachthe worm.