Installing the WiMAX Modem - Alvarion
Installing the WiMAX Modem - Alvarion Installing the WiMAX Modem - Alvarion
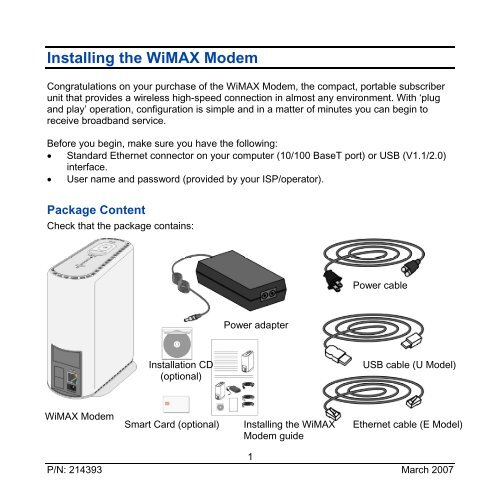
Installing the WiMAX ModemCongratulations on your purchase of the WiMAX Modem, the compact, portable subscriberunit that provides a wireless high-speed connection in almost any environment. With ‘plugand play’ operation, configuration is simple and in a matter of minutes you can begin toreceive broadband service.Before you begin, make sure you have the following:• Standard Ethernet connector on your computer (10/100 BaseT port) or USB (V1.1/2.0)interface.• User name and password (provided by your ISP/operator).Package ContentCheck that the package contains:Power cablePower adapterInstallation CD(optional)USB cable (U Model)WiMAX ModemSmart Card (optional)Installing the WiMAXModem guideEthernet cable (E Model)1P/N: 214393 March 2007
- Page 2 and 3: Installing the WiMAX ModemIf you ha
- Page 4 and 5: Installing the WiMAX ModemWindows 2
- Page 6 and 7: Installing the WiMAX ModemWindows X
- Page 8 and 9: Installing the WiMAX Modem3. Select
- Page 10 and 11: Installing the WiMAX Modem10. The i
- Page 12 and 13: Installing the WiMAX Modemd. Connec
- Page 15 and 16: Installing the WiMAX ModemC.2.1. Mo
- Page 17 and 18: Installing the WiMAX ModemC.2.3. Mo
- Page 19 and 20: Installing the WiMAX ModemC.3. Conn
<strong>Installing</strong> <strong>the</strong> <strong>WiMAX</strong> <strong>Modem</strong>Congratulations on your purchase of <strong>the</strong> <strong>WiMAX</strong> <strong>Modem</strong>, <strong>the</strong> compact, portable subscriberunit that provides a wireless high-speed connection in almost any environment. With ‘plugand play’ operation, configuration is simple and in a matter of minutes you can begin toreceive broadband service.Before you begin, make sure you have <strong>the</strong> following:• Standard E<strong>the</strong>rnet connector on your computer (10/100 BaseT port) or USB (V1.1/2.0)interface.• User name and password (provided by your ISP/operator).Package ContentCheck that <strong>the</strong> package contains:Power cablePower adapterInstallation CD(optional)USB cable (U Model)<strong>WiMAX</strong> <strong>Modem</strong>Smart Card (optional)<strong>Installing</strong> <strong>the</strong> <strong>WiMAX</strong><strong>Modem</strong> guideE<strong>the</strong>rnet cable (E Model)1P/N: 214393 March 2007
<strong>Installing</strong> <strong>the</strong> <strong>WiMAX</strong> <strong>Modem</strong>If you have <strong>the</strong> <strong>WiMAX</strong> <strong>Modem</strong> Application installation CD, skip to Section B.O<strong>the</strong>rwise, proceed to Section A.SpecificationsPhysical and electrical:• Dimensions: 167 mm (H) x 170 mm (L)x 79 mm (W)• Weight: 650g• Power Consumption: 12.5W maximum• DC Power Input (from Power Supply)7.3 VDC• Mains Power Input (to Power Supply)90-256 VAC,47-63 HzConnectors:• E<strong>the</strong>rnet (E model): 10/100Base-T (RJ-45) with two embedded LEDs• USB (U model): USB 1.1/2.0• DC IN: standard DC power jack• Antenna: SMA jack, 50 ohmEnvironmental:• Operating temperature: -5°C to 45°C• Operating humidity: 5%-95% noncondensingStandards compliance:• EMC: ETSI EN 301 489-1/4, FCC part15 subpart B• Safety: EN 60950-1, UL 60950, AS/NZS3260• Environmental: ETS 300 019• Radio: ETSI EN 301 021 V.1.6.1,ETSI EN 301 753 V.1.2.12P/N: 214393 March 2007
<strong>Installing</strong> <strong>the</strong> <strong>WiMAX</strong> <strong>Modem</strong>A. <strong>Installing</strong> <strong>the</strong> <strong>WiMAX</strong> <strong>Modem</strong>A.1. Connect <strong>the</strong> <strong>WiMAX</strong> modemBefore installing <strong>the</strong> <strong>WiMAX</strong> modem (U model), refer to <strong>the</strong> README file in <strong>the</strong> USB driverinstallation CD supplied with <strong>the</strong> unit.1. If a Smart Card for <strong>the</strong> unit is available, insert it in <strong>the</strong> intended slot at <strong>the</strong> bottom side of<strong>the</strong> unit.2. Connect <strong>the</strong> Power cable to <strong>the</strong> Power Adapter.3. Connect <strong>the</strong> Power Adapter to <strong>the</strong> <strong>WiMAX</strong> modem.4. Connect <strong>the</strong> E<strong>the</strong>rnet (Left drawing)/USB (Right drawing) cable to <strong>the</strong> <strong>WiMAX</strong> modem.5. Connect <strong>the</strong> o<strong>the</strong>r end of <strong>the</strong> E<strong>the</strong>rnet/USB cable to your PC.6. Connect <strong>the</strong> o<strong>the</strong>r end of <strong>the</strong> power cable to <strong>the</strong> wall outlet. Wait a few seconds for <strong>the</strong>modem to initialize.7. Power on <strong>the</strong> computer.A.2. Set <strong>the</strong> computer’s IP addressMost users need to set up <strong>the</strong>ir computer to receive an IP address automatically from <strong>the</strong>irservice provider.3P/N: 214393 March 2007
<strong>Installing</strong> <strong>the</strong> <strong>WiMAX</strong> <strong>Modem</strong>Windows 2000• From <strong>the</strong> Start menu, select Settings.Then select Network and Dial-upConnections.• Create a network connection to your ISP(consult your ISP).• Right-click on <strong>the</strong> newly createdconnection. From <strong>the</strong> pop-up menu, selectProperties.• The Local Area Connection Propertieswindow appears. Select <strong>the</strong> InternetProtocol (TCP/IP) item. Click Properties.• Click to select <strong>the</strong> Obtain an IP addressautomatically option.• Click OK and close <strong>the</strong> Control Panel.Windows XP/2003• From <strong>the</strong> Start menu, select Settings. Thenselect Network Connections.• Create a network connection to your ISP(consult your ISP).• Right-click on <strong>the</strong> newly created connection.From <strong>the</strong> pop-up menu, select Properties.• The Local Area Connection Properties windowappears. Select <strong>the</strong> Internet Protocol(TCP/IP) item. Click Properties.• Click to select <strong>the</strong> Obtain an IP addressautomatically option.• Click OK and close <strong>the</strong> Control Panel.4P/N: 214393 March 2007
<strong>Installing</strong> <strong>the</strong> <strong>WiMAX</strong> <strong>Modem</strong>If you use a non-Windows operating system, refer to <strong>the</strong> documentation shipped with <strong>the</strong>operating system to learn how to set up <strong>the</strong> computer for DHCP. If you need to use a staticIP address, refer to <strong>the</strong> instructions from your service provider.Skip to Section C.B. <strong>Installing</strong> <strong>the</strong> <strong>WiMAX</strong> <strong>Modem</strong> Using <strong>the</strong> <strong>WiMAX</strong><strong>Modem</strong> Application CDB.1. Set <strong>the</strong> computer’s IP addressMost users need to set up <strong>the</strong>ir computer to receive an IP address automatically from <strong>the</strong>irservice provider.Windows 2000• From <strong>the</strong> Start menu, select Settings. Thenselect Network and Dial-up Connections.• Create a network connection to your ISP(consult your ISP).• Right-click on <strong>the</strong> newly created connection.From <strong>the</strong> pop-up menu, select Properties.• The Local Area Connection Properties windowappears. Select <strong>the</strong> Internet Protocol(TCP/IP) item. Click Properties.• Click to select <strong>the</strong> Obtain an IP addressautomatically option.• Click OK and close <strong>the</strong> Control Panel.5P/N: 214393 March 2007
<strong>Installing</strong> <strong>the</strong> <strong>WiMAX</strong> <strong>Modem</strong>Windows XP/2003• From <strong>the</strong> Start menu, select Settings. Thenselect Network Connections.• Create a network connection to your ISP(consult your ISP).• Right-click on <strong>the</strong> newly created connection.From <strong>the</strong> pop-up menu, select Properties.• The Local Area Connection Properties windowappears. Select <strong>the</strong> Internet Protocol(TCP/IP) item. Click Properties.• Click to select <strong>the</strong> Obtain an IP addressautomatically option.• Click OK and close <strong>the</strong> Control Panel.If you use a non-Windows operating system, refer to <strong>the</strong> documentation shipped with <strong>the</strong>operating system to learn how to set up <strong>the</strong> computer for DHCP. If you need to use a staticIP address, refer to <strong>the</strong> instructions from your service provider.6P/N: 214393 March 2007
<strong>Installing</strong> <strong>the</strong> <strong>WiMAX</strong> <strong>Modem</strong>B.2. Install <strong>the</strong> <strong>WiMAX</strong> <strong>Modem</strong> application1. Insert <strong>the</strong> installation CD to yourCD drive.2. Run <strong>the</strong> executable program(Setup.exe). The licenseagreement window is displayed(see figure to <strong>the</strong> right).7P/N: 214393 March 2007
<strong>Installing</strong> <strong>the</strong> <strong>WiMAX</strong> <strong>Modem</strong>3. Select “I accept <strong>the</strong> terms of<strong>the</strong> license agreement” andclick Next.4. The Choose DestinationLocation window is displayed(see figure to <strong>the</strong> right).5. Click Next to confirm <strong>the</strong> defaultlocation, or Browse to select adifferent location.6. The Select Program Folder isdisplayed (see figure to <strong>the</strong>right).8P/N: 214393 March 2007
<strong>Installing</strong> <strong>the</strong> <strong>WiMAX</strong> <strong>Modem</strong>7. It is recommended to leave <strong>the</strong>default program folder (<strong>WiMAX</strong><strong>Modem</strong>). Click Next.8. The Language window isdisplayed. Select a languageand click Next.9. Review <strong>the</strong> displayedinformation.If you want to make any changesto your selections, click Back.O<strong>the</strong>rwise, click Next.9P/N: 214393 March 2007
<strong>Installing</strong> <strong>the</strong> <strong>WiMAX</strong> <strong>Modem</strong>10. The installation completionwindow appears.Click Finish to complete <strong>the</strong>installation of <strong>the</strong> application.The modem configuration willbegin.B.3. Connect and configure <strong>the</strong> <strong>WiMAX</strong> modem1. Enter your user name and yourpassword, as provided by yourinternet supplier and click Next.10P/N: 214393 March 2007
<strong>Installing</strong> <strong>the</strong> <strong>WiMAX</strong> <strong>Modem</strong>2. Select your location and clickNext.The unit can be placed on a desktop or a shelf. It can also be wall mounted using <strong>the</strong>supplied bracket. Position <strong>the</strong> unit away from electrical equipment, including <strong>the</strong> dataequipment, monitor etc., metal furniture, and moving metal objects such as metal fansor doors.If necessary, connect an external antenna (to be ordered separately) to <strong>the</strong> antennaconnector located on <strong>the</strong> unit’s top panel. For instructions on mounting <strong>the</strong> externalantenna, refer to Section C below.3. Connect your <strong>WiMAX</strong> modem toyour PC.a. Connect <strong>the</strong> Power cable to<strong>the</strong> Power Adapter.b. Connect <strong>the</strong> Power Adapterto <strong>the</strong> modem.c. Connect <strong>the</strong> E<strong>the</strong>rnet (Leftdrawing)/USB (Rightdrawing) cable to <strong>the</strong>modem.11P/N: 214393 March 2007
<strong>Installing</strong> <strong>the</strong> <strong>WiMAX</strong> <strong>Modem</strong>d. Connect <strong>the</strong> o<strong>the</strong>r end of <strong>the</strong> E<strong>the</strong>rnet/USB cable to your PC.e. Connect <strong>the</strong> o<strong>the</strong>r end of <strong>the</strong> power cable to <strong>the</strong> wall outlet. Wait a few seconds for<strong>the</strong> modem to initialize.The following three screens will guide you through <strong>the</strong> connection. If your modem isalready connected, you can Skip to <strong>the</strong> configuration screen. Click Next.4. The following window isdisplayed:If you are using a Firewall and awarning message appears,select “Allow” and Click Next.12P/N: 214393 March 2007
<strong>Installing</strong> <strong>the</strong> <strong>WiMAX</strong> <strong>Modem</strong>5. The automatic configuration of your modem begins. Wait until <strong>the</strong> following windowappears:Your <strong>WiMAX</strong> modem is ready for use.Proceed to Section C.13P/N: 214393 March 2007
<strong>Installing</strong> <strong>the</strong> <strong>WiMAX</strong> <strong>Modem</strong>C.2.1. Mounting <strong>the</strong> antenna on <strong>the</strong> wall1. If anchors are needed (wall-board, plaster board,etc.), drill two holes for <strong>the</strong> anchors using a 5 mm drillbit and insert anchors. Use a 9/64” drill bit forscrewing directly into a solid surface (stud).2. Fasten <strong>the</strong> antenna to <strong>the</strong> wall. Use <strong>the</strong> two screwsprovided with <strong>the</strong> kit. Do not over tighten.3. Connect <strong>the</strong> antenna cable to <strong>the</strong> connector locatedon <strong>the</strong> bottom side of <strong>the</strong> antenna. Use only <strong>the</strong>torque key supplied with <strong>the</strong> antenna. Do not overtighten. Do not use a wrench or a similar tighteningtool.Proceed to Step C.3.15P/N: 214393 March 2007
<strong>Installing</strong> <strong>the</strong> <strong>WiMAX</strong> <strong>Modem</strong>C.2.2. Mounting <strong>the</strong> antenna on <strong>the</strong> window1. Attach <strong>the</strong> suction cups to <strong>the</strong> antenna.2. Determine <strong>the</strong> location of <strong>the</strong> antenna on <strong>the</strong> glass.Attach it to <strong>the</strong> window by pressing <strong>the</strong> suction cups onto<strong>the</strong> glass.3. Connect <strong>the</strong> antenna cable to <strong>the</strong> connector located on<strong>the</strong> bottom side of <strong>the</strong> antenna. Use only <strong>the</strong> torque keysupplied with <strong>the</strong> antenna. Do not over tighten. Do notuse a wrench or a similar tightening tool.Proceed to Step C.3.16P/N: 214393 March 2007
<strong>Installing</strong> <strong>the</strong> <strong>WiMAX</strong> <strong>Modem</strong>C.2.3. Mounting <strong>the</strong> antenna on <strong>the</strong> window with rotation capability1. Attach <strong>the</strong> rotation bars to <strong>the</strong> antenna and <strong>the</strong>suction cups to <strong>the</strong> rotation bars.2. Determine <strong>the</strong> location of <strong>the</strong> antenna on <strong>the</strong>glass. Attach it to <strong>the</strong> window by pressing <strong>the</strong>suction cups onto <strong>the</strong> glass.3. Connect <strong>the</strong> antenna cable to <strong>the</strong> connectorlocated on <strong>the</strong> bottom side of <strong>the</strong> antenna. Useonly <strong>the</strong> torque key supplied with <strong>the</strong> antenna.Do not over tighten. Do not use a wrench or asimilar tightening tool.4. Rotate <strong>the</strong> antenna left or right so <strong>the</strong> domedsurface of <strong>the</strong> antenna is facing <strong>the</strong> direction of<strong>the</strong> Base Station. Check <strong>the</strong> received SignalLEDs to ensure <strong>the</strong> antenna is aimed correctly.Proceed to Step C.3.17P/N: 214393 March 2007
<strong>Installing</strong> <strong>the</strong> <strong>WiMAX</strong> <strong>Modem</strong>C.2.4. Mounting <strong>the</strong> antenna on <strong>the</strong> window with tilt & pan capabilities1. Attach <strong>the</strong> adjustable arm to <strong>the</strong> wall.2. Assemble <strong>the</strong> antenna to back plate withsupplied screws and washers.3. Screw <strong>the</strong> back plate to <strong>the</strong> adjustable arm.4. Remove <strong>the</strong> cap from <strong>the</strong> antennaconnector located on <strong>the</strong> bottom side of <strong>the</strong>antenna and connect <strong>the</strong> cable. Use only<strong>the</strong> torque key supplied with <strong>the</strong> antenna.Do not over tighten. Do not use a wrench ora similar tightening tool.5. Align <strong>the</strong> antenna by releasing <strong>the</strong> spikeknob located next to <strong>the</strong> base bracket. Thebracket’s arm can be adjusted sideways ortilted up and down. Position <strong>the</strong> antennasuch that it faces <strong>the</strong> base station cell site.Tighten <strong>the</strong> spike knob to lock <strong>the</strong> antennainto position.6. Check your receive signal strength (RSSI)LEDs on <strong>the</strong> <strong>WiMAX</strong> modem to ensure <strong>the</strong>antenna is optimally aligned. If necessary,re-align antenna following <strong>the</strong> stepsdescribed above.Proceed to Step C.3.18P/N: 214393 March 2007
<strong>Installing</strong> <strong>the</strong> <strong>WiMAX</strong> <strong>Modem</strong>C.3. Connecting <strong>the</strong> antenna to <strong>the</strong> <strong>WiMAX</strong> modem1. Remove <strong>the</strong> cap on <strong>the</strong> unit’s top panel to expose <strong>the</strong> connector.2. Connect one end of <strong>the</strong> antenna cable (supplied with <strong>the</strong> antenna) to this connector.3. Connect <strong>the</strong> o<strong>the</strong>r end of <strong>the</strong> cable to <strong>the</strong> antenna. Do not over-tighten.TroubleshootingChecking <strong>the</strong> <strong>Modem</strong>’s lightsThe lights on <strong>the</strong> modemindicate <strong>the</strong> strength of <strong>the</strong>signal received. The more lightsilluminate, <strong>the</strong> stronger <strong>the</strong>received signal.If <strong>the</strong> modem is not able toreceive any signal, chooseano<strong>the</strong>r location for <strong>the</strong> unit.19P/N: 214393 March 2007
<strong>Installing</strong> <strong>the</strong> <strong>WiMAX</strong> <strong>Modem</strong>FCC Information:The Subscriber Unit equipment has been tested and found to comply with <strong>the</strong> limits for aclass B digital device, pursuant to ETSI EN 301 489-1 rules and Part 15 of <strong>the</strong> FCC Rules.These limits are designed to provide reasonable protection against harmful interferencewhen <strong>the</strong> equipment is operated in a residential environment notwithstanding use incommercial, business and industrial environments. This equipment generates, uses, andcan radiate radio frequency energy and, if not installed and used in accordance with <strong>the</strong>instruction manual, may cause harmful interference to radio communications.To comply with FCC RF exposure requirements in Section 1.1307and 2.1091 of FCC Rules,<strong>the</strong> antenna used for this transmitter must be kept at a separation distance of at least 20 cmfrom all persons and must not be co-located or operating in conjunction with any o<strong>the</strong>rantenna or transmitter.R&TTE Compliance Statement:This equipment complies with <strong>the</strong> appropriate essential requirements of Article 3 of <strong>the</strong>R&TTE Directive 1999/5/EC.Disposal of Electronic and Electrical WastePursuant to <strong>the</strong> WEEE EU Directive electronic and electrical waste mustnot be disposed of with unsorted waste. Please contact your local recyclingauthority for disposal of this product.20P/N: 214393 March 2007


