DishTV aerialBox-ultra T1050 - Dish TV Technologies
DishTV aerialBox-ultra T1050 - Dish TV Technologies
DishTV aerialBox-ultra T1050 - Dish TV Technologies

Create successful ePaper yourself
Turn your PDF publications into a flip-book with our unique Google optimized e-Paper software.
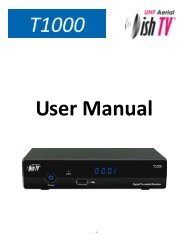
aerialBx - <strong>ultra</strong>User Manual
Thank you for choosing this <strong><strong>Dish</strong><strong>TV</strong></strong> Freeview High Definition Digital Set Top Box.You will be be able to receive all Freeview|HD UHF High Definition and Standard Definitiondigital <strong>TV</strong> channels, as well as detailed Freeview program information with theFreeview 8 Day Electronic Program Guide. For more information about Freeviewvisit www.freeviewnz.tvWithDigitalUHFA Freeview Digital Set Top Box gives you accessover 10 free to air digital channels, without asubscription or contract. For more information onFreeview please visit www.freeviewnz.tvA digital box lets you access the free digitalchannels that are broadcast in New Zealand.It uses a digital signal, received through yournormal UHF aerial and lets you watch itthrough your existing television.Warranty & Product RegistrationPlease register your product to assist with warranty and product updates.To do this please visit www.dishtv.co.nz and click on Warranty & Registration2
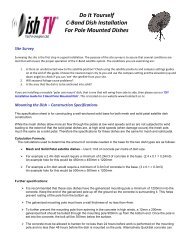
AV CableRF INUHF AerialinputUSB Firmwareupgrade +HDDconnectionDC 12VConnect 230V - 12v adapterRF OUTUHF Signaloutput3
Your Remote ControlConnecting upGetting StartedMain MenuUser Settings- Favourite View- Organizer- User PreferenceInstallation- Tuning Wizard- Auto Scan- Manual Scan- System Setting- Factory Default- S/W uprade via OTASystem Configuration- Wakeup Timer- VersionESGMedia Manager- Thumbnail Browser- Recorded Book List- Media InformationConnectivity- eNet Buttons- eWeather- eMap- eMailRecordingRecordings LibraryBookmarkingEditing RecordingsFirmware UpgradeFrequently Asked QuestionsTroubleshootingTechnical SpecificationsCheck your signal levelsWarrantyPage5678991011121314141515161718181920212223,242526272829303131324
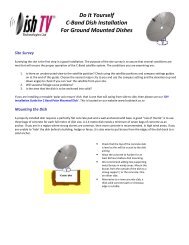
EPGExitPause Pause playback.Stop Stops playbackRecord Record a programme.Fast Forward/Rewindplayback.Beginning/End5
Connect the cable that comes from your UHF aerial to the RF IN socket in the back of yourset top box.Connect the AV cable that came with your set top box between the yellow red and whitesockets on the.6
Switch your <strong>TV</strong> On and select the correct video input.Please make sure you don’t have a USB device plugged in while going through the setup process.Once you are setup you can then plug your device in.7
Main MenuMain Menu:All other Settings and tuning menus are selected from this main menu.This menu is the gateway for all other menus.User can invoke the main menu by pressing the MENU key.This main menu contains several optionsUser SettingsInstallationSystem ConfigurationESGMEDIA ManagerConnectivityUser can toggle between the options by using UP/DOWN or LEFT/RIGHT Keys.8
Main Menu - User Settings - Favourite View/OrganizerFavourite View:To enter this menu you will be prompted for your password (Default is 0000)This menu allows you to view your favourite channel list and allows you to classify channelsand group them together to be viewed through favourites later. These groups can then be accessed viathe FAV button on your remote. Use the number keys on your remote according to the numbers on theright hand side of the screen to add or remove channels from your favoute group.Organizer:To enter this menu you will be prompted for your password (Default is 0000)In this menu you will have the options to Lock, Skip or Delete your channels from the list.Lock: Allows you to lock a selected channel. Once a channel is set to Lock you will need to enteryour password to view the channel.Skip: Means when browsing with P+/- the selected channel will be skipped over, but is still able to beaccessed by pressing the channel number button.Delete: Deletes a channel off the list.9
Main Menu - User Settings - User PreferenceUser Preference:Note: To adjust a preference use the right arrow on your remote not the OK button.Here you can adjust your brightness and contrast levels.The Visual Impaired option turns discriptive audio on/off. This setting is for the sight impaired.OSD TimeOut or On-Screen-Display timeout, this option will adjust how long the information banners will stayon the bottom of your screen, these banners appear each time you change channel.Parental Rating - To enter this option you will be prompted for your password (Default is 0000). Here you canchange the password. (Passwords can only be 4 numbers.) You can also set the parental rating using theYellow and Blue buttons on your remote.Recording Start Offset - This option will adjust how many minutes before your program the unit will start recording.This is very handy when programs are not running on time so you don’t miss part of your program.Recording Stop Offset - This option will adjust how many minutes after your program the unit will stop recording.This is very handy when programs are not running on time so you don’t miss part of your program.Auto Time Shift Mode - When this option is on the unit will time-shift continually.Each time you change channel the previous time shift will be deleted and it will start again on that channel.Time Shift Mode - When this option is on the unit will time-shift only when the Pause button is pushed.Load Date & Time - It is best to leave this set to Optus D1 to keep the correct time for NZ.10
Main Menu - Installation - Tuning Wizard - Auto ScanAuto Scan:When the OK Button is pressed, the confirmation dialogwill be displayed.Select the Yes option to start the scanning process.The Scan progress will be displayed along with the SignalStrength and Quality for the current frequency.If no channels scan in, Try a manual scan to see if you canget good signal levels on the channels availible in yourarea. To see a list of the channels in your area visitwww.freeviewnz.tv and type in the search at the top ofthe page: freeview hd channel frequencies.Here you should be able to find a list of channelfrequencies used on the Freeview|HD® service.11
Main Menu - Installation - Tuning Wizard - Manual ScanTuning Wizard:To enter the Tuning Wizard menu you will be asked to inputyour password - the default is 0000.Manual Scan:Allows you to select and scan a single UHFchannel/frequency. Also displayed is the signal strengthand quality levels of the selected UHF channel/frequency.Scan Mode give you the options All, FTA, ScrambledOnce you have good signal strength and quality you canpush the OK button to search the selected UHF frequency.What is good signal strength and quality?Strength should be between 70-100%Quality should be 75-100%These levels are indicative only. If your levels are good butyou are still having reception problems it may be due to RFinterference in your area.The Progress screen will display any channels found.Once you have scanned channels in you will beprompted to save them or not.12
Main Menu - Installation - System SettingNote: To adjust a setting use the right arrow on your remote. To select a setting use the OK button.Digital Video – Here you have the option of Auto, HDMI and DVI. DVI is HDMI video but no sound.It is best to keep this setting to HDMI.HD Resolution – This is where you set the HDMI output resolution depending on what your <strong>TV</strong> can handle. Mostnewer <strong>TV</strong>s have upscalers and so therefore you can sometimes get a better picture by lowering the outputresolution in this menu, It does however depend on the quality and type of upscaler your <strong>TV</strong> has. If you want thevery best picture possible, then you will need to experiment with these resolutions.The Native option will mean the unit will output the broadcasted resolutions.HDMI Output Mode – Here you have the options of Compressed or Uncompressed. This option may be changedto suit your HDMI receiver or surround sound unit depending on what it requires. Default is Uncompressed.HDCP or High-bandwidth Digital Content Protection. This can be turned on/offAspect Ratio – This is to set the output picture shape depending on your <strong>TV</strong>. If you have a modern LCD or Plasma<strong>TV</strong> or a wide screen, then you most likely need to set it to 16:9. If you have an older square <strong>TV</strong> then 4:3 Panscan willmost likely suit.LPM in stand-by – This option turns Low Power mode on/offAuto OTA search – This option turns automatic Over The Air updating (or Auto Software updating) on/off.Hearing Impaired – This option is to turn subtitles on/off.13
Main Menu - Installation - Factory Default/ S/W upgrade via OTAFactory DefaultThis will reset all settings back to factory, deleting all channels and user settings. Default password is0000.S/W Upgrade via OTAThis option can be used only if an Over The Air softwareupdate is broadcasted via satellite. The software will onlybe broadcast for a few weeks when there is a majorupdate needed. But if Auto OTA Search in the settingsmenu is set to on, you won’t need to use this option.14
Main Menu - System Configuration - Wakeup Timer/VersionWakeup TimerYou can set a service to be recorded at a specific time. Even if the digital receiver is in standby mode, it will startrecording at a specified time. When the recording comes to the end the unit will stay in standby until you pressthe standby button. A maximum of 8 timers can be set at once.1. Set the Timer Mode to Once, Daily or Weekly to make a recording. If this option is set to Off, the timer will notoperate.2. Set the Wakeup Mode to Recording, Services or Message. If you only want the unit to wake up on a channel atthe set time without recording, set this to Services3. Set the channel you want to record, or set the message you want to appear at the set day and time.4. Set the Date option to a desired date, on which the digital receiver will turn on. Use the left, right buttons onyour remote to navigate and change. The date format is Day/Month/Year.5. Set the start Time option to a desired time, at which the recording will be started. Use the left, right andnumber buttons on your remote to navigate and change. The time format is Hour:Minute.6. Set the Duration option to a desired length of time, in which the recording will be finished. Use the left, rightand number buttons on your remote to navigate and change.VersionThis is an informationpage only. Here youcan find your unitsSoftware/ Firmwareversion.15
Main Menu - ESGESGThe ESG is an Electronic Service Guide. This is in addition to the freeview EPG(accessed using the GUIDE button) . Usually you will only use the ESG for non-freeviewchannels. The ESG will be displayed when selecting the ESG option from theMain Menu. It will list the available services and when focus is set to the currentservice then its corresponding current and next events are displayed.When your in the ESG schedule dialog and the Info button is pressed on the selected event a shortdescription is shown above, pressing the Info button again will give an extended description of theselected event that will be displayed.16
Main Menu - Meadia Manager - Thumbnail BrowserHere you can browse through your recorded programs as thumbnails, the title and information for yourrecording is displayed below for the selected thumbnail/recording. The information displayed icludes theduration of your recording, the size, the age rating(eg G, PGR, AO), the recordings created date and also theaccess date. The access date is the date and time the recording was last viewed. If the access date is blank thismeans the recording has not yet been viewed.If you push the Yellow button when in the thumbnailbrowser, this will take you to the recording librarywhere you can view your recordings by title. Hereyou can select and delete multiple recordings.By pushing the Blue button you will see the sort byoptions. You can also go directly to the recordingbooklist using the blue button and selectingBooking List.17
Main Menu - Media Manager - Recorded Book List/Media InformationHere you can view all your programs waiting to record. You can use the Red button on your remoteto delete a booking. The Green button on your remote will change the selected booking between asingle record or a series booking. The Yellow button will take you to the recordings library.Media InformationThis window provides your storagedevice information. In this windowyou can press the Red button toformat your storage device.18
Main Menu - Connectivity - eNet ButtonsAll of the eNet features require an internet connection via the LAN port on the rear panel of the <strong>aerialBox</strong>-<strong>ultra</strong>. Theweather and map services are provided by secondary providers and are not under the control of <strong><strong>Dish</strong><strong>TV</strong></strong>. <strong><strong>Dish</strong><strong>TV</strong></strong> cannotguarantee the ongoing availablility of these free services.eWeather - Allows you to view the weather conditions forthe day. It shows Humidity, Temperature etc.eMap - Allows you to browse and search maps onthe internet.eMail - Allows you to log in to your email address, tosend/recieve messages and view attached files.19
eNet Buttons - eWeatherFrom the eNet Buttons menu you canselect eWeather. Use Up/Down tonavigate between eNet buttonsUse SMS type keyboard to enter letters.(entry using number keys )Type in the Country you desire and thenthe closest city name to you.Press the OK button to load the weather page.Press Blue button to change the view betweenCelsius, Fahrenheit and Kelvin.Press the i (Info) button to toggle betweenminimum & maximum mode.20
eNet Buttons - eMapFrom the eNet Buttons menu you canselect eMap. Use Up/Down tonavigate between eNet buttonsUse SMS type keyboard to enter letters.(entry using number keys )Type in the area you wish to search andpress OK for the map to start loading.Press the Blue button to zoom in on the map, Yellowto zoom out. Press the Left/Right button to move themap left and Right. Press the Up/Down button tomove the map up and down.21
eNet Buttons - eMailTo check your email on your <strong>TV</strong> choosethe eMail button from the eNet menu.Profile Entry - To keep your email account securethis digital receiver allows multiple secure profiles.The profle has nothing to do with your email loginor password. Simply create your own personal profile,which then allows you to keep your email privatefrom other users of this digital receiver.- Use the Green button to changethe keypad mode( uppercase, specialcharacters, numbers ).- Use the i (Info) button to navigate between thedifferent text boxes (like a tab key).- The Back button will exit the keypad modeto allow you to save your profile.Follow the help bar information for furthernavigation short cut keys available forquick navigation to create mail,forward mail, reply, address book, etc.,Press Up/Down button to navigate thedifferent mail headers. If the number of mailsis more than 20, mails are split by pages,one page contains 20 messages.22
RecordingInstant Record:This is done by pressing the record button on the remote. (This is the grey button with a red circle on it.)Pressing it will start recording on the channel you are currently watching and allow you to select the durationof the recording. The default duration is to the end of the current programme. You can select to the end of thefollowing programme or manually enter a duration by pressing the left/right navigation keys. If you press thestop button you will then have the options of renaming and continuing to record, just saving or discarding it.Timer Recordings:This is done through the EPG. Access theEPG by pressing the GUIDE button onthe remote. It will bring up the guidefrom which you can then browse tochoose a programme to record.Pressing the Red button on a selected showin the EPG menu will mark the program tobe recorded. If the program is part of a seriesyou will have the option of recording thewhole series (Yellow button) or just thisepisode (Blue button).23
RecordingOnce you have a recording set you will see a smallR or S to the righthand side of your program. TheR indicates the program will only be recordedonce, the S indicates the program will be recordedevery time it appears on <strong>TV</strong>.If you want to cancel a recording, all you have todo is go back into the EPG menu, go to theprogramme you selected for recording and pressthe Red button this will ask you whether youwant to cancel the recording or not.Wakeup Timer - Recording:From here you can manually set timer recordings.This is done through Main Menu/SystemConfiguration/Wakeup Timer. By going down tothe Wakeup Mode and scrolling across toRecording the options beneath will change toaccomodate the new wakeup mode, giving youchoices of Channel, Date, Time and Duration. Seepage 15 for more info on the wakeup timer.24
Recordings LibraryTo view recorded programmes, press the Library button.It will be labeled LIB on the remote.From here you can select the programme you wish to play.To play a recording press the OK button, this will then ask you ifyou want to play from the beginning or from your last viewedposition.To delete mutiple recordings you need to select therecordings you want to remove using the Yellow button, thenpush the Red button to delete.To view booked recordings, press the Options button (Blue)and select it in the options list that appears.From here you can delete bookings, choose to convert to a seriesrecording or not by following on screen instructions.By pressing the Library button (LIB) a second time, the Thumbnailbrowser menu of your video recordings will be opened.You can also access the Thumbnail Browser in the Main MenuBy selecting Media Manager then Thumbnail Browser.25
BookmarkingWhat is Bookmarking?You can mark favourite parts of a recording by creating bookmarks, and then jump to them. You can also usebookmarks to skip ads, just place a bookmark at the end of each ad break and when you next play yourrecording you can easly skip the ads by pressing the Right Arrow button next to the OK button. Bookmarks arestored with the recordings so that you can use them again afterwards.To enter the bookmarking window select your recording from the Library or Thumbnail Browser, then pushthe Green button on your remote then the OK button.26
Editing RecordingsTo enter the Record Edit window select your recording from the Library orThumbnail Browser, then push the Green button on your remote then the OKbutton.Here you can remove sections of your recordings. In the record edit window your recording will play inthe top right of the screen, you can use all your normal play, fast forward, rewind, pause functions toget to where you want to edit. To select an area to delete push the Red button to start the selection,and then the Red button again to end. If the selection you have made is not quite in the right placeyou can press the Yellow button to edit/move the start of your selection(A) or the end (B). The Bluebutton on your remote will remove the selected section but will not delete that part of your recording.To move between the selections use the Up/Down arrows on your remote. Once you are happy withthe selections you have made and want to delete these parts from your recording, press the OK buttonand select yes.27
Firmware UpgradeVia USB:One way to perform a firmware upgrade on your receiver is via USB using the USB port in the back.To do this just follow the instructions below...1. Download firmware from www.dishtv.co.nz and extract (unzip) onto a USB flashdrive in a folder called DISH<strong>TV</strong>_71672. Turn your <strong>aerialBox</strong>-Ultra onto standby with the button on the front, insert the flashdrive.3. Push the Power button while holding down the Info button on the front of the unit, until the unit says USB on thefront panel. Then you can stop and let the unit load the firmware.The receiver will first display “Load” and if done correctly the display on the front will show “USB” after about 3 seconds.On screen at the same time it will present a window headed “Software Update through USB”If the upgrade has been loaded correctly onto the USB flashdrive it will come up with ”SW Image File Reading inprogress...” straight after it displays “Searching USB Memory stick...”Then to a couple of loading screens which will take about 3 minutes to complete.If the firmware upgrade was incorrectly place on the USB it will also come up with the “Searching USB Memory Stick...”message, the difference is the next message will say “SW Image is not present” it will then quickly display the FlashVerification screen which will last only a few seconds. If this happens double check to see if the firmware files arecorrectly in a folder called DISH<strong>TV</strong>_7167 on your USB drive.S/W Upgrade OTA:This is Software Upgrade over the air. This will only work if the upgrade is beingbroadcast. It can be selected from the “Installation” option in the Main Menu.28
Frequently Asked Questions<strong>T1050</strong> Terrestrial Receiver – Use with UHF Antenna onlyQ. Message on <strong>TV</strong> says “No Signal”A. No or Low Signal can be the cause of this problem and it can be due to either or all of:1. Faulty Aerial Set up2. Aerial set for wrong polarity3. Cables too old and damaged4. Poor joints in cable5. Split into too many rooms6. If using Rabbit ear or indoor antenna7. Not enough signal at the locationQ. Some Channels are missingA. It will be due to reasons 1 ~ 6 as aboveQ. Pixellation in Live PictureA. Press Info button twice on remote control, this will give the quality level. Good signals have QualityLevels >70% and Signal>70%. If they are below 70% then check set up for above 1 ~ 6 faultsQ. Cannot watch Prime <strong>TV</strong> when recording <strong>TV</strong>1 and <strong>TV</strong>3A. Freeview|HD signal is transmitted on 3 x different frequencies, with dual tuner receivers you canonly tune to and record 2 x frequencies at a time and hence channels on the other frequencies arenot available until 2nd tuner is free.Before returning back:1. Do a factory reset by clicking MENU>INSTALLATION>FACTORY DEFAULT>Pin 00002. Check Software version by Clicking MENU>CONFIGURATION>VERSION>SOFTWAREVERSION and check on www.dishtv.co.nz if not latest please follow the instructions on ourwebsite to update to latest version.3. If the problem persists please call <strong>Dish</strong> <strong>TV</strong> on 0800 DISH <strong>TV</strong> (0800 3474 88) OR email onsupport@dishtv.co.nz29
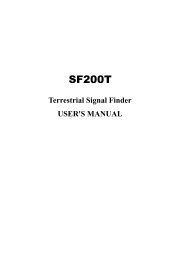
TroubleshootingProblem Possible Causes SolutionNo picture<strong>T1050</strong> is not plugged in or turnedon at the wall.Check the front panel. If nothingis illuminated then it is a powerissue - please check powersocket and plug socket.Your display isn’t able to display thecurrent Output Format.Please make sure that Main Menu -Installation - System Setting - HDResolution is set to one thatyour <strong>TV</strong> will be able to display.You can view this using thecomposite outputRemote control is notworkingNo batteries or batteries incorrectlyinserted.Batteries are flat.The Infrared reciever on <strong>T1050</strong> isobstructed.Insert the supplied 2x AAA batteriesas shown on page 7.Insert fresh batteries as shown onpage 6.Check that there is a clear “line ofsight” from the remote to the sensoron the front panel.Picture is distorted -too wide or narrowWrong <strong>TV</strong> shape is set.Go to Main Menu/Installation/SystemSetting/Aspect Ratio, make sure it isset to match the shape of your display.No Channels loaded.Database is EmptyNo Signal In.Your UHF signal levels are to low forthe <strong>aerialBox</strong>-Ultra to operate.UHF aerial Cable not plugged into RF in.Have your signal levels checked then tryMain Menu/Installation/Factory Defaultand scan again.How to check your signal and quality levelsPush the info button your remote twice to display thescreen to the left. Down the bottom right you will see yoursignal and quality levels. A normal signal strength isaround 80-100% and a normal signal quality level is70-100%. If your levels are lower than 70% and you arehaving problems you will need to get your aerial and cablechecked by a technician.30
Technical Specification<strong>T1050</strong>Designed to receive Freeview|HDhigh definition broadcasts via a UHFantenna.YUV via RCA socketsComposite via RCA socketsFor internet connection12v DC orMax 10w100via adapter31
WarrantyPlease keep your receipt as proof of purchase. This product is warrantedfor any defect in materials or workmanship for one year after the originaldate of purchase. This product is for normal domestic use only.this warranty does not cover damage from misuse or neglect, accidentaldamage, vermin infestation, eccessive voltages such us lightning or powersurges or any alteration that affects the performance or reliability of theproduct.In the unlikely event that your product fails to work normally pleasecontact your supplier and have your receipt of purchase on hand.This warranty is subject to the following provisions:● This is only valid within New Zealand.● The product must be correctly connected and operated inaccordance with the instructions contained in the manual.● This product must be used solely for domestic purposes.● The warranty does not cover accidental damage.● The warranty will be rendered invalid if the product is resold or hasbeen damaged by unauthorised repair.● The manufacturer disclaims any liability for incidental orconsequential damages.Warranty & Product RegistrationPlease register your product to assist with warranty and product updates.To do this please visit www.dishtv.co.nz and click on Warranty & Registration32