USB-Synthesizer - SDR-Kits
USB-Synthesizer - SDR-Kits
USB-Synthesizer - SDR-Kits
- No tags were found...

You also want an ePaper? Increase the reach of your titles
YUMPU automatically turns print PDFs into web optimized ePapers that Google loves.
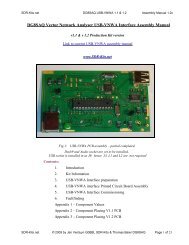
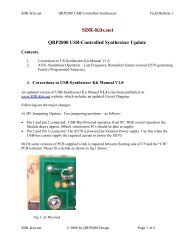
<strong>SDR</strong>-<strong>Kits</strong>.net QRP2000 <strong>USB</strong>-Controlled <strong>Synthesizer</strong> Kit Assembly v2.03c( ) Look at Figure 2 to see the exact placement of the SMD capacitors and the PCB terminals.The SMD Capacitors are the small oblong shapes (0805 package), the soldered ends of thePCB terminals show as shiny circles.( ) Adjust Temperature of Temperature Controlled Soldering Station to correct temperature forsoldering SMD components. Temperature depends on type of solder you are using normally330C or 630F with 60/40 Pb/Sn( ) Solder SMD 0.1uF 0805 Capacitors C2, C3, C5, C6, C7, C8, C9, C11, C12, C13 and C14 asshown in Figure 2. Then check against Figure 2.( ) Solder C4 1nF 0805 Capacitor (identified with BLACK mark on strip) next to C3 (Lowerright hand side of the board( ) Check all joints – the board should look like fig 2 below( ) Note: 6 PCB pins are supplied, If you are using the kit for other purposes then solder PCB pinsto suit your particular application( ) Fit PCB terminals by pressing pin through PCB using a hard metal surface or long nose pliersmaking sure that you do NOT damage any of the SMD capacitors in the process and solder atBottom layer . Typical location of the PCB terminals is: +12V, +5V, GND, CW1, CW2 andPTT as shown in Fig 3 below.( ) Turn board overComponents mounted on Top ~Layer of PCB (Top Silk)<strong>SDR</strong>-<strong>Kits</strong>.net © 2008 & 2009 by QRP2000 Design Page 5 of 28