Series 811 Mighty Mouse High Density (HD) Connectors - Glenair, Inc.
Series 811 Mighty Mouse High Density (HD) Connectors - Glenair, Inc.
Series 811 Mighty Mouse High Density (HD) Connectors - Glenair, Inc.

You also want an ePaper? Increase the reach of your titles
YUMPU automatically turns print PDFs into web optimized ePapers that Google loves.
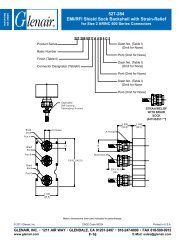
<strong>Series</strong> <strong>811</strong> <strong>Mighty</strong> <strong>Mouse</strong> <strong>High</strong> <strong>Density</strong> (<strong>HD</strong>)Contacts and ToolsBand-Master Advanced Termination SystemBands and instructions<strong>Mighty</strong> <strong>Mouse</strong><strong>High</strong> <strong>Density</strong><strong>Glenair</strong> Band-Master Advanced Termination System: How To Order1Fast, cost-effective shield termination. Attach cable shields to backshells with Band-Master ATS stainlesssteel straps. The Band-Master ATS system offers fast termination and the flexibility to handle a wide rangeof parts with just one band size. Approved for aerospace and defense, these straps have successfully passedrigorous shock, vibration and environmental testing.1Band installation Tool. Use with .240" (6.10 mm)wide bands. 6.75 inches (172 mm) length, 1.2pounds (0.6 Kg.)2Figure Description Part Number1 Band installation Tool 600-058Standard Band, .240" (6.10 mm) wide. Availablein two lengths, flat or pre-coiled. Stainless steel.2Length Part Number Accommodates DiameterFigure in. mm Flat Pre-Coiled in. mm2 14.250 362.1 600-052 600-052-1 1.8 45.72 18.000 457.2 600-090 600-090-1 2.5 63.5Contact <strong>Glenair</strong> or visit our website (glenair.com) to view our complete line of Band-Master ATS products,including pneumatic tools for high volume production and calibration kits.LENGTH ± .060 (1.5).240 (6.10)Band-Master ATS Shield Termination instructions1. Prepare Cable Braid for termination process(Figure 1).2. Push Braid forward over Adapter Retention Lipto the Adapter incline Point (or .4" [10.2mm]minimum braid length). Milk Braid as requiredto remove slack and insure a snug fit aroundthe shield termination area (Figure 2).3. Prepare the Band in the following manner:IMPORTANT: Due to Connector/Adapter circumference,it may be necessary to preparethe Band around the Cable or Retention Area.A. Roll Band through the Buckle Slot twice.(Bands must be double-coiled.)B. Pull on Band until Mark ( ) is within approximately.250 inch (6.4mm) of BuckleSlot (Figure 3). The Band may be tightenedfurther if desired.NOTE: Prepared Band should have ( ) Markvisible approximately where shown in Figure 3..350 (8.9)Shield TerminationClamping Process (Figures 4 thru 8)NOTE: To free Tool Handles, move Holding Clipsto center of Tool.4. Squeeze Gripper Release Lever and insertBand into the front end opening of theTool. (NOTE: Circular portion of loopedband must always face downward.)5. Aligning the Band and Tool with the ShieldTermination Area, squeeze Black Pull-UpHandle repeatedly using short strokes untilit locks against Tool Body. (This indicatesthe Band is compressed to the Tool PrecalibratedTension.)NOTE: If alignment of band and shield isunsatisfactory, tension on band can berelaxed by pushing on slotted releaselever on top of tool. Make adjustments asnecessary and again squeeze black pull-uphandle.6. Complete the Clamping Process by squeezingthe Gray Cut-Off Handle.7. Remove excess band from tool and dispose.8. inspect Shield Termination.1357AdapterRetention LipConductorsBraidAdapterincline 2BuckleTAIL LENGTHINDICA OR MARKTTail Lengthindicator Mark468.400 (1.2mm) Min.Length Braid OverTermination AreaDimensions in <strong>Inc</strong>hes (millimeters) are subject to change without notice.© 2011 <strong>Glenair</strong>, <strong>Inc</strong>. U.S. CAGE Code 06324 Printed in U.S.A.GLENAIR, INC. • 1211 AIR WAY • GLENDALE, CA 91201-2497 • 818-247-6000 • FAX 818-500-9912www.glenair.com33E-Mail: sales@glenair.com11 - JULY - 2013